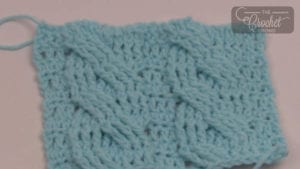
Crochet Cables
Crochet cables are easier to manage than you might assume. The visual look of the braiding going in and out and around each other is an illusion that is easy to accomplish.
This stitch can be accomplished with any size hook and/or yarn choice. You just have to ensure the yarn compliments the hook in sizing. For example, I have accomplished this design using Bernat's Baby Blanket Yarn that is really thick requiring a 10 mm or N size crochet hook.
The trick to making the project bigger is knowing to keep each multiple in sets of 12 stitches. When doing your first chain, your chain must be in groups of 12 to work. At the end of the chain, you must add 5 extra chains to ensure the entire project will stay in balance in appearance. I explain this in the video tutorial.
Each cable consists of 9 stitches with each part of the braid of the cable consists of 3 stitches.
To Make Different Sizes
Multiple of 12 sts + 5.
Remember the + number at the end of the sentence means that you are to add chains at the very end to maintain the pattern as written.
Written Instructions
- Using yarn and hook that compliment each other.
- Abbreviations CH - chain, DC - Double Crochet, STS - Stitch(es), FPDC - Front Post Double Crochet, HDC - Half Double Crochet, BPDC - Back Post Double Crochet, FPTR - Front Post Treble Crochet.
- Chain in multiples of 12 across. At the end of the chain, add 5 extra chains. DC into 4th CH from the hook and into each chain across. Turn.
- CH 3, DC into next two stitches. * Skip 3 STS FPTR into each of the next 3 sts. Place 1 FPTR into each of the skipped STS. 1 FPDC into next 3 available STS. DC into next 3 and repeat * again across. Final 3 stitches will be 1 DC into each.
- Ch 2, 1 HDC into next 2 STS. * BPDC into next 9 STS (back of the complete cable section) and 1 HDC into each of the next 3 sts. Repeat * across. Final 3 stitches will be 1 HDC into each.
- CH 3, DC into next two stitches. * 1 FPDC into next 3 sts. Skip 3 STS FPTR into each of the next 3 sts. Place 1 FPTR into each of the skipped sts. DC into the next 3 and repeat * again across. Final 3 stitches will be 1 DC into each.
- Ch 2, 1 HDC into next 2 sts. * BPDC into next 9 sts (part of the cable) and 1 HDC into each of the next 3 sts. Repeat * across. Final 3 stitches will be 1 HDC into each.
You will continue to repeat the cable rows 2 - 5 continuously until the end of your project. In the video, I have referred to these as repeating the cable rows 1 - 4 as there are only 4 rows that repeat each other.
For the finishing, you will just CH 3, and 1 DC into each across.
Need help to visualize this? Just follow my tutorial below.
Sandra says
Hi Mikey, love your tutorial! I want to make a 30 x 40 baby blanket so how may skeins of the chunky baby blanket yarn would I need? Many thanks!
Mikey, The Crochet Crowd says
I don't know the answer to that. The crochet cable is a concept idea for repeat stitching to make it happen. As far as yarn needed to make different size afghans, I really have no idea. Sorry I cannot be any more clearer.
Sandra says
Thanks no worries, I'll figure it out, I bought extra blanket yarn to cover me since I have to make 2 blankets. So I'm a few rows into the project and I noticed that the bottom on the cable side keeps curling up. I am trying to not crochet tight to avoid this. It's hard to tell if this is normal for this yarn since you did not use the bulky blanket yarn in your video. Please let me know what I am doing wrong and how to correct this. Thanks!! 🙂
Deb says
I would like to make this in two colors, probably strips. Can I do that with 12,12, 5 in each color and the sc them together? I love your videos. You taught me how to crochet!
karen says
the video is not close enough to the stitches in this video.... so many of your videos are great to follow as you show in detail what we need to do...but this one is harder to see the stitches you mean......I had a hard time figuring out which stitch he meant as his hands were in the way and the pace was so fast....and there is some punctuation missing in the written pattern. Great tutorial as ever as he talks about moving and pulling the stitches so you can see what you are doing, always great tips in every video. I love your videos.