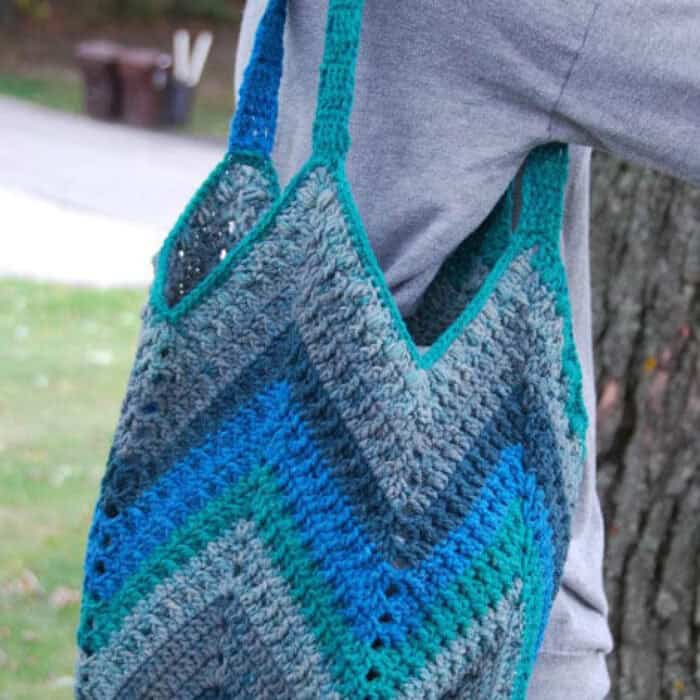
This is the Crochet One Big Cake Chevron Bag. I love crocheting with self-striping yarn. The Caron Big Cakes is great because the ball size is so generous. You can make a nice tote or market bag without having to change colours and still have a pretty striped effect. I made this bag using Shadowberry because I think it looks great with a pair of blue jeans.
This pattern was revised in June 2024.
Chevron One Big Cake Bag
- Caron Big Cakes - 1 ball in colour called Shadowberry.
- Crochet Hook 4.5mm / Size US 7
Abbreviations
- Beg = Beginning
- Ch(s) = Chain
- Dc = Double Crochet
- Lp = Loop
- Rep = Repeat
- Rnd = Round
- Sc = Single Crochet
- Sk = Skip
- Sl st = Slip Stitch
- Sp = Space
- St(s) = Stitch(es)
- Yo = Yarn Over Hook
Special Stitch
Special Stitch: Puff stitch - Yo, pull up a lp, yo, pull up a lp, yo, pull up a lp, (should be 7 lps on hook), yo, pull thru 6 lps on hook, yo pull thru last 2.
The bag is made by starting with a solid double crochet square, then skipping stitches in the middle of the row to pull the square into a chevron.
Ch 5. Sl st in first ch to form a ring.
1st rnd: Ch 3, into ring, 3 dc. *Ch 2, 4 dc, into ring. Rep from * twice more. Join with hdc to the top of the first beg ch-3.
Note: Ch 2 in the row below counts as the first dc. It makes the stitches tighter.
2nd rnd: Ch 2. Dc in same sp below. 1 dc in each st to next corner. *(2 dc. Ch 2. 2 dc) in ch-2 corner sp. 1 dc in each st to next corner. Rep from * around. 2 dc is beg corner space. Join with hdc to top of beg ch-2.
3rd to 11th rnds: Rep 2nd rnd.
Begin chevron. You will be skipping 4 sts in the middle of each side to form the valley of the chevron. You will also want to start changing colors to stripe as desired.
12th rnd: Ch 2 (counts as dc), dc in same sp, *[FPdc next st, dc in next st] 10 times. Sk 4 sts, **[dc in next st, FPdc in next st] 10 times. (2 dc, ch 2, 2 dc) in ch-2 sp, rep from * all 4 sides to beg sp. 2 dc and join with hdc to top ch-2.
13th rnd: Ch 2 (counts as dc), dc in same sp, dc in next 20 sts, sk 4 sts, dc in next 20 sts to corner (2 dc, ch 2, 2 dc) in ch-2 sp; rep all 4 sides to beg sp, 2 dc, ch 1, sc to beg ch-2.
14th to 24th rnds: Rep 12th and 13th rnds.
25th rnd: Rep 12th rnd.
26th rnd: Ch 2 (counts as dc), dc in same sp, *dc in next st, puff st in next st, dc in next st; rep * 5 more times, sk 4 sts, rep * 6 more times to corner (2 dc, ch 2, 2 dc) in ch-2 sp; rep all 4 sides to beg sp, 2 dc, ch 1, sc to beg ch-2.
27th rnd: Ch 1, sc in same sp, sc in next 20 sts, sk 4 sts, sc in next 20 sts to corner, 3 sc in ch-2 sp, rep all 4 sides to beg sp, 2 sc in sp, sl st to beg sc. Break yarn.
Handles
Attach yarn with a sl st, 1st to the right (if right handed) or 1st stitch to the right (if left handed) of any 3 sc corner group.
1st row: Ch 3. 1 dc in next 4 sts. Turn. 5 sts.
2nd to 34th rows: Ch 3, 1 dc each st across. Turn. 6 sts.
Match stitches to the next corner and sl st to attach the handle to corner with whip stitch.
Repeat handle on next two corners. Finish off.
.
.

Chelsey says
I'm having a lot of trouble making the connecting corners for rounds 2-10. All the others look like beautiful corners and the connecting one is round, like there's too many stitches maybe? I wish there were pictures or a video
Kari martin says
Can you please make a video for this bag. I am having issues with the pattern
Heather Ast says
Does Round 12 start in the corner? The beginning/end of my rounds 2-11 are in the middle of the sides so the instructions for round 12 don't seem to work. Thanks!
Jeanne - The Crochet Crowd says
Yes, all of the rounds should have started in the corner. Since yours didn't, just break the yarn and start from a corner.
Nikki M says
I'm surprised at how many people have had issues and yet there's no reply to the main problem. Anyways.. I stopped the granny square at row 10 and instead of skipping 4 stitches, I skipped only 3. I have not finished the bag yet, but it feels like it might be working out better this way!
Erica Smith says
I too was surprised that there was no real answer to the main issue of stitch count...
I stopped the granny at row 10 as suggested here and by Rhonda Reid (below) and was able to get first row of the pattern to work, (FPDC in next st, 1DC in next st) x9 sk 4 sts (1DC in next st FPDC in next st) x9, now it fits nicely on each side, so hopefully the pattern will continue to progress properly .... Would still LOVE to see this done as a tutorial. Hint Hint, Mikey 😉
Jeanne - The Crochet Crowd says
I answered and all of the stitch counts are here in the comments. I will add them when I convert this to a PDF. I'm so sorry.