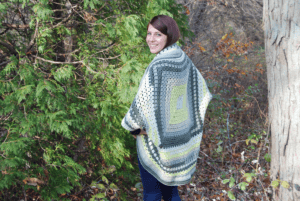
Crochet Modern Granny Shrug
This fall, I've been starting to see the granny shrug popping up on the crochet boards, so I decided I needed to make one for myself. It looks like a big granny square, and I found a great "recipe" at Mariavalles Handmade that I used to put mine together. It's quite a cozy sweater and an easy project to accomplish. This is the Crochet Modern Granny Shrug pattern.

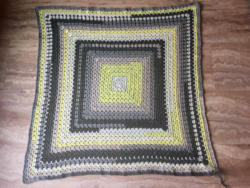
I decided that I did not want the typical granny square and wanted something a bit different for mine. I found this cool Granny Pillow on Yarnspirations and decided that it was the fun look I was going for in my granny shrug. And I just knew the Caron Cakes would be perfect for this project. This granny would also be a fun way to play with your own colour ideas if you would rather go that route.
This is basically one size fits the most pattern, but if you need to go up a size, just make your square bigger. The model is small but I'm pretty average, and it fits us both.
Pattern Suggestions
- Table Top Crochet Wreath Pattern
- Crochet Baby Sneakers Pattern
- Crochet Gigi's Block Party Blanket Pattern
- Crochet Baby Chunky Blanket Pattern
Modern Granny Shrug
by Jeanne Steinhilber
- 4 Caron Cakes or ~ 26 oz of worsted weight yarn
- Crochet Hook size 5.5mm or I hook
- Round 1: Ch 3 (counts as first dc here and throughout), 2 dc in ring, ch 1, [3 dc in ring, ch 1] 3 times; join with sl st in top of beginning ch—Four 3-dc groups, and 4 ch-1 sps.
- Round 2: Sl st in next 2 dc, [(sc, ch 3, sc) in next ch-1 sp (corner made), ch 3] 4 times; join with sl st in first sc—4 corners, 4 ch-3 sps.
- Round 3: (Sl st, ch 3, 2 dc, ch 1, 3 dc) in first corner ch-3 sp, 3 dc in next ch-3 sp, [(3 dc, ch 1, 3 dc) in next corner ch-3 sp, 3 dc in next ch-3 sp] 3 times; join with sl st in top of beginning ch—4 corners, and four 3-dc groups.
- Round 4: Sl st in next 2 dc, *(sc, ch 3, sc) in next corner ch-1 sp, ch 3, sc in next space between the corner and next 3-dc group, ch 3, sc in next space between next 3-dc group and corner, ch 3; repeat from * 3 more times; join with sl st in first sc—4 corners, and 12 ch-3 sps.
- Round 5: (Sl st, ch 3, 2 dc, ch 1, 3 dc) in first corner ch-3 sp, 3 dc in next 3 ch-3 sp, *(3 dc, ch 1, 3 dc) in next corner ch-3 sp, 3 dc in next 3 ch-3 sp; repeat from * 2 more times; join with sl st in top of beginning ch—4 corners, and twelve 3-dc groups.
- Note: In Round 6 and later rounds you are instructed to work a stitch in the space between 3-dc groups. These include the spaces between a corner 3-dc group and the next side 3-dc group.
- Round 6: Sl st in next 2 dc, *(sc, ch 3, sc) in next corner ch-1 sp, ch 3, [sc in next space between 3-dc groups, ch 3] to next corner ch-1 sp; repeat from * 3 more times; join with sl st in first sc—4 corners, and 20 ch-3 sps.
- Round 7: (sl st, ch 3, 2 dc, ch 1, 3 dc) in first corner ch-3 sp, 3 dc in each ch-3 sp across to next corner, *(3 dc, ch 1, 3 dc) in next corner ch-3 sp, 3 dc in each ch-3 sp across to next corner; repeat from * 2 more times; join with sl st in top of beginning ch—4 corners, and twenty 3-dc groups.
- Continue repeating Rounds 6 & 7 until piece measures one of the sizes listed below.
For the Different Sizes
- XS, S, M = 36" Square
- X, XL, 2 XL = 38" Square
- 3XL, 4XL, 5 XL = 40" Square
- Final Round: (sl st, ch 3, 2 dc, ch 1, 3 dc) in first corner ch-3 sp, dc in next sc, 3 dc in next ch-3 sp, dc in next sc, across to corner,*(3 dc, ch 1, 3 dc) in next corner ch-3 sp, dc in next sc, 3 dc in each ch-3 sp, dc in next sc across to next corner; repeat from * 2 more times; join with sl st in top of beginning ch. Finish off.
Assembly
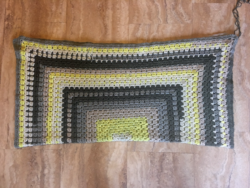
- Fold the large square into half.
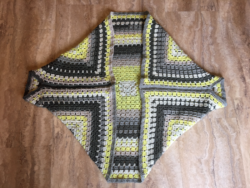
- Arm Holes - Mark 8" down from the top fold and place a stitch marker.
- Sew from the 8" mark to the bottom of the seam opening. Do both sides.
Final Touches
Add a cuff to each arm opening. Join with a sl st to the seam line.
- Ch 1, 1 sc evenly around the hole. Join with a sl St to the beginning sc.
- Ch 3, 1 dc in each around. Join with a sl st.
- Repeat last instruction, 2 more times. Fasten off and weave in ends.
- Repeat for the second armhole.
Entire Opening
You will now crochet around the entire opening. This opening is what appears as her collar heading down behind here. It is a full circle.
Join with a sl st to any seam join at the large opening.
- Ch 1, 1 sc evenly around the base opening. Join with a sl st to the beginning sc.
- Ch 2, 1 hdc in each stitch all the way around. Join with a st st to the beginning hdc.
- Ch 3, 1 dc in each all the way around. Join with a st st to the beginning dc.
- Repeat last instruction 2 more times.
- Fasten off, weave in ends.
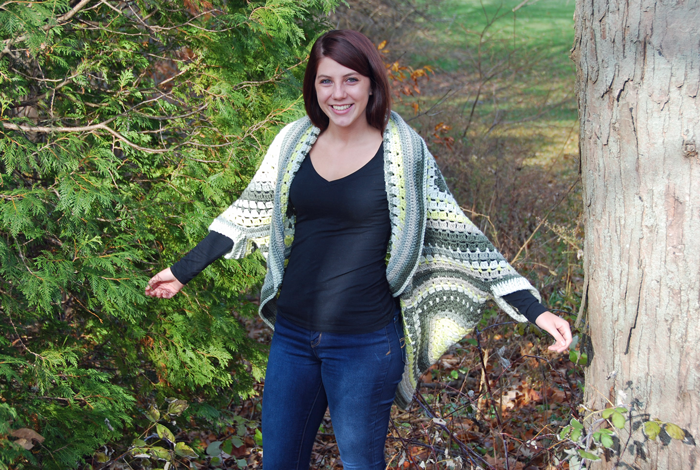
Crochet Modern Granny Shrug by Jeanne Steinhilber
Tutorial
Download the MG Modern Granny Pattern Book
![]()
Be creative! 🙂 ~ Jeanne – The Crochet Crowd
heather says
grid
Mikey says
Thankx