Adult / Teenager Beanie Hat
Start today in making your own beanie hat. This is for Teenagers and Adults. This is the Crochet Adult/Teenager Beanie Hat.
Colour changing is up to you. Cathy's original pattern has 3 colours. You can opt to use one solid colour or even a colour transitioning yarn such as Red Heart Treasure or Eclipse Yarns as well.

Materials
- Size G Crochet Hook or 4.5 MM
- Cathy used Vanna's Choice Yarns by Lion Brand. Saphire, Aqua and Silver Blue. You will need only 1 ball of each. You can do a few hats using 4 ply worsted yarns such as Red Heart Super Saver, Bernat Super Value or equivalent. Substitute with any 4 ply worsted yarn you prefer.
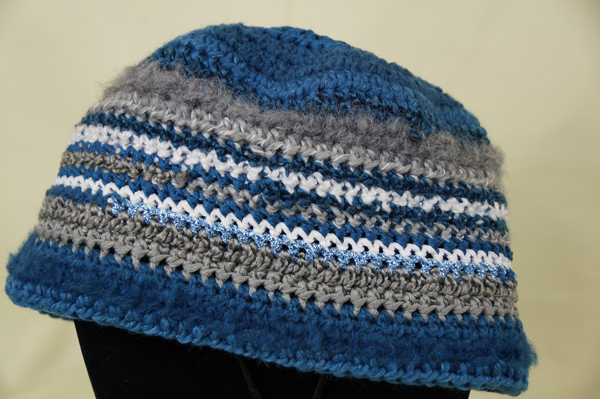
- The picture is using Red Heart Boutique Changes. I used Grey, White and Blue.
Definitions
CH - Chain, DC - Double Crochet, HDC - Half Double Crochet, SC - Single Crochet, SL ST - Slip Stitch, BEG - Beginning, REP - Repeat, 2TOG HDC Decrease - 2 Stitches Together to Decrease,
Free Pattern
Colours Definitions, you can use 1 colour or colour transitioning yarns if you prefer.
- Colour A - Saphire
- Colour B - Aqua
- Colour C - Silver Blue
This pattern works in rounds.
- Colour A - Ch 4 and SL ST to the Beg CH to form a ring.
- Ch 2, then HDC 9 times around the ring. (Ch 2 counts as 1 HDC = 10 HDC). SL ST at the end to the top of the Beg Ch 2.
- Ch 2, then 1 HDC into the same joining stitch. 2 HDC into each stitch around the circle. SL ST at the end to the top of the Beg Ch 2.
- Ch 2, *1 HDC into the next stitch and then 2 HDC into the next. Repeat from * all the way around. SL ST at the end to the top of the Beg Ch 2.
- Ch 2, *1 HDC into the next 2 stitches, 2 HDC into the next. Repeat from * all the way around. SL ST at the end to the top of the Beg Ch 2.
- Ch 2, *1 HDC into the next 3 stitches, 2 HDC into the next. Repeat from * all the way around. SL ST at the end to the top of the Beg Ch 2.
- Ch 2, *1 HDC into the next 4 stitches, 2 HDC into the next. Repeat from * all the way around. SL ST at the end of the top of the Beg Ch 2.
- Ch 2, *1 HDC into the next 5 stitches, 2 HDC into the next. Repeat from * all the way around. SL ST at the end of the top of the Beg Ch 2.
- Ch 2, * 1 HDC into the next 6 stitches, 2 HDC into the next. Repeat from * all the way around. SL ST at the end of the top of the Beg Ch 2.
- Ch 2, 1 HDC into each stitch all the way around. Join with a SL ST to the top of the Beg Ch 2.
- Colour Change B, Ch 2 and 1 HDC into each stitch all the way around. SL ST at the end to the top of the Beg Ch 2.
- Ch 2, 1 HDC into each stitch all the way around. ST ST at the end of the top of the Beg Ch 2.
- Colour Change A, Ch 1, SC into each stitch. SL ST at the end.
- Colour Change C, Ch 1, Sc into each stitch. SL ST at the end.
- Colour Change A, Ch 1, SC into each stitch. SL ST at the end.
- Colour Change B, Ch 1, SC into each stitch. SL ST at the end.
- Colour Change A, CH 1, SC into each stitch. SL ST at the end.
- Colour Change C, Ch 1, SC into each stitch, SL ST at the end.
- Colour Change A, Ch 1, SC into each stitch, SL ST at the end.
- Colour Change B, Ch 2, HDC into each stitch. SL ST at the end.
- Ch 2, HDC into each stitch. SL ST at then end.
- Colour Change A, CH 2, HDC into each stitch. ST ST at the end.
- Ch 2, HDC into each stitch. SL ST at the end.
- Ch 2, HDC into each stitch. ST ST at the end.
- Fasten off and weave in ends.
Tutorial
Enjoy this free pattern compliments of Cathy Cunningham of The Crochet Crowd.
Cathy Cunningham, ©2012, The Crochet Crowd
Mary says
Thanks for this pattern, I love top-down beanies! I learned a way to add ribbing to top-down projects from video on Yarn and Chai channel, Left in Knots has a similar video. I like to finish my hats with ribbing or camel stitch rows. Thanks for all you and the Crowd do.
Veronica Dumas says
Love your videos!
katherine says
When starting on the next row should I be turning my work?