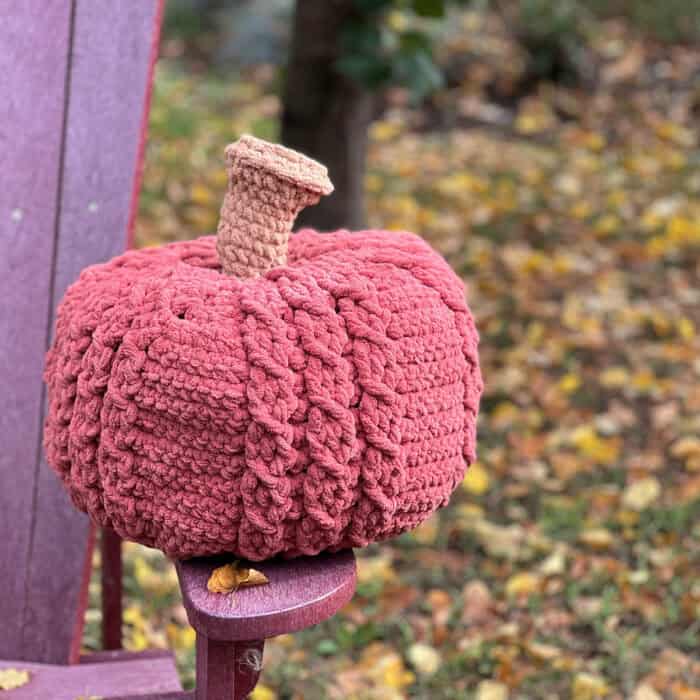
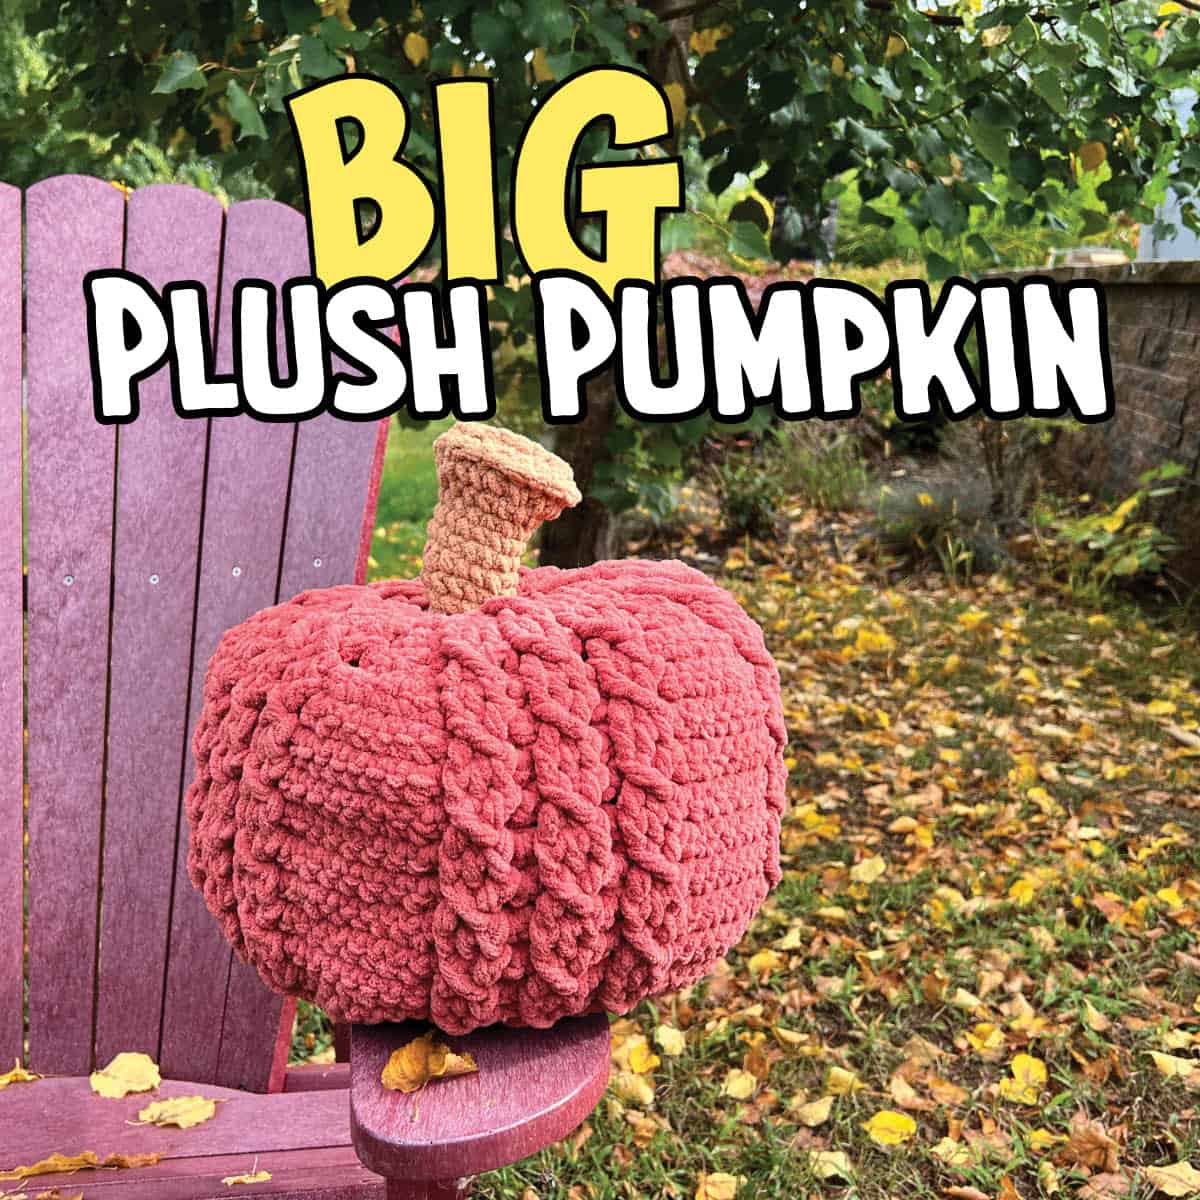
This delectable Big Plush Crochet Pumpkin pattern has been on my bucket list to make for years. It's 14" diameter and 10" tall without the stem. It's big and fluffy! Just perfect for fall.
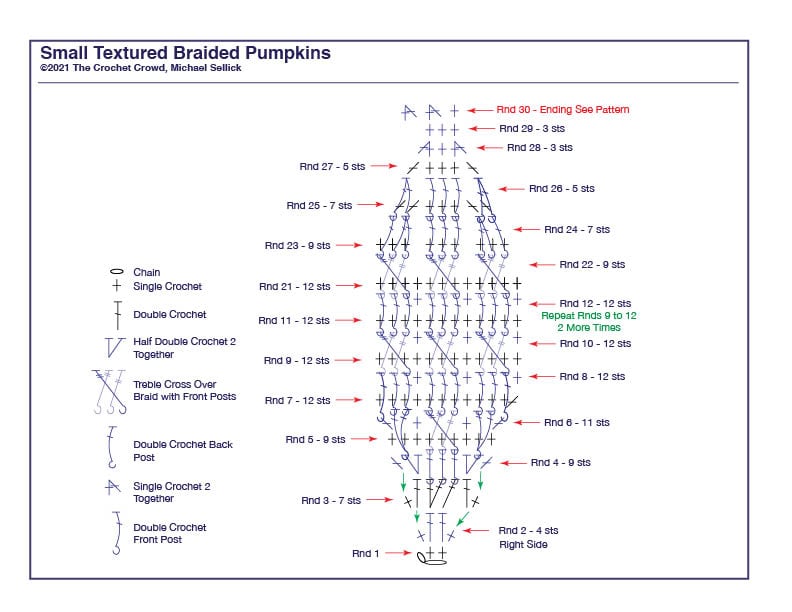
I used a smaller crochet hook to make the stitches nice and tight. A matching crochet diagram has been provided to show you how to make this.
Bernat Blanket can make regular-size patterns much bigger.

Bernat Blanket, 300g / 10.5 oz, 201 meters / 220 yards
A - Red Rust - 2 Balls (Almost 2 full balls are used but you won’t play yarn chicken)
B - Caramel (small portion for stem)
Hook: 6.5 mm / K/10.5
Gauge: 8 sc and 9 rows = 4” [10 cm]
Pumpkin is 14” dia x 10” without stem.
Instructions
The starting of this pumpking is the top of the pumpkin.
Ch 2.
1st rnd: (WS.) 10 sc in 2nd ch from hook. Join. Turn. 10 sc. 2nd rnd: (RS) Ch 1. *(1 sc. 1 dc) in next st. (1 dc. 1 sc) in next st. Rep from * around. Join. Turn. 20 sts.
3rd rnd: Ch 1. *(1 sc. 1 dc) in next st. 2 dc in next st. 1 dc in next st. (1 dc. 1 sc) in next st. Rep from * around. Join. Turn. 35 sts.
4th rnd: Ch 1. *1 sc in next st. 2 hdc in next st. 3 dcfp around next 3 sts. 2 hdc in next st. 1 sc in next st. Rep from * around. Join. Turn. 45 sts.
5th and alt rnds: Ch 1. 1 sc in each st around. Join. Turn.
6th rnd: Ch 1. *1 sc in each of next 2 sts. 2 hdc in next st. Skip next st. 1 trfp around each of next 2 sts 2 rows below. 1 trfp around skipped st. 2 hdc in next st. 1 sc in each of next 2 sts. Rep from * around. Join. Turn. 55 sts.
8th rnd: Ch 1. *2 sc in next st. Skip next st. 3 dcfp in next st 2 rows below. 1 dcfp around next 3 sts 2 rows below. 1 dcfp around next 3 sts in next st 2 rows below. 2 sc in next st. Rep from * around. Join. Turn. 65 sts.
10th rnd: Ch 1. *1 sc in next st. 2 hdc in next st. (1 dc in sp before group of 3 dcfp 2 rows below. Skip next st, 1 trfp around next 2 sts 2 rows below, Working in front of two trfp just worked, 1 trfp in front around skipped st) 3 times. 1 dc in the sp after group of 3 dcfp sts 2 rows below, 2 hdc in next st, 1 sc in next st. Rep from * around. Join. Turn. 95 sts.
12th rnd: Ch 1. *1 sc in each of next 3 sts. (1 dcbp around next st 2 rows below. 3 dcfp around each of next 3 sts 2 rows below) 3 times. 1 dcbp around next st 2 rows below. 1 sc in each of next 3 sts. Rep from * around. Join. Turn.
14th rnd: Ch 1. *1 sc in next 3 sts, (1 dcbp around next dcbp 2 rows below. Skip next st. 1 trfp around each of next 2 sts rows below. Working in front of two trfp just worked, 1 trfp in front around skipped st) 3 times. 1 dcbp around next dcbp 2 rows below. 1 sc in next 3 sts. Rep from * around. Join. Turn. 95 sts. 15th rnd: Ch 1. 1 sc in each st around. Join.
16th to 31st rnds: Rep 12th to 15th rnds three times more.
32nd rnd: Ch 1. *1 sc in next st. Hdc2tog. (Skip next st. 1 dcfp around each of next 3 sts 2 rows below) 3 times. Skip next st. Hdc2tog. 1 sc in next st. Rep from * around. Join. Turn. 65 sts.
34th rnd: Ch 1. *Sc2tog. (Skip next st. 1 trfp around each of next 2 sts 2 rows below. Working in front of two trfp just worked, 1 trfp around skipped st) 3 times. Sc2tog. Rep from * around. Join. Turn. 55 sts.
36th rnd: Ch 1. *1 sc in next st, 1 dcfp around next st 2 rows below. Working into next 2 sts 2 rows below, dcfp2tog. 1 dcfp around each of next 3 sts 2 rows below. Working into next 2 sts 2 rows below, dcfp2tog. 1 dcfp around next post 2 rows below. 1 sc in next st. Rep from * around. Join. Turn. 45 sts.
38th rnd: Ch 1. *1 sc in next st. dcfp2tog using next 2 posts 2 rows below, 1 dcfp around each of next 3 posts 2 rows belo., Working into next 2 sts 2 rows below, dcfp2tog. 1 sc in next st. Rep from * around. Join. Turn. 35 sts.
39th rnd: Ch 1. *Sc2tog. 1 sc in each of next 3 sts. Sc2tog. Rep from * around. Join. Turn. 25 sts.
Stuff pumpkin, being careful not to overtuff (stuffing should not be visible through sts.)
40th rnd: Ch 1. *Sc2tog. 1 sc in next st. Sc2tog. Rep from * around. Join. Do not turn. 15 sts.
41st rnd: As 5th rnd. 15 sts.
42nd rnd: Ch 1. (Sc2tog) 8 times. Join.
Fasten off, leaving an approx 24” [61 cm] tail. Place yarn on a tapestry needle and feed the yarn through all stitches in the last round and pull to close.
Pumpkin Shaping and Finishing
With yarn on tapestry needle, feed needle through center of both top and bottom of Pumpkin. Catch edge of hole at bottom of Pumpkin, and feed needle back through center of top. Pull lightly on yarn so indentation forms at top of Pumpkin as shown in photo. Secure tightly and weave in end.
Stem
With B, ch 2.
1st rnd: Ch 1, 10 sc in 2nd ch from hook. Join. 10 sc.
2nd rnd: Ch 1, 2 sc in each st around. Join. 20 sc.
3rd rnd: Ch 1, 1 hdc in each st around. Join. 20 hdc.
4th rnd: Ch 1, 1 scbp in around each hdc. Join. 20 scbp.
5th rnd: Ch 1, 1 scbp around each scbp. Join. 20 scbp.
Push the top of the first few rounds down into the stem to be like a bowl shape.
6th rnd: Ch 1, *1 sc in each of the next 3 scbp, sc2tog. Rep from * around. Join. 16 sc.
7th and 8th rnds: Ch 1, 1 sc in each sc around. Join. 16 sc.
9th rnd: Ch 1, 1 sc in next 6 sc, 1 hdc in next 6 sc, 1 sc in last 4 sc. Join. 16 sts.
10th and 11th rnds: Ch 1, 1 sc in each st around. Join. 16 sts. Fasten off at the end of the 11th rnd. Leave long enough tail to sew to the top of the pumpkin.
Stuff the stem lightly so you can bend the stem in the iconic look for a pumpkin. Sew the stem to the middle of the top of the pumpkin.
.
.
Crochet Diagram
You can print this diagram to help you.
Tutorial
Another Similar Pumpkin
There are some differences in the larger version of this pumpkin. I am using 4 ply, #4 medium weight yarn.
Leave me your thoughts...