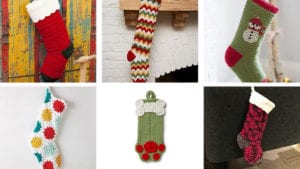
Christmas Stockings
The Crochet Christmas Handmade Stockings hung by the chimney with care. For me, for you and for our furbabies too.
Two of these stockings I have adapted with some alterations. Like the Classic Stocking, I adapted to using Bernat POP!, the self-striping yarn with being able to use 1 ball of yarn to detail the iconic colours of the cuff, heel and more. The Bernat Velvet Stocking is an adaptation of the Traditional Christmas Stocking with a slight variance as Yarnspirations asked me to make a Velvet Stocking.
Easiest stocking is definitely the Traditional Stocking with the Zig Zag and Hexagonal as being a bit more work.
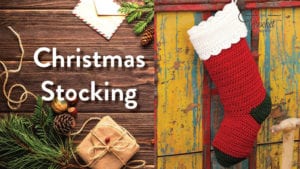
Traditional Christmas Stocking
The easiest Christmas Stocking is this one. It is the most downloaded stocking on Yarnspirations. No Fooling! The Quick & Easy Christmas Stocking is just as it's promised. It is truly quick and easy!
I substituted my yarn for Red Heart Boutique Midnight as it has more of a rustic look with sparkle incorporated into the yarn. You can make the colours of this stocking to match your own personality.
In this tutorial, I gave suggestions on how you can change up your stitches and still have success, from the top of the stocking to the start of the heel is open to a free choice I think. You need to go at about 10". This stocking is not worked in rounds but back and forth in rows. So as long as your stitch counts are correct with keeping the same number going across, you can play with different stitches to get to the 10" length you need!

Tutorial
Embroidered Christmas Stocking
Next stocking up is the basic stocking that has additional embroidery that can be added. This is the Embroidered Crochet Christmas Stocking.
Nicely shaped and there is a tutorial. You should know that after I completed the heel, I left it on you to do the decreasing and then do the instep on your own. I didn't do the decreasing as I should have and my stocking still turned out pretty nice. Though I did an error, the video tells you that you should decrease but if you don't, there's no crochet police and it will most likely work out as mine did.
The tutorial doesn't show the embroidery process.

Tutorial
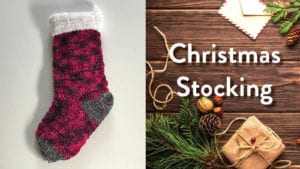
Velvet Christmas Stocking
The Bernat Velvet Christmas Stocking is an exclusive adaptation of the traditional stocking above. I was asked by Yarnspirations to adapt a stocking using Bernat Velvet Yarn. I mixed three yarns in this example that included Bernat Velvet, Bernat Crushed Velvet and Bernat Pipsqueak yarn.
Unexpectedly, the Bernat Crushed Velvet gives this a cottage plaid look with the how the yarn pools. Due to the rows being mixed of single crochet and double crochet, the yarn pools uniquely. My personal Christmas colours for my decor are the red/black plaids.
There was a slight edit after the production of this tutorial to make the cuff a little bit wider in diameter. It's noted in the tutorial and updated here in the pattern. However, the original photograph here doesn't have that adjustment. Hindsight is 20-20.
Dec 14, 2019 Revision 1, © 2019 The Crochet Crowd
Designed by Yarnspirations, Adapted By Michael Sellick
Crochet Velvet Christmas Stocking
Easy, 20" long x 7" dia. Gauge not important.
Materials
Bernat Crushed Velvet, 300 g/10.5 oz, 288 m/315 yds
- Contrast A - Bright Magenta - 1 Ball
Bernat Crushed Velvet, 300 g/10.5 oz, 288 m/315 yds
- Contrast B - Vapour Gray - 1 Ball
Bernat Pipsqueak, 100g/3.5 oz, 92 meters/101 yards
- Contrast C - Whitey White - 1 Ball
Abbreviations
- Approx = Approximate(ly)
- Beg = Begin(ning)
- Ch = Chain(s)
- Dc = Double Crochet
- Rep = Repeat
- Rs = Right Side
- Sc = Single Crochet
- Sc2tog = [draw up a loop in next st] twice, yo and draw
- through all 3 loops on hook.
- Sl St = Slip Stitch
- St(s) = Stitch(es)
Instructions
Stocking Leg Area
With A, ch 43.
Row 1 (Right Side): Sc in 2nd ch from hook and in each ch across; turn – 42 sc.
Row 2: Ch 3 (counts as dc), skip first sc, dc in next sc and in each sc across; turn.
Row 3: Ch 1, sc in each dc across, sc in top of ch-3; turn.
Repeat Rows 2 and 3 for pattern until 10” from beginning, end by working Row 2. Fasten off.
Heel
With right side facing, skip first 32 sts of last row, join B in next st; ch 1, sc in same st and in next 9 sts, bring other side of stocking around and sc in first 11 sts; turn – 21 sts.
Shape Heel
Work short rows as follows:
Next Row: Ch 1, sc in first 14 sc; turn.
Next Row: Ch 1, sc in first 7 sc; turn.
Next Row: Ch 1, sc in first 7 sc, sc in next st of long row below; turn. – 8 sc.
Next Row: Ch 1, sc in first 8 sc, sc in next st of long row below; turn – 9 sc. Continue in this manner until all 21 heel sts are worked. Fasten off.
Foot
With right side facing, skip first 10 sc of heel, join A in next sc; ch 1, sc in same sc and in next 10 sc of heel, skip next 2 sts of stocking, sc in next 17 sts of stocking, skip next 2 sts, sc in next 10 sts of heel; turn – 38 sc.
Repeat pattern Rows 2 and 3 five more times, then Row 2 once more. Fasten off.
Toe
With right side facing, join B in first st of foot; ** ch 1, sc2tog, sc in next 15 dc, sc2tog, turn – 17 sc.
Continue in sc only and decrease 1 st each end of every row until 3 sts remain. Fasten off. **
With right side facing, join B in next st of last long row. Work the same as first-half of the toe from ** to **.
Finishing
Sew toe, foot and back seams. Sew openings closed at corners of the heel.
Cuff
Row 1: With C, join with sl st to beg post of second row of dc from the top of the stocking. Ch 1, 1 sc in each front post around. Turn.
Row 2: Ch 1, 3 sc in first st, 1 sc in each st to last st. 3 sc in last st. Turn.
Rows 3 - 15: Ch 1, 1 sc in each st across. Turn.
Fasten off. Sew seam shut. Fold down the cuff.
Hanging Loop
With C, ch 12. Fasten off leaving long tail ends on both sides.
Affix loop to the cuff where the fold is at the top. Favour the back of the cuff area so the stocking leans at the right angle hanging down.
Tutorial

Dog Paws Christmas Stocking
Give your dog something special for Christmas with this adorable Dog Paws Christmas Stocking.
I tried this stocking before and I wasn’t successful because I was getting too distracted around me. This time, I decided to change up the game plan by looking for a pattern to create my own diagram to follow long. With great success, I created my diagram and completed the stocking.
In the tutorial, I refer to this diagram.
Download / Save My Tutorial Diagram Below
Download this diagram or click the picture.

By noticing where the increases start on each row, you can avoid all of the extra countings by strategically placing your stitch marker in the right stitch for the next row. In the video tutorial, as we work along in the paw stocking area, I will be showing you where to put the stitch marker as we do each row. Having this diagram will save you a lot of time and grief over potentially miscounting the pattern.
The tutorial also includes the bone to sew on as well.
Tutorial

Cat Paws Christmas Stocking
The Crochet Cat Paws Stocking is the same shape but with the alteration of the fish that is added to the pattern. The crochet diagram above for the dog paws Christmas Stocking also matches this tutorial as well.
The Crochet Fish is also included in the tutorial to finish this project off.

Cat Padded Rim Bed - Bonus Pattern
For extra special kits or small dogs in your life, the Crochet Padded Rim Bed is something I made with 2 extra balls of Bernat Home Bundle that I had laying around in my yarn collection.
At the time of writing this, it's been over a year and my cat is still using this bed. The trick is to position the bed in a place where the cat is the most comfortable. It's not always within eye-shot of us. It fills my heart with joy when I see her using it. In the tutorial picture, both Binky Boo and Puss Puss are sharing it. That's not a staged photo.
The tutorial is included below.
Dec 02, 2018, Revision 1, © 2018 The Crochet Crowd
Designed by By Michael Sellick
Padded Rim Cat Nap Bed
Easy, 18" dia x 4" tall. Gauge not important.
Materials
Bernat Home Bundle, Teal Deal.
Polyfil is required.
Hook 10 mm / N Hook
Tip
There are photographs of assembly included with the download of the free pattern.
Abbreviations
- Approx = Approximate(ly)
- Beg = Begin(ning)
- Ch = Chain(s)
- Dc = Double crochet
- Rep = Repeat
- RS = Right Side
- Rnd(s) = Round(s)
- Sc = Single crochet
- Sl st = Slip stitch
- Sp(s) = Space(s)
- St(s) = Stitch(es)
Instructions
Bottom & Sides
Rnd 1: Ch 4, 11 dc in 4th ch from hook. Sl st to top of beg ch.
Rnd 2: Ch 3. Dc in same st as join. 2 dc in each st around. Join with sl st to top of beg ch3.
Rnd 3: Ch 3. Dc in same st as join. Dc in next st. *2 dc in next st, 1 dc in next st. Repeat * around. Join with sl st to top of beg ch-3.
Rnd 4: Ch 3. Dc in same st as join. Dc in next 2 sts. *2 dc in next st, 1 dc in next 2 sts. Repeat * around. Join with sl st to top of beg ch-3.
Rnd 5: Ch 3. Dc in same st as join. Dc in next 3 sts. *2 dc in next st, 1 dc in next 3 sts. Repeat * around. Join with sl st to top of beg ch-3.
Rnd 6: Ch 3. Dc in same st as join. Dc in next 4 sts. *2 dc in next st, 1 dc in next 4 sts. Repeat * around. Join with sl st to top of beg ch-3.
Rnd 7: Ch 3. Dc in same st as join. Dc in next 5 sts. *2 dc in next st, 1 dc in next 5 sts. Repeat * around. Join with sl st to top of beg ch-3.
Rnd 8: Ch 1, 1 sc in each back loop around. Do not sl st at the end of round.
Working in continuous rounds without slip stitching. You will work up the side of the basket.
Rnd 9: Beg hdc in each st continually until sides reach 9” tall from the rnd 8 back loop sc round. When 9” tall, sc in next 3 sts, sl st in next 2 sts. Fasten off.
Inside Bottom Pad
Repeat rnds 1 - 7 from bottom to sides section. Fasten off.
Assembly
Place Bottom & Side Piece on table. Lightly stuff the middle bottom section. Place the inside bottom pad, right side up, into the middle and sew the middle bottom into position. Do not over stuff the base as it will create a mountain hill in the center of the basket.
Next, equally spread the fluff in the bottom sealed section. Then sew the middle section down to the middle of the one middle to the other.
With the side, fold down the side with adding lots of polyfil stuffing for more firmness to fill it in on the inside of the basket. Sew the top edge of the side to the bottom.
Cat Project Tutorials
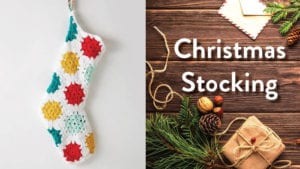
Hexagonal Christmas Stocking
Learn how to make this vintage looking Crochet Christmas Stocking. The free pattern by Yarnspirations is called On the Dot Christmas Stocking.
I substituted my yarn for the Caron Simply Soft Party Yarn. The yarn has a filament of sparkle added to it so the yarn has a glimmering effect. I opted to do my stocking in solid red but you can see the original pattern has options for colours for the middle of the hexagons. The creative choice is up to you.
The assembly diagram included with the downloadable free pattern.
In the video tutorial below, I have added instructions on how to read the instructions. I show how to make the granny hexagons as shown in the original sample. I show you how to view the diagram so it makes sense. I will also walk you through whip stitching and final assembly.
Tutorial
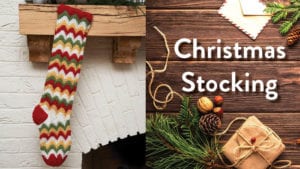
Zig Zag Christmas Stocking
The Crochet Zig Zag Stocking is vintage in appearance.
This is designed by Linda Cyr, for Red Heart Yarns. This part is super easy to follow, though it looks complicated. It's one of those projects where you can say it was really tough but realizes you did it with ease.
Of all of the patterns for the stockings, I found this one to be the trickiest to get the pattern into my head. I did less colour changing in the tutorial sample. I filmed this project years ago and still have the stocking 6 years later. It's timeless.
Tutorial

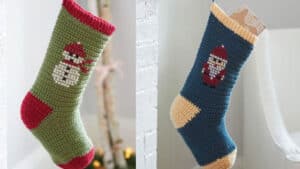
Classic Christmas Stocking
My personal favourite stocking of the set is this one. It was easily adaptable to create a unique looking Christmas Stocking with altering it for Bernat POP! Yarn. This Classic Christmas Stocking is definitely easy for beginners.
To me, I'm surprised this is not the most downloaded stocking pattern. I think it could be the additional optional embroidery of the Christmas Tree, Snowperson or Santa that may be making crocheters a bit apprehensive. As you can see from my Bernat POP! version below in the tutorial face that I didn't bother to embroidery. Truth is, I suck at it.
With my Bernat POP! Sample, I am doctoring the colours to ensure a colour never changes midway through a round. If I am seeing the yarn ball change, I will try to squeeze every possible colour out of it.
Tip
In the tutorial, I explain how I manipulated the colour of the Bernat POP! 1 ball equals 1 stocking with a very little leftover.
Karen Armstrong says
grid
Mikey says
Thanks
Diana Goldsack says
Mickey, I love your tutorials. You make them so easy to understand (already like the added diagrams).
Wish I could send you a photo of my crochet version of the “1950 Jumbo Christmas Stocking”.