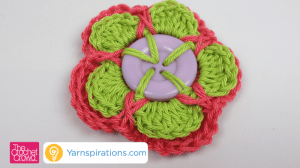
Button Flower
Learn how to crochet a button flower using an actual button as the starting and centre point of your flower.
These types of flowers require a bit of practice to get used to using the buttons at the centre but once you get the hang of it, watch out for button collection.

Today, I have used Patons Grace Yarn. This yarn is a Light 3 Level Weight. It's made of 100% mercerized cotton. It's really tough yarn in the sense of being exceptionally strong. It's very difficult to break this yarn using just your hands to pull it apart.
There are 23 colours in this yarn line and some of them are really beautiful to make the most delicious-looking flowers. The flowers don't use a lot of yarn so you can expect 1 ball to go a long way if you are making these flowers.
I have created 10 different designs as well as different size buttons. I want your feedback if you think I should spend time to write out all of the patterns and make video tutorials. Please leave me your comments below in my blog and/or leave a comment in the video.
Materials Required
- 2 Colours of Patons Grace Yarn or Equivalent.
- 3.5 mm or E/4 Crochet Hook.
- 2.0 mm or B/1 Crochet Hook. (Hook should fit into the holes of the buttons. Get a smaller size crochet hook if your hook doesn't fit into the buttonhole.)
- Tapestry Needle
- 1" Button with 4 Holes
Instructions
The video tutorial below will help illustrate where you need to go and exactly how to handle the yarn and tension. If you have any questions, please review the video.
Button Starting Point
You are only going to do 5 petals. This means you will be using all four holes on the button and use 1 hole for 2 strands. See the above photo to show you that.
- Insert smaller crochet hook through the front of any hole in the button. Pull a Patons Grace Yarn loop through. Using a bigger crochet hook. Yarn over and pull the yarn from the back. Ch 2. Extend the loop and remove the larger hook.
- Using a section of the yarn coming from the ball, insert your smaller hook into the next hole and pull a loop through. Insert your hook back into the extended loop and pull the new loop through that loop. Ch 2.
- Keep repeating Step 2 until you have 5 loops coming from the middle. You will be using 1 hole twice.
- Once all 5 are done. Slip stitch to the beginning loop.
You will see the yarn is ready for the flower. The tension is a bit loose offering a bit of flexibility for inserting the stitches for the petal. If this is your first attempt, the 2nd or 3rd try end up having better tension as you are used to the steps involved.
Petal Creation
- *In next ch 2 space, 1 SC, 6 DC, and 1 SC into the same space. Repeat * all the way around. Slip Stitch to the beginning SC. You should have 5 completed petals.
- With the front side of the flower facing you, turn the flower around. Ch 1, * front post single crochet around the loops extending to the centre of the flower, ch 2, and repeat * around. You should end up with 5 front post single crochet with 5 ch 2 spaces. Fasten off colour.
- With the flower front side facing you, tilt the flower down so you can see the ch 2 spaces from the last round 2. Fasten onto the Ch 2 space. Ch 3, 5 Trebles and 1 DC into the same ch 2 space. * Front post single crochet around the extended loop leading to the centre of the flower. 1 DC, 6 TR, 1 DC into next Ch 2 Space. Finish off with a front post single crochet in the last extended loop and then slip stitch to the beginning ch 3. Fasten off
More Ideas
- Extended Moss Crochet Stitch Tutorial
- Crochet Button Flower Pattern
- Tunisian Extended Simple Stitch tutorial
- Crochet Petal Pops Afghan Pattern
Patricia says
I love this! I crochet dog collars, and I'm always looking for new embellishments. I'd love to have the patterns for other designs!
zoe says
Love this button pattern as a pin for Mothers Day for local church. Mothers Day service event etc.
Mary Weber says
I would love to see more patterns for these button flowers. Thank you so much for all you do. Can't wait to try some button flowers.