Garden Gate Afghan Crochet Pattern
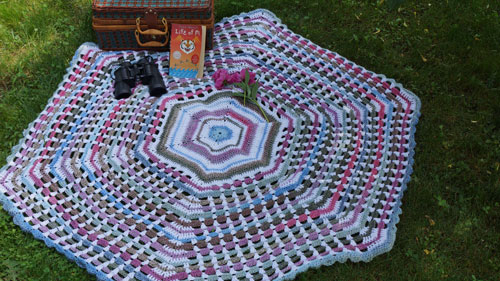
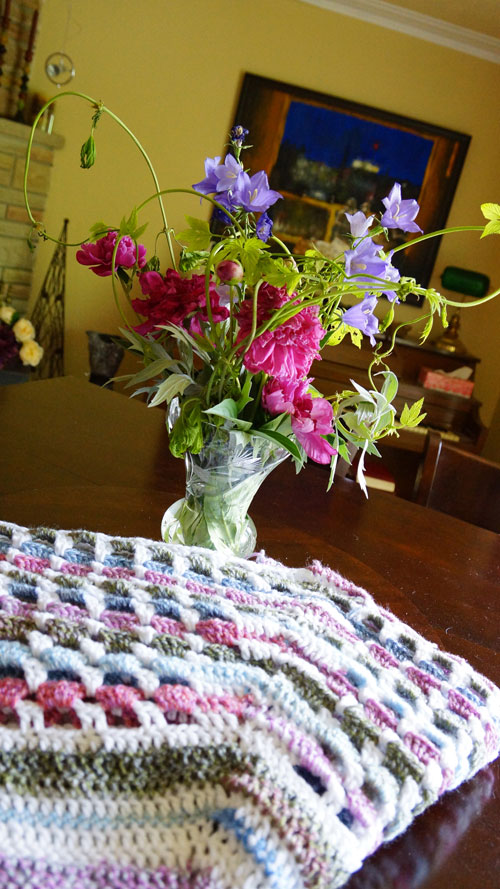
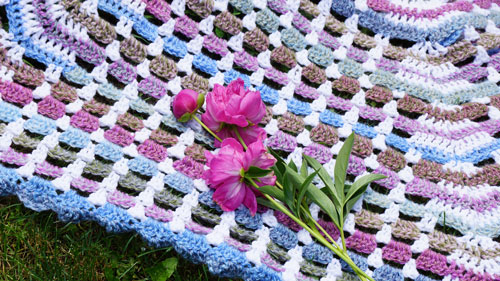
I completed this afghan is just a matter of 4 days without breaking a sweat. It was inspired by a gorgeous vase of flowers Daniel created for our dining room table. In looking at the vase while enjoying a delicious lunch, I wondered what the equivalent design to the flower vase would be if I crocheted something using the exact same colours. This is the Garden Gate Afghan.

I decided to use traditional stitches but then opted for a stitch that I have never done in a project before. Together with the double crochet stitch, I incorporated the boxed block stitch into the pattern to make it much more interesting. The choice of stitching helped grow the afghan at the tremendous speed that I had achieved.
The colours were inspired by Red Heart's colour palette from Collage and With Love. I noticed with the Collage that the colours are slowly transitioning with colours that are within the same shades of colour within the vase. I then mixed Red Heart's With Love due to the extreme softness of Collage so that the afghan would maintain a really soft texture and feel.
Pattern Suggestions
- Crochet Dragonfly Bag Pattern
- Hexagon Christmas Tree Skirt Pattern
- Scarf 2 Ways Crochet Pattern
- Crochet Tweed Stitch Shawl Pattern
- Simple Slouchy Crochet Pattern
Dimensions
- Afghan is a hexagon shape. Tip to Tip = 5 Feet Diameter, Flat Edge to Flat Edge = 4.5 Feet.
Materials:
Size K Crochet Hook, 6.5 MM
Red Heart's With Love - 2 Balls of Egg Shell
Red Heart's Collage, 2 Balls of Rose Dust, 2 Balls of Blue Wave & 2 Balls of Landscape Green.
Abbreviations: CH = Chain, ST ST = SL ST, BEG = Beginning, DC = Double Crochet,
Starting in the middle of the afghan and go in rounds around the afghan. With every round completed, we slip stitch to complete the round before moving up to the next level.
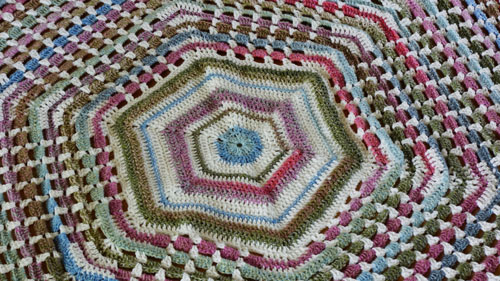
CENTRE HEXAGON - SOLID DC's
- Using Blue Wave Collage Yarn, CH 4, Join with SL ST to form a ring
- CH 3, 2 DC into the ring, CH 1, *3 DC into the ring, CH 1, Repeat from * 4 times. Join with SL ST. (There should be 6 groups of 3DC which represent each one of the 6 sides.
- CH 3, *1 DC into each of the next 3 DC, V-Stitch in the corner (1 DC, CH 1, 1 DC). Repeat from * 5 times. The final corner will be 1 DC, CH 1 and join with top of the BEG CH 3. Fasten off and weave in ends.
- Join With Love Eggshell into the same corner where you fastened off in step 3. CH 3, *1 DC into each DC till the next corner, V-STITCH in the next corner. Repeat * 5 time times. The last corner will be finished with 1 DC, CH 1 and ST ST.
- Repeat Step 4 and fasten off, weave in ends.
- Fasten on Red Heart Collage Landscape Green. CH 1, *SC into each DC until the next corner, in the corner, V-STITCH (1 SC, CH 1, 1 SC). Repeat from * 5 more times. Final corner gets 1 SC, CH 1 and SL ST to the BEG CH 1 Stitch. Fasten off and weave in ends.
- Fasten on With Love Eggshell. Repeat step 4 and fasten off. Weave in ends.
- Fasten on Red heart Collage Rose Dust. Repeat Steps 4 using this colour.
- Repeat Step 4 using Collage Rose Dust. Fasten off and weave in ends.
- Fasten on Red Heart's With Love Eggshell. Repeat Step 4 using this colour.
- Repeat Step 4 using With Love Eggshell.
- Fasten on Collage Blue Wave, Repeat step 6. Fasten off and weave in ends.
- Repeat step 7. Fasten off and weave in ends.
- Fasten on Collage Landscape Green, repeat 4 & 5 steps using this colour. Fasten off and weave in ends.
- Repeat step 7. Do not fasten off. Read directions between here and the first instruction below.
3, 5, 7, 9, 11, 13, 15, 17, 19, 21, 23, 25, 27, 29, 31
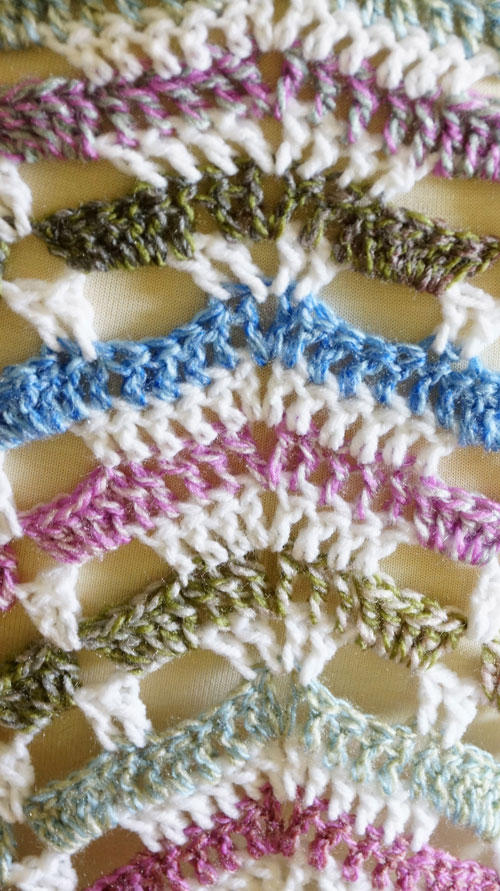
Boxed Block Stitch
The very first round will have 2 sections that are off by 2 stitches. This is required to bring the boxed block stitch in balance for the remainder of this project.
- CH 3, **DC in the next 3 stitches, CH 3, SKIP 4 DC Stitches and then put 1 DC into the next 2 stitches, *CH 3, SKIP 3 DC Stitches, then put 1 DC into the next two stitches, Repeat * 2 more times, CH 3, SKIP 4 DC Stitches, 1 DC into the next 3 stitches, Corners get a V STITCH (1 DC, CH 1, 1 DC). Repeat from ** to complete the remaining 5 sides. The last corner will get 1 DC, CH 1 and ST ST. Fasten off, White.
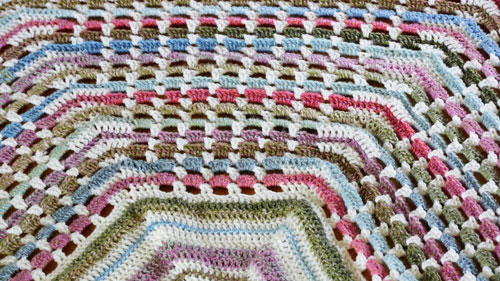
- (If you look at the blown-up picture, you can follow the colours exactly as shown. Stitches are easy to see. Look at the centre line as a starting of each flat space going from centre to left. Then look at the picture and think of it ending each flat space looking from the right to the centre point.) Fasten on Collage Dust Rose, CH 3, **1 DC into each of the next 4 stitches, *5 DC's into CH 3 Gap. Repeat from * all the way across. Final 4 stitches will get 1 DC each and then V-Stitch for the corner (1 DC, CH 1, 1 DC). Repeat ** for the remainder of the sides. Fasten off and weave in ends.
- Fasten on With Love Eggshell. Ch 3, **1 DC into each the next 5 stitches before the first group of 5 DC's in each gap, CH 3, 2 DC into the space between the 2 groups of 5 DC's. The last section match the DC's with the round below, V-STITCH in the corner (1 DC, CH 1, 1 DC). Repeat from ** for the remainder of the sides. The final corner is 1 DC, CH 1, and SL ST. Fasten off and weave in ends.
- Fasten on Collage Blue Wave, CH 3, **1 DC into each of the next 6 stitches before the next gap space. *5 DC's into each CH 3 gap. Repeat from * for each gap space. End of flat edge finishes off with 1 DC into each of the 6 DC's remaining. The corner is a V-Stitch. Repeat from ** for the remaining sides. Final Corner finishes with 1 DC, CH 1 and SL ST. Fasten off and weave in ends.
- For the remainder of the pattern, this is the reset each side where another gap space is added to ensure the hexagon is growing properly. You can see this clearly on the picture by lowing over the blue and seeing a new gap space. Fasten on With Love Eggshell. CH 3, **1 DC into the next stitch, CH 3, SKIP 4 stitches, 1 DC into the next two stitches (directly before the 5 DC's Group), *CH 3, 2DC's into the next space between the two 5 DC's Groups. repeat from * across. Place 1 DC into the two DC stitches after the 5 DC Group (see picture on the upper right), CH 3, 1 DC into the final stitch and then finish corner off with a V-Stitch. Repeat from ** for the remaining sides. The final corner is 1 DC, CH 1 and SL ST. Fasten off and weave in ends.
- Fasten on Collage Landscape Green. Chain 3, **1 DC into the next 2 stitches, *5 DC's into CH 3 Gap. Repeat from * all the way across. The end of the flat edge will end up with 1 DC into the final 2 Stitches. The corner will be a V-Stitch. Repeat from ** for the remaining sides. The final corner is 1 DC, CH 1, Join with SL ST. Fasten off and weave in ends.
- Repeat Step 2 - 6 - 5 MORE TIMES so COLLAGE BLUE WAVE is the final round.
 Border Edge
You will end up with COLLAGE BLUE WAVE. Like the centre of using Collage Blue Wave, we want to double up on the round of blue to bring balance to this afghan.
- CH 3, **1 DC into each of the DC's. *On the groups of 5 DCs, 1 SC, next stitch 1 DC, next stitch 2 Triple Crochets, next stitch 1 DC, final stitch gets 1 SC. Repeat from * on the groups of 5. This will cause the afghan to have a flowery effect around the border. On corners, place 1 DC into each DC stitch, Corners will get a V-Stitch. Repeat ** for all sides.
- Fasten off and enjoy your new afghan.
Videos:
Crochet Afghan Pattern Ideas
[the_grid name="Afghans"]By Michael Sellick,
©2012 The Crochet Crowd.
Nancy I Sanchez says
no blue button
Julia Smith says
No blue button
Mikey says
updated.
Patty Koch says
No blue button