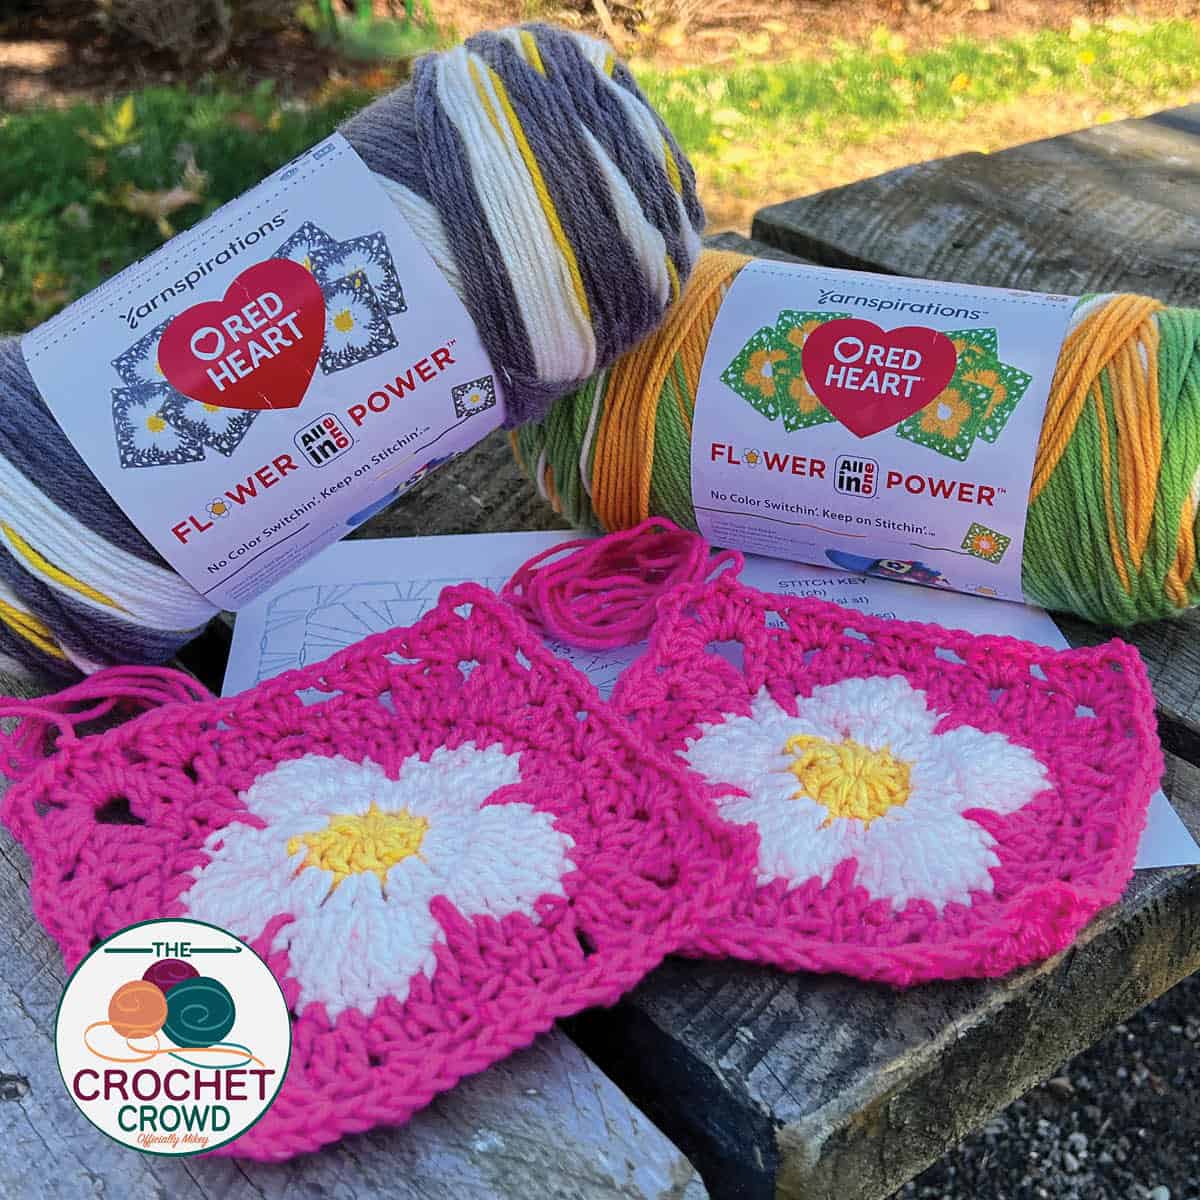
New as of October 14, 2024 is the Red Heart All In One Flower Power Yarn. Yarn is designed to keep on stitching, and there is no colour switching to slow you down. Like the Red Heart All In One Granny Square yarn, this yarn will form a flower centre. There are 22 colours in all. Look At The Free Patterns here.

The most important part of this yarn is to determine your gauge, which is talked about in the tutorial, to check fairly quickly on the first round. Everyone has a different tension, and it's a must to hit those transitions correctly. The tutorial was the second time I tried this, and once I did it, I found it was much easier the second time. It may take a bit of practice.
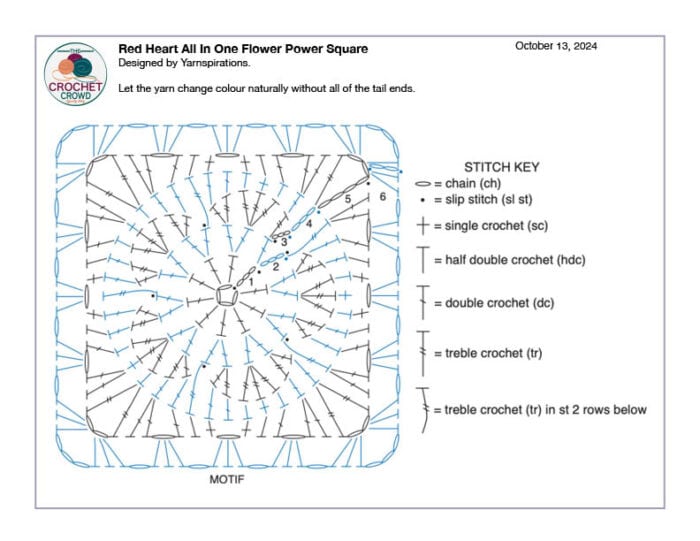
This yarn requires an established pattern to make it work. Written instructions and a crochet diagram are available.
Mikey's Extra Tip
The ball band has the recommended hook size of 5.5 mm / I/9. To double-check yourself, do a gauge check on the first round. Mikey needs to use a smaller 5 mm / H/8 hook for the square, as his yarn is a bit looser. This is talked about in the demonstration tutorial.
Notes:
- Motifs begin with Color 1 (shortest color rep) from center of pull-skein, leaving a 4" [10 cm] tail to weave in.
- 2nd and 3rd rnds will be worked in Color 2.
- 4th, 5th, and 6th rnds will be worked in Color 3.
- If too much color is left at end of rnd, pull back some stitches (sts) and slightly loosen gauge to re-work sts and finish at color change. If too little color is left, pull back some sts and slightly tighten gauge to re-work sts and finish at color change.
- Leave approx 24" [61 cm] tail of 3rd color at end of motif.
- Ch 3 at beg of rnd counts as dc.
- Ch 2 at beg of rnd does not count as st.
- Join all rnds with sl st to first st unless otherwise stated.
Abbreviations
- Approx = Approximately
- Beg = Beginning
- Ch = Chain(s)
- Dc = Double crochet
- Hdc = Half double crochet
- Rep = Repeat
- Rnd(s) = Round(s)
- RS = Right side
- Sc = Single crochet
- Sl st = Slip stitch
- Sp(s) = Space(s)
- St(s) = Stitch(es)
- Tr = Treble crochet
- WS = Wrong side
GAUGES 12 sc and 15 rows = 4" [10 cm]
Motif = Approx 6" [15 cm] square.
Instructions
Ch 4. Join with sl st to first ch to form ring.
1st rnd: Ch 3. 9 dc in ring. Join. 10 dc. Color 1 complete.
2nd rnd: Color 2 begins. Ch 3. 1 dc in first dc. 2 dc in each dc around. Join. 20 dc.
3rd rnd: Sl st in next dc. (Ch 3. 1 tr) in same st as last sl st. 3 tr in next dc. (1 tr. 1 dc) in next dc. Sl st in next dc. *(1 dc. 1 tr) in next dc. 3 tr in next dc. (1 tr. 1 dc) in next dc. Sl st in next dc. Rep from * around, ending last rep by joining with sl st to top of ch-3 of previous (2nd) rnd. Color 2 complete.
4th rnd: Color 3 begins. Sl st in first dc. Ch 3. *1 dc in next tr. 1 hdc in next tr. 1 sc in next tr. 1 hdc in next tr. 1 dc in each of next 2 sts. 1 tr in dc of 2nd rnd below sl st.** 1 dc in next dc. Rep from * 3 times more, then from * to ** once. Join.
5th rnd: Ch 6 (counts as tr and ch-2). 1 tr in same sp as sl st. *2 dc in next st. Ch 1. 1 dc in next st. 1 hdc in next st. 1 sc in next st. Ch 1. Skip next st. 1 sc in next st. 1 hdc in next st. 1 dc in next st. Ch 1. 2 dc in next st.** (1 tr. Ch 2. 1 tr) all in next st. Rep from * twice more, then from * to ** once. Join to 4th ch of ch-6.
6th rnd: Sl st in next ch-2 sp. Ch 2 (does not count as st). (1 hdc. Ch 3. 3 hdc) in same ch-2 sp as sl st. Ch 1. *(3 hdc. Ch 1) in each ch-1 sp to next corner ch-2 sp.** (3 hdc. Ch 3. 3 hdc) all in next ch-2 sp. Ch 1. Rep from * twice more, then from * to ** once. 2 hdc in first ch-2 sp. Join. Fasten off, leaving approx 24" [61 cm] tail.
Follow along to make your own.
Tutorial
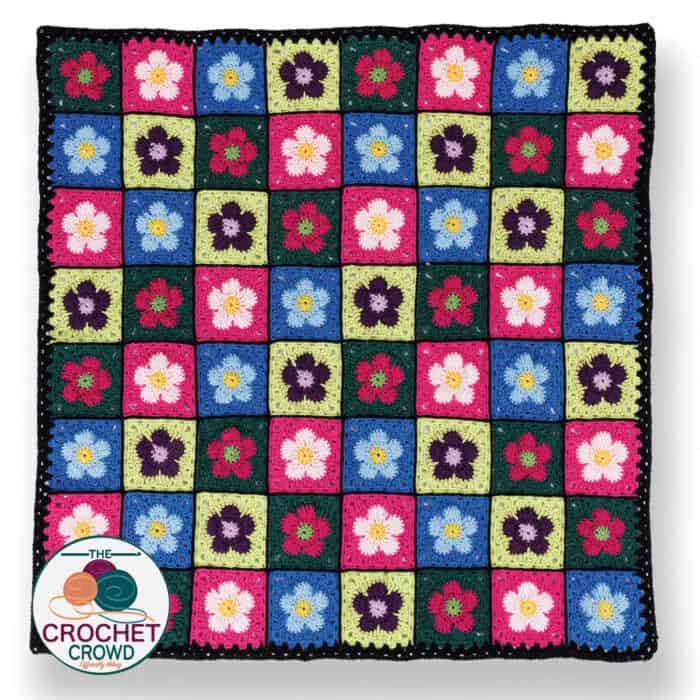
You can piece together squares to make great examples of granny blankets just like below.
Check out all of the free patterns for this yarn here.
Vicki says
Thank you so much for both the video and the pattern written out on this page. This helped so much. I had to go down to a 4.0mm hook. I think I am the most relaxed crocheter ever. Thanks again!!!!
Tomi Shmaisani says
I love the all-in-one Granny squares. I also like the fact that there is extra yarn after the last round on the flower power yarn to be able to join the squares. I am not clear on how to join the squares though. I have crocheted the squares needed for a project, laid them out to start joining and don't like the way it looks using the whip stitch. I like using a mattress stitch if I am joining with sewing. I really like using a crocheted join so that I can use a continuous amount of thread. I am just hoping that some videos exist that show how to join using the extra yarn. I am super excited about all the new squares since I can work up a ton of squares and then join them into whatever I want later.