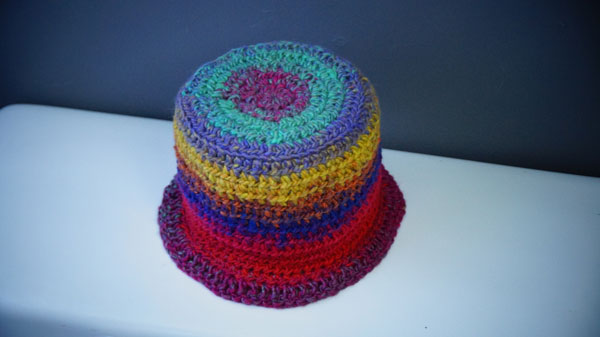
Vibrant Toilet Paper Cover Pattern
This Crochet Toilet Paper Cover is considered a double roll. The brand underneath is actually Cashmere. The roll measurements are 4" wide by 4.5" diameter. I created this to give my porcelain a bit of colour without having to heavily accessorize the top of the toilet tank. The yarn is doing all of the colour transitions and therefore making you look like an artist when you have completed your project. I used a smaller than normal crochet hook for this gauge of yarn. I did that so it's nice and tight and the toilet paper being white will not be seen through it.

Instructions
Yarn List 1 Ball - Bernat Mosaic (Discontinued) or equivalent.
Hook 5 mm / H Hook
Abbreviations
Beg = Beginning Ch = Chain Hdc = Half Double Crochet Rep = Repeat Sl st = Slip Stitch St = Stitch
Size: 4.5” dia x 4” high Instructions
Easy to make toilet paper roll cover.
Note: Ch 2 at beg of rnds does not count as a stitch.
Rnd 1: Ch 3, hdc 12 times into the first ch, to create a full circle.
Rnd 2: Ch 2, 2 hdc into each st around. Join with sl st to beg hdc.
Rnd 3: Ch 2, 2 hdc in same st as join. Hdc in next. *2 hdc in next stitch, hdc in next. Repeat * around. Join with sl st to beg hdc.
Rnd 4: Ch 2, 2 hdc in same st as join, hdc in next 2 sts. *2 hdc in next st, hdc in next 2 sts. Repeat * around. Join with sl st to beg hdc.
Rnd 5: Ch 2, 2 hdc in same stitch as join, hdc in next 3 sts. *2 hdc in next st, hdc in next 3 sts. Repeat * around. Do not join with sl st as we are going to start continuous rnds from here. Mark last stitch with a stitch marker. Rnd 6: Working in back loops only, hdc in each st around back to the stitch marker.
Rnd 7 - 16: In regular stitches, hdc in each stitch around. Use a standard toilet roll to measure how many rotations you should do. Finishing: When satisfied with the height, last 6 stitches will be as follows. 3 sc, then 3 sl st. Fasten off and weave in your ends.
Kathleen Siegrist says
The printed instructions do not match the YouTube video instructions, missing a step. Took me awhile to figure it out, had to rip out my stitched a few times because I knew it was correct, went back to the video and then compared the printed instructions to the video
Doesn't match
Tricia Devine says
On step 7, do you continue to crochet into the back loop only of the stitch or both loops? Please let me know as soon as you can. I'm doing this for a shower gift, and (my own fault), didn't really read the pattern that closely, and just now watched your awesome video tutorial. Sorry for my procrastination! Thank you so much for this website!
Marcia says
Keep doing it in the back loop only until it's the right height then follow the last six stitches as worn at the end of the pattern. Hope it helps