Vintage Fan Ripple Stitch
Learn how to crochet this amazing vintage fan ripple stitch that I recently discovered. I was blown away by the tall pillars of magnificence of the Triple Trebles. Changing the colours strategically will create incredible results.

Try the Scarf Version + Bonus Free Patterns
- Vintage Fan Ripple Scarf
- The Secret to Finding the Multiples
- Crochet Plaid Blanket + Tutorial
- 23 Scarf Patterns to Try

In the video tutorial, I used Bernat Satin Yarn with a 5.0 or H Hook Size. You just need to match the hook to the yarn and use this pattern to create the results you see. This yarn is extremely soft and inexpensive. You will need to figure out your own yarn quantities when making your projects. The purpose of today's article is to show you how to do the stitch and you can run away with the creativity.

You can use this stitch for anything as I am giving you the keys to the kingdom to create your own custom sizes. Each fan is a multiple of 9.
To Make Different Sizes
Multiple of 9 sts + 1.
Remember the + number at the end of the sentence means that you are to add chains at the very end to maintain the pattern as written.
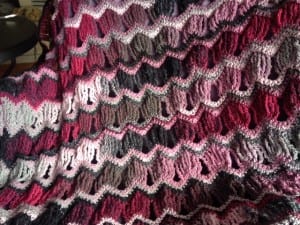
At the time of publication, I was creating this afghan using this stitch. I know I know... eye candy! (at least to me it is) It goes with my decor and teases my senses.
I used the discontinued Bernat Mosiac Yarn that slowly changes colour.
Crochet Diagram
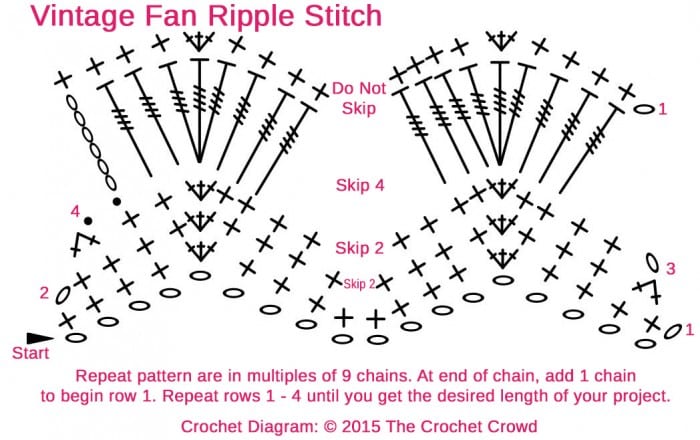
So let me give you some resources to help you. Firstly, here is a crude crochet diagram I made to show you where the stitches fall into place when making this stitch. You are welcome to print off this diagram if it helps you.

- The pattern consists of 4 repeating rows. Rows 1 - 4. The chain is just to get you started.
- When creating your base chain, keep the counts in multiples of 9. Once you get to your desired width for a chain, add 1 to the chain so you can single crochet 2nd chain from the hook and keep your project in balance.
Written Instructions
- Use a yarn and hook that compliment each other. You can refer to yarn band label to see the suggested hook size to go with the yarn.
Chain in sets of 9 until you get to the desired width. At the end of the chain add 1 more chain.
- SC 2nd chain from hook and then SC in next 3 chains. * 3 SC into next chain. SC into next 8 chains and repeat * across. Final 4 chains will be 1 SC into each. Turn.
- Ch 1, skip 1st stitch and SC into next 4 sts. * 3 SC into next st. SC into next 4 sts, skip 2, SC into next 4 sts. Repeat * across. Final 4 stitches will be 1 SC into next 3 stitches and then SC 2 TOG for the final. Turn.
- Repeat Row 2.
- Slip Stitch 2 stitches, then CH 6. Triple Treble (TTR) into next 2 stitches. * 3 TTR into next and then 1 TTR into next 3 stitches. Skip 4 stitches, 1 TTR into next 3 stitches, Repeat * across. Final stitches will be 1 TTR in 3 stitches. (You will notice the TTR do not extend all the way to the end of the row. This is what we want.)
- If changing colour, this is where you would do it before doing the next repeat rows.
- Repeat Rows 1 - 4 continually until your project gets the desired length.
See video tutorial below to make it easier for your to follow if you have any questions.
Marcia Spicer says
How can I get this pattern Mikey
Mikey says
I just added a blue download button and created a pdf for you.
Dee Dee sanchez says
this stitch is beautiful I am confused though the first row has the ends hanging out beyond the rest of the blanket what do you do with those?
kathy says
It would be great if it were a PDF; but YT has it con crochet crowd. Good luck.