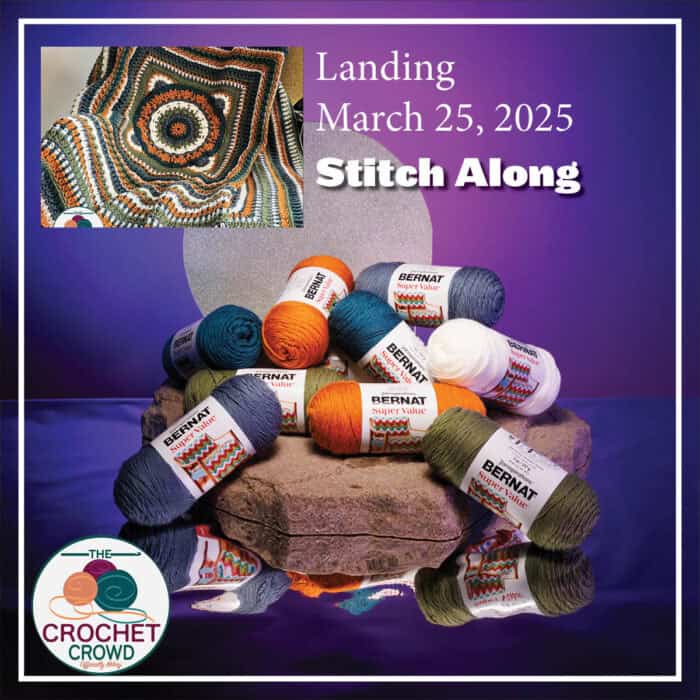
Mikey's (me) Bernat Study of Reality Crochet Blanket joins his Study of Series of Crochet Blankets. The study is about learning stitches and breaking boredom by applying skills you probably already know and combining them with other stitches you don't or have forgotten about. I get sick and tired of stitches that are one or two-row repeats as my ADHD kicks in full swing, and I will quit. I design with the mission to keep curiosity going.
The date of the stitch-along beginning has yet to be determined. The free pattern will include only the written instructions and access to the tutorials as they are released. The 13 created crochet diagrams will only be in the purchasable download.
.
.
.
Funds raised for the purchasable download are going towards Michael's therapy costs for his hands and arms. Due to the precision required, the crochet diagrams are very hard on the hands and fingers.
Kits
Yarnspirations has launched the Study of Reality Yarn Kits. While supplies last, get it while you can. As of March 3, 2025, there are 269 kits available in the USA warehouse and only 46 kits in the CDN warehouse. Get it before they are gone.
Extra Help
Requests have come in about rounds 5 and 6. Here's a video on just those two rounds.
Repeating Advice
During the pre-launch, crocheters asked about repeating instructions for making the project bigger. Below is a free download of the repeating that is talked about in the video.
.
.
The name comes from binge-watching Traitors, hosted by Alan Cumming. Sometimes, it was hard to sit there and crochet as the nonsense in this series caught way too much attention. I want to hear Alan's sly talk. It makes me giggle.
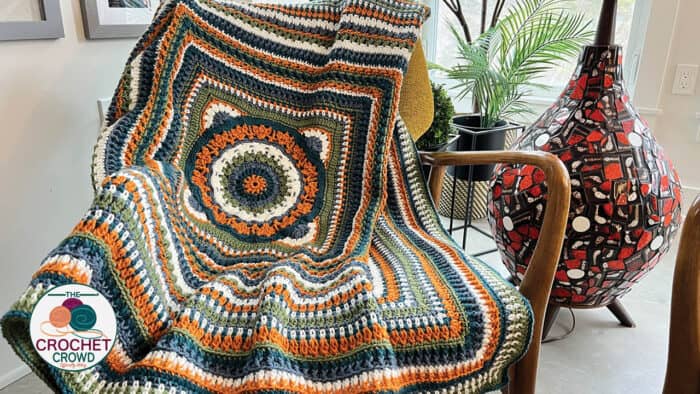
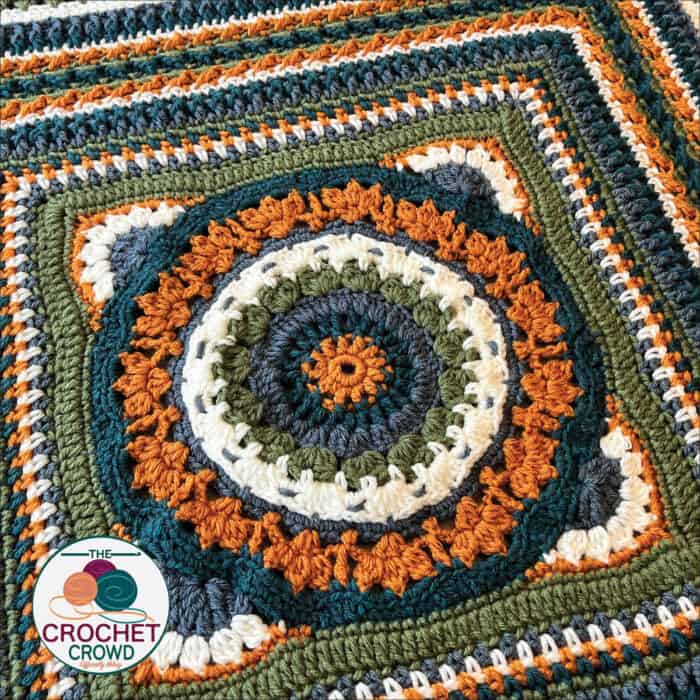
In this study, Daniel challenged me to figure out a different way to go from a large circle to a square without using the same old technique I am most comfortable with. You would see something like this done on mandalas. With only three rows per corner, the circle gets to the square, and you have a developed visual interest.
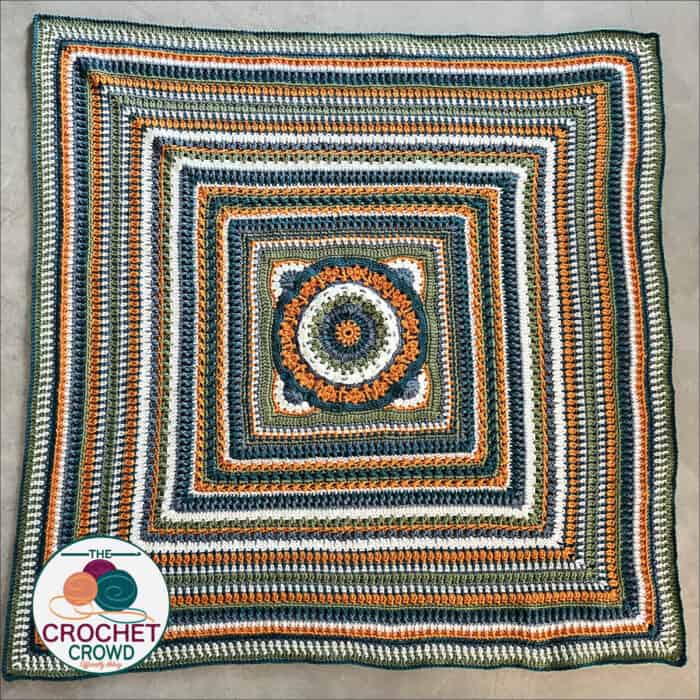
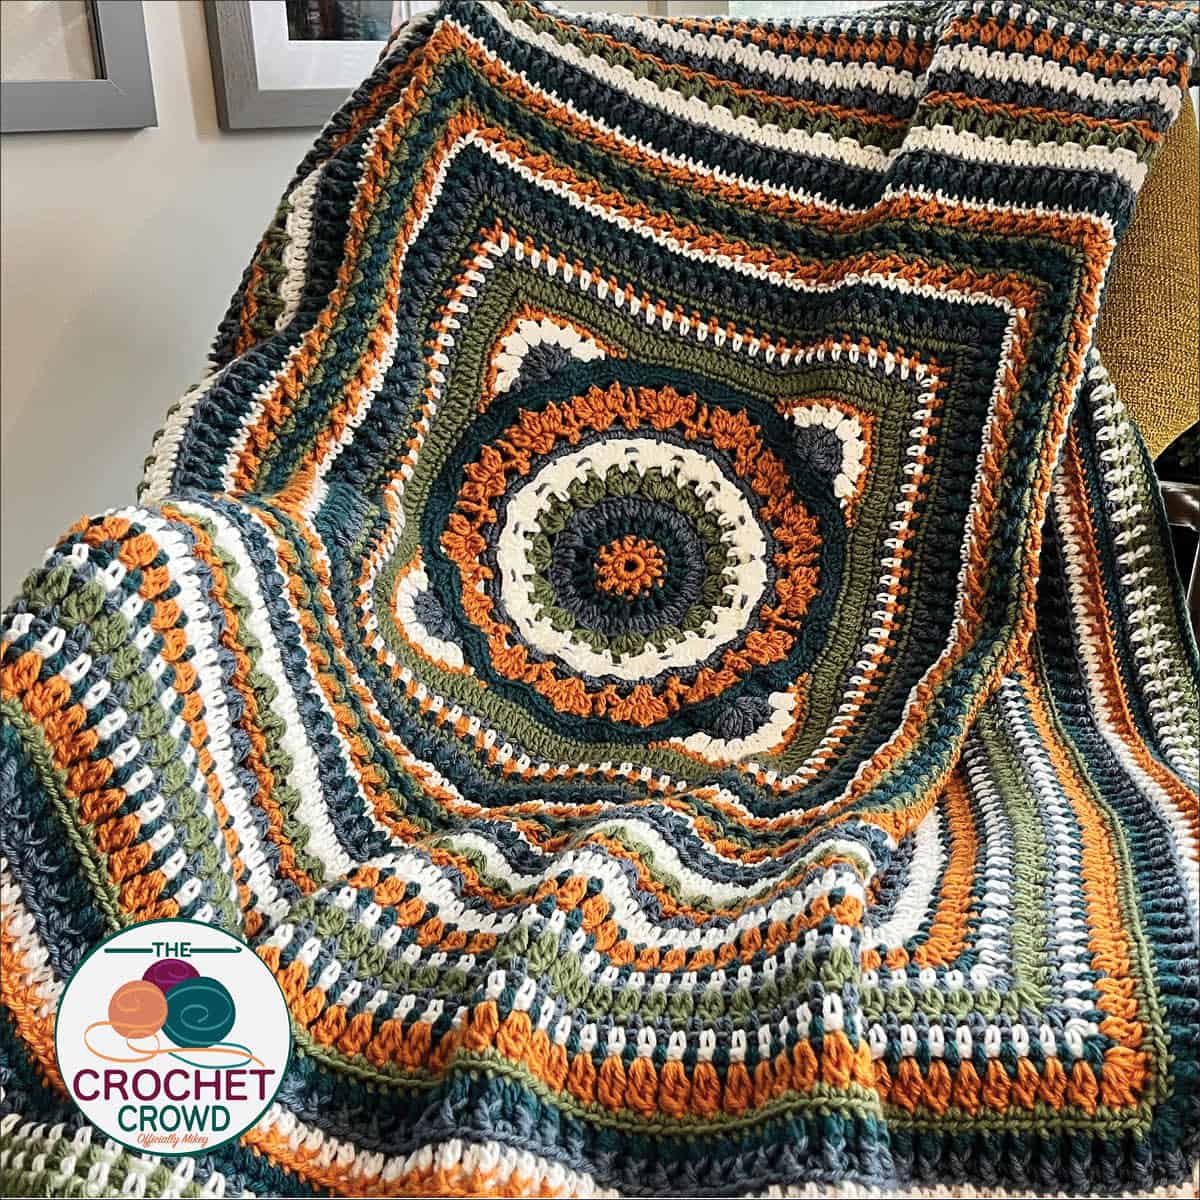
Yarnspirations had a straightforward criterion for me. Design a throw with only five balls of colour.
Secret: I used the moss stitch often so that yardage wouldn't be sucked up, and I could get the blanket to grow more in the distance.

Details
VERSION 1 - Through the Pines
Bernat Super Value, 197g / 7 oz, 402 meters / 440 yards
- Contrast A - Masala
- Contrast B - Teal Heather (This colour gets close to the end of ball.)
- Contrast C - Colonial Blue
- Contrast D - Forest Green
- Contrast E - Winter White
VERSION 2 - Fields of Sunshine
Bernat Super Value, 197g / 7 oz, 402 meters / 440 yards
- Contrast A - Peacock
- Contrast B - Grey Ragg (This colour gets close to the end of ball.)
- Contrast C - Cornflower
- Contrast D - Curry
- Contrast E - Taupe Heather
TIP: Write the colour letter on the ball band to change yarn with confidence when the colour changes in the pattern.
Hook 5 mm / H/8 Crochet Hook or size needed to obtain gauge.
Gauge 13 dc x 6 rows = 4”.
Measurement 50” x 50”
Presentation
The date of the stitch-along has just to be determined. The written pattern plus crochet tutorials will be available for free. The crochet diagrams will be an option to purchase, as they are hard on my hands, and the funds raised will go toward medical therapy costs.
Abbreviations
- Beg = Begin(ning)
- Big Xst = Big cross stitch. Skip 2 sts, 1 dc in next. Ch 1. 1 dc 2nd stitch back behind the first st.
- BLO = Back loop only
- Ch(s) = Chain(s)
- Cluster = Dc3tog in same stitch or space
- Dc = Double crochet
- Dcbp = Double crochet back post
- Dcfp = Double crochet front post
- Double cl = Dc2tog in same stitch or space.
- Esc = Extended single crochet. Insert hook into st or sp, yoh, draw up a loop, yoh, draw through one loop, yoh, draw through both loops.
- Hdc = Half double crochet
- Hdc join = Join to beg st with an hdc. Equivalent to a ch-2 space.
- Join = Sl st to beg st or top of beg st
- Rem = Remain
- Rep = Repeat
- RS = Right side
- Sc = Single crochet
- Sctog = Single crochet 2 together
- Scbp = Single crochet back post
- Scfp = Single crochet front post
- Sk = Skip
- Sl st = Slip stitch
- Sp(s) = Space(s)
- St(s) = Stitch(es)
- Standing sc = Form slip knot and insert onto the hook. Insert hook into st, yoh and pull loop through, yoh through 2 loops.
- Standing scbp = With loop already on hook, wrap around assigned st(s) like a back post. Yoh hook. Yoh and pull through 2 loops.
- Yoh = Yarn over hook
Important Notes:
- Stitch counts are provided as a circle until the blanket transitions to a square.
- Once the blanket forms a square, stitch counts will be provided per side.
- In pattern reading. Ch 1 means to physically crochet by chaining 1. If it states ch-1, the instructions use that to place the stitch assigned to it.
Counting Tip: When Stitches Per Side

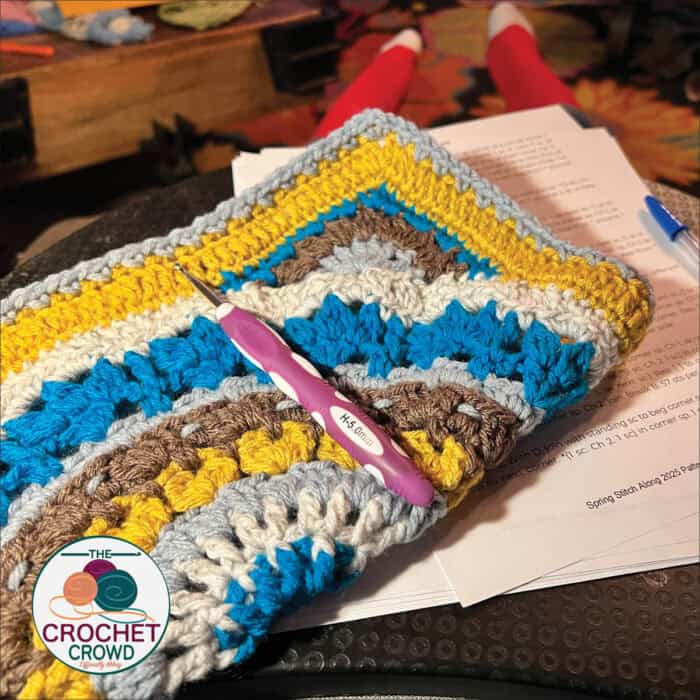
Week 1
With A, ch 4. Sl st to beg ch to form ring.
1st rnd: RS. Ch 1. 12 sc in ring. Join. 12 sc.
2nd rnd: Ch 3 (counts as dc here and throughout), 1 dc in same st as join. *2 dc in next sc. Rep from * around. Join. Break A. 24 dc.
3rd rnd: With B, join with standing scbp around the same st as the join. 1 scfp around next dc. *1 scbp around next dc, 1 scfp around next dc. Rep from * around. Join. 24 sts.

4th rnd: Ch 4 (counts as 1 dc and ch-1 sp). *1 dc in next sc, ch 1. Rep from * around. Join to the 3rd ch of beg ch-4. Break B. 24 dc and 24 ch-1 sps. 48 sts total.
5th rnd: With C, join with sl st to next ch-1 sp. Ch 3, 2 dc in same ch-1 sp. Sk next dc. 2 dc in next ch-1 sp. *Sk next dc, 3 dc in next ch-1 sp, skip next dc, 2 dc in next ch-1 sp. Rep from * around. Join. Break C. 60 dc.
TIP: When placing the cluster petals, ignore the fact that you have 1 set of 3 dc grouped and 1 set of 2 dc grouped. Just look at the last round as 60 dc.
6th rnd: With D, join with sl st to same st as join. Ch 1. (Cluster. Ch 3. Cluster) into the same st as join. Ch 1. *Sk 3 dc. (Cluster. Ch 3. Cluster) into next st. Ch 1. Rep from * around. Join. Break D. 15 cluster petals separated by ch-1 sps.
7th rnd: With E, join with sl st to the ch-1 sp before the join. Ch 1. 1 sc in same sp as join. Ch 3. 1 sc in next ch-3 sp. Ch 3. *1 sc in next ch-1 sp, ch 3, 1 sc in next ch-3 sp, ch 3. Rep from * around. Join. 30 ch-3 sps and 30 sc.
8th rnd: Sl st to next ch-3 sp. Ch 1. 2 sc in same ch-3 sp. 5 dc in next ch-3 sp. *2 sc in next ch-3 sp, 5 dc in next ch-3 sp. Rep from * around. Join. Break E. 15 5-dc fans and 15 groups of 2 sc.
9th rnd: With C, use standing scbp wrapping around BOTH sc together. Ch 5. *Scbp around both of the next 2 sc, ch 5. Rep from * around. Join. 15 ch-5 sps and 15 scbp.
10th rnd: Sl st to next ch-5 sp. Ch 1. 3 sc in ch-5 sp, 1 sc into middle 5 dc of round below going over ch-5 sp to trap inside stitch, 3 sc in same ch-5 sp. *3 sc in ch-5 sp, 1 sc into middle 5 dc of round below going over ch-5 sp to trap inside stitch, 3 sc in same ch-5 sp.. Rep from * around. Join. Break C. 15 groups of 7 sc.
11th rnd: With A, join with sl st to last sc of the previous group of 3 sc. Ch 1. Sc2tog using the same st as join and first sc in next 3-sc group. Ch 3. Sk next 2 sc, 3 dc in next sc, ch 3. Sk next 2 sc. *Sc2tog over next 2 sc, ch 3, sk next 2 sc, 3 dc in next sc, ch 3, sk next 2 sc. Rep from * around. Join. 15 sets of sts.
12th rnd: Ch 4 (counts as 1 dc and ch-1 sp). Cluster in next dc, [ch 3, cluster in next dc] twice, ch 1. *1 dc in next sctog st, ch 1, cluster in next dc, [ch 3, cluster in next dc] twice. ch 1. Rep from * around. Join to the 3rd ch of the beg ch-4. Break A. no 15 sets of cluster petals.
13th rnd: With B, join with sl st to next ch-1 sp. Ch 1. 1 sc in same ch-1 sp. [4 sc in next ch-3 sp] twice. 1 sc in next ch-1 sp. *1 sc in next ch-1 sp, [4 sc in next ch-3 sp] twice. 1 sc in next ch-1 sp. Rep from * around. Join with sl st to back loop of beg sc. 150 sc.
TIP: We must eliminate two stitches from the count to form a square after the 14th rnd. The reduction of 2 stitches is done at the beginning of the round and at the halfway point around to keep the symmetry of the shape.
14th rnd: Using back loops only. Ch 3. Sk next st. 1 sc in next 6 sc, 1 esc in next st, 1 dc in next st. [1 dc in next st, 1 esc in next st, 1 sc in next 6 sc, 1 esc in next st, 1 dc in next st.] 6 times. 1 dc in next st, sk next st, 1 sc in next 6 sc, 1 esc in next st, 1 dc in next st. *1 dc in next st, 1 esc in next st, 1 sc in next 6 sc, 1 esc in next st, 1 dc in next st. Rep from * for the rem of rnd. Join. Break B. 148 sts.
Sample is 12.5” diameter.
Transition to square will start in next rnd beginning on Week 2
Week 2
Before you begin, mark where your corners appear with a stitch marker BEFORE starting the next steps. Skip the frustration and do this first. There are 36 sts between each stitch marker.
The illustration below shows rnd 14 as a single crochet, indicating stitch counting as a representation. Choose any stitch to start with the first corner and then count to locate the other three corners.

Locating the four corners is just choosing one stitch and then counting from there to find the other three corners. A corner may be a single crochet, extended single crochet or half double crochet based on the counting. In testing, no matter which stitch you pick, a corner never lands on the same type of stitch for all corners.
Each corner will be done independently. Each corner has only 3 rows. All rows are completed on the blanket's right side (RS). You will never turn the blanket to the back to make the corners.
Corner Motifs (complete 4 times)
TIP: For 3rd row, you will use a standing single crochet that will make it look better.
1st row: Attach C with sl st to the 4th sc away from the stitch marker. 7 tr in the stitch marker location. Sl st to the 4th sc away from the stitch marker. Break C.
2nd row: Go back to where you started the 1st row. With E, sl st to the 4th sc away from the sl st of the 1st row. Ch 1. Cluster into the first tr. [Ch 2, cluster into the next treble] 6 times. Ch 1. Sl st to the 4th sc away from the last sl st in the 1st row. Break E.
3rd row: Go back to where you started the 2nd row. With A, standing sc to the 2nd sc away from the sl st in 2nd row. 1 sc in next sc on main circle. 1 sc in next ch-1 sp on 2nd row. [1 sc in next cluster, 2 sc in next ch-2 sp] 3 times. (1 sc. Ch 2. 1 sc) in next cluster - corner made. [2 sc in next ch-2 sp, 1 sc in next cluster] 3 times. 1 sc in next ch-1 sp. 1 sc in next 2 sc on main circle. Break A.
Rep corner for the remaining 3 stitch marker points of the circle. 4 corners will be complete.
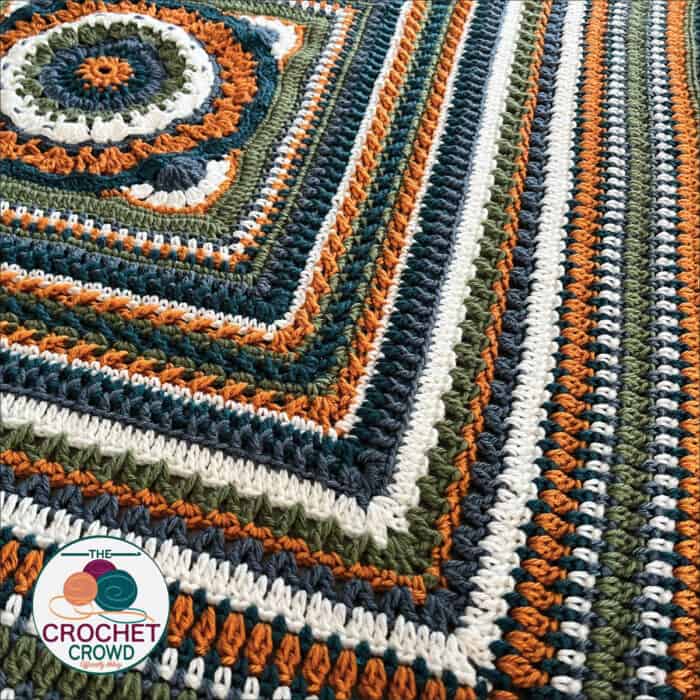
Body of The Blanket
With all corners in position, we will rotate around the blanket and introduce stitches per side.
TIP: We need 45 sts per side after the 1st round. We will have to do 2 sc in the middle of each side as indicated in the pattern.
1st rnd: With D, join with standing sc to any ch-2 sp corner of a corner motif. 1 sc in next 13 sc of a corner motif. 1 sc in next 7 sc of main circle. 2 sc in next sc of main circle. 1 sc in next 8 sc of main circle. 1 sc in next 13 sc of corner motif. *(1 sc. Ch 2. 1 sc) in ch-2 sp corner. 1 sc in next 13 sc of a corner motif. 1 sc in next 7 sc of main circle. 2 sc in next sc of main circle. 1 sc in next 8 sc of main circle. 1 sc in next 13 sc of corner motif. Rep from * around. 1 sc in beg corner sp. Hdc join. 45 sc per side.
2nd rnd: Ch 3. 1 dc in same corner sp. 1 dc in each sc to next corner. *(2 dc. Ch 2. 2 dc) in corner sp. 1 dc in each st to next corner. Rep from * around. 2 dc in beg corner sp, ch 2. Join. Break D. 49 dc per side.
3rd rnd: With C, join with standing sc to beg corner sp. Ch 1, sk next dc, [1 sc in next dc, ch 1, sk next dc.] Rep [ ] to corner. *(1 sc. Ch 2. 1 sc) in corner sp. Ch 1, sk next dc, [1 sc in next dc, ch 1, sk next dc.] Rep [ ] to corner. Rep from * around. 1 sc in beg corner sp. Ch 2, join. Break C. 51 sts per side.
4th rnd: With E, join with standing sc to beg corner sp. Ch 1, sk next sc, [1 sc in ch-1 sp, ch 1, sk next sc.] Rep [ ] to corner. *(1 sc. Ch 2. 1 sc) in corner sp. Ch 1, sk next sc, [1 sc in next ch-1 sp, ch 1, sk next sc.] Rep [ ] to corner. Rep from * around. 1 sc in beg corner sp. Ch 2, join. Break E. 53 sts per side.
TIP: 5th and 6th rnds are the same as 4th round just with using a different colour.
5th rnd: With A, join with standing sc to beg corner sp. Ch 1, sk next sc, [1 sc in ch-1 sp, ch 1, sk next sc.] Rep [ ] to corner. *(1 sc. Ch 2. 1 sc) in corner sp. Ch 1, sk next sc, [1 sc in next ch-1 sp, ch 1, sk next sc.] Rep [ ] to corner. Rep from * around. 1 sc in beg corner sp. Ch 2, join. Break A. 55 sts per side.
6th rnd: With B, join with standing sc to beg corner sp. Ch 1, sk next sc, [1 sc in ch-1 sp, ch 1, sk next sc.] Rep [ ] to corner. *(1 sc. Ch 2. 1 sc) in corner sp. Ch 1, sk next sc, [1 sc in next ch-1 sp, ch 1, sk next sc.] Rep [ ] to corner. Rep from * around. 1 sc in beg corner sp. Ch 2, join. Break B. 57 sts per side.
7th rnd: With D, join with standing sc to beg corner sp. 1 sc in each sc and ch-1 sp to next corner. *(1 sc. Ch 2. 1 sc) in corner sp. 1 sc in each sc and ch-1 sp to next corner. Rep from * around. 1 sc in beg corner sp. Ch 2, join. Break D. 59 sts per side.
8th rnd: With C, join with sl st to corner sp. Ch 3. 1 dc in same corner sp. 1 dc in each sc to next corner. *(2 dc. Ch 2. 2 dc) in corner sp. 1 dc in each st to next corner. Rep from * around. 2 dc in beg corner sp, ch 2. Join. Break C. 63 dc per side.
9th rnd: With B, join with sl st to corner sp. Ch 1. 2 esc in same corner sp. 1 dcfp around next dc. [1 dcbp around next dc, 1 dcfp around next dc.] Rep [ ] to corner. *(2 esc. Ch 2. 2 esc) in corner sp. 1 dcfp around next dc. [1 dcbp around next dc, 1 dcfp around next dc.] Rep [ ] to corner. Rep from * around. 2 esc in beg corner sp, ch 2. Join. Break B. 67 sts per side.
10th rnd: With E, join with standing sc to beg corner sp. 1 sc in each st to corner. *(1 sc. Ch 2. 1 sc) in corner sp. 1 sc in each st to corner. Rep from * around. 1 sc in beg corner sp. Ch 2, join. Break E. 69 sts per side.
End of Week 2.
Sample is 19.5” x 19.5”.
Tutorial
Launch Schedule
- Week 3: April 8th, 2025
- Week 4: April 15th, 2025
- Week 5: April 22th, 2025
Week 3
The free pattern version is launching April 8th, 2025.
Answering the Biggest Question - Making This Bigger
People want a blanket that can get bigger and know where to restart the pattern again. What makes the 11th rnd work is that in the round below, the 10th round, each side was equally divisible by 3 stitches.
You can begin to make this bigger and follow the pattern as written starting the 11th round before it is one of the following rounds:
- 16th
- 19th
- 21st
- 27th
- 29th
- 32nd
- 34th
- 36th
- 38th
- 40th
- 43rd
If you change the size, you must guess the amount of yarn on your own.
More Photos


Second Version - Fields of Sunshine
Testing has begun, and a second sample is made with a different colour lineup. Daniel put this colour combination together.
Maria Martinez says
getting my colors together to start my blanket cant wait.
Nina merkley says
I RECEIVED MY LAST COLOUR TO DO THE BLANKLET HOPING IT WILL START REAL SOON