Crochet Saturday Square
The Crochet Saturday Square is the first motif in the 7 Day Sampler Afghan Stitch Along. This crochet project can be easily completed in just one week.
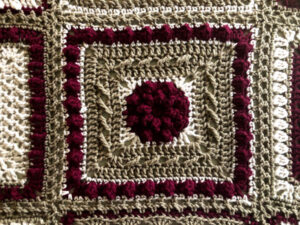
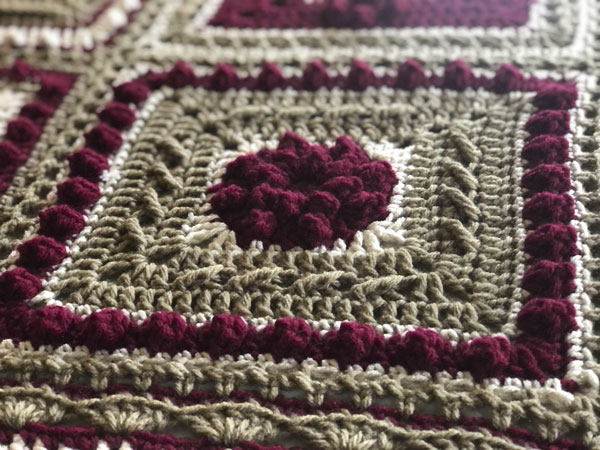
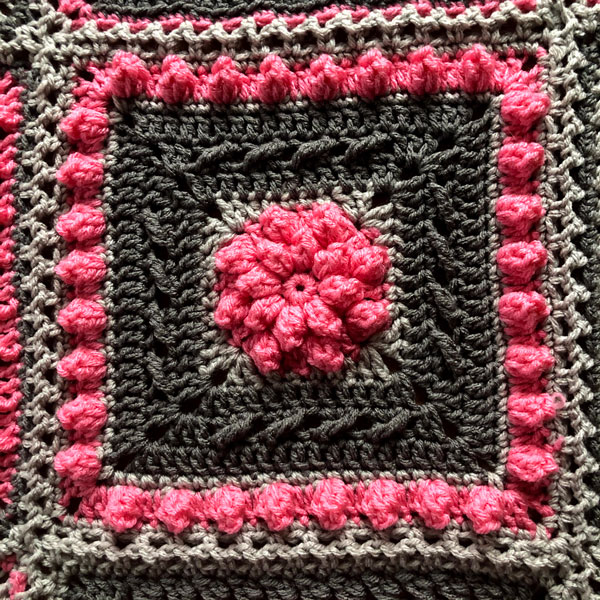
The Saturday Square features 2 unique textures. The popcorn stitch is done in the round to look like a flowery center. I also added a cross behind a grouping of stitches that is quite fun to do and looks nice at the end.
When you upload your project to The Crochet Crowd Stitch Social Group or Instagram, feel free to tag me so I can see what you have crocheted. Follow me on Instagram @ jeannestein or on Facebook. My designs can also be saved in your Ravelry favorites by following me HERE.

More Ideas
- Crochet a Quick & Easy Baby Blanket Pattern
- Crochet Chevron One Big Cake Bag Pattern
- Crochet Hugs & Kisses Starshine Blanket Pattern
Tutorial
Saturday Square
Size U.S. J/10 (6.0 mm) crochet hook.
Measurements Approx 10” x 10” per square.
Abbreviations List
- Beg = Begin(ning)
- BLO = Back loop only
- Ch = Chain
- Cl = Cluster
- Dc = Double crochet
- Dc2tog = Double crochet 2 together
- Dtr = Double treble crochet
- FLO = Front loop only
- Hdc = Half double crochet
- Pc = Popcorn* see below
- Rem = Remain
- Rep = Repeat
- Rnd(s) = Round(s)
- RS = Right side
- Sc = Single crochet
- Sk = Skip
- Sl st = Slip stitch
- Sp = Space
- St(s) = Stitch(es)
- Tr = Treble crochet
- Trbp = Treble crochet back post
- Trfp = Treble crochet front post
- Yoh = Yarn over hook
Popcorn = Work 4 dc into same st or sp, drop loop from hook, insert hook from front to back into first dc of 4 dc group, pull dropped loop through st, ch 1 to secure popcorn.
Standing Sc = Form slip knot and insert onto the hook. Insert hook into st, yoh and pull loop through, yoh through 2 loops.
INSTRUCTIONS
1st rnd: (RS) With color A, ch 2, 8 sc in 2nd ch from hook, join with sl st to first sc. 8 sc.
2nd rnd: Ch 3 (counts as dc here and throughout), 1 pc in same st, *(1 dc, 1 pc) in next st; rep from * around, join with sl st to top of ch-3. 8 dc, 8 pc.
3rd rnd: Ch 3, 1 pc in same st, 1 dc in next st, *[(1 dc, 1 pc) in next st, 1 dc in next st]; rep from * around, join with sl st to top of ch-3. Break A. 16 dc, 8 pc.
4th rnd: Attach B to any dc with a sl st, ch 3, 1 dc in same st, *1 hdc in next st, 1 sc in next 3 sts, 1 hdc in next st,** (2 dc, ch 2, 2 dc) in next st; rep from * twice, then from * to ** once, 2 dc in first st, join with hdc to top of ch-3 (hdc counts as a ch-2 sp). Break B. 4 dc, 2 hdc, 3 sc per side, 4 ch-2 corners.
5th rnd: Attach C to any ch-2 sp with a sl st, ch 3, 1 dc in same sp, *1 dc in each st to corner,** (2 dc, ch 2, 2 dc) in ch-2 sp; rep from * twice, then from * to ** once, 2 dc in beg sp, join with hdc to top of ch-3. 13 dc per side.
6th rnd: Ch 3, 1 dc in same sp, *1 dc in next st, [sk 2 sts, 1 tr in next st, working behind tr, 1 dc in 2 skipped sts] to corner,** (2 dc, ch 2, 2 dc) in ch-2 sp; rep from * twice, then from * to ** once, 2 dc in beg sp, join with hdc to ch-3. 17 sts per side.
7th rnd: Ch 3, 1 dc in same sp, *1 dc in each st to corner,** (2 dc, ch 2, 2 dc) in 2 sp; rep from * twice, then from * to ** once, 2 dc in beg sp, join with hdc to beg ch-3. Break C. 21 dc per side.
8th rnd: Attach B to any ch-2 sp with a standing sc, *1 sc in each st to corner,** (1 sc, ch 2, 1 sc) in ch-2 sp; rep from * twice, then from * to ** once, 1 sc in beg sp, join with hdc to beg sc. Break B. 23 sc per side.
9th rnd: Attach A to any ch-2 sp with a sl st, ch 3, 1 dc in same sp, *1 dc in next st, 1 pc in next st, [1 dc in next 2 sts, 1 pc in next st] to corner,** (2 dc, ch 2, 2 dc) in ch-2 sp; rep from * twice, then from * to ** once, 2 dc in beg sp, join with hdc to ch-3. Break A. 8 pc, 19 dc per side.
10th rnd: Attach B to any ch-2 sp with a standing sc, *1 sc in each st to corner,** (1 sc, ch 2, 1 sc) in ch-2 sp; rep from * twice, then from * to ** once, 1 sc in beg sp, join with hdc to beg sc. Fasten off. 29 sc per side.
7 Day Sampler Afghan Squares
[the_grid name="7 Day Afghan"]
Patricia Griffith says
I'm confused on the Sunday Square, 6th rnd: Ch 3, 1 dc in same sp, *sk 2 dc, 3 dc BEFORE next dc, [sk 3 dc, 3 dc BEFORE next dc] 3 times, sk 2 dc **......and so on.
3 DC BEFORE next dc, usually it says 3 dc IN next dc. I don't understand the BEFORE next dc. Can you explain please? Thank you!
Jeanne says
It's like working a granny square, where you crochet in the gap between 3 dc groups. I would suggest watching Mikey's video and it will show exactly where to place the stitches.