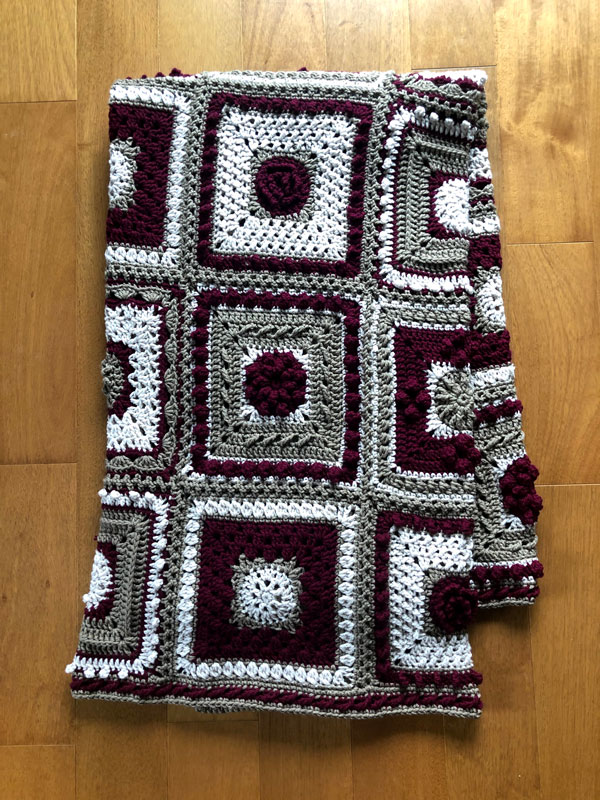
Crochet, a full blanket or baby-size blanket with this free pattern, is called the Crochet 7-Day Stitch Sampler Afghan by Jeanne Steinhilber. We used Red Heart With Love; each square is 10" x 10".
The goal was to provide texture for each of the motifs. If you don't like a motif, leave it out and substitute it with another one. You are the artist. Below is a baby size with a recommendation for the number of squares and the big blanket version.
The instructions have been combined into a 14-page Crochet Blanket Downloadable PDF. Each written pattern also has a supporting tutorial to follow to be able to follow along.
Remember, the colour recommendations are just that, recommendations. Use colours and yarn you love and complete a blanket in 7 days. Just keep in mind it's not a race. When you find time, grab a square and turn on the TV to hook away.
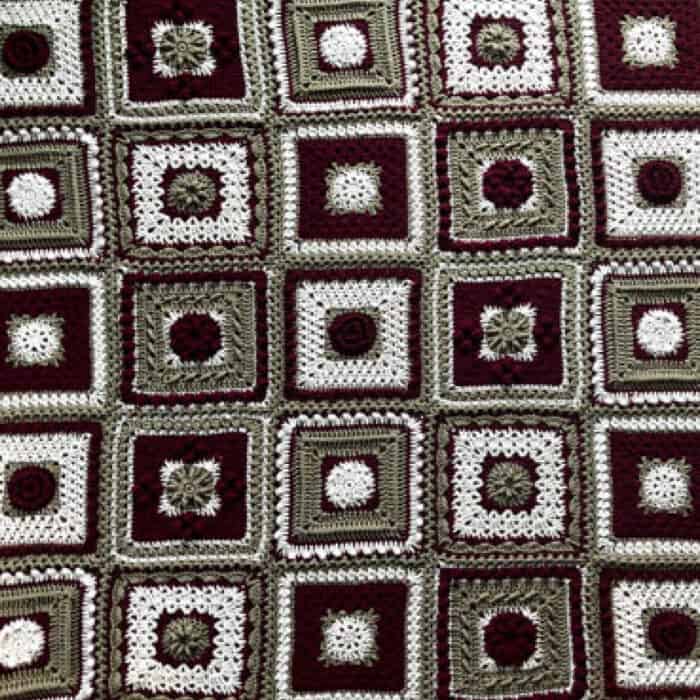
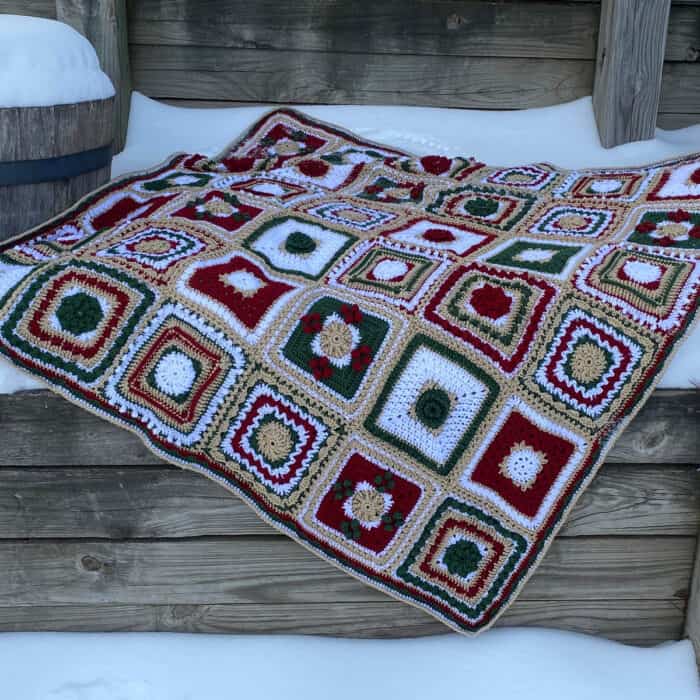
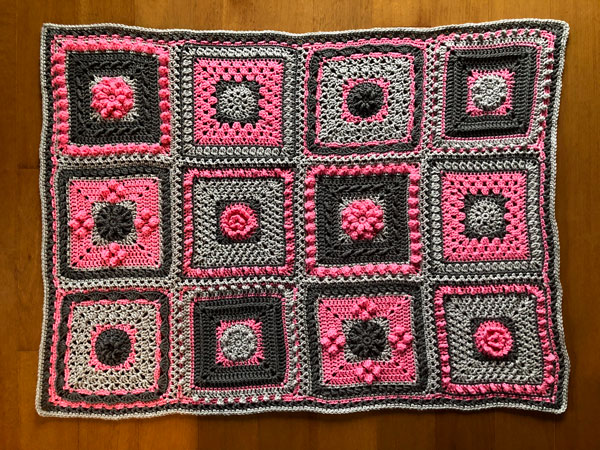
I have completed 2 sizes of the afghan. The full size is 55" X 66" and the baby size is 33" x 44". The full size uses 5 of each motif, while the baby size uses only 2 of each one. Don't be afraid, I have a fast and simple joining method you will just love. But if not, feel free to use you favorite join and border to create you own look.
7 Day Sampler Afghan
Full Size Afghan
Red Heart® With Love™ (198 g/7 oz, 338 meters/370 yards)
- Color A - Merlot - 3 balls
- Color B - Stone - 2 balls
- Color C - Taupe - 3 balls
Size U.S. J/10 (6.0 mm) crochet hook.
Measurements Approx 10” x 10” per square. Finished blanket 55” X 66” [140 x 168 cm].
Crochet 5 of each of the 6 squares.
Baby Size Afghan
Red Heart® With Love™ (198 g/7 oz, 338 meters/370 yards)
- Color A - Bubblegum - 1 ball
- Color B - Light Grey - 1 ball
- Color C - Pewter - 1 ball
Size U.S. J/10 (6.0 mm) crochet hook.
Measurements Approx 10” x 10” per square. Finished blanket 33” X 44” [84 x 112 cm].
Crochet 2 of each of the 6 squares.
Abbreviations for All Squares
Beg = Begin(ning)
BLO = Back loop only
Ch = Chain
Cl = Cluster
Dc = Double crochet
Dc2tog = Double crochet 2 together
Dtr = Double treble crochet
FLO = Front loop only
Hdc = Half double crochet
Pc = Popcorn
Rem = Remain
Rep = Repeat
Rnd(s) = Round(s)
RS = Right side
Sc = Single crochet
Sk = Skip
Sl st = Slip stitch
Sp = Space
St(s) = Stitch(es)
Tr = Treble crochet
Trbp = Treble crochet back post
Trfp = Treble crochet front post
Yoh = Yarn over hook
Special stitches, if applicable will be listed with each square.
.
.
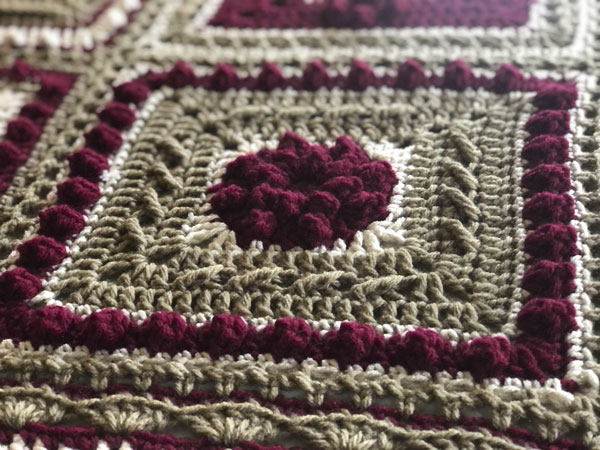
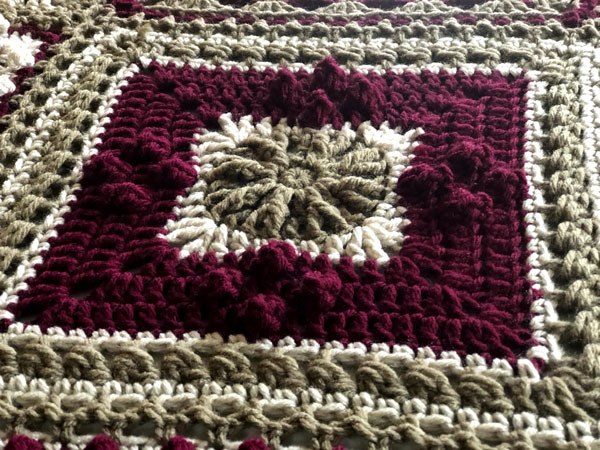
Saturday - Day 1 Square
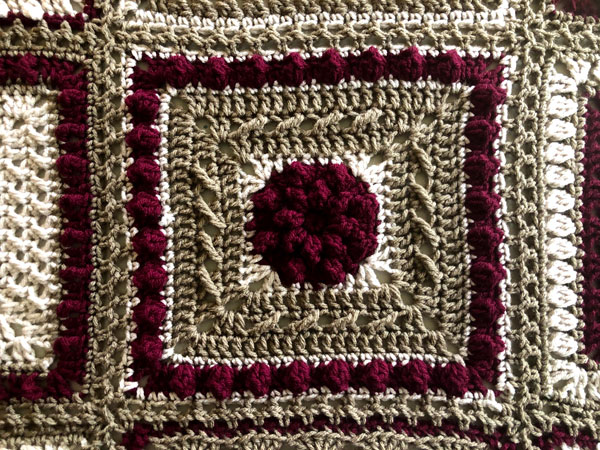
Special Stitches for this square.
Popcorn = Work 4 dc into same st or sp, drop loop from hook, insert hook from front to back into first dc of 4 dc group, pull dropped loop through st, ch 1 to secure popcorn.
Standing Sc = Form slip knot and insert onto the hook. Insert hook into st, yoh and pull loop through, yoh through 2 loops.
Tutorial for this Square
Instructions
Make 5 squares.
1st rnd: (RS) With color A, ch 2, 8 sc in 2nd ch from hook, join with sl st to first sc. 8 sc.
2nd rnd: Ch 3 (counts as dc here and throughout), 1 pc in same st, *(1 dc, 1 pc) in next st; rep from * around, join with sl st to top of ch-3. 8 dc, 8 pc.
3rd rnd: Ch 3, 1 pc in same st, 1 dc in next st, *[(1 dc, 1 pc) in next st, 1 dc in next st]; rep from * around, join with sl st to top of ch-3. Break A. 16 dc, 8 pc.
4th rnd: Attach B to any dc with a sl st, ch 3, 1 dc in same st, *1 hdc in next st, 1 sc in next 3 sts, 1 hdc in next st,** (2 dc, ch 2, 2 dc) in next st; rep from * twice, then from * to ** once, 2 dc in first st, join with hdc to top of ch-3 (hdc counts as a ch-2 sp). Break B. 4 dc, 2 hdc, 3 sc per side, 4 ch-2 corners.
5th rnd: Attach C to any ch-2 sp with a sl st, ch 3, 1 dc in same sp, *1 dc in each st to corner,** (2 dc, ch 2, 2 dc) in ch-2 sp; rep from * twice, then from * to ** once, 2 dc in beg sp, join with hdc to top of ch-3. 13 dc per side.
6th rnd: Ch 3, 1 dc in same sp, *1 dc in next st, [sk 2 sts, 1 tr in next st, working behind tr, 1 dc in 2 skipped sts] to corner,** (2 dc, ch 2, 2 dc) in ch-2 sp; rep from * twice, then from * to ** once, 2 dc in beg sp, join with hdc to ch-3. 17 sts per side.
7th rnd: Ch 3, 1 dc in same sp, *1 dc in each st to corner,** (2 dc, ch 2, 2 dc) in 2 sp; rep from * twice, then from * to ** once, 2 dc in beg sp, join with hdc to beg ch-3. Break C. 21 dc per side.
8th rnd: Attach B to any ch-2 sp with a standing sc, *1 sc in each st to corner,** (1 sc, ch 2, 1 sc) in ch-2 sp; rep from * twice, then from * to ** once, 1 sc in beg sp, join with hdc to beg sc. Break B. 23 sc per side.
9th rnd: Attach A to any ch-2 sp with a sl st, ch 3, 1 dc in same sp, *1 dc in next st, 1 pc in next st, [1 dc in next 2 sts, 1 pc in next st] to corner,** (2 dc, ch 2, 2 dc) in ch-2 sp; rep from * twice, then from * to ** once, 2 dc in beg sp, join with hdc to ch-3. Break A. 8 pc, 19 dc per side.
10th rnd: Attach B to any ch-2 sp with a standing sc, *1 sc in each st to corner,** (1 sc, ch 2, 1 sc) in ch-2 sp; rep from * twice, then from * to ** once, 1 sc in beg sp, join with hdc to beg sc. Fasten off. 29 sc per side.
Sunday - Day 2 Square
Special stitches for this square.
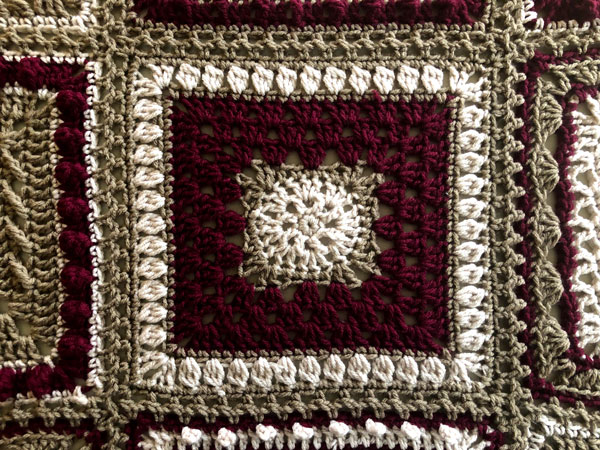
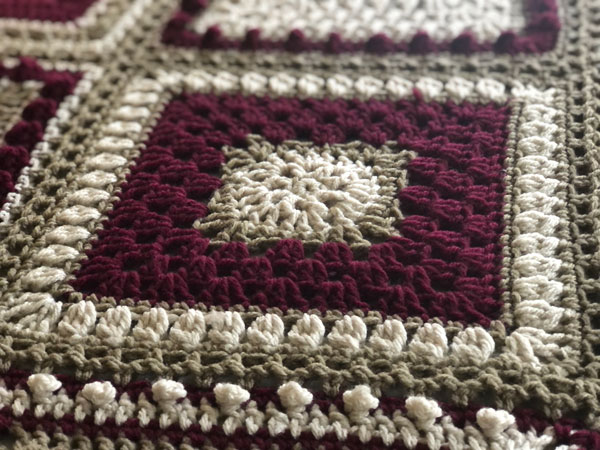
Cluster = Double crochet 3 together in same st or sp.
Standing Sc = Form slip knot and insert onto the hook. Insert hook into st, yoh and pull loop through, yoh through 2 loops.
Tutorial for this Square
Instructions
Make 5 squares.
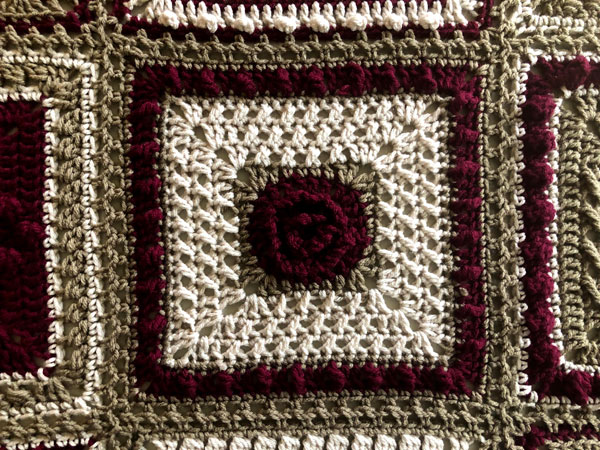
1st rnd: (RS) With color B, ch 2, 8 sc in 2nd ch from hook, join with sl st to first sc. 8 sc.
2nd rnd: Ch 4 (counts as 1 dc and ch 1 sp), (1 dc, ch 1) in each st around, join with sl st to top of ch-3. 8 dc, 8 ch-1 sps.
3rd rnd: Sl st into ch-1 sp, ch 3, 2 dc in same sp, 3 dc in each ch-1 sp around, join with sl st to top of ch-3. Break B. 24 sts.
4th rnd: Attach C to any dc with a sl st, ch 3, 1 dc in same st, *1 hdc in next st, 1 sc in next 3 sts, 1 hdc in next st,** (2 dc, ch 2, 2 dc) in next st; rep from * twice, then from * to ** once, 2 dc in first st, join with hdc to top of ch-3. Break C. 4 dc, 2 hdc, 3 sc per side, 4 ch-2 corners.
5th rnd: Attach A to any ch-2 sp with a sl st, ch 3, 1 dc in same sp, *sk 1 dc, 3 dc in next dc, [sk 2 dc, 3 dc in next dc] twice, sk 1 dc,** (2 dc, ch 2, 2 dc) in ch-2 sp; rep from * twice, then from * to ** once, 2 dc in beg sp, join with hdc to top of ch-3. 13 dc per side.
6th rnd: Ch 3, 1 dc in same sp, *sk 2 dc, 3 dc before next dc, [sk 3 dc, 3 dc before next dc] 3 times, sk 2 dc,** (2 dc, ch 2, 2 dc) in ch-2 sp; rep from * twice, then from * to ** once, 2 dc in beg sp, join with hdc to ch-3. 16 dc per side.
7th rnd: Ch 3, 2 dc in same sp, *sk 2 dc, 3 dc before next dc, [sk 3 dc, 3 dc before next dc] 4 times, sk 2 dc,** (3 dc, ch 2, 3 dc) in 2 sp; rep from * twice, then from * to ** once, 3 dc in beg sp, join with hdc to beg ch-3. Break A. 21 dc per side.
8th rnd: Attach C to any ch-2 sp with a standing sc, *1 sc in each st to corner,** (1 sc, ch 2, 1 sc) in ch-2 sp; rep from * twice, then from * to ** once, 1 sc in beg sp, join with hdc to beg sc. Break C. 23 sc per side.
9th rnd: Attach B to any ch-2 sp with a sl st, ch 3, 1 dc in same sp, *ch 1, sk 1 st, [1 cl in next st, ch 1, sk 1] to corner,** (2 dc, ch 2, 2 dc) in ch-2 sp; rep from * twice, then from * to ** once, 2 dc in beg sp, join with hdc to ch-3. Break B. 11 cl, 4 dc per side.
10th rnd: Attach C to any ch-2 sp with a standing sc, *1 sc in each st and ch-1 sp to corner,** (1 sc, ch 2, 1 sc) in ch-2 sp; rep from * twice, then from * to ** once, 1 sc in beg sp, join with hdc to beg sc. Fasten off. 29 sc per side.
Monday - Day 3 Square
Special Stitches for this Square
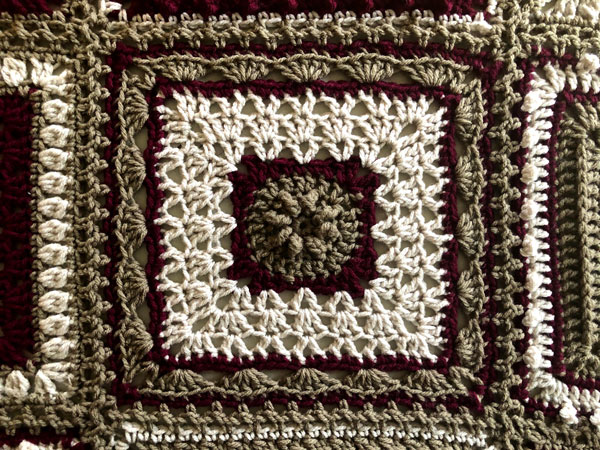
V-st = Work 1 dc, ch 1, 1 dc all in same st or sp.
Standing Sc = Form slip knot and insert onto the hook. Insert hook into st, yoh and pull loop through, yoh through 2 loops.
Tutorial for this Square
Instructions
Make 5 squares.
1st rnd: (RS) With color C, ch 2, 8 sc in 2nd ch from hook, join with sl st to first sc. 8 sc.
2nd rnd: Ch 3, 1 dtr in same st, [1 dc, 1 dtr] in each st around, join with sl st to top of ch-3. 8 dc, 8 dtr.
3rd rnd: Ch 3, 1 dc in same st, 1 dc in next st, [2 dc in next st, 1 dc in next st]; rep from * around, join with sl st to top of ch-3. Break C. 24 dc.
4th rnd: Attach A to any dc with a sl st, ch 3, 1 dc in same st, *1 hdc in next st, 1 sc in next 3 sts, 1 hdc in next st,** (2 dc, ch 2, 2 dc) in next st; rep from * twice, then from * to ** once, 2 dc in first st, join with hdc to top of ch-3. Break A. 4 dc, 2 hdc, 3 sc per side, 4 ch-2 corners.
5th rnd: Attach B to any ch-2 sp with a sl st, ch 3, 1 dc in same sp, *sk next st, [v-st in next st, sk 2 sts] twice, v-st in next st, sk last st,** (2 dc, ch 2, 2 dc) in ch-2 sp; rep from * twice, then from * to ** once, 2 dc in beg sp, join with hdc to top of ch-3. 3 v-st, 4 dc per side.
6th rnd: Ch 3, *3 dc in next st, [sk 2 sts, 3 dc in ch-1 sp] until 3 sts rem, sk 2 sts, 3 dc in last st,** (1 dc, ch 2, 1 dc) in ch-2 sp; rep from * twice, then from * to ** once, 1 dc in beg sp, join with hdc to ch-3. 17 dc per side.
7th rnd: Ch 3, 1 dc in same sp, *1 dc in next st, sk 1 st, v-st in next st, [sk 2 sts, v-st in next st] until 2 sts rem, sk 1 st, 1 dc in last st,** (2 dc, ch 2, 2 dc) in 2 sp; rep from * twice, then from * to ** once, 2 dc in beg sp, join with hdc to beg ch-3. Break B. 5 v-st, 6 dc per side.
8th rnd: Attach A to any ch-2 sp with a standing sc, *1 sc in each st and ch-1 sp to corner,** (1 sc, ch 2, 1 sc) in ch-2 sp; rep from * twice, then from * to ** once, 1 sc in beg sp, join with hdc to beg sc. Break A. 23 sc per side.
9th rnd: Attach C to any ch-2 sp with a sl st, ch 3, *sk 1 st, 5 dc in next st, [sk 4 sts, 5 dc in next st] 4 times, sk last st,** (1 dc, ch 2, 1 dc) in ch-2 sp; rep from * twice, then from * to ** once, 1 dc in beg sp, join with hdc to ch-3. Break C. 27 dc per side.
10th rnd: Attach A to any ch-2 sp with a standing sc, *working in BLO, 1 sc in each st to corner,** (1 sc, ch 2, 1 sc) in ch-2 sp; rep from * twice, then from * to ** once, 1 sc in beg sp, join with hdc to beg sc. Fasten off. 29 sc per side.
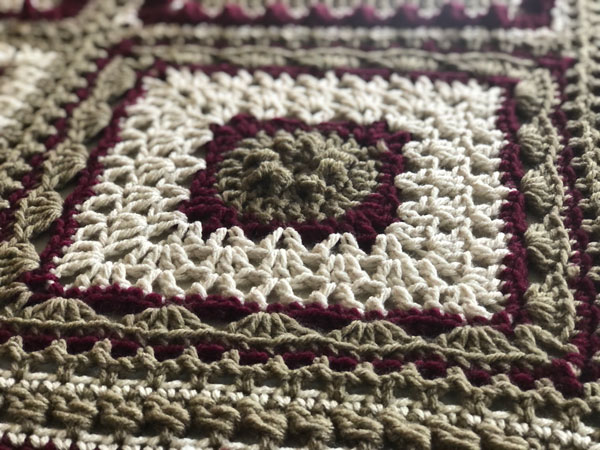
Tuesday - Day 4 Square
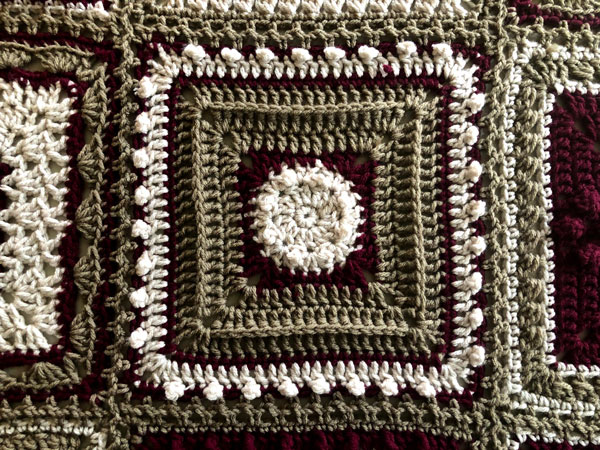
Special Stitches for this Square
Picot = Ch 4, sl st back into the last st worked.
Standing Sc = Form slip knot and insert onto the hook. Insert hook into st, yoh and pull loop through, yoh through 2 loops.
Tutorial for this Square
Instructions
Make 5 squares.
1st rnd: (RS) With color B, ch 2, 8 sc in 2nd ch from hook, join with sl st to first sc. 8 sc.
2nd rnd: Ch 3, 1 dc in same st, picot, (2 dc, picot) in each st around, join with sl st to top of ch-3. 16 dc, 8 picot.
3rd rnd: Ch 3, 2 dc in same sp, sk next st, [3 dc in next st, sk next st] around, join with sl st to top of ch-3. Pushe picots from previous round to RS. Break B. 24 dc.
4th rnd: Attach A to any dc with a sl st, ch 3, 1 dc in same st, *1 hdc in next st, 1 sc in next 3 sts, 1 hdc in next st,** (2 dc, ch 2, 2 dc) in next st; rep from * twice, then from * to ** once, 2 dc in first st, join with hdc to top of ch-3. Break A. 4 dc, 2 hdc, 3 sc per side, 4 ch-2 corners.
5th rnd: Attach C to any ch-2 sp with a sl st, ch 3, 1 dc in same sp, *1 dc in each st to corner,** (2 dc, ch 2, 2 dc) in ch-2 sp; rep from * twice, then from * to ** once, 2 dc in beg sp, join with hdc to top of ch-3. 13 dc per side.
6th rnd: Ch 3, 1 dc in same sp, *1 dc in each st to corner,** (2 dc, ch 2, 2 dc) in ch-2 sp; rep from * twice, then from * to ** once, 2 dc in beg sp, join with hdc to top of ch-3. 17 dc per side.
7th rnd: Ch 3, 1 dc in same sp, *1 trbp in each st to corner,** (2 dc, ch 2, 2 dc) in 2 sp; rep from * twice, then from * to ** once, 2 dc in beg sp, join with hdc to beg ch-3. Break C. 21 dc per side.
8th rnd: Attach A to any ch-2 sp with a standing sc, *1 sc in each st to corner,** (1 sc, ch 2, 1 sc) in ch-2 sp; rep from * twice, then from * to ** once, 1 sc in beg sp, join with hdc to beg sc. Break A. 23 sc per side.
9th rnd: Attach B to any ch-2 sp with a sl st, ch 3, 1 dc in same sp, *1 dc in next st, picot, [1 dc in next 3 sts, picot] until 1 st rem, 1 dc in last st,** (2 dc, ch 2, 2 dc) in ch-2 sp; rep from * twice, then from * to ** once, 2 dc in beg sp, join with hdc to ch-3. Break B. 27 dc, 8 picots per side.
10th rnd: Attach A to any ch-2 sp with a standing sc, *1 sc in each st (pushing picots to RS) to corner,** (1 sc, ch 2, 1 sc) in ch-2 sp; rep from * twice, then from * to ** once, 1 sc in beg sp, join with hdc to beg sc. Fasten off. 29 sc per side.
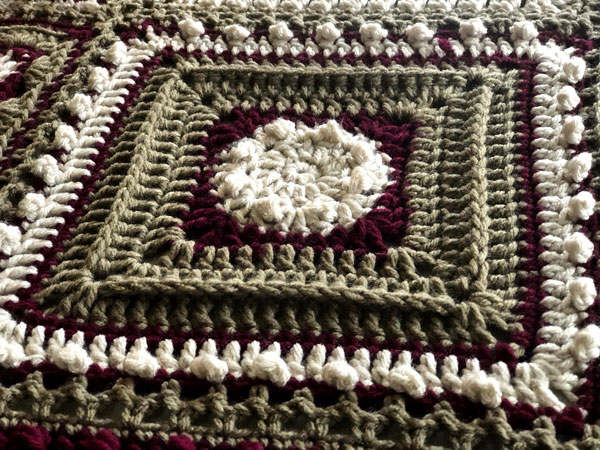
Wednesday - Day 5 Square
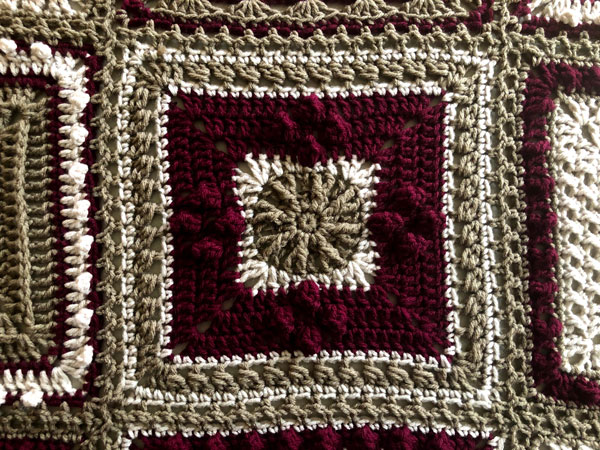
Special stitches used for this square.
Popcorn = Work 4 dc into same st or sp, drop loop from hook, insert hook from front to back into first dc of 4 dc group, pull dropped loop through st, ch 1 to secure popcorn.
Standing Sc = Form slip knot and insert onto the hook. Insert hook into st, yoh and pull loop through, yoh through 2 loops.
Tutorial for this Square
Instructions
Make 5 squares.
1st rnd: (RS) With color C, ch 2, 8 sc in 2nd ch from hook, join with sl st to first sc. 8 sc.
2nd rnd: Ch 3, 1 dc in same st, 2 dc in each st around, join with sl st to top of ch-3. 16 sts.
3rd rnd: Ch 3, 2 trfp in next st, *[1 dc in next st, 2 trfp in next st]; rep from * around, join with sl st to top of ch-3. Break C. 24 sts.
4th rnd: Attach B to any dc with a sl st, ch 3, 1 dc in same st, *1 hdc in next st, 1 sc in next 3 sts, 1 hdc in next st,** (2 dc, ch 2, 2 dc) in next st; rep from * twice, then from * to ** once, 2 dc in first st, join with hdc to top of ch-3. Break B. 4 dc, 2 hdc, 3 sc per side, 4 ch-2 corners.
5th rnd: Attach A to any ch-2 sp with a sl st, ch 3, 1 dc in same sp, *1 dc in next 4 sts, 1 pc in next st, 1 dc in next 4 sts,** (2 dc, ch 2, 2 dc) in ch-2 sp; rep from * twice, then from * to ** once, 2 dc in beg sp, join with hdc to top of ch-3. 12 dc, 1 pc per side.
6th rnd: Ch 3, 1 dc in same sp, *1 dc in next 4 sts, 1 pc in next st, 1 dc in next 3 sts, 1 pc in next st, 1 dc in next 4 sts,** (2 dc, ch 2, 2 dc) in ch-2 sp; rep from * twice, then from * to ** once, 2 dc in beg sp, join with hdc to ch-3. 15 dc, 2 pc per side.
7th rnd: Ch 3, 1 dc in same sp, *1 dc in next 8 sts, 1 pc in next st, 1 dc in next 8 sts,** (2 dc, ch 2, 2 dc) in 2 sp; rep from * twice, then from * to ** once, 2 dc in beg sp, join with hdc to beg ch-3. Break A. 20 dc, 1 pc per side.
8th rnd: Attach B to any ch-2 sp with a standing sc, *1 sc in each st to corner,** (1 sc, ch 2, 1 sc) in ch-2 sp; rep from * twice, then from * to ** once, 1 sc in beg sp, join with hdc to beg sc. Break B. 23 sc per side.
9th rnd: Attach C to any ch-2 sp with a sl st, ch 3, 1 dc in same sp, *[1 dc in next st, dc2tog around post of previous dc, sk next st] 11 times, 1 dc in last st,** (2 dc, ch 2, 2 dc) in ch-2 sp; rep from * twice, then from * to ** once, 2 dc in beg sp, join with hdc to ch-3. Break C. 27 sts per side.
10th rnd: Attach B to any ch-2 sp with standing sc, *1 sc in each st to corner,** (1 sc, ch 2, 1 sc) in ch-2 sp; rep from * twice, then from * to ** once, 1 sc in beg sp, join with hdc to beg sc. Fasten off. 29 sc per side.
Thursday - Day 6 Square
Special stitches used for this square.
Standing Sc = Form slip knot and insert onto the hook. Insert hook into st, yoh and pull loop through, yoh through 2 loops.
Tutorial for this Square
Instructions
1st rnd: (RS) With color A, ch 2, 8 sc in 2nd ch from hook, join with sl st to FLO of first sc. 8 sc.
2nd & 3rd rounds will circle the project twice each, first working in the front loops, then working in the back loops.
TIP: Place a stitch marker on the first stitch, which includes both loops of a stitch of rnd 2 A and 3 A. You will only be using the Front Loops Only for the A and then Back Loops Only for B. This will help you locate when to start 2 B and 3 B.
2nd A rnd: Ch 3, *sl st in FLO on next st, ch 3, rep from * 7 times , now work in BLO, sl st in of beg sc.
2nd B rnd: Work in back loops only of rnd 1. Ch 3, 1 dc in same st, 2 dc in each st around, join with sl st to FLO at top of beg ch-3. 16 dc, 8 ch-3 loops.
3rd A rnd: Ch 3, *sl st in FLO on next st, ch 3, rep from * 15 times , now work in BLO, sl st in beg dc.
3rd B rnd: Work in back loops only of rnd 2 B. Ch 3, 1 dc in same st, 1 dc in next st, [2 dc in next st, 1 dc in next st] around, join with sl st to top of ch-3. Break A. 24 dc, 16 ch-3 loops.
4th rnd: Attach C to any dc with a sl st, ch 3, 1 dc in same st, *1 hdc in next st, 1 sc in next 3 sts, 1 hdc in next st,** (2 dc, ch 2, 2 dc) in next st; rep from * twice, then from * to ** once, 2 dc in first st, join with hdc to top of ch-3 (hdc counts as a ch-2 sp). Break C. 4 dc, 2 hdc, 3 sc per side, 4 ch-2 corners.
5th rnd: Attach B to any ch-2 sp with a sl st, ch 3, 1 dc in same sp, *1 dc in next st, [sk next st, 1 dc in next st, 1 dc in skipped st] to corner,** (2 dc, ch 2, 2 dc) in ch-2 sp; rep from * twice, then from * to ** once, 2 dc in beg sp, join with hdc to top of ch-3. 13 dc per side.
6th rnd: Ch 3, 1 dc in same sp, *[sk next st, 1 dc next in next st, 1 dc in skipped st] until 1 st remains before corner, 1 dc in next st,** (2 dc, ch 2, 2 dc) in ch-2 sp; rep from * twice, then from * to ** once, 2 dc in beg sp, join with hdc to ch-3. 17 dc per side.
7th rnd: Ch 3, 1 dc in same sp, *1 dc in next st, [sk next st, 1 dc next in next st, 1 dc in skipped st] to corner,** (2 dc, ch 2, 2 dc) in 2 sp; rep from * twice, then from * to ** once, 2 dc in beg sp, join with hdc to beg ch-3. Break B. 21 dc per side.
8th rnd: Attach C to any ch-2 sp with a standing sc, *1 sc in each st to corner,** (1 sc, ch 2, 1 sc) in ch-2 sp; rep from * twice, then from * to ** once, 1 sc in beg sp, join with hdc to beg sc. Break C. 23 sc per side.
9th rnd: Attach A to any ch-2 sp with a sl st, ch 3, 1 dc in same sp, *1 dc in next st, 1 dtr in next st, [1 dc in next 2 sts, 1 dtr in next st] to corner,** (2 dc, ch 2, 2 dc) in ch-2 sp; rep from * twice, then from * to ** once, 2 dc in beg sp, join with hdc to ch-3. Break A. 8 dtr, 19 dc per side.
10th rnd: Attach C to any ch-2 sp with a standing sc, *1 sc in each st to corner,** (1 sc, ch 2, 1 sc) in ch-2 sp; rep from * twice, then from * to ** once, 1 sc in beg sp, join with hdc to beg sc. Fasten off. 29 sc per side.
Day 7 - Joining and Final Border
Zig Zag Horizontal and Vertical Joining
Be sure all motifs are right side up.
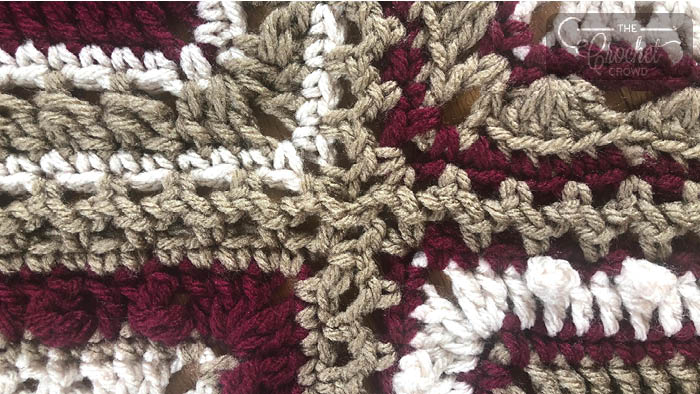
Join Motifs into 5 Strips, 6 Motifs long, as shown on diagram above as follows: Join C (for baby option, use B) in any corner ch-2 sp of first Motif. With WS tog, ch 1. 1 sc in corner ch-2 sp of second Motif. *Ch 1. Skip next st of first Motif. 1 sc in next st of first Motif. Ch 1. Skip next st of second Motif. 1 sc in next st of second Motif. Rep from * to end of row, always working into corner ch 2 sps.
Tutorial for Joining and Border
Final Border
1st rnd: Attach C (for baby option, use A) to any ch-2 sp with a standing sc, *1 sc in each st to corner, working evenly into the joins between the squares,** (1 sc, ch 2, 1 sc) in ch-2 sp; rep from * twice, then from * to ** once, 1 sc in beg sp, join with hdc to beg sc. Break yarn.
Full Size
2nd rnd: Attach A to any ch-2 sp with a sl st, ch 3, 1 dc in same sp, *[sk 2 sts, 1 tr in next st, working behind tr, 1 dc in 2 skipped sts] to corner (adjust with an extra dc if necessary),** (2 dc, ch 2, 2 dc) in ch-2 sp; rep from * twice, then from * to ** once, 2 dc in beg sp, join with hdc to ch-3.
Baby Size
2nd rnd: Attach C to any ch-2 sp with a sl st, ch 3, 1 dc in same sp, *sk next st, [v-st in next st, sk 2 sts] to corner (adjust with an extra dc if necessary),** (2 dc, ch 2, 2 dc) in ch-2 sp; rep from * twice, then from * to ** once, 2 dc in beg sp, join with hdc to top of ch-3.
3rd rnd: Attach C (for baby option, use B) to any ch-2 sp with a standing sc, *1 sc in each st and/or sp to corner,** (3 sc) in ch-2 sp; rep from * twice, then from * to ** once, 2 sc in beg sp, sl st to beg sc. Fasten off.
Enjoy your new blanket.
Community Submissions
See what other community members have done with this unique fun 7-Day Crochet Blanket Pattern.

nancy says
Grid
Mikey says
Thanks