
Crochet Chevron One Big Cake Bag Pattern
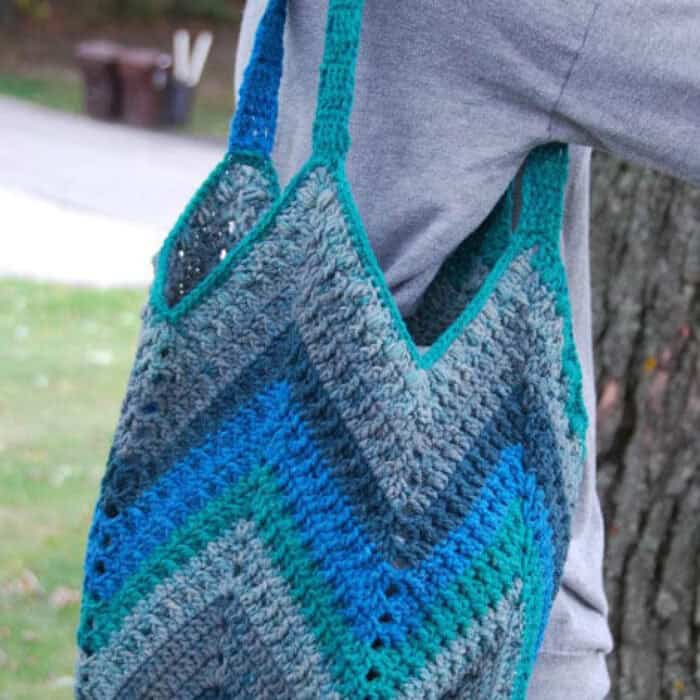
This is the Crochet One Big Cake Chevron Bag. I love to crochet with self-striping yarn. The Caron Big Cakes is great because the ball size is so generous you can make a nice tote or market bag without having to change colors and yet still have the pretty striped effect. I made this bag using Shadowberry because I think it looks great with a pair of blue jeans.

Chevron One Big Cake Bag
- Caron Big Cake
- Crochet Hook 4.5mm Size 7
Special Stitch: Puff stitch – Yo, pull up a lp, yo, pull up a lp, yo, pull up a lp, (should be 7 lps on hook), yo, pull thru 6 lps on hook, yo pull thru last 2.
The bag is made by starting with a solid dc square, then skipping stitches in the middle of the row to pull the square into a chevron.
Begin – Ch 5, sl st in first ch to form a ring.
Rnd 1 – Ch 3, into ring, 3 dc, ch 2, 4 dc, ch 2, 4 dc, ch 2, 4 dc, ch 1, sc to beg ch-3.
Rnd 2 – Ch 2, dc in sp, dc in each st to corner, (2 dc, ch 2, 2 dc) in ch-2 sp, rep all 4 sides to beg sp, 2 dc, ch 1, sc to beg ch-2.
Rnd 3 thru 11 – Rep rnd 2.
Begin chevron. You will be skipping 4 sts in the middle of each side to form the valley of the chevron. You will also want to start changing colors to stripe as desired.
Rnd 12 – Ch 2, dc in sp, *FPdc next st, dc in next st; rep * 8 more times, sk 4 sts, **dc in next st, FPdc in next st; rep ** to corner (2 dc, ch 2, 2 dc) in ch-2 sp, rep from * all 4 sides to beg sp, 2 dc, ch 1, sc to beg ch-2.
Rnd 13 – Ch 2, dc in sp, dc in next 18 sts, sk 4 sts, dc in next 18 sts to corner (2 dc, ch 2, 2 dc) in ch-2 sp; rep all 4 sides to beg sp, 2 dc, ch 1, sc to beg ch-2.
Rnd 14 thru 24 – Rep rnds 12 and 13.
Rnd 25 – Rep rnd 12.
Rnd 26 – Ch 2, dc in sp, *dc in next st, puff st in next st, dc in next st; rep * 5 more times, sk 4 sts, rep * 6 more times to corner (2 dc, ch 2, 2 dc) in ch-2 sp; rep all 4 sides to beg sp, 2 dc, ch 1, sc to beg ch-2.
Rnd 27 – Ch 1, sc in sp, sc in next 18 sts, sk 4 sts, sc in next 18 sts to corner, 3 sc in ch-2 sp, rep all 4 sides to beg sp, 2 sc in sp, sl st to beg sc. Break yarn.
Handles
Attach yarn with a sl st, one st to the right of any 3 sc corner group.
Handle row 1 – Ch 3, dc in next 4 sts. Turn.
Row 2 thru 34 – Ch 3, dc each st across. Turn.
Match stitches to the next corner and sl st to attach handle to corner.
Repeat handle on next two corners. Finish off.

No blue button
updated
No blue buttonn
updated
As everyone said, the pattern is not well written, and the stitch counts are incorrect. You start with 4, and you add 4 each side as you go around, so you end the increase at row 11 with 44 on each side… simple math. You then add 4 and decrease 4 after that, keeping the stitch count the same… 44 on each side, which means you need 10 FPDC followed by a DC, not 9… then skip 4… then 10 again. This makes it correct. It’s working out well for me after fixing this.
I’m using a different yarn weight and a 7mm hook. Can anyone tell me the measurements of the bag, please? At least the width.
Ok. People are having trouble with row 11… I went and did row 12 but what pattern said to do to row 11 I did at row 12. Turned out great. I have 5 bags done this way and starting on 6th bag. I’m using 2 strands 2 different colors and an I hook. Turning out great!
Are the first 11 rows supposed to be all wonky? I have the correct number of stitches and I am using a 4.5mm hook and trying to crochet as loosely as I can but it starts to wrinkle and twist into a spiral. Does this straighten out after row 11?
I think the pattern is in US terminology.
In the US dc is actually tr in UK.
I found that square wouldn’t flatten until I realised this and when I used to instead of dc, it was fine.
Yes, as Michael and Jeanne are in North America, all of the designs for The Crochet Crowd are in US terms
Hello, I also have been trying to work out this pattern for some time. Can you please add total stitch counts at the end of each round on the pattern? That would help us ensure we are on track.
Does anyone know how many stitches in the last round before you start the chevron?
I appreciate any help. Thank you
Rnd 1 = 16 dc
Rnd 2 = 32 dc
Rnd 3 = 48 dc
Rnd 4 = 64 dc
Rnd 5 = 80 dc
Rnd 6 = 96 dc
Rnd 7 = 112 dc
Rnd 8 = 128 dc
Rnd 9 = 144 dc
Rnd 10 = 160 dc
Rnd 11 = 176 dc
Hi Jeanne, thank you for the stitch count. When I divide 176 by 4 that means 44 stitches per side for round 11. That doesn’t seem to work with round 12, I also end up with 8 extra stitches unless I add a couple more repeats before skipping 4 stitches making it 20 stitches, skip 4, 20 stitches, then do the corner. Thank you for all your help and patterns!
Pattern is broken.
How is it broken?
PLEASE make a video of this! I have been trying and trying to do this and cannot get it to work. I’m sick of the constant frogging. I have no idea what I am doing wrong….I’m following the pattern and it looks great until round 12 then it all goes awry. I saw this and thought Oh what a nice quick project …something different ….boy was I wrong!
I’m dealing with the same concerns! Very frustrating
I agree that you have to skip around 11 in order to make the count match up for the rest of the pattern. Also I’m confused on rounds 14-24. It ends on a repeat of round 12 then Round 25 says to repeat round 12. So I did two rows of Round 12 it just looks a little off. Is that the correct way to do Round 25?
I’m having a lot of trouble making the connecting corners for rounds 2-10. All the others look like beautiful corners and the connecting one is round, like there’s too many stitches maybe? I wish there were pictures or a video
Can you please make a video for this bag. I am having issues with the pattern
Does Round 12 start in the corner? The beginning/end of my rounds 2-11 are in the middle of the sides so the instructions for round 12 don’t seem to work. Thanks!
Yes, all of the rounds should have started in the corner. Since yours didn’t, just break the yarn and start from a corner.
I’m surprised at how many people have had issues and yet there’s no reply to the main problem. Anyways.. I stopped the granny square at row 10 and instead of skipping 4 stitches, I skipped only 3. I have not finished the bag yet, but it feels like it might be working out better this way!
I too was surprised that there was no real answer to the main issue of stitch count…
I stopped the granny at row 10 as suggested here and by Rhonda Reid (below) and was able to get first row of the pattern to work, (FPDC in next st, 1DC in next st) x9 sk 4 sts (1DC in next st FPDC in next st) x9, now it fits nicely on each side, so hopefully the pattern will continue to progress properly …. Would still LOVE to see this done as a tutorial. Hint Hint, Mikey 😉
I answered and all of the stitch counts are here in the comments. I will add them when I convert this to a PDF. I’m so sorry.
Hi there I would love to do this pattern but I am having trouble after row 11 starting the pattern row I have 8 stitches left over and no matter how many times I’ve tried it’s remains the same what am I doing wrong ?
Can you email photos to me at [email protected] and I’ll see if I can help you.
I found that you only need to do 10 rounds before you start the Chevron. That will make the stitch count come out right when doing the Chevron pattern. (If you do 11 rounds, you have too many stitches.)
Is there a video tutorial for this bag. I have been working on it with no luck. Thank you.
I’m not sure if Mikey will be filming this. It depends on if he gets enough requests.
Please make a video! Such a pretty bag
I love the look of this bag but doesn’t the acrylic stretch over time. I think I might make it with some cotton in my stash. Great job and I love it.
That is exactly what I’m thinking, unless you line it.
When you start a new row (row 2 for example: chain 2, DC into the space, DC to corner) does your first DC go into the chain from the previous row or do you start your DC in the first real DC? My stitches aren’t adding up to the same as yours in the comments. I assume that after you do your first DC into the space that the DC acrossed the row should be even before you get to the corner, right? Or is that where I’m going wrong?
When you SC into the ch2 to join, you ch2, DC over the SC post, then DC into the same space as your sc join.
Hi! I’ve just made the bag and quite love it! I do have a question, though. My bag is super stretchy and almost doesn’t keep its shape like in your picture. Did I just crochet it too loose perhaps? Is lining it my best bet?
Lining it would be best but tension could be an issue as well.