
Crochet Tunic
This cute and intermediate crochet tunic isn't too difficult and has no shaping required. The tunic is strictly just 2 rectangular blocks put together and spaces left for the neck and armholes.
Once you get past the setup row, there is a repeat of 4 rows only. It will take you a bit getting used to this pattern. I found after a few repeats of doing rows 1 - 4, I was finally clicking with this pattern. I think that is part of what makes this an intermediate pattern.

Pattern Suggestions
- Crochet Summer Breeze Top Pattern
- Tops Free Crochet Patterns
- Crochet Watermelon Dress Pattern
- Crochet Cowl Pullover Sweater Pattern
- Crochet Poncho for Me and You Pattern + Tutorial
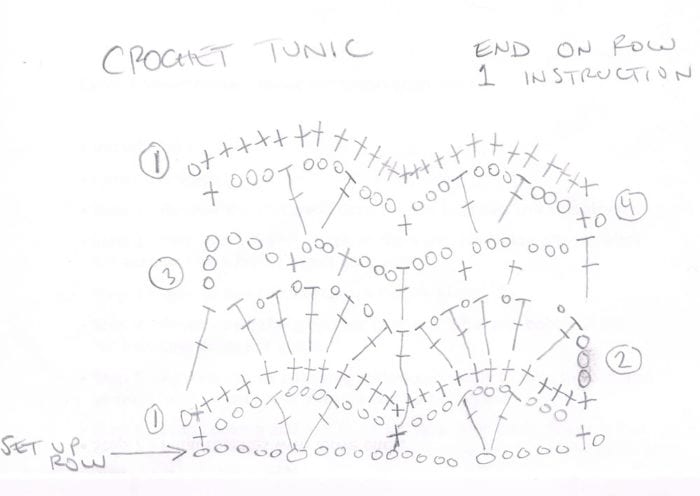
I created a homemade diagram that is demonstrated in the video tutorial. I have provided it below for you to save or print if you want to use it. I found it helped me tremendously speed up instead of continuously figuring out what row I was on. After a while, I was able to keep it close as a reference but started to remember the pattern and was flying along nicely.
In the video tutorial, I demonstrate the ins and outs of this pattern. I show you the stitch work to do. I filmed after one of the sides was completed so I could start the second on camera with you so I was familiar with this pattern. Seriously though, I could have had this particular project done in just two days. It took me roughly 9 hours from start to finish for this. It's not a lot of time investment. I crocheted both panels in just two evenings and did the assembly in person with you on camera.
You have to watch the gauge on this one. I was tight and it was tight on the mannequin though it shouldn't have been. However, once I sewed the items together and relaxed the yarn with my steamer, it fit the mannequin perfectly. So pay attention to the final instructions of dampening the project to block it. Or you can steam it as I did in the video tutorial to block it. Once it was steamed and relaxed, it really turned out nice. I was pleasantly surprised.
The colour changing I did was done on Rows 3 after the fan was put in on Row 2. Here's how many fans I did of each colour if you want to match it:
- 7 Fans for Orchid
- 2 Fans for Off White
- 4 Fans for Taupe
- 2 Fans for Cool Green
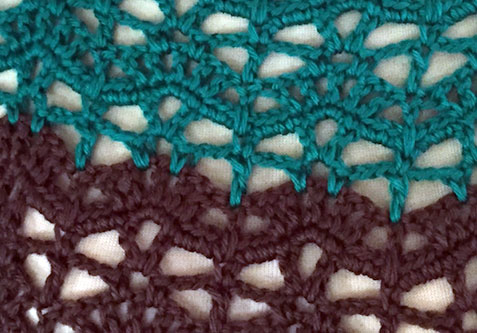
Mikey's Finished Example

Crochet Tunic Diagram by Mikey
Click on the pic to print, download and save.
Aileene says
Dear Mikey,
I've been trying to follow your tutorial for this wonderful tunic but I kept frogging it because whenever I do the row2, at the part where I have to DC on the stitch below, the chains right after it bunches outward. Even if I changed the hook into a bigger size, it is still doing the same. I wish I could show a picture to help you understand it better. Please help. Thank you.
Thais says
Aileene, I think there is a spot at the end of row 3 where Mikey tells us to dc into the "end of the row" and shows us how he stitches into the bottom of a chain of 3 when we really should be stitching into the top of the chain. That chain was the beginning of row 2 and mirrors the dc at the end of row 2. Would this make a difference in your work?
Alice Segundina L. Magadia says
your amazing!!! thanks for sharing your crochet pattern , I love it!!!
Erin OBryan says
Something I noticed and haven't watched the video. My G/6 hook is 4.25mm her's is 4mm. I'm certain mine is US???