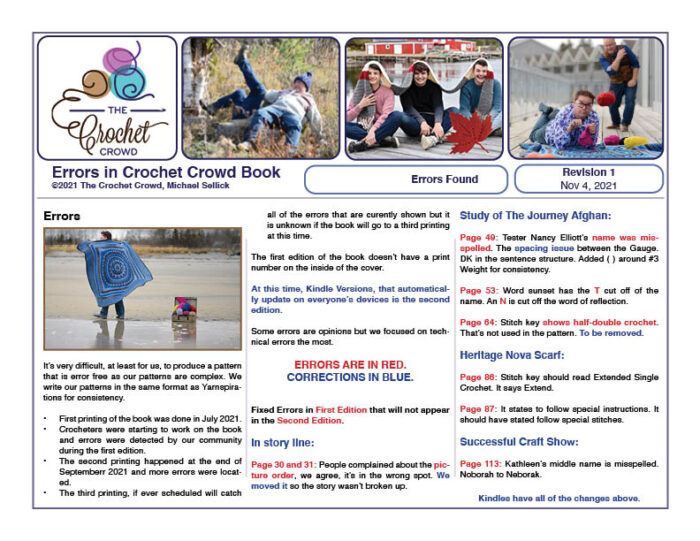
While it's fantastic to be accurate, with any crochet pattern and significant projects, it's easy to make a mistake. Here are the known mistakes and fixes for them. Professionally, this is known as errata.
Learn more about our Book and how to get it here.
First Printing July 2021 has the following known errors and fixes for them. These were fixed before the second printing on Sept 10, 2021.
Errors are in red with the corrections in blue.
DOWNLOAD CURRENT CORRECTIONS

Fixed for the Second Printing - September 10th, 2021
Page 30 and 31: People felt the order was wrong. Was moved in the book to not break up the story. This was intentional but people prefer it not be in its place. We agree with the assessment as well.
Page 49: Tester Nancy Elliott's name was misspelled. The spacing issue between the Gauge. DK in the sentence structure. Added ( ) around #3 Weight for consistency.
Page 53: Word sunset has the T cut off of the name. An N is cut off the word of reflection.
Page 64: Stitch key shows half-double crochet. That's not used in the pattern. To be removed.
Page 86: Stitch key should read Extended Single Crochet. It says Extend.
Page 87: It states to follow special instructions. It should have stated follow special stitches.
Page 113: Kathleen's middle name is misspelled. Noborah to Neborak.
To Be Fixed for Third Printing
These will be fixed before the third printing.
Page 52: 19th Rnd: With A, join with sl st to next ch 2 sp. Ch 1, *3 sc in each ch 2 space around. Join. Break. Turn. 240 sc.
Page 52: Diagram. The diagram shows the red arrow pointing with the shark fin reference. The first red arrow from the going right to left is pointing to the wrong stitch on rnd 19. It should be shifted over to the left 1 more stitch.
Page 53: 24th rnd: With A, join with standing sc 1 st before the join, 1 sc in next 4 sts, 1 sc in next st going through the space between the ch 3 and n9c next post of the first shark fin to pin it back. *1 sc in next 6 sts, 1 sc going through shark fin post first and next st together. Rep from * around. 1 sc in last 2 sts. Join. 280 sc.
Page 54: 31st rnd: Written instructions and diagram don't match at the end of the round. Written instructions are right. The diagram shows a half-double crochet join which you can still do but you will still need to fasten off. Assigning Daniel to fix diagram before 3rd printing.
Page 57: Diagram on Rnd 46 doesn't show a sc in the beg corner when you finish the rnd.
Page 58: Diagram showing Rnd 47. Skipped stitch not shown. There should be a skipping of a stitch right out of the corner and before the corner.
Page 61: Rep 5th to 24th rows, 8 more times. Should be, Rep 5th to 26th rows, 8 more times.
Page 67 - Baby Blanket With Love
To help you with stitch counts per side. The ch 1 spaces and slip stitches are not counted at the end of each of the instructions. So I am providing that here for your help. Stitch counts increase the ch 1 spaces and slip stitches per side.
I also put in the increase of what is going to happen in the next round so you can understand the increase when you do the repeats.
- Rnd 1 - 1 sts per side. Next rnd increases by 4.
- Rnd 2 - 5 sts per side. Next rnd increases by 2.
- Rnd 3 - 7 sts per side. Next rnd increases by 2.
- Rnd 4 - 9 sts per side. Next rnd increases by 4.
- Rnd 5 - 13 sts per side. Next rnd increases by 2.
- Rnd 6 - 15 sts per side. Next rnd increases by 2.
- Rnd 7 - 17 sts per side. Next rnd increases by 4.
- Rnd 8 - 21 sts per side. Next rnd increases by 2.
- Rnd 9 - 23 sts per side. Next rnd increases by 4.
- Rnd 10 - 25 sts per side. Next rnd increases by 4.
- Rnd 11 - 29 sts per side. Next rnd increases by 4.
- Rnd 12 - 33 sts per side. Next rnd increases by 4.
- Rnd 13 - 37 sts per side. Next rnd increases by 4.
- Rnd 14 - 41 sts per side. This includes the slip stitches. Next rnd increases by 2.
- Rnd 15 - 43 sts per side. Next rnd increases by 2.
- Rnd 16 - 45 sts per side. Next rnd increases by 2.
- Rnd 17 - 47 sts per side. Next rnd increases by 2.
- Rnd 18 - 49 sts per side. Next rnd increases by 4.
- Rnd 19 - 53 sts per side. Next rnd increases by 2.
- Rnd 20 - 55 sts per side. Next rnd increases by 4.
Repeating rounds 4 - 20 sts. Then rounds 4 - 15. Then round 8 once. Then complete the final border round.
Page 73: 2nd row: Ch 1. Working in front loops only, 1 sc in each of rst first 5 (6-7) sc. *Work 1 hdc into horizontal bar created below st in the previous row (bar is below loops normally worked – see diagram). Rep from * to end of row. Turn.
Page 85: USA and Metric dimensions are incorrect. [13" x 40", 101 cm x 100 cm] [13" x 151", 33 cm x 384 cm] Fringe is not included in measurement.
Page 89: 11th rnd: Ch 2, *1 dc in next 5 sts, 2 dc in next. Rep from * around. join with sl st to beg dc. 84 sts.
Page 108: There is double writing of the same text. Measurement approx 90 ” [ 228.5 cm ] long x 20 ” [ 50.5 cm ] wide . Gauge 17 sc and 20 rows = 4 ” [10 cm]. Remove one of them.
Page 109: 7th row: Ch 1, 1 sc in same st. * 5 sc in next ch 6 5 sp. 1 sc in next sc. Rep from * across. Turn. 397 sts.
Page 109: Rows 10 and 12 have 67 puff stitches per row, not 66.
Page 117: Remove Bp Back Post from the text. I put this in as I thought it would be helpful as it's a sub-abbreviation. Dc2tog in instructions refers to a back post that should be removed.
Page 117: Dtrcl Double Treble Cluster, Yoh twice and draw up a loop in next stitch. (Yoh and draw through 2 loops on hook) twice 3 times. Yoh twice and draw up a loop in same stitch. (Yoh and draw through 2 loops on hook) twice 3 times. Yoh and draw through all 3 loops on hook.
Page 119: Tr4tog Treble crochet 4 together, *Yoh twice and draw up a loop in next stitch. (Yoh and draw through 2 loops on hook) twice. Repeat from * once 3 times. Yoh and draw through all 3 5 loops on hook.
I will add any more that we find there.
Ruth Garcia says
Hello Mikey,
Love the book and the stories. At top of page 86 it says Bobblet Stitch. I thought at first it was a mistake and should be Bobble stitch. After reading the instructions, it sounds like a stitch similar to the Bobble but not identical. The additional instructions are a bit confusing. It says to start on the RS of the project so texture can be seen. The next sentence says the first row of bobblet sts will be worked on the WS. Could you clarify this please?
Thank you
Mikey says
This was Daniel's design. When you create this stitch. The natural texture automatically pops out to the back. So if you crochet on the RS, the natural pop will show up on the back of the project. 1st Row is RS... the Bobblet is 2nd Row which is the WS, this means the texture will pop out to the front of the project because you are crocheting it on the WS. I hope this helps.
When Daniel says to start the project on the RS, you will notice it's just a SC row... it's the 2nd row, where the Bobblet is that is on the WS which naturally pops out the back side, which in this case, would be the RS of the work. So crocheting the WS with this stitch would have the texture on the back of the project.
If you try this stitch, you will see what is meant and notice where the texture is.
Michael
Ashley Rose Johnson says
To Mikey Sellick,
Mikey you should be able to get a list of those who ordered your book from your publisher and you should be able to send the free corrected book out to them for the publishers mistakes and errors and misspellings. they need to be the ones to correct their mistake and send the buyers a corrected and right book. mistakes happen and I was one of those with a bad book and adding on sticky notes till they can replace it with a corrected book free and I am on your order list for sure.
Lucinda says
Thanks Mikey, I was stuck on the page 30, 31, I even had to turn it to continue reading but I’m still enjoying everything about it! Human as we are, we all make mistakes but such a great first book, the mistakes are minimal ??❤️?
Barbara Pavoni says
That would be nice. Now waiting for an answer to what I think is an error on page 56 = 40th round - there can't be two corner spaces at the same time!!
Mikey says
is this a new comment or based on the emails you sent last night? Sorry. I am confused.
Sue Kearney says
I've pre ordered mine cos I'm in the uk. I did have a note from Amazon the say it would be delayed. No problem with that but it's now unclear which print run mine will be from. I cant deal with so many errors (me bad but it set off my OCD ) any idea if i can find which print run I'm likely to get or should cancel and wait till the next print run has most of the fixers sorted out?
Mikey says
I would probably avoid buying my book. I'm unsure if I can provide an error-free book. It was one of my fears in deciding to write a book with so many instructions. It would be best if you just skip buying this book as I know there will be something. It won't set off your OCD then. 3rd Printing is expenses to have a price increase as Pulp and Paper Mill prices are skyrocketing.
Ashley Rose Johnson says
Mikey,
I would correct mine with the sticky note pads and make corrections there in my book so I knew where the correction is and I am very glad people are pointing things out to you and that helps others like me to add sticky notes to where there are errors and I don't write in my books but this is another helpful tool I wanted to point out for everyone