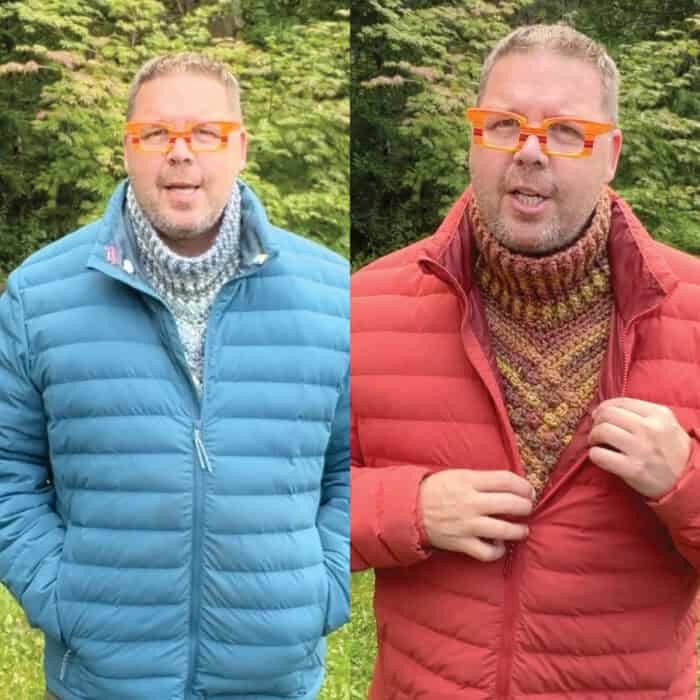
The Crochet Interwoven Cowl with a turtleneck. It's an easy-to-follow pattern using two balls of Bernat Symphony yarn in Maple or Sea Spray. If you keep building this out, it can be a shawl, but you must figure out the amount of yarn needed to make this adjustment.

I designed this in June 2024 and considered how to achieve a woven look on the front of the cowl. It took me several tries to get the sizing right, but I eventually nailed the formula.
You could build the interwoven section into a turtleneck poncho once the interwoven section is done. The interwoven cannot continue, but it would be a fabulous front square.

The free pattern has pictures and crochet diagrams to show you more detail.
Size: Average Adult
Bernat Symphony - 225 g/7.9 oz, 282 m/309 yds
Autumn Maple - 2 Balls, the tutorial version is Sea Spray.
Hook Size: 6.5 mm / K/10.5
GAUGE = 12 sc and 12 rows = 4” [10 cm]
Abbreviations List
- Approx = Approximately
- Beg = Beginning
- Ch = Chain(s)
- Hdc = Half double crochet
- Hdcbp = Half double crochet back post
- Hdcfp = Half double crochet front post
- Rep = Repeat
- RS = Right side
- Sc = Single crochet
- Sc2tog = Single Crochet 2 Together
- Sc3tog = Single Crochet 3 Together
- Sk = Skip
- Sl st = Slip stitch
- Sp(s) = Space(s)
- St(s) = Stitch(es)
- WS = Wrong side
Instructions
Cowl
Notes: There are 11 keyholes on one side of the cowl and 11 slip stitch strands that will feed through the keyholes
Ch 103.
Notes:
- Place stitch markers into the ch-2 spaces in the 1st row to help you see the corners.
- I placed an extra 32 chains and slip stitching back to form the keyhole strips at the end of each odd number rows to give a better start for the next row.
- There are no starting ch 1 at the beginning of the even number rounds.
- We are turning midway through an instruction on the odd number rows such as 1, 3, 5 and etc.
1st row: RS. 1 sc 2nd ch from hook. [Ch 1, sk next ch, 1 sc in next st] 11 times. - Place stitch marker in the 11th ch-1 sp to see it clearly. 1 sc in next 16 ch. (1 sc. Ch 2. 1 sc) in next ch. [1 sc in next 20 ch. (1 sc. Ch 2. 1 sc) in next ch.] twice. 1 sc in last 20 ch. - Place stitch marker on the last st before you do the next part. Ch 32. 1 sl st 2nd ch from hook. 1 sl st in remaining 30 ch. *
The stitch markers will save you so much time and obsessive counting.
Stitch Marker Placement. Move them up each time you pass them.
2nd row: [1 sc in each sc to next corner. (1 sc. Ch 2. 1 sc) in corner sp] 3 times. 1 sc in each st and ch-1 sp to the end of the row. Turn.
3rd row: Ch 1, 1 sc in first st. [Ch 1, sk next st, 1 sc in next st] 11 times.- Move stitch marker up to the 11th ch-1 sp to see it clearly. [1 sc in each st to corner. (1 sc. Ch 2. 1 sc) in corner sp] 3 times. 1 sc in each sc to end of the row. Ch 32. 1 sl st 2nd ch from hook. 1 sl st in remaining 30 ch.*
Rep 2nd and 3rd row - 9 times more. Then rep row 2 once more.
The keyhole side will have the eleven ch-1 sp holes.
The strips side will have 11 strips that will feed through the keyholes in the next part of this pattern.
Interweave the Strips into the Keyhole with the strip at the centre of neck being first go OVER the edge and then up and down through the keyholes to the end.
Let the strips rest after you weave in the strips. You will single crochet those into position on the edge round next.
Outer Edge Round
1st rnd: With RS facing, sc evenly around placing 3 sc in each corner. At the ends of each of the 11 strips, put the hook through the edge of the st and tip of the strip to sandwich them together and sc them permanently into position. At the end of the round, join. Fasten off.
You will see the middle square for the neck. There is a small gap between the strip section and the side, we will pull that together with a sc3tog stitch to reduce the stitches at the neckline.
Start this section at the back of the neck. In the picture, it’s the corner opposite where I am pointing.
Important: At the end of the first round, ensure there is an even number. If you have one extra, it is better to do an additional sc2tog stitch to even it out.
1st rnd: Join at the back neck 2 stitches over from the corner with RS facing. Ch 1, 1 sc in same st. *Sc3tog over the next 3 stitches that is in the corner, 1 sc in each st to next corner. Continue around and with the strips area, pull together where you think the corner should be and use the 3 stitches to bring them together as sc3tog. Join with sl st to beg sc. Stitch count has to be even for the remainder of the turtle neck to work.
2nd rnd: Ch 2 (doesn’t count as stitch here and throughout), 1 hdc in each st around. Join with sl st to beg hdc.
Place stitch marker here in the project.
3rd rnd: Ch 2. 1 hdcfp around first st, 1 hdcbp around next st. *1 hdcfp around next st, 1 hdcbp around next. Rep from * around. Join to top of beg hdcfp.
4th rnd to end: Rep 3rd rnd until 4” high from the stitch marker. Fasten off.
.
.
Tutorial


Robin Kubasik says
Quick question, does the sc count between the corners increase or stay at the original counts of 20. I am using the stitch markers as indicated in the video, however because of my OCD I still count. Mine have increased and before I totally finish this beautiful pattern only to find out it is way to big and have frog the whole thing. Please help a girl out. Thank you so much for sharing you talent and time to create such beautiful patterns.
Robin Kubasik
Mikey says
It will continue to grow outward. So no, it won't stay the same.
CyndiE says
I have been crocheting since I was 14, but have never tried anything more challenging than a dish cloth, pot holder or tree skirt. This came across as really complicated in the first rows, but my husband really liked the pattern. I am now on row 3 and Mikey, you are a crochet design genius! I totally get it! Your tutorial is awesome and I can't wait to finish. This is so exciting!
Joyce Newton says
You’ve been doing wonderful work. Enjoy your post. Take care. Enjoy your life.right now crochet dish cloths. So far 75. I give away. Change nothing. Soon maybe do. Place mats. Or towels keep wonderful work. Don’t stress out and if any one says that nasty. You know what I meant
Joyce
Carolann says
I think I’m gonna need a tutorial video for this one! Please
Wendy Maruna says
Mikey released the tutorial for this today. You should find it embedded under the yellow print pattern button.
If it isn’t showing up on the page, it’s available on our YouTube channel.
Happy Stitching