Holiday Wreaths
You can make large wreaths with your crochet hook to be in any shape you want. For Christmas, using a coat hanger is easy to shape into a circle and crochet around it.
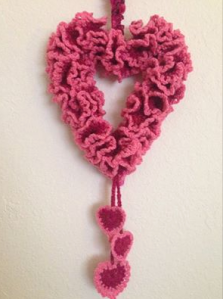
I love it when our fans get an idea and personalize it to make it their own. Lynn Niehaus, a fan of The Crochet Crowd, saw a different concept in one of the patterns I made.
Instead of making a predictable round wreath, Lynn bent her wire to look like a heart instead. Using pink, she created a fun new wreath design. She another heart pattern and added them as danglers. She made hers for Valentine's Day.

You can do the same thing with our Table Top Wreaths. The only difference is that the circumference of the wreath is much bigger. I actually have two large wreaths in my Christmas Holiday Decor. One in green and one in pink.

Pattern Suggestions
- Crochet Butterfly Stitch Scarf Pattern
- Crochet Round Dishcloth Pattern
- Crochet Large Miniature Pumpkin + Tutorial
- Crazy Eight Shawl Crochet Pattern
- Fabulous Dahlia Crochet Flowers + Tutorial
Written Instructions
- Fasten onto a ring, SC around the ring. Do it tight enough so that the stitches are covering all of the wire. It doesn’t need to be compressed extremely tight. Just enough to ensure the wire is covered. SL ST when you get back to the start.
- CH 3, then DC 3 Times into each stitch going around the ring. SL ST at the end to the top of the CH 3.
- CH 3, then DC 3 Times into each stitch going around the ring. SL ST at the end to the top of the CH 3.
- CH 3, then SC into the next stitch, *CH 3, SC into the next stitch. Repeat * all the way around. SL ST at the end.
- Fasten off and weave in ends.
Dana says
I have the same problem with it spiraling around the wire. I think it is because I knew my yarn was limited, so I skimped a little on the first round. It came out beautiful, but it does tend to spin around the wire. I coated the stitches at the wire (on the back) with Elmers glue, which helped a little, but not enough, as it's very heavy.
I too, would appreciate any ideas to remedy this 🙂
nkcajKaren says
I have made 3 everlasting wreaths, I bought mini ornaments to decorate them with. Problem is, is that if I put the ornaments on it, the wreaths turn so the ornaments are not on the front side. Any idea how to remedy this situation?
Dana says
I, too have this problem. I coated the backside with Elmers glue, with some success, but I'd appreciate better ideas
Sue McEndree says
I did a slight variation to this wreath. I took a cardboard tube from a roll of toilet tissue & crocheted a tube to fit around it. Instead of crocheting around a ring, I joined the green yarn on the last row of the crocheted tube & made the wreath from that point. Then I took a 3 oz bathroom cup & put in the tube as far as it would go & trimmed it even with the cardboard & glued it into the tube. I set a battery operated tea light inside the cup at the top.