• Skip to primary navigation
  • Skip to main content
  • HOME
  • PATTERNS
    • ACCESSORIES
    • ARMS & HANDS
    • BABY
    • BLANKETS
    • CLOTHING
    • HEAD & NECK
    • HOLIDAYS
    • HOME DECOR
    • STITCH ALONGS
    • TOYS
  • VAULTS
    • PATTERN VAULT
    • DIAGRAM VAULT
  • VIDEOS
    • REELS
    • STITCH ALONGS
    • ALL TUTORIALS
    • YT MEMBERSHIPS
  • EVENTS
  • NEWS

The Crochet Crowd

Home » Yarn Artistry

March 5, 2024

Crochet Yarn Bombed Bike

Sharing is caring!

  • Facebook
  • Email

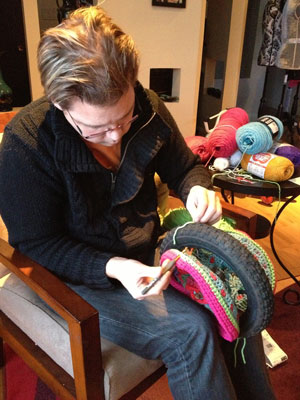
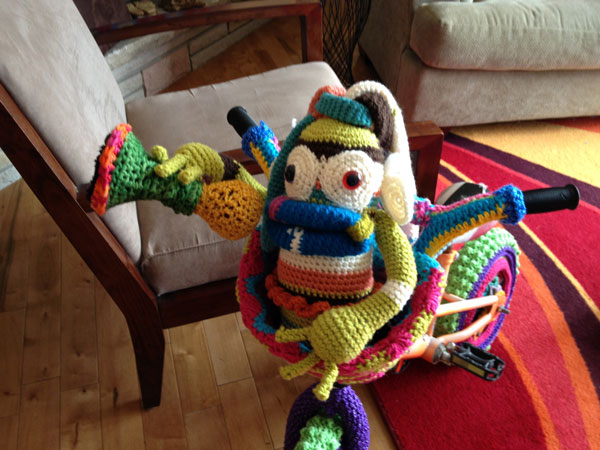
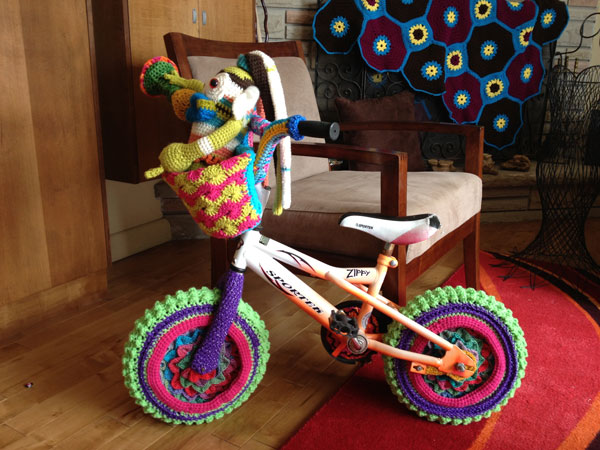
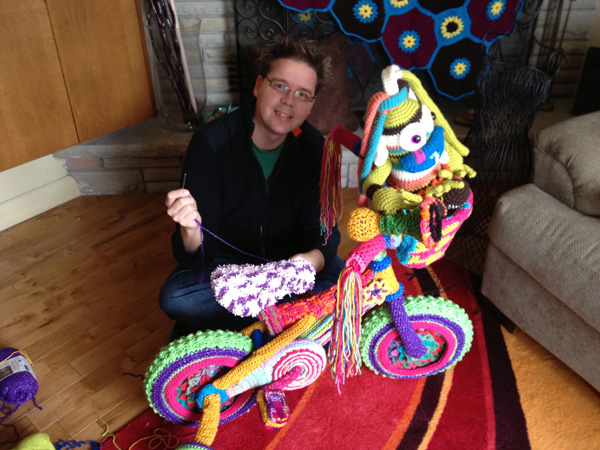
This Crochet Yarn Bike took me about 70 hours of crocheting to transform. I had a few rules for myself:

  • Customize each piece to go onto the bike and not get lazy to make squares to stretch over. 
  • Once a panel was created, decide if further embellishments were necessary to push it up the creativity scale. 
  • Take my time and really examine the colours as I go. Ensure there's a great balance of really exciting colours.
Crochet Yarn Bike Designed by Mikey
Crochet Yarn Bike
Crochet Yarn Bike

See our steps. As each step is completed, a photograph showing our update will be added. I also did a Crochet Ferris Wheel too! 

Crochet Ferris Wheel

Our mission is to yarn bomb this bike for an amazing exhibit to inspire crocheters. Here are my steps to transform this bike.

Yarn Bomb Bike, Before Photo
Yarn Bomb Bike, After Photo


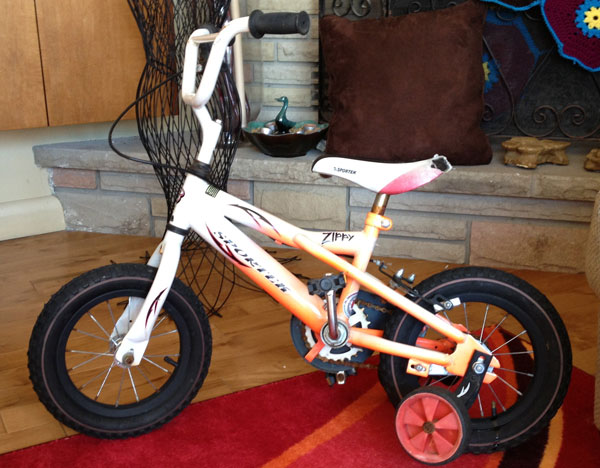
Please note this bike was damaged and unusable that was heading to the scrap metal yard. 


Final Thoughts

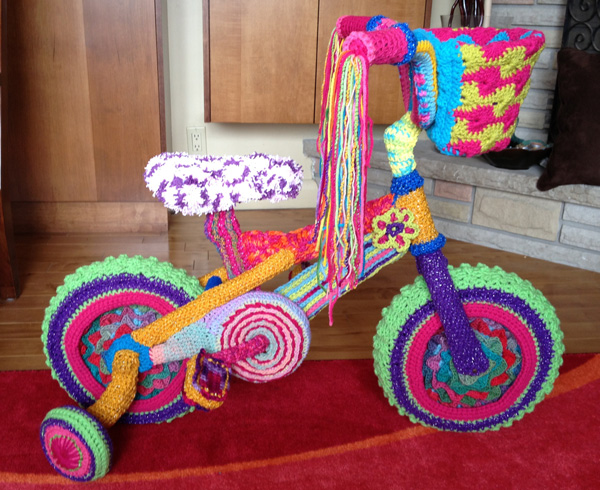
As you go through the photographs below, you will see that everything done was custom fit. 

  • I wouldn't describe this project for newbie or fresh crocheters. Years of experience has taught me how I can manipulate flat panels to have shapes or bulges. You need to know how the project will react when adding or subtracting stitches out. 
  • There are 20 different stitches used in this. SL, SC, Catherine Wheel Stitch, HDC, DC, 7 DC TOG, 7 DC Shell, TR, BP DC, BP HDC, BP SC, FP DC, FP HDC, FP SC, Crocodile Stitch, 5 DC Shell, Magical Circle, 2 DC TOG, 3 DC TOG, 4 DC TOG, Basket Weave, 2 SC TOG, 3 SC TOG, 
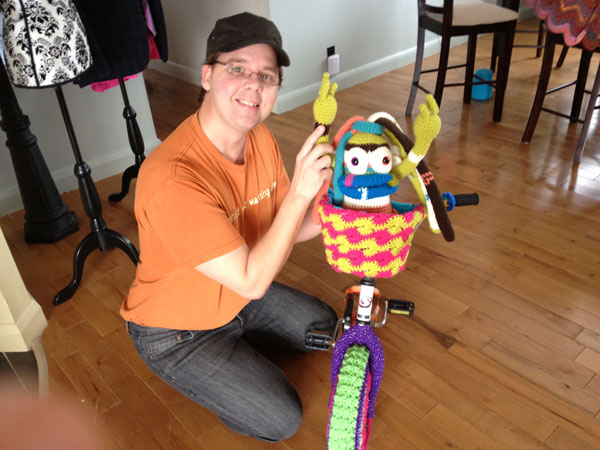
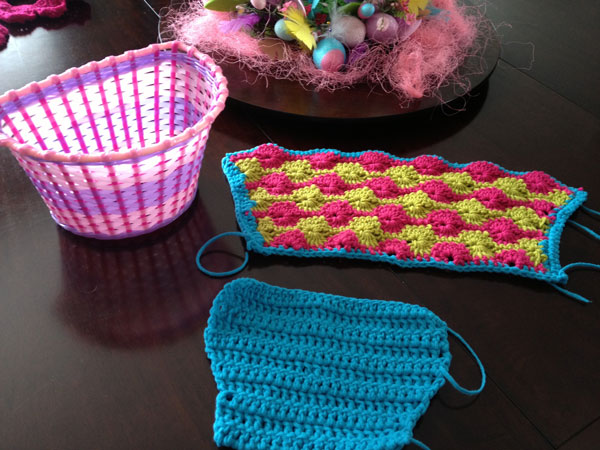
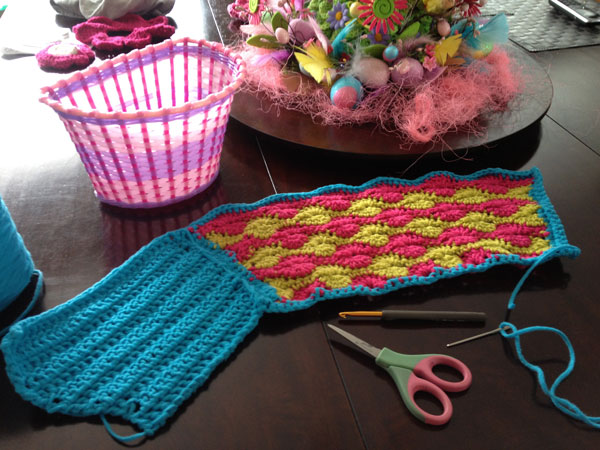
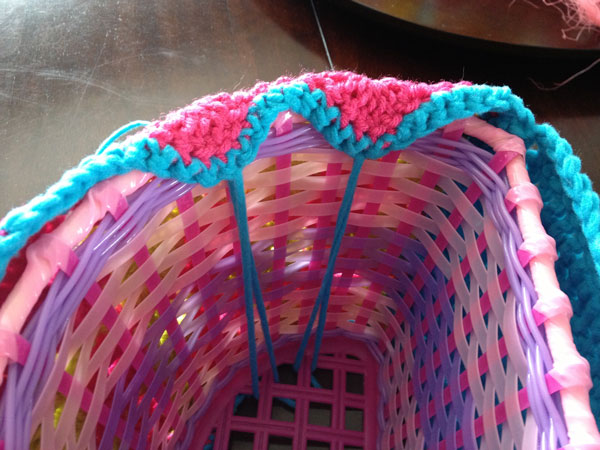
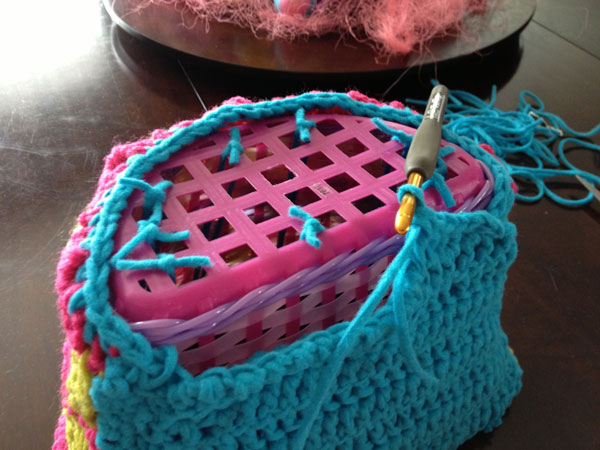
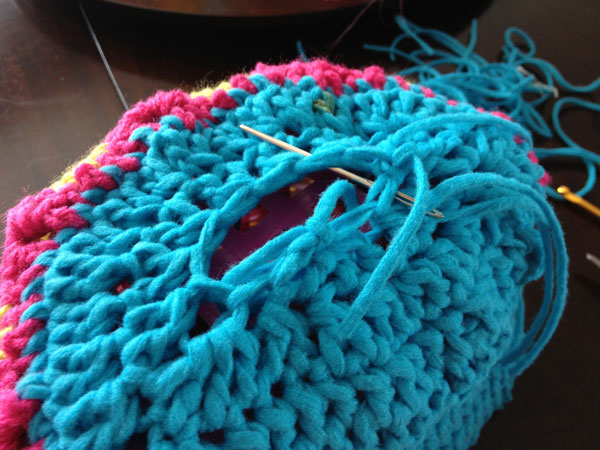
  • The basket took me 4 trials of different colours to get it right. 
  • The most pain in the butt area was the pedal covering. The shaping of that is really unusual. I took my time to figure out the shape with sometimes removing out rounds to re-shape. 
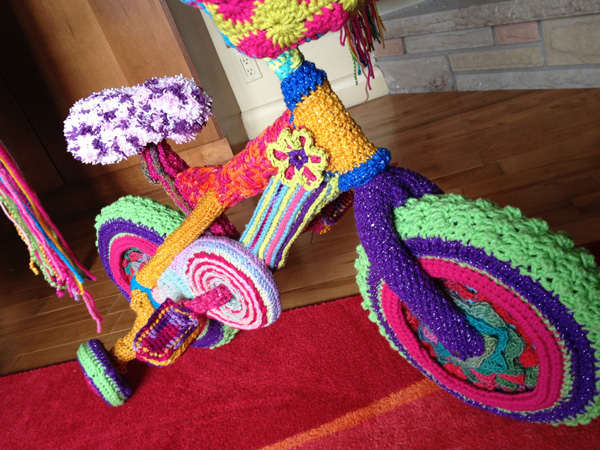
  • The flower on the front of the frame is there as the joining of the panels look a bit too dramatic. The flower give the bike a touch of cuteness while covering up what I thought to be an eye sore. 
Overall, I loved doing this project. It challenged me in ways of extreme satisfaction as the bike came together. I'm actually kind of sad it's done as it's nice to do something different than a hat, scarf or afghan. 

Follow My Steps 

Cleaning off the Yarn Bomb Bike
Examining Parts and Taking Measurements of the Yarn Bomb Bike

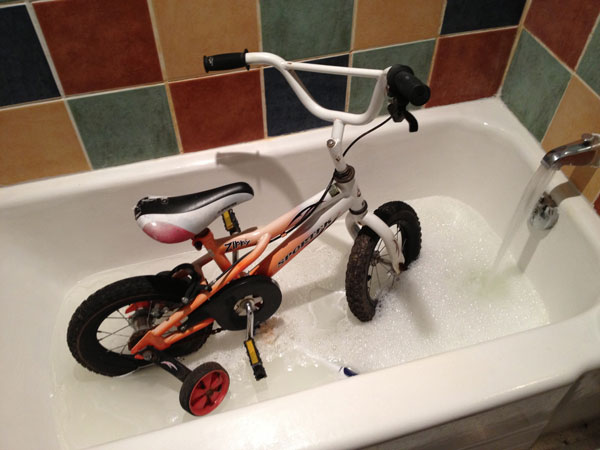
  • Wash the bike so the yarn doesn't get dirty. Then take inventory of the parts to decide what colours will work together and come up with a theme on paper for an action plan. 
Getting Dimensions of Bike for Yarn Bombing
Removing Components from The Yarn Bike


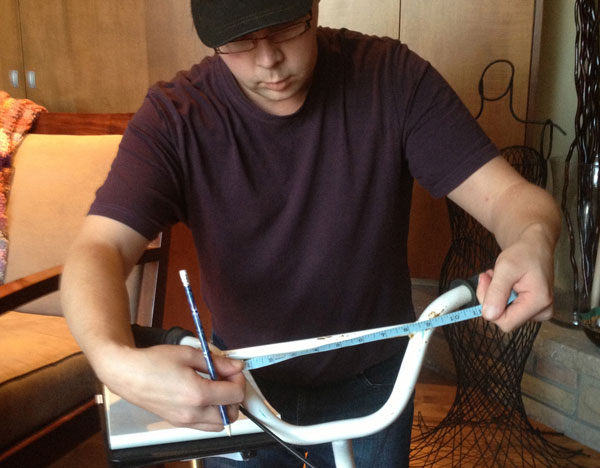
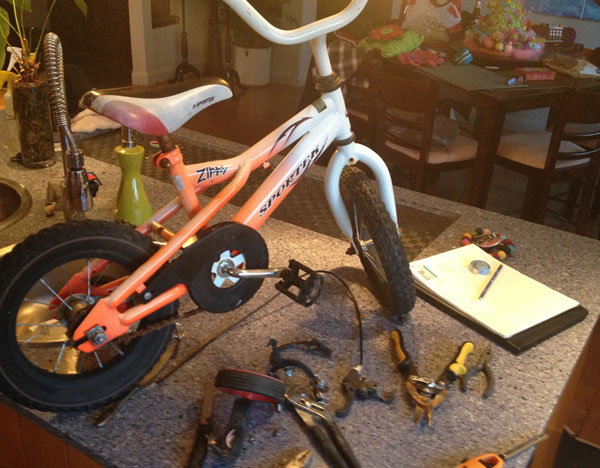
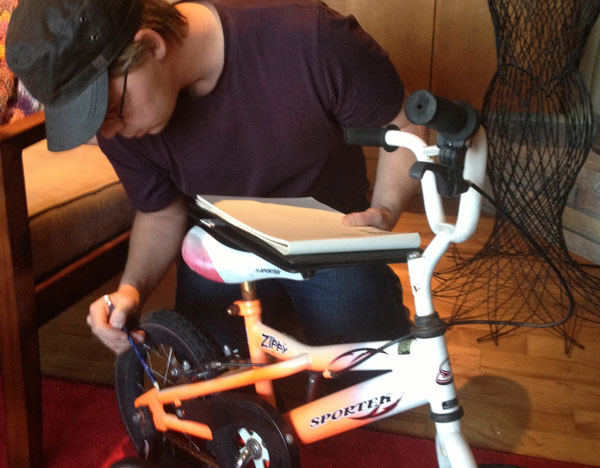
  • Take some preliminary measurements of the frame for thinking about doing strips of crochet work. I then removed off components that weren't necessary. Items like the brakes were removed. The chain has been removed for safety reasons as we don't want a child that sees this bike to accidentally get their hands stuck between the chain and the gears. 
  • With Diva Dan, we headed to my yarn stash to start coming up with preliminary theme colours. We are thinking of making this bike really abstract and fun. 
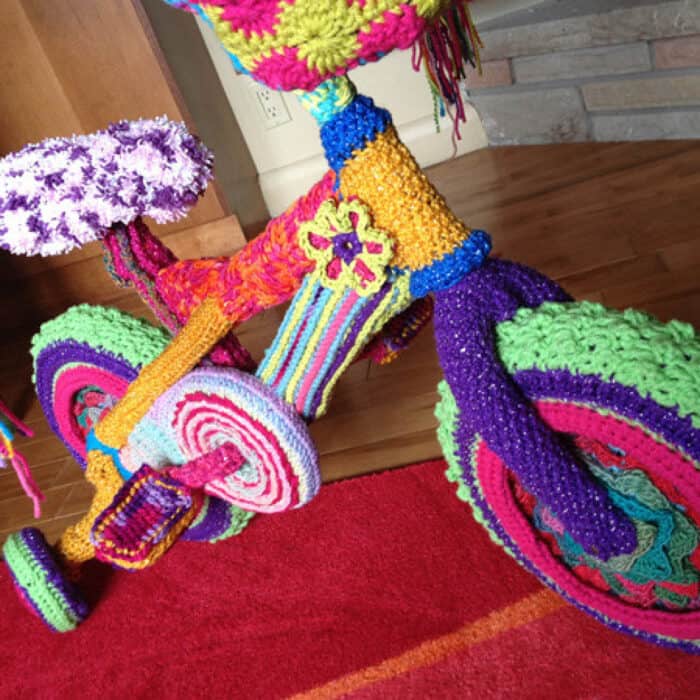
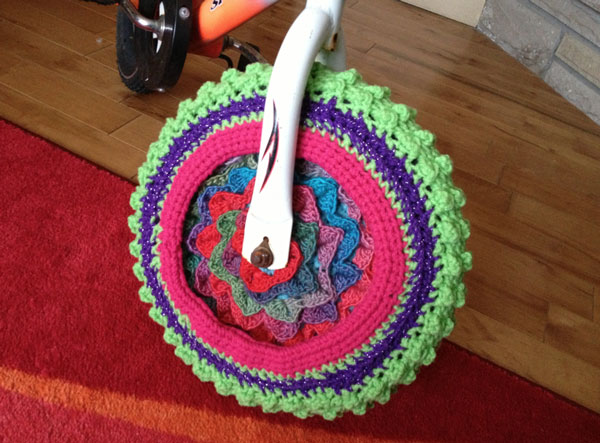
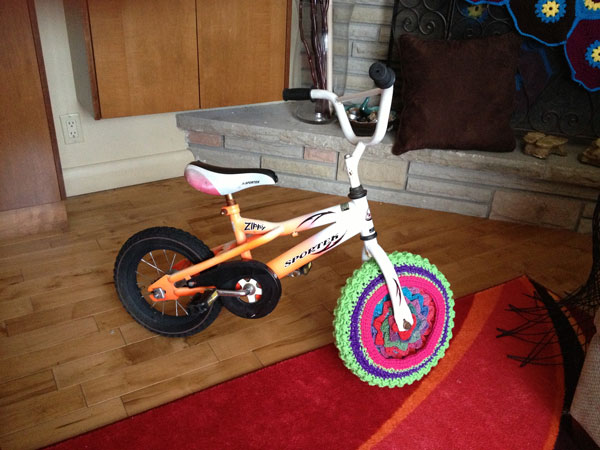
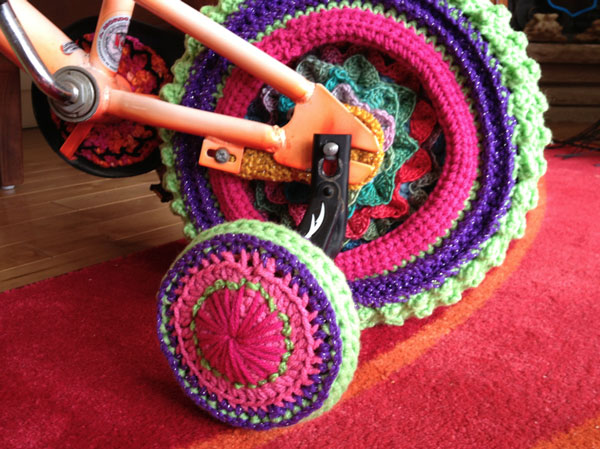
Front Wheel

Crochet Front Wheel of Yarn Bomb BikeI was struggling to find my starting point on the bike. The bike is being designed as I go but colouring and how it will come together is still up in the air.
 
With the skills I know, I decided to look into my brain and see where I have done other projects that can influence the design of the wheel. I initially thought a flat panel stretching around the wheel but then I thought, that really isn't going to inspire anyone. 
 
My Questions:
 
  • What to do with the elevations of height in the spokes area?
  • Do I want the outside edges of the tire to have a line or be a solid colour?
  • How do I make the wheel look like it has a tread?
  • Can I design the spokes area to be using the latest popular stitches to further inspire others?
I looked to the past I there are 4 different projects worked into this one wheel. A bit of this and that. You can see The Rio Scarf in the hubcap area but using the Spring Tree Design as a concept for the circle. Then the hot pink area was done like the rings of the Ringtoss Afghan that I made last year. Then for the tread, we have just done the Spring Fling Pillow and I loved the bumps on the pillow. I exagerated the bumps using Trebles instead of Double Crochet to really bring the treads out. 
 
Crochet As You go, Yarn Bomb Hub Cap
Affixing Crochet to Bike Wheel
 
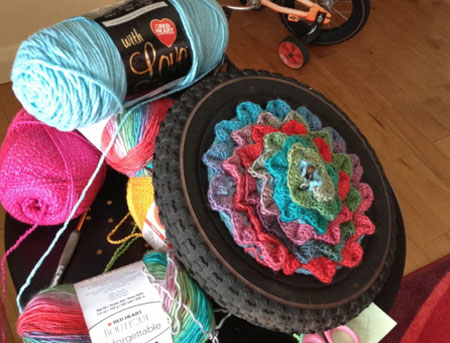
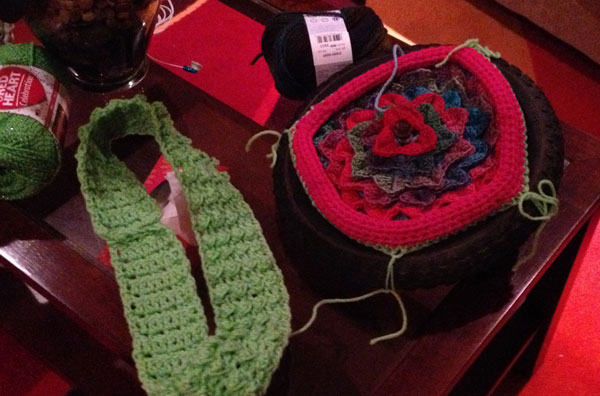
  • I created a round circle base to match the interior diameter of the spokes area. 
  • I then crocodile stitched around the circle over the base.
  • I then added the Ringtoss Afghan concept of a 3D ring around the circle to give it a sinking look that I needed. 
  • I made 2 of these. One for each side. 
  • Using spare yarn, I tied the finished circles to the wheel to hold them into position. I needed to do this to see how the stretch was going to react when deciding how wide the tread will be. 
Secured Hub Caps waiting for Yarn Tread for Yarn Bike
Crochet Tread
 
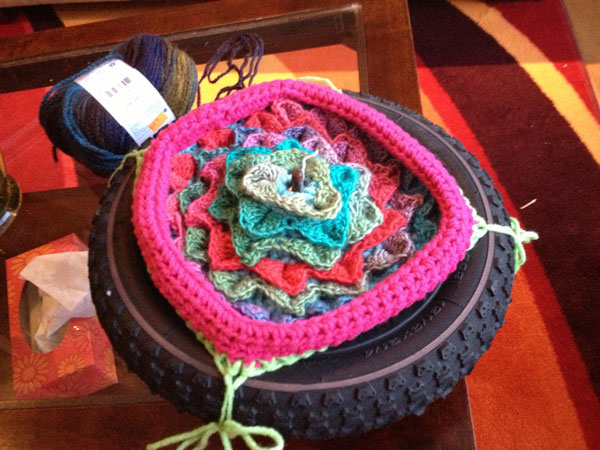
  • I chained across the for the green tread and then went back and forth until I was able to stretch the peice around the wheel. I wanted a slight stretch, not a huge stretch as stitches get pulled apart and you can see the black of the tire through if the material is too stretched.
  • Once the tread was done, there was a gap of space between the hub cap area and the tread. I didn't want to stretch that too much. So I went around the tread with the Purple to create the solid line to prevent the wheel cover from being over stretched. 
Wheel Test to Determine Rest of the Bike
I put the wheel on temporarily to see what it looks like. 

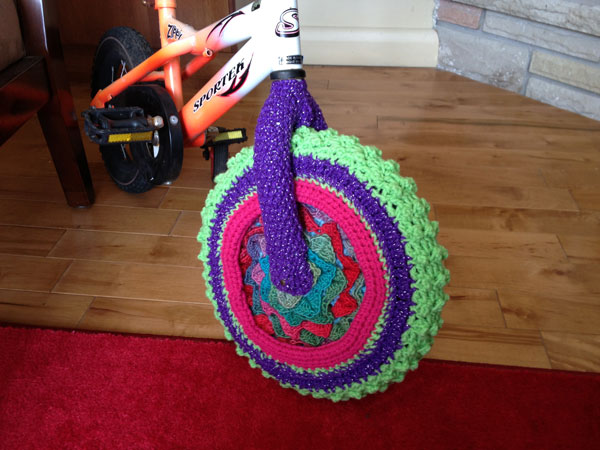
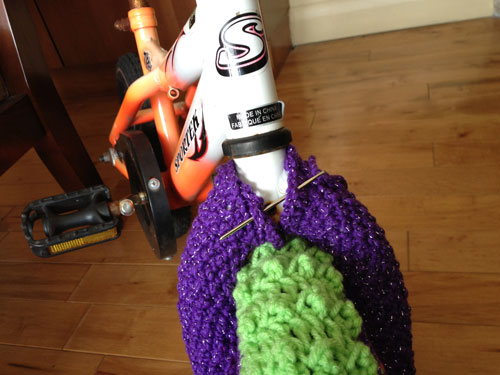
Next is the Forks of the Front Wheel

I crocheted 2 Sleeves. The wheel was removed and I slid the sleeves onto the forkes. I doubled the round of stitches on the final rotation to ensure the top had a wider mouth so I could sew it around the frame that top. 
Bike Forks for Yarn Bike
Customing Project to the Yarn Bike
 

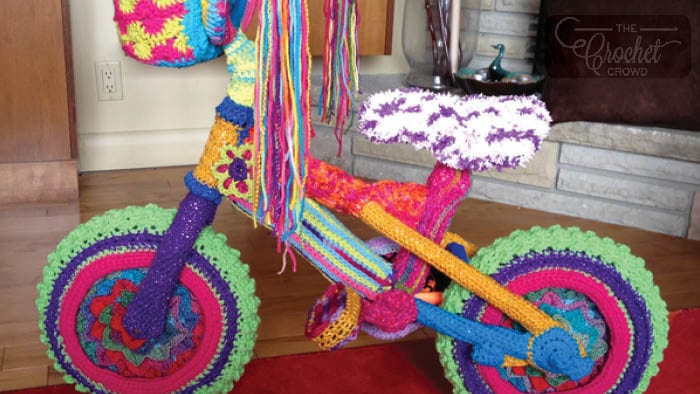
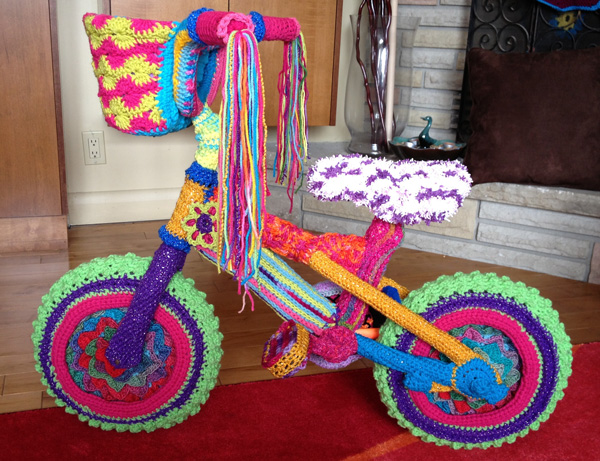
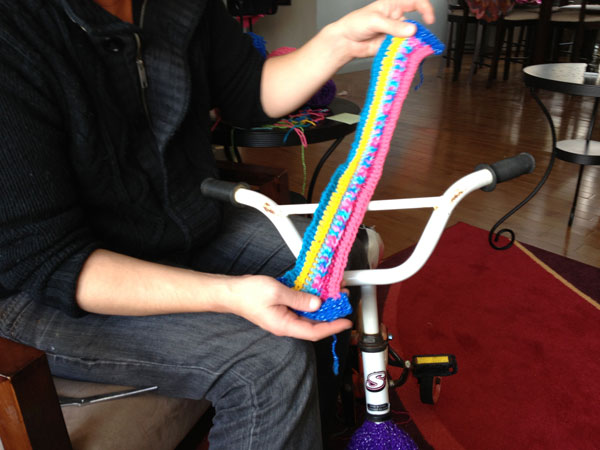
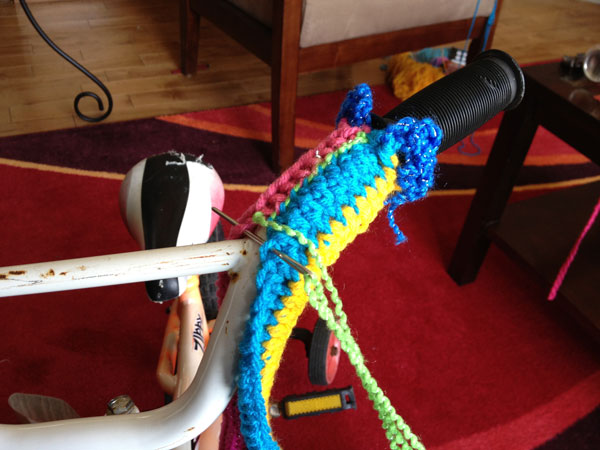
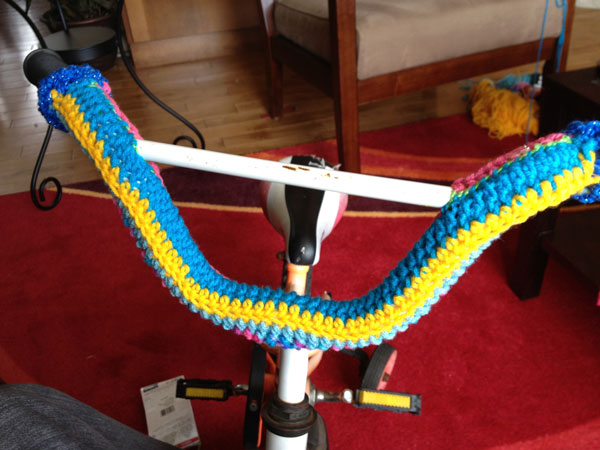
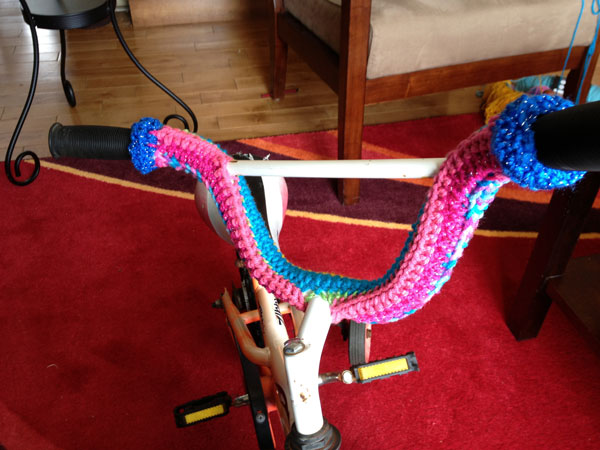
Time for the Handle Bars
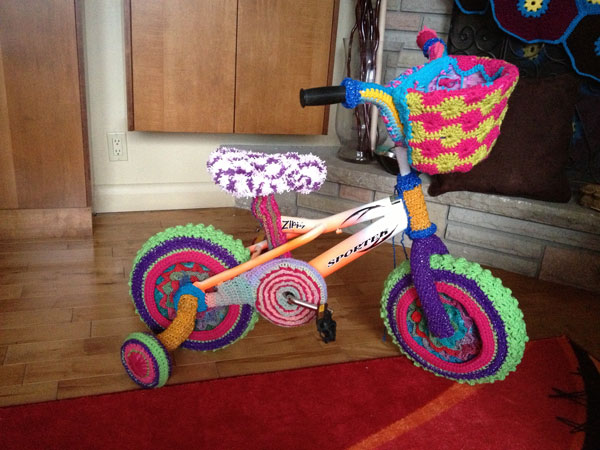
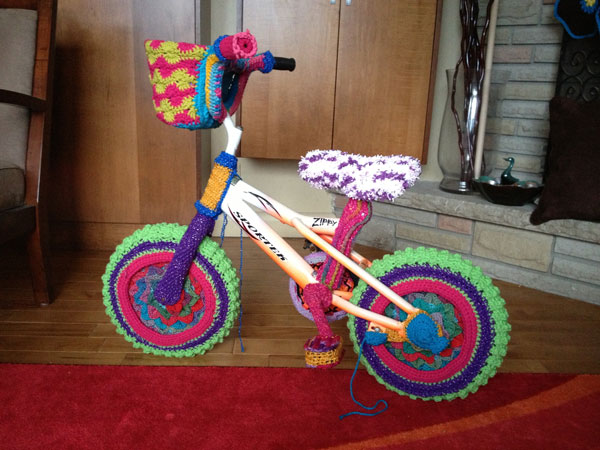
This was a no brainer as I just hand to measure the distance of the bar that sinks downward. I crocheted a flat panel that would wrap around the bar. I had to create the blew edging to go over the lip of the black rubber of the handles. I sewed the panel into place and then sewed the blue ends around the black hand lips to secure it. Where there are bars attaching in a different direction, I have to work around that as the panel on the bars that are attaching will be sewn to this panel at a later time. 
Create Stripes to Sew to Handle Bars
Handle Bars of Crochet Bike
 
Strip of Handle Bars Complete
Ready for More Crochet Bike Parts
 

Time for the Basket

The basket so far as been thee hardest element to do on this bike so far. I was going to upcycle a cardboard box but then the realism of the basket shape woudn't be acheived. Anyone can crochet a box, so I picked up an $8 Disney Bike Basket. I ripped off the embellishments of the Disney characters so you wouldn't see abnormal shaping to make my material sit flush to the basket. 
What you see below is actually my 4th Attempt... I couldn't get the colours to be perfect. I tried several stitches and it just didn't look right. I even tried a Basket Weave Stitch and it didn't give the basket the push to creativity inspiration. 
I looked the Original Octagon & Throw Afghan and reviewed the colours. I tried stripes and different stitches using these two colours. It then occured to me to try a Catherine Wheel Stitch Pattern. The trick is that the Catherine Wheel Stitch Panel couldn't be a square. The starting row had to be shorter than the final row at the top. So to compensate, I added stitches in the lines to create the wedge shape I needed. You can see that on the right hand side that the top has an extra circle and it grew gradually to get that. I just free formed it with no real plan. 
I created the back panel and it also had to have a s wedge shape. I sewed the seams together and put the basket in the middle. Using crude skills. I attached the yarn to the top of the catherine wheel stitch wheels and tied them to the bottom of the basket to form the top to over lap over. I then crocheted a closure to the bottom of the basket with 2 DC DEC, 3 DC DEC, and up to 6 DC DEC stitches to make sure it stayed flush. I'm not ready to attach this to the bike yet but I am getting closer. 
Bike Basket for Yarn Bike
Crochet Components to cover Yarn Basket for Yarn Bike
 
Sew components Together to go over the basket.
Sew components directly to the basket frame.
 
Custom Crochet the Bottom to Fill it in.
Bottom of Yarn Bike Basket
 

Horn

The bike didn't come with a horn. I went the store to pick up a horn for the character to hold. I yarn bombed the horn completely. 

Found a Bike Horn. Crocheted a cover and sewed it to a character.

Gears

To keep the bike looking consistant. I covered the gears over and then hand sewed on some black to represent the gears.

Crocheted over the Bike Gears


Back Wheel

I then covered the back wheel. I used the same yarn and principals as the front wheel to ensure it was looking consistent. I was leaning toward having a completely different style of wheel but I thought it would be better if they were both the same. 

Back Wheel Crocheted for Yarn Bike.


Training Wheel

  • I decided to remove one of the training wheels and only keep one. This allows the bike to stand on it's own. I really struggled with the frame that holds the wheel to the frame of the bike. I was procrastinating it as I was unsure what to do.
  • Once complete, I attached it to the bike so the rest of the covering could be started. 
Crocheted a Cover for the Yarn Bike Training Wheel.


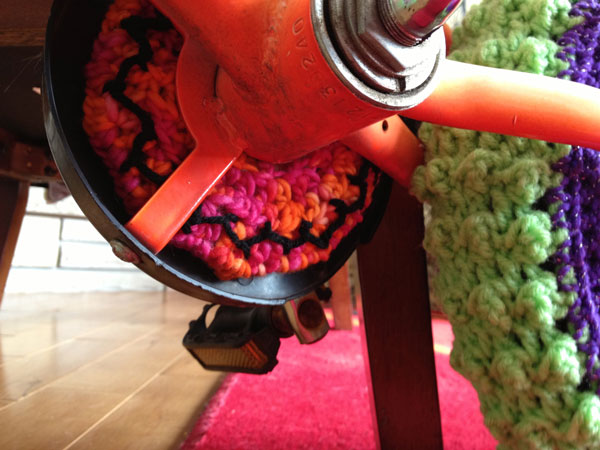
Petal Frame, Seat & Pedals

  • The seat was thee hardest for me to figure out. The shaping was really tough and I really wanted a funky look. I had to constantly check the size for each row of stitches to ensure it was shaping just right.
  • I covered the petal frame which was 2.5 hours of work. The round round circles you see is hand sewn embellishments. 
  • I covered the petals which some great stitch work. You will see Yellow around the edge to symbolize reflectors. These were simple. 
Crochet Petal Gear Cover for Yarn Bike
Covered Pedals for the yarn Bike + Back gear.


 The Final Kick

  • I was able to get the final cross beam bars covered. I used as many stitches as possible to make it more interesting.
  • Pulling a sample from every yarn ball I used, the tassels are made up of all the yarn in the entire bike with the exception to the seat. 
Sewed the Last Stitch to bring this yarn bike to conclusion.
Finished Yarn Bike

Finished Crochet Yarn Bike
Crochet Yarn Bike

Like this:

Like Loading...

Related

More Crochet Artistry

  • 19+ Crochet Wedding Day Patterns
  • Crochet Along Bobble Heart Scarf Pattern + Tutorial
  • Skull Party Sticks & Pompoms Pattern
  • Crochet Along Spring Fling Pillow Pattern + Tutorial

Filed Under: Bernat Yarn Patterns, Crochet Patterns by Michael Sellick, Exclusive Crochet Crowd Knit and Crochet Patterns, Red Heart Yarn Patterns, Yarn Artistry

Reader Interactions

Comments

  1. Jess says

    June 06, 2019 at 10:37 am

    Awesome! Love this 🙂 Is the bike fully functional?

    Reply
  2. Marcene Radack says

    December 13, 2014 at 10:40 pm

    not interested. Need the end of the pattern for
    shells with front and back post.

    Reply

Leave me your thoughts... Cancel reply

Your email address will not be published. Required fields are marked *

The maximum upload file size: 360 MB. You can upload: image, document. Links to YouTube, Facebook, Twitter and other services inserted in the comment text will be automatically embedded. Drop file here

© 2008–2025, THE CROCHET CROWD. Site Design & Maintenance by Michael Sellick.

%d