Crochet Baby Blanket
This idea comes from another existing design that is part of Yarnspirations that is called the Simple Baby Blanket. I've changed up the starting chain but the concept is the same which includes the border.
This afghan plays with the idea of doing single crochet and ch 1. This creates ch-1 spaces which are where you play in the row above. Due to this effect, it makes the stitches look locked together and makes for a speedy process.

Helpful Videos
This video will help you get started with crochet as well as cover the basics such as chaining and single crochet.
Of course, you can use this same design with the Bernat Baby Blanket Yarn lines if you prefer the typical colours of baby blankets too. You are the artist and can do what you want.


Bernat Baby Blanket Yarn
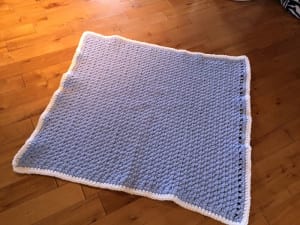
This baby blanket uses two colours. White and Baby Blue. To get this complete size, you will 2 balls of Baby Blue and 1 Ball of White
The balls are 300 g or 10.5 ozs. There are two sizes of yarn. Be sure to get the biggest ball which is the 300 g size.
More Ideas
- Fluffy Meringue Baby Afghan + Tutorial
- Crochet Warm C2C Shawl + Tutorial
- Crochet Baby Blanket Star + Tutorial
- From The Middle Baby Blanket + Tutorial
- Crochet Puffy Baby Blanket + Tutorial
Dimensions
Using 10 mm or Size N crochet hook, you will get a 31″ wide by 34″ long baby blanket.
Tips
- This pattern is exceptionally simple. The stitches really connect well with each other too.
- If changing the size of the pattern, the stitch multiples are in sets of 2. If changing the size, it will alter the amount of yarn needed for your project. Every 2 stitches = 1 inch.
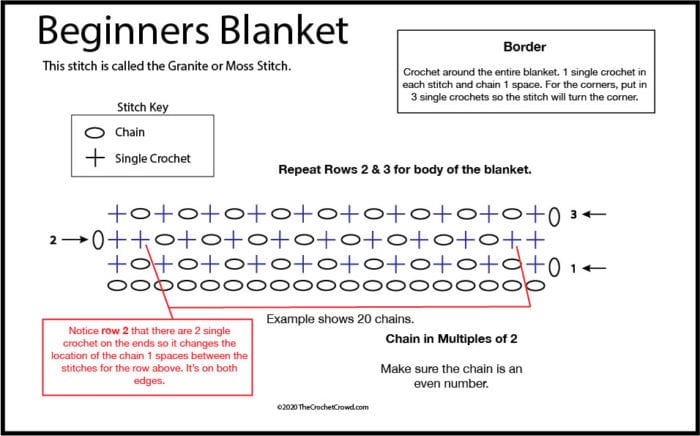
Crochet Diagram
You can download this diagram if you think you could use it.

Pattern

Beginners Baby Crochet Blanket Using Bernat Baby Blanket Baby Blue, chain 74. 1 single crochet (sc) in 2nd ch from hook. *Ch 1. Skip next ch. 1 sc in next ch. Repeat (rep) from * to end of the chain. Turn.
- 2nd row: Ch 1. 1 sc in first sc. 1 sc in next ch-1 space (sp). *Ch 1. Skip next sc. 1 sc in next ch-1 sp. Rep from * to last sc. 1 sc in last sc. Turn.
- 3rd row: Ch 1. 1 sc in first sc. *Ch 1. Skip next sc. 1 sc in next ch-1 sp. Rep from * to last 2 sc. Ch 1. Skip next sc. 1 sc in last sc. Turn. Rep 2nd and 3rd rows for the pattern (pat) until work from beginning (beg) until you run out of baby blue. Fasten off.
- Edging: Fasten on white at the same corner. Ch 1. Work 1 rnd of sc evenly around the outer edge of Blanket, working 3 sc in each corner. Join with a slip stitch (sl st) to first sc. Fasten off
You will notice there is a gap space on the one edge. That is to apply ribbon through the stitches if you prefer it. Up to you.

Christina Wood says
I love this pattern! It’s quick and easy to work up a quick blanket. I’ve used this pattern to make a blanket for each of my grandsons and I’m just finishing one for first granddaughter.
Cynthia Blackwell says
I love this pattern, I wish the video was more step by step because I have issues with my eye site. Thank you so much for what you do.
Mikey says
I'm sorry to hear about your eyesight. Noted on your thoughts though.