DOWNLOAD CROCHET BRAIDED PUMPKIN
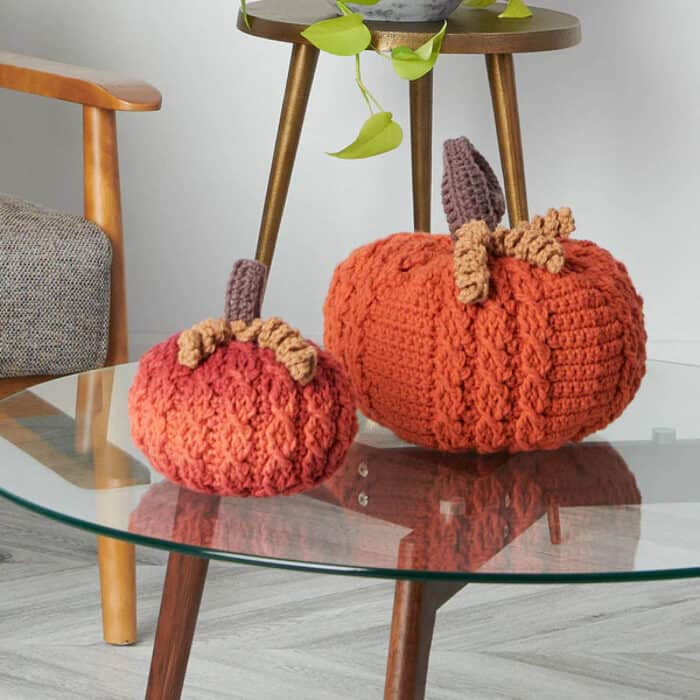
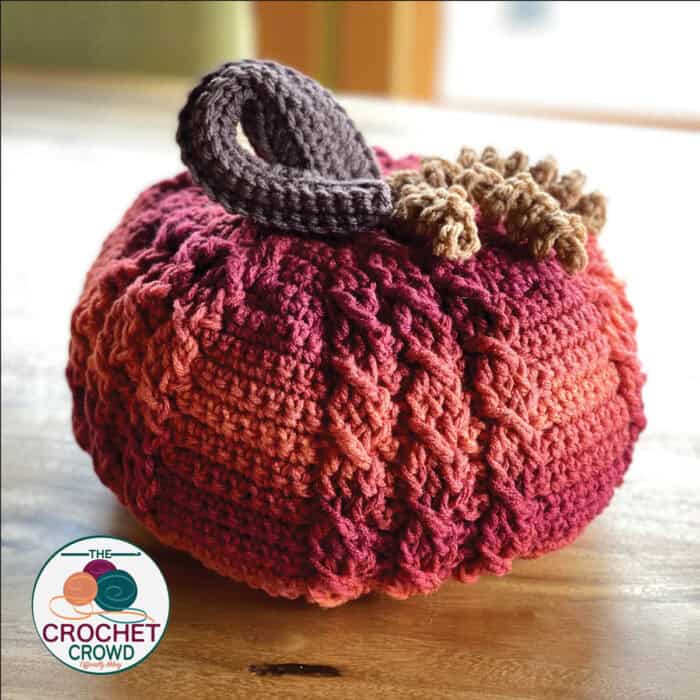
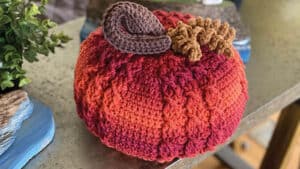
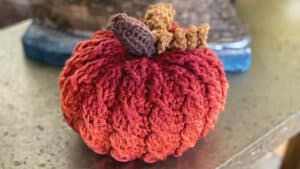
The Crochet Braided Pumpkins were designed by Mikey using Red Heart Super Saver Ombre. They are tabletop fabulousness for fall. There are two designs, and the large design has two versions based on an error that our tester, Wendy, made. Her error turned out to be an awesome idea.
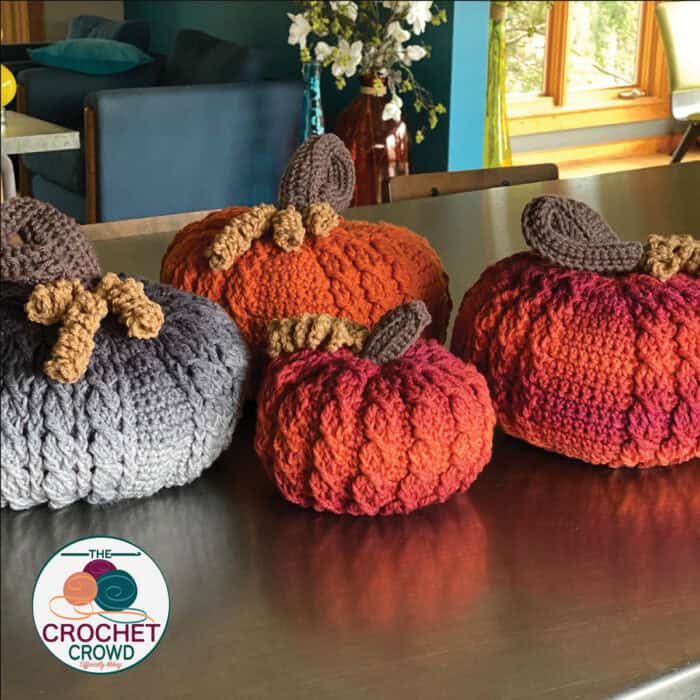
Wendy's error version is actually in the black/gray version where she misunderstood the back post double crochets and made them front post double crochets instead. Her error really frames through braids beautifully and I thought, OMG, I love it!
We have another different pattern but looks similar with Bernat Blanket yarn. It's even bigger.
I picked up the stitch of the crossing over on the 14-Motif Stitch Sampler Blanket. I really thought it was so much easier than other cables I had seen. The stitch was called cable bands. I provided the video below for the stitch concept to be in an afghan/blanket instead. You could crochet a matching blanket.
I designed these in May 2020 and was so excited about them. It was originally scheduled for The Crochet Crowd Book 2 but we have decided to pause the book and release the patterns we made and revisit the idea of doing a second book in the future at some point.
Materials List & Sizing
- Use size 5 mm, U.S. H/8 crochet hook or size needed to obtain gauge.
- Poly-fil stuffing for toys and crafts.
- Measurement large pumpkin approx 11” [28 cm] dia x 6” [15 cm] tall.
- Small pumpkin approx 7” [18 cm] x 4.5” [11.5 cm].
- Gauge 15 sc and 15 rows = 4” [10 cm].
Colours
Colour A is the main colour and there are three versions in the large pumpkin size using different yarn choices.
- A - Red Heart® Super Saver Ombre™ (283 g/10 oz, 440 m/482 yds) - Hot Sauce, 1 Ball, 172 g/6 oz for large and 96 g/3.4 oz for small size.
- A - Alternative (black and gray version) is Red Heart® Super Saver Ombre™ (283 g/10 oz, 440 m/482 yds) - Anthracite, 1 Ball, 172 g/6 oz for large pumpkin.
- A - Alternative is Caron® One Pound™, (454g /16 oz, 742 m/812 yds) - Pumpkin, 1 Ball, large pumpkin 191 g, 6.7 oz.
- B - Bernat® Super Value™ (197 g/7 oz, 389 m/426 yds) - Taupe (you don’t need much just 9 g/0.3 oz.
- C - Bernat® Super Value™ (197 g/7 oz, 389 m/426 yds) - Topaz (you don’t need much just 7 g/0.2 oz.
Abbreviations
- Beg = Beginning
- Ch = Chain
- Dc = Double Crochet
- Dcbp = Double Crochet Back post. Yoh and draw up a loop around the assigned post at the back, inserting hook from right to left if right handed or left to right is left handed. (Yoh and draw through 2 loops on hook) 2 times.
- Dcfp = Double Crochet Front Post. Yoh and draw up a loop around the assigned post at the front, inserting hook from right to left if right handed or left to right is left handed. (Yoh and draw through 2 loops on hook) 2 times.
- Dcfp2tog = Double Crochet Front Post 2 Together. Yoh and draw up a loop around the assigned post, inserting hook from right to left if right handed or left to right is left handed. Yoh and draw through 2 loops on hook. 2 loops now on hook. Yoh and draw up a loop around the next assigned post, inserting hook the same way. Yoh and draw through 2 loops on hook. 3 loops on hook. Yoh and draw through all loops on hook.
- Hdc = Half Double Crochet
- Hdc2tog = Half Double Crochet 2 Together. Yoh and draw up a loop around the assigned st and draw up a loop in next assigned st. Yoh and draw through all 5 loops on hook.
- Rep = Repeat
- RS = Right Side
- Sc = Single Crochet
- Sc2tog = Single Crochet 2 Together. Draw up a loop around the assigned st and and draw up a loop in next assigned st. Yoh and draw through all 3 loops on hook.
- Sl st = Slip Stitch
- Sk = Skip
- Sp = Space
- St(s) = Stitch(es)
- Trfp = Treble Crochet Front Post. (Yoh) twice and draw up a loop around the assigned post below, inserting hook from right to left if right handed or left to right is left handed. (Yoh and draw through 2 loops on hook) 3 times.
- WS = Wrong Side
Large Braided Pumpkin Instructions
Alternative for black/gray version is given in this as it's just a simple change to make it happen.
With A, ch 2.
1st rnd: WS. 10 sc in 2nd ch from hook. Join. Turn. 10 sc. Top of pumpkin.
2nd rnd: RS. Ch 1. *(1 sc and 1 dc) in next st. (1 dc and 1 sc) in next st. Rep from * around. Join. Turn. 4 sts, 20 sts.
3rd rnd: WS. Ch 1. *(1 sc and 1 dc) in next st, 2 dc in next st, 1 dc in next st, (1 dc and 1 sc) in next st. Rep from * around. Join. Turn. 7 sts, 35 sts.
4th rnd: RS. Ch 1. *1 sc in next st, 2 hdc in next st, sk next st, 3 dcfp in next st, sk next st, 2 hdc in next st, 1 sc in next st. Rep from * around. Turn. Join. 9 sts, 45 sts.
Hint: Going forward, every other round on the WS is just 1 sc in each st unless stated otherwise.
5th rnd all alternating rnds: WS. Ch 1, 1 sc in each st around. Join. Turn.
Hint: Each time you complete 2 trfp that have a cross over with the trfp over it, that is considered 1 braid.
6th rnd: RS. Ch 1. *1 sc in next 2 sts, 2 hdc in next st, sk next st, 1 trfp around next 2 sts 2 rows below, 1 trfp in front around skipped st, 2 hdc in next st, 1 sc in next 2 sts. Rep from * around. Join. Turn. 11 sts, 55 sts.
Just a reminder, the alternate round is here before proceeding to 8. That’s why you see the round numbers jump from 6th to 8th.
8th rnd: RS. Ch 1. *2 sc in next st. sk next st, 3 dcfp in next st 2 rows below, sk next st, (1 dcfp around post 2 rows below) 3 times, sk next st, 3 dcfp in next st 2 rows below, sk next st, 2 sc in next st. Rep from * around. Join. Turn. 13 sts, 65 sts.
10th rnd: RS. Ch 1. *1 sc in next st, 2 hdc in next st, (1 dc in the sp before group of 3 dcfp sts 2 rows below, sk next st, 1 trfp around next 2 sts 2 rows below, 1 trfp in front around skipped st) 3 times, 1 dc in the sp after group of 3 dcfp sts 2 rows below, 2 hdc in next st, 1 sc in next st. Rep from * around. Join. Turn. 19 sts, 95 sts. Growth will stop here.
Hints
- The dcbp in the next round are going around the posts 2 rows below that were placed in the spaces before and after the groups of 3 stitches that make up the braids.
- To get the gray pumpkin. Change the dcbp in 12th and 14th rounds to a fpdc. This will frame the braiding as shown in her example.
12th rnd: RS. Ch 1. *1 sc in next 3 sts. (1 dcbp around next post 2 rows below, 3 dcfp around next 3 posts 2 rows below) 3 times. 1 dcbp around next post 2 rows below, 1 sc in next 3 sts. Rep from * around. Join. Turn. 19 sts, 95 sts.
14th rnd: RS. Ch 1. *1 sc in next 3 sts, (1 dcbp around next dcbp 2 rows below, sk next st, 1 trfp around next 2 sts 2 rows below, 1 trfp in front around skipped st) 3 times, 1 dcbp around next dcbp 2 rows below, 1 sc in next 3 sts. Rep from * around. Join. Turn. 19 sts, 95 sts.
Rep 12th to 15th rnds four times more.
32nd rnd: RS. Ch 1. *1 sc in next st, hdc2tog, (sk next st, 1 dcfp around next 3 posts 2 rows below) 3 times, sk next st, hdc2tog, 1 sc in next st. Rep from * around. Join. Turn. 13 sts, 65 sts. This round starts the decrease.
34th rnd: RS. Ch 1. *Sc2tog, (sk next st, 1 trfp around next 2 sts 2 rows below, 1 trfp in front around skipped st) 3 times, sc2tog. Rep from * around. Join. Turn. 11 sts, 55 sts.
36th rnd: RS. Ch 1. *1 sc in next st, 1 dcfp around next post 2 rows below, dcfp2tog using next 2 posts 2 rows below, 1 dcfp around next 3 posts 2 rows below, dcfp2tog using next 2 posts 2 rows below, 1 dcfp around next post 2 rows below. 1 sc in next st. Rep from * around. Join. Turn. 9 sts, 45 sts.
38th rnd: RS. Ch 1. *1 sc in next st, dcfp2tog using next 2 posts 2 rows below, 1 dcfp around next 3 posts 2 rows below, dcfp2tog using next 2 posts 2 rows below,1 sc in next st. Rep from * around. Join. Turn. 7 sts, 35 sts.
Hint: There are no more alternative rnds from this point. Follow instructions as given below to finish.
39th rnd: WS. Ch 1. *Sc2tog, 1 sc in next 3 sts, sc2tog. Rep from * around. Join. Turn. 5 sts, 25 sts.
Stuff pumpkin is somewhat firm but don’t explode the stitch apart. The pumpkin will be sewn to have a squat so the top will sink down.
40th rnd: RS. Ch 1. *Sc2tog, 1 sc in next st, sc2tog. Rep from * around. Join. Do not turn. 3 sts, 15 sts.
41st rnd: RS. Rep 5th rnd. 3 sts, 15 sts.
42nd rnd: RS. Ch 1. 1 sc in next st, sc2tog the rest of the stitching around. Join. Cut yarn about 24” [61 cm] and pull loop on hook so all of the yarn comes out. 7 sts.
Place yarn on a tapestry needle and feed the yarn through all stitches in the last round and pull the hole shut.
Proceed to pumpkin shaping at the bottom of the article.
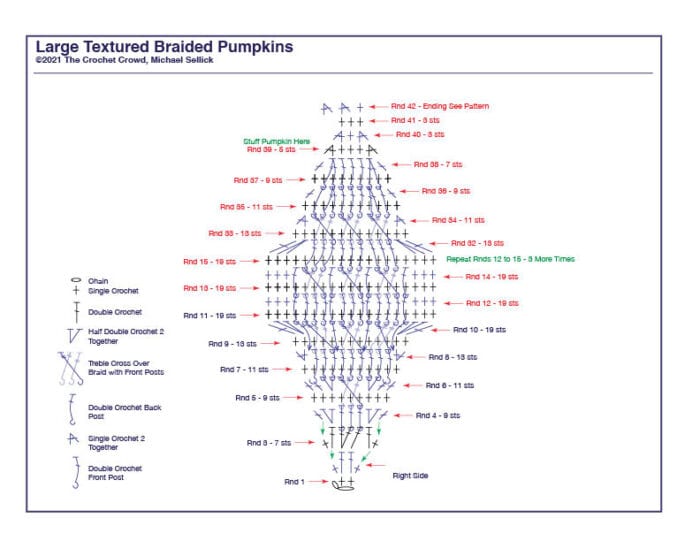
Large Pumpkin Crochet Diagram
You can click the picture to save or download. Keep in mind this is for the regular version pumpkin. For the black/gray version, substitute the back post double crochet with the front post double crochet where indicated above the 12th and 14th rounds.
Diagram shows 1 of 5 sides. It’s repeating around. Missing is the slip stitching to start each round. For this purpose, I didn’t want to over complicate the slice of a side by showing the chain 1 to start each round.
Large Pumpkin Crochet Tutorial
More Ideas
Small Braided Pumpkin
With A, ch 2.
1st rnd: WS. 10 sc in 2nd ch from hook. Join. Turn. 10 sc. Top of pumpkin.
2nd rnd: RS. Ch 1. *(1 sc and 1 dc) in next st. (1 dc and 1 sc) in next st. Rep from * around. Join. Turn. 4 sts, 20 sts.
3rd rnd: WS. Ch 1. *(1 sc and 1 dc) in next st, 2 dc in next st, 1 dc in next st, (1 dc and 1 sc) in next st. Rep from * around. Join. Turn. 7 sts, 35 sts.
4th rnd: RS. Ch 1. *1 sc in next st, 2 hdc in next st, 1 dcfp around next 3 sts, 2 hdc in next st, 1 sc in next st. Rep from * around. Join. Turn. 9 sts, 45 sts.
5th rnd and alternating rnds): WS. Ch 1, 1 sc in each st around. Join. Turn. 9 sts, 45 sts.
Hint: Each time you complete 2 trfp that have a crossover with the trfp over it, that is considered 1 braid.
6th rnd: RS. Ch 1. *1 sc in next st, 2 dcfp around 1st hdc post 2 rows below, sk next st behind the 2 dcfp sts, 1 sc in next st, sk next st, 1 trfp around 2nd and 3rd dcfp 2 rows below, 1 trfp around skipped dcfp below , skip 3 sts behind trfp,1 sc in next st, 2 dcfp around 2nd hdc post 2 rows below, sk next st behind the 2 dcfp sts, 1 sc in next st. Rep from * around. Join. Turn. 11 sts, 55 sts.
7th rnd: WS. Ch 1, *1 sc in next 10 sts, 2 sc in next st. Rep from * around. Join. Turn. 12 sts, 60 sts.
Hints:
- The pumpkin from this point has an equal amount of stitches to leave 1 sc between each braid.
- Going forward starting on rnd 9, every other round on the WS is just 1 sc as written for rnd 5 unless stated otherwise.
8th rnd: RS. Ch 1. *1 sc in next st. 3 dcfp around next 3 posts. Rep from * around. Join. Turn. 12 sts, 60 sts.
Just a reminder, the alternate round is here.
10th rnd: RS. Ch 1. *1 sc in next st, sk next st, 1 trfp around next 2 sts 2 rows below, 1 trfp in front around skipped st. Rep from * around. Join. Turn. 12 sts, 60 sts.
12th rnd: RS. Ch 1. *1 sc in next st. 3 dcfp around next 3 posts. Rep from * around. Join. Turn. 12 sts, 60 sts.
Repeat 9th to 12th rnds 2 more times. This will take you to the end of rnd 20 which is an alternate round starting in rnd 21.
21st rnd: Rep rnd 5. Alternating rnds resumes from this point.
Hint: All single crochet stitches in the next round are skipped and just doing the braiding only.
22nd rnd: RS. Ch 1. *Sk next 2 sts, 1 trfp around next 2 sts 2 rows below, 1 trfp in front around skipped 2nd st. Rep from * around. Join. Turn. 9 sts, 45 sts.
24th rnd: RS. Ch 1. Using just the posts 2 rows below for this rnd. *1 dcfp around next st, dcfp2tog using next 2 sts, 1 dcfp around next 3 sts, dcfp2tog using next 2 sts, 1 dcfp around next st. Rep from * around. Join. Turn. 7 sts, 35 sts.
26th rnd: RS. Ch 1. Using just the posts 2 rows below for this rnd. *Dcfp2tog using next 2 sts, 1 dcfp around next 3 sts, dcfp2tog using next 2 sts. Rep from * around. Join. Turn. 5 sts, 25 sts.
28th rnd: RS. Ch 1. *Sc2tog, 1 sc in next st, sc2tog. Rep from * around. Join. DO NOT TURN. 3 sts, 15 sts.
Stuff pumpkin somewhat firm but don’t explode the stitch apart. The pumpkin will be sewn to have a squat so the top will sink down.
30th rnd: RS. Ch 1. 1 sc in 1st st. Sc2tog all remaining stitches. Cut yarn about 24” [61 cm] and pull loop on hook so all of the yarn comes out. Place yarn on tapestry needle and feed yarn through all stitches in the last round and pull hole shut.
Proceed to pumpkin shaping.
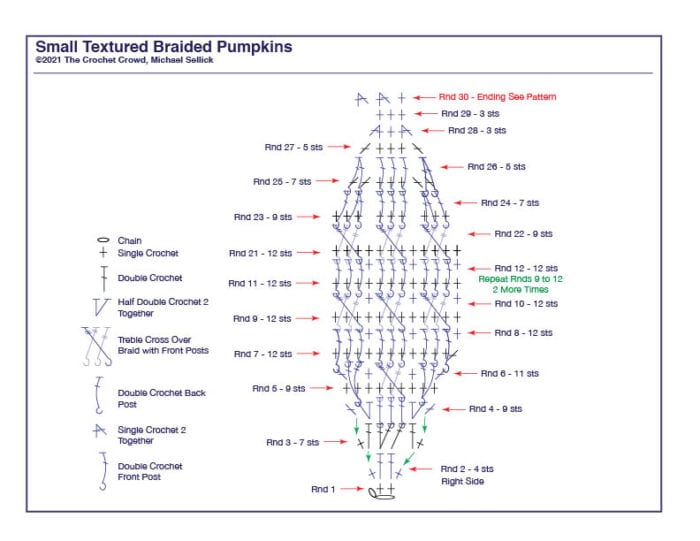
Small Pumpkin Crochet Diagram
You can click on the diagram to save or print it for your convenience.
Diagram shows 1 of 5 sides. It’s repeating around. Missing is the slip stitching to start each round. For this purpose, I didn’t want to over complicate the slice of a side by showing the chain 1 to start each round.
Pumpkin Shaping and Finishing
Keep in mind that the beginning of these pumpkins is the top of the pumpkin.
- Place the needle with the long yarn tail directly in the middle of the hole and feed through the pumpkin to pop the needle out of the top of the pumpkin hole.
- Catch the edge of the hole and then go back down to the bottom of the pumpkin on the inside.
- Pull on the strand to pull down the top of the pumpkin so it sinks in.
- Determine how far you want the sink and then secure the tail strand with a tie and weave in end.
Large Pumpkin Stem
Large pumpkin shown here.
With B, ch 31.
1st row: 1 sc in 2nd ch from hook, 1 sc in each chain across. Turn. 30 sts.
2nd row: Ch 2 (doesn’t count as st). Using back loops only across,1 hdc in next 10 sts, 1 sc in last 20 sts. Turn. 30 sts.
3rd row: Ch 1, using back loops only, 1 sc in next 20 sts, 1 hdc in last 10 sts. Turn. 30 sts.
Rep 2nd and 3rd rows 2 more times. Fasten off leaving 24” [61 cm] yarn tail.
The thicker side of the panel is the attaching part to the pumpkin. Proceed to stem finishing next.
Small Pumpkin Stem
With B, ch 11.
1st row: 1 sc in 2nd ch from hook, 1 sc in each chain across. Turn. 10 sts.
2nd to 7th rows: Ch 1, using back loops only across,1 sc in each st across. Turn. 10 sts.
Fasten off leaving 24” [61 cm] yarn tail. Proceed to stem finishing.
Stem Finishing
Roll the stem so the long sides are touching each other. Favour just one loop closest to each other while doing the whip stitch to make the seam invisible. Whipstitch along both edges so it forms the step into a cylinder shape. Once across, gather the side of the rows to pull closed. This is the top of the stem. Fasten off and weave in ends.
For the large stem on the bigger diameter side (thicker), lightly stuff for the distance of the hdc stitches with Polyfill. For the smaller stem light stuff the entire stem.
Sew the stem to the top of the pumpkin. For the small pumpkin, I intentionally sewed the stem so it has a lean so it doesn’t stay straight up and once sewn for the smaller pumpkin you are done.
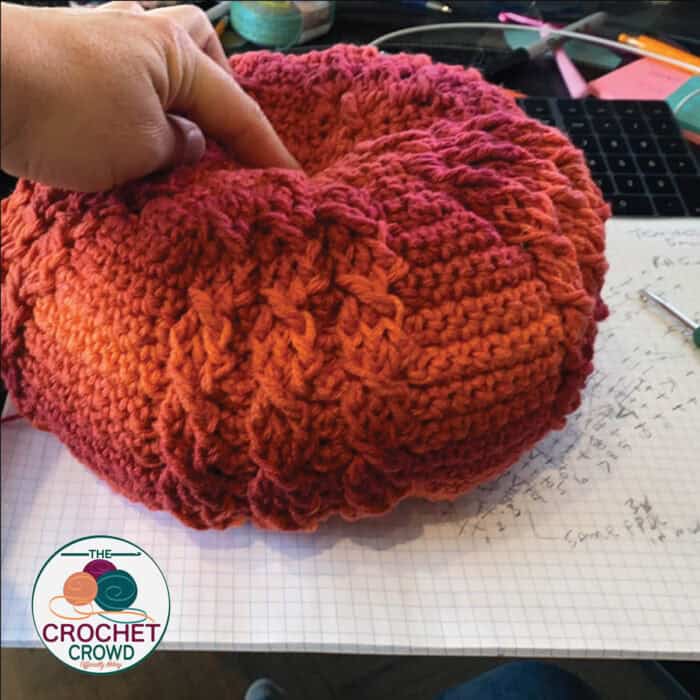
For the large pumpkin, once sewn around, do not finish. Curl the thinner part of the stem into a circle. See picture. Run the strand up through the stem and come out where you believe the permanent curl should be. Run it through the touching spot of the curl and go back and forth between the two sections a few times. Then secure with a tie and weave in end.
Curly Vines
When fastening off, leave longer tails to sew to the base of the pumpkin stem. Large pumpkin has all three vine sizes while small pumpkin just has vine 2 and vine 3 only.
With C, make 3 vines in different sizes.
Vine 1 - Ch 27. Vine 2 - Ch 21. Vine 3 - Ch 15.
1st row: 3 sc in 2nd ch from hook. 3 sc in each ch across. Fasten off.
Sew each vine to the base of the stem where you think it looks the best. Use pictures of projects for an idea.

Testers
- Nancy Elliott
- Wendy Marple
- Diane Suder
- Michele Sanders
Tutorial
Not filmed at this time.
Kim Bosley says
Grid
Mikey says
Thanks
Dominick says
May I please sell my products from this pattern on my Etsy shop. I promise to give full credit to all of y'all who worked on this pattern and will add your links and recommend
you
Mikey says
For sure... just not the free pattern. 🙂 Best wishes.
Karen Armstrong says
grid
Mikey says
Thanks