Mikey's Crochet Vest - My First Vest
Viewers seem to be loving my brand new vest that I didn't create with a pattern. Are you like me and struggle with crocheting adult sizing of clothes?
I've tried to do sweaters in the past and my clothing for my size always is misshaped or I have chosen the wrong yarn. After waking from a 20-minute power nap 3 days ago, I said "This is my opportunity to figure out how to make a vest that works for me... I'm not willing to say failure yet again this time!"
Pattern Suggestions
- Basic Diaper Cover Pattern with Ruffles + Tutorial
- Crochet Classy Cowl Pattern + Tutorial
- Simple Slouchy Crochet Pattern
- Baby Peapod Sundress Crochet Pattern + Tutorial
- Crochet Double Layered Braided Cowl Pattern
Here's my checklist:
- Understand how clothing is made and put together.
- How can I simplify the design for my ease and comfort level? I Googled One-Piece Vest and found a viewer from Australia who has blogged about doing such a thing. Check out her Happy Hippy Crochet Scrap Vest. Cat's instructions showed me that I can be creative and try something new. The shape of my vest isn't the same.
- Understand the dimensions of clothing, so I looked up Wikipedia for Clothing Sizes for USA Standards.
- Pick a yarn and size of hook that would be appropriate, fun and fabulous. I didn't want gaping holes or my vest to look like a typical double crochet stitch. I decided on Red Heart Boutique Treasure, colour is called Mosaic. Trim was done with Red Heart Boutique Changes.
- 10 Balls of Red Heart Boutique Treasure.
- 1.2 Balls of Red Heart Boutique Changes.
- Size 5.0 mm or Size H Crochet Hook.
- Tape Measure
- Stitch Markers
- Scissors
Click Read More to see Pattern / Diagrams and more pictures to make your own.
 As I learned from Cat, from Australia, I can make a one-piece vest. I changed the front seam to be straight down instead of an indentation.
Bottom Area Measurements:
- I determined the length I wanted from my underarm to the bottom of the vest. I wanted it to drape to my butt area. I determined the height to be about 20" for myself.
- I then wrapped the measuring tape around my waist and looked down to ensure my stomach would fit inside the measurement. In the end, we will be adding a bit of trim to increase the distance by an inch. My measurement was 47".
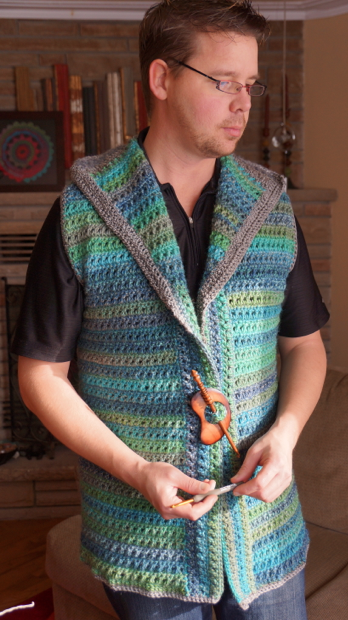
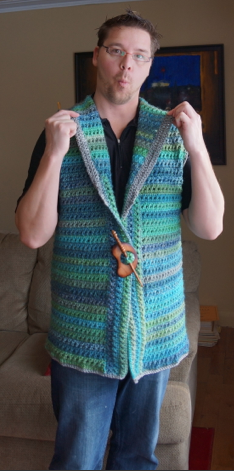
- Did you see my mistake? If you look at my vest, you will have noticed that I have a 3.5" stitching going up and down in the middle of the vest at the front. It extends from the bottom to the under the arm area as I didn't crochet it wide enough. As I crocheted the first several rows, the distance of the chain shrunk. So I have to compensate by adding 3.5" of crochet to the front bottom section before moving to the top shoulder and upper back area. It still looks great and worked out just fine.
Before going to the rest of the dimensions, I crocheted the bottom section first to the height of the underarms.
Bottom Section
- Using a Size H or 5.0 mm Crochet Hook. Chain the number of chains it takes to go your maximum wrap area, try to keep the chain in "even numbers" when you finish. When testing it or measuring it after you have chained it, try not stretching out the chain so it's more realistic to the right size.
- DC 4th from the Hook and all the way down the chain. Turn.
- There is the Criss Crossing Stitch used in this pattern. To Criss Cross, Ch 3, then *skip the first stitch and DC into the next. Then DC into the stitch you skipped over. Then repeat from * all the way across. The last stitch will be a regular DC. Turn.
- Ch 1, then SC into each stitch all the way across.
- You may want to test your wrap distance after a few rows to see what the shrinkage is, just in case you made the chain too short or too long.
- Repeat steps 3 - 4 until you get the height you measured from bottom to the underarm.
- Be sure to finish off with a Single Crochet Row.
Test Your Vest
- Test your vest now to see if the wrapping distance is fine.
- Like me, I made a mistake as I said above. I simply figured out the distance I needed and continued the same stitch working up and down on both sides of the bottom section to increase the distance.
Shoulders and Back Panels
- Take your measurements for the upper areas. We are going to continue crocheting the main body but add these panels directly to the pattern.
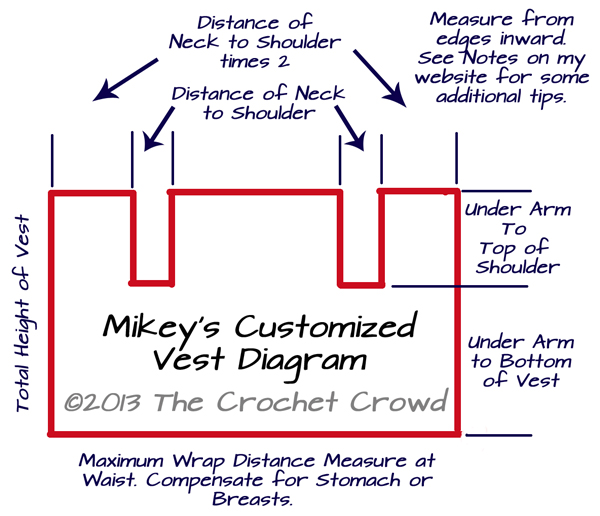
- Measure the distance of your neck to the edge of your shoulder. For the outside upper blocks, you need to take that measurement and times it by 2. My measurement was 5" and I times that by 2. So the distance for both sides of the upper blocks is 10" wide.
- With a measuring tape, measure the distance you got and mark it with a stitch marker.
- To keep your shoulder areas the exact same. Go to the other side count the stitches you got from step 3 above. Then measure the distance inward and I would strongly recommend you count the stitches and mark it with a stitch marker.
- The gaps downward are your armholes. The distance of that gap is the distance you got for your shoulders. In my case, the measurement was 5" and so the gap distance is always 5".
- Measure from the stitch marker inward another 5" and mark it as the starting position of your back.
- To keep the arms the exact same, measure inward but count the stitches you got from step 6 and mark it with a stitch marker.
- Measure the height by taking the measurement from the upper arm around the arm and to the top of the shoulder.
- At this point, you have the positions marked where all blocks will stop and start. You are ready to begin doing the upper blocking area.
In using colour transitioning yarn.
- In my case, I used Red Heart Boutique Treasure that has a phenomenal colourway.
- A common mistake can be using yarn like this and not honouring the established colourway. When doing the upper blocks, you want to ensure the yarn you are using is close to the colour that you finished off the bottom section with.
- In a jacket like this, the sudden jump of a colourway is shockingly noticeable. So when creating the three upper blocks, be sure the colour that you are starting within all three sections is close to the final colour that you are attaching to.
Starting the Upper Panels
- Choose your panel. I did the left one first.
- Fasten on the yarn, Ch 2 and start to do the Criss Cross Stitching First to the first stitch marker, Turn.
- Ch 1 then SC all the way across. Turn.
- Ch 3, do the Criss Cross Stitching.
- Repeat steps 3 - 4.
- Go to the height you measured from the up from the underarm to the top of the shoulder.
- The final two rows of the block should be Single Crochet.
Let's Sew The Shoulders Together
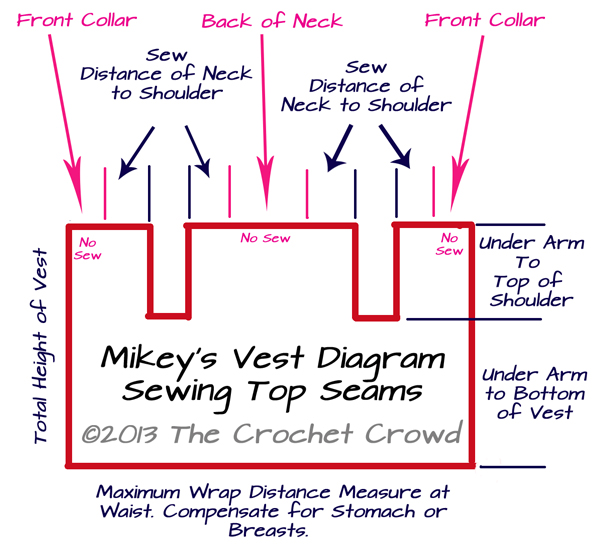
The diagram below will help you. We want to sew from the gaps of the arms toward the outside and inside of the vest.
- Lay your project flat, inside out, and measure from the inside gap areas. Measure the distance you got from your neck to shoulder. In my case that is 5".
- Measure 5" on both sides of the gap and mark with a stitch marker. You could also fold the project over top of each other as if it was sewn and measure them both together at the same time and put a stitch marker through both sections to hold them together.
- A helpful hint is to ensure you are looking at the jacket inside out. The sewing will be under the underside of the vest.
Trims & Borders
Now that your panels are sewing together at the top. The upper collar is now ready for the trim. I used back posts and front posts for my upper collar to give it a bit of texture. My trim is also Red Heart Boutique Changes.
- On the upper collar (not lapel) you will fasten on at the edge of the lapel area to the back collar. Ch 2 and then DC all the way across the upper collar to the opposite side where the lapel starts.
- Ch 2, then *Back Post Double Crochet (BPDC) and then Front Post Double Crochet (FPDC) and repeat from * all the way across. The final stitch is a Half Double Crochet (HDC).
- Repeat Step 2 - 4 Times... BUT LISTEN UP! If the stitch below is FPDC, be sure to put the opposite stitch above it and vice versa for BPDC. This will create the crochet to look weaved.
Arm Holes
- Fasten on with the trim yarn. Ch 1, and SC all the way around as equal in the distance as most of the sleeve won't have established stitches to use. Slip Stitch at the end and weave in your ends.
Bottom Border
- Fasten on with trim yarn on the bottom edge of the front of the vest. Then SC all the way around the bottom to the opposite side of the front of the vest. Turn.
- Ch 1, SC all the way across the bottom edge.
- Fasten off and weave in ends.
Lapel Area
- Starting a midpoint section where the front drapes down to the middle of your lower chest. Fasten on yarn. SC in the 1st 3 stitches, HDC into the next 3 stitches, DC remaining to the top of the corner of the back collar. Turn.
- Measure back 6 stitches from the starting of this row where you fastened on. This is your ending. Mark with a stitch marker.
- Ch 3, and DC all the way until you get to the 7th stitch before the stitch marker. The next 3 Stitches are HDC. The final 3 stitches are SC. Fasten off and weave in ends.
Optional
- I originally was going to do a zipper for closure.
- I was then going to do buttons instead.
- You can make a belt to go around if you wanted to.
- You can add a flower or something special to the lapel to represent your creativity.
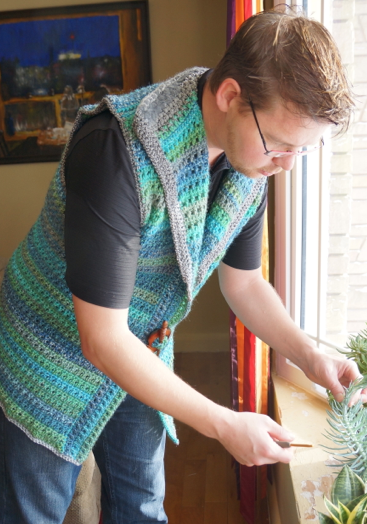
- I opted for a shawl pin to bring it to a close at the front in one area instead.
Lee Clark says
What I need is a video that explains how to do each step. I see what you are doing but being able to take that from the written pattern to a vest is more difficult. Please could you do a video on how to add sleeves and making a vest. I think I could follow a video. I think if I see it done like in a video, it wouldn't seem so difficult. I so love this crowd and want to learn more about clothing just like you. thanks
Cheryl says
Not only is the vest a great looking product on you, Mikey, you also look like you've lost a fair amount of weight as well!! Congratulations & thanks for the possibly unintended inspiration to make both the vest and start back on a good eating regimen (sp?).
Angela says
I really loved the vest and the colors.I liked the article.