Butterfly Stitch Crochet Pattern
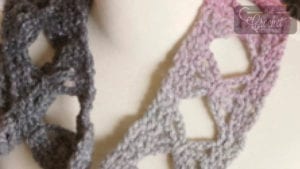
This is the butterfly scarf. It is so named because the stitches give the appearance of butterflies. This is a very popular scarf from our viewers. You will be amazed by how fast you can do one of these scarves.
This is the Butterfly Scarf created using the Butterfly Stitch. This is so quick and easy... it's not even funny!

I used a transitional colour yarn with this to really kick this scarf into an amazing concept. Some yarns really can make you look creative, even when the stitches are so simple.
This concept is the foundation of the Scarf within a Scarf Pattern.
Please note: The Video's Row 1 is different from the pattern below. In the video, I decided to have no DC border at the top or bottom. I essentially changed Row 1.
Instructions
- 1 Ball of 4 Ply Worsted Medium 4 Weight Yarn. I used 1 Ball of Red Heart Boutique Midnight Yarn. 2.5 oz or 70 g ball. 153 yards. The colour used in this sample is called "Shadow".
- Use 6.0 mm or Size J Crochet, Hook
- Karen's sample (to the right) has been done using 50 g ball of Rico Baby Yarn in Christmassy Red using a 4 mm Crochet Hook.
- Abbreviations are: Ch = Chain, DC = Double Crochet
- Ch 16. Begin DC 3rd Chain from hook all the way across. Turn. OPTIONAL AS PER VIDEO: In the video, I did 1 DC 3rd Ch from hook, and then DC into the next two stitches, Ch 8, skip 8 stitches and put 1 DC into the final three stitches. If you do this, automatically skip over ROW 2 instructions next and start on Row 3. This will allow you to keep a consistent amount of chains going across. This way prevents you from having a DC border edge. The choice is up to you.
- Ch 2, DC into the first two stitches, Ch 8, DC into the final three stitches of the row. Turn.
- Ch 2, DC into the first two stitches, Ch 8, DC into the final three stitches of the row. Turn.
- Ch 2, DC into the first two stitches, Ch 8, DC into the final three stitches of the row. Turn.
- Ch 2, DC into the first two stitches, Ch 4, SC around the Rows 2 - 4 Chains to link them together, Ch 4, DC into the final three stitches.
- Repeat Rows 2 - 5 until you get the desired length of scarf you want.
- To end this scarf, the final row should be DC all the way across. Fasten off and wave in ends. If you don't want a DC border edge, simply end the project using Row 5 instructions.
Tips:
- If some of your stitches in rows 5 are not in the center of your scarf. Pull the scarf on the sides and the stitches will even out.
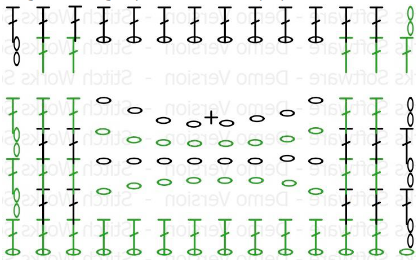
Crochet Diagram
The diagram below shows you the starting point on the bottom left. You keep repeating the chains in the middle throughout the scarf but every 4th you will join the 3 rows of chains under it together.
There is a gap in the diagram showing you at the top on how to finish this scarf.

Kim Bosley says
Grid
Mikey says
Thanks
Ann says
No blue button
Mikey says
added
alana says
I love his work is very good thanks for teaching techniques of crochet beautiful greetings and blessings