DOWNLOAD FREE PATTERN

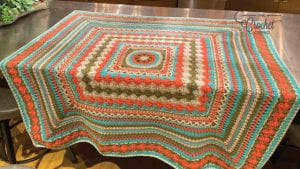
Introducing the Crochet Better Together Afghan, the first collaboration of Jeanne Steinhilber and Michael Sellick (me) in a blanket where two minds are better than one. This was our third attempt as I kept changing my mind. Honestly, frustrating the hell out of Jeanne with my stalling and finding time to throw in my parts.
Yarn
Red Heart® With Love® (198 g/7 oz; 370 yds/338 m)
- Contrast A Stone (1306) 2 balls
- Contrast B Cameo (1711) 2 balls
- Contrast C Papaya (1939) 2 balls
- Contrast D Iced Aqua (1502) 2 balls
Sizing
- Size U.S. I/9 (5.5 mm) crochet hook or size needed to obtain gauge. Stitch markers.
- Approx 54” [137 cm] square.
- Gauge 12 sc and 13 rows = 4" [10 cm].
Abbreviations
- Approx = Approximately
- Beg = Begin(ning)
- Camel St = 1 sc into horizontal bar created below st in previous row (bar is below loops normally worked on WS – see diagram)
- Ch = Chain(s)
- Dc = Double crochet
- 4-dc cluster = (Dc4tog). (Yoh and draw up a loop in next stitch. Yoh and draw through 2 loops on hook) 4 times. Yoh and draw through all 5 loops on hook
- 7-dc cluster = (Dc7tog). (Yoh and draw up a loop in stitch. Yoh and draw through 2 loops on hook) 7 times. Yoh and draw through all 8 loops on hook
- Dcbp = Yoh and draw up a loop around post of next stitch at back of work, inserting hook from right to left. (Yoh and draw through 2 loops on hook) twice
- Dcfp = Yoh and draw up a loop around post of next stitch at front of work, inserting hook from right to left. (Yoh and draw through 2 loops on hook) twice
- Hdc = Half double crochet
- Rep = Repeat
- RS = Right side
- Sc = Single crochet
- Shell = 7 dc in indicated stitch
- Sl st = Slip stitch
- Sp(s) = Space(s)
- St(s) = Stitch(es)
- Tr = Treble crochet
- Trfp = (Yoh) twice and draw up a loop around post of next stitch at front of work, inserting hook from right to left. (Yoh and draw through 2 loops on hook) 3 times.
- Trfp2tog = [(Yoh) twice and draw up a loop around post of next stitch at front of work, inserting hook from right to left. Yoh and draw through 2 loops on hook) twice. 2 loops remain on hook] twice. Yoh and draw through all 3 loops
- Xsc = Skip first stitch. 1 sc in next stitch. Working in front of stitch just made, 1 sc in skipped stitch.
- WS = Wrong side
- Yoh = Yarn over hook
Measurements & Tips
- Due to the finite amount of yarn in each shade, pattern gauge must be matched to ensure successful results.
- Joining with hdc in corners counts as ch-2 sp.
- Week 1 measurement is approx 12½" x 12½" [32 x 32 cm].
- Week 2 measurement is approx 28" x 28" [71 x 71 cm].
- Week 3 measurement is approx 40" x 40" [101.5 x 101.5 cm].
- Week 4 measurement is approx 47" x 47" [119 x 119 cm].
- Week 5 measurement is approx 54" x 54" [137 x 137 cm].
- Join all rnds with sl st to first st (sc, top of ch 3)
- Ch 2 at beg of rnd does not count as st.
- Ch 3 at beg of rnd counts as dc.
Week 1
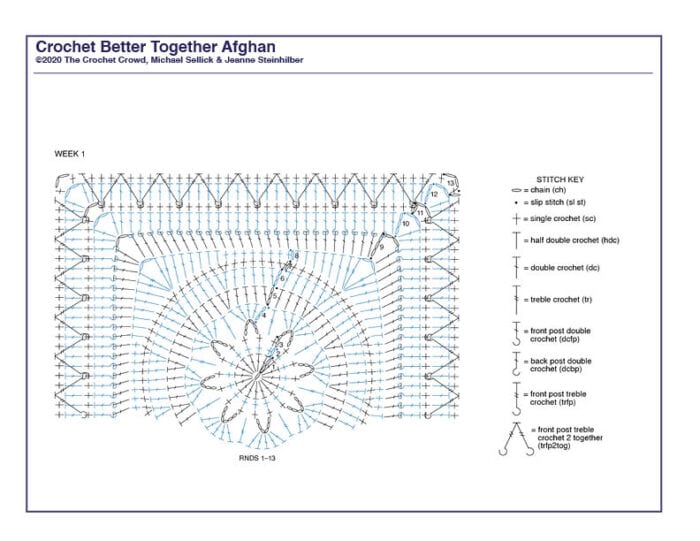
1st rnd: With A, ch 3. 16 dc in 3rd ch from hook. Join. Fasten off. 16 dc.
2nd rnd: Join B with sl st to first dc. Ch 1. 1 sc in same sp as sl st and each dc around. Join. Do not fasten off. 16 sc.
3rd rnd: Ch 1. 1 sc in same sp as sl st. 1 sc in next sc. Ch 6. (1 sc in each of next 2 sc. Ch 6) 7 times. Join. Fasten off. 8 ch-6 sps.
4th rnd: Join C with sl st to ch-6 sp. Ch 3. 4 dc in same sp as sl st. 1 tr between next 2 sc. (5 dc in next ch-6 sp. 1 tr between next 2 sc) 7 times. Join. Fasten off. 48 sts.
5th rnd: Join D with sl st to first dc. Ch 3. 1 dc in same sp as sl st. 1 dc in each of next 3 sts. (2 dc in next st. 1 dc in each of next 3 sts)
6th rnd: Join A with sl st to first dc. Ch 3. 1 dc in same sp as sl st. 1 dc in each of next 4 dc. (2 dc in next dc. 1 dc in each of next 4 dc) 11 times. Join. Fasten off. 72 dc.
7th rnd: Join B with sl st to first dc. Ch 1. 2 sc in same sp as sl st. 1 sc in each of next 5 dc. (2 sc in next dc. 1 sc in each of next 5 dc) 11 times. Join. Do not fasten off. 84 sc. TIP • In 8th rnd, the circle transitions to a square.
8th rnd: Ch 1. *1 sc in each of next 8 sc. 1 hdc in each of next 3 sc. 1 dc in each of next 3 sc. (2 tr. Ch 2. 2 tr) in next sc (corner). 1 dc in each of next 3 sc. 1 hdc in each of next 3 sc. Rep from * 3 times more. Join. Fasten off. 8 sc, 6 hdc, 6 dc, 4 tr each side.
TIP • In 9th rnd, notice the corners are (1 dc. Ch 2. 2 dc). This achieves an odd st count across each side.
9th rnd: Join A with sl st to corner ch-2 sp. Ch 3. 1 dc in same sp as sl st. 1 dc in each st to next corner ch-2 sp. *(1 dc. Ch 2. 2 dc) in corner ch-2 sp. 1 dc in each st to next corner ch-2 sp. Rep from * twice more. 1 dc in first ch-2 sp. Ch 2. Join. Fasten off. 27 dc each side.
10th rnd: Join C with sl st to corner ch-2 sp. Ch 3. 1 dc in same sp as sl st. *(1 dcfp around post of next dc. 1 dcbp around post of next dc) 13 times. 1 dcfp around post of next dc.** (2 dc. Ch 2. 2 dc) in corner ch-2 sp. Rep from * twice more, then from * to ** once. 2 dc in first corner ch-2 sp. Ch 2. Join. Fasten off. 31 sts each side.
11th rnd: Join A with sl st to corner ch-2 sp. 1 sc in same sp as sl st. 1 sc in each st to next corner ch-2 sp. *(1 sc. Ch 2. 1 sc) in corner ch-2 sp. 1 sc in each st to next corner ch-2 sp. Rep from * twice more. 1 sc in first ch-2 sp. Ch 2. Join. Fasten off. 33 sc each side.
12th rnd: Join B with sl st to corner ch-2 sp. Ch 3. 1 dc in same sp as sl st. *1 dc in each st to corner ch-2 sp.** (2 dc. Ch 2. 2 dc) in corner ch-2 sp. Rep from * twice more, then from * to ** once. 2 dc in first ch-2 sp. Ch 2. Join. Fasten off. 37 dc each side.
13th rnd: Join A with sl st to corner ch-2 sp. Ch 1. (1 sc. Ch 2. 1 sc) in same sp as sl st. *1 trfp around post of first sc 2 rows below. (Skip next dc on working row behind just made st. 1 sc in each of next 3 dc. 1 trfp2tog over same sc as last trfp worked and 4th sc 2 rows below) 8 times. Skip next dc on working row behind just made st. 1 sc in each of next 3 dc. 1 trfp over same sc as last trfp2tog worked. Skip last dc before ch-2 sp on working row behind just made st.**(1 sc. Ch 2. 1 sc) in corner ch-2 sp. Rep from * twice more, then from * to ** once. Join. Fasten off. 29 sc each side.
Week 1 Diagram
Click diagram to save or print.
Week 2 - Catherine's Wheel Stitch
TIPS
- When starting 14th rnd, don’t overlook 1st sc when skipping first 2 sts to begin first Shells.
- 14th rnd sides are not symmetrical as we need to adjust sts for proper st count. Take extra note of the ending of each side.
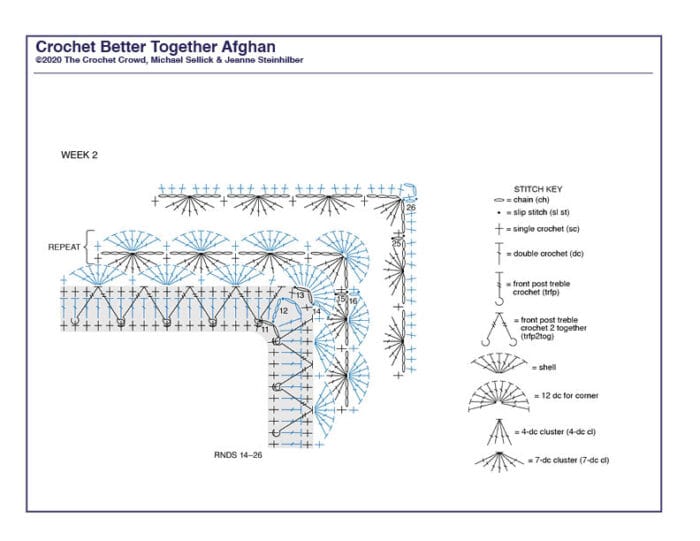
14th rnd: Join D with sl st to corner ch-2 sp. Ch 3. 11 dc in same sp as sl st. [*Skip next 2 sts. 1 sc in next st. Skip next 2 sts. Shell in next st. Rep from * to last 3 sts before corner ch-2 sp. Skip next st. 1 sc in next st. Skip next st.** 12 dc in corner ch-2 sp] 3 times. Rep from * to ** once more. Join. Fasten off. 6 Shells each side.
15th rnd: Join C with sl st to 4th dc of corner 12-dc group. Ch 1. 1 sc in same sp as sl st. [Ch 3. 4-dc cluster over next 4 sts for corner. Ch 3. *1 sc in next st. Ch 3. 7-dc cluster over next 7 sts. Ch 3. Rep from * to corner 12-dc group. 1 sc in next st] 4 times. Join. Do not fasten off. 7 partial bottom wheels between 12-dc groups.
16th rnd: Ch 1. 1 sc in same sp as sl st. [12 dc in 4-dc cluster for corner. *1 sc in next sc. Shell in next 7-dc cluster. Rep from * to last sc before corner 4-dc cluster. 1 sc in next sc] 4 times. Join. Fasten off. 7 Shells each side between corner 12-dc groups.
17th and 18 rnds: With A, as 15th and 16th rnds. Break A. 8 full wheels each side between corner 12-dc groups.
19th and 20th rnds: With B, as 15th and 16th rnds. Break B. 9 full wheels each side between corner 12-dc groups.
21st and 22nd rnds: With A, as 15th and 16th rnds. Break A. 10 full wheels each side between corner 12-dc groups.
23rd and 24th rnds: With C, as 15th and 16th rnds. Break C. 11 full wheels each side between corner 12-dc groups.
25th rnd: With D, as 15th rnd. Break D. 12 partial wheels each side between corner 12-dc groups.
26th rnd: Join A with sl st to corner 4-dc cluster. Ch 1. (1 sc. Ch 2. 1 sc) in same sp as sl st. [*3 sc in next ch-3 sp. Skip next sc. Rep from * to next corner 4-dc cluster.** (1 sc. Ch 2. 1 sc) in corner 4-dc cluster] 3 times. Rep from * to ** once more. Join. Fasten off. 80 sc each
Week 2 Diagram
Click diagram to save or print.
Week 3 - Alpine Stitching
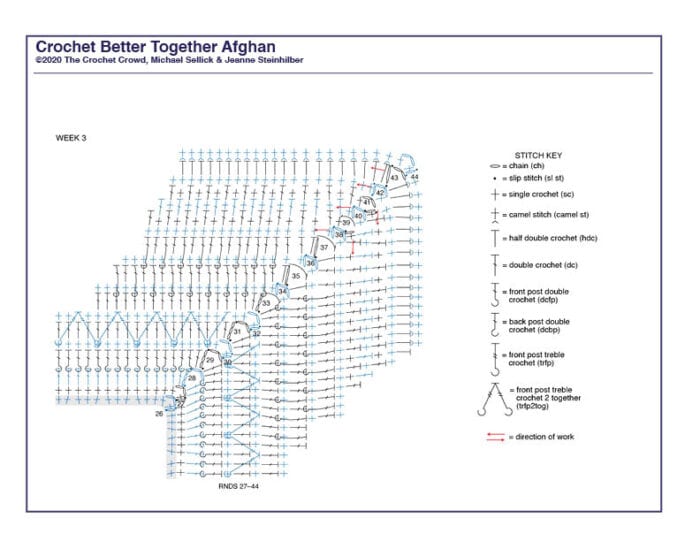
27th rnd: Join B with sl st to corner ch-2 sp. Ch 1. (1 sc. Ch 2. 1 sc) in same sp as sl st. *1 sc in each sc to next corner ch-2 sp.** (1 sc. Ch 2. 1 sc) in corner ch-2 sp. Rep from * twice more, then from * to ** once. Join. Fasten off. 82 sc each side.
TIP • In 28th rnd, an odd number of sts each side is required. Note corners are (1 dc. Ch 2. 2 dc).
28th rnd: Join A with sl st to corner ch-2 sp. Ch 3. 1 dc in same sp as sl st. *1 dc in each sc to next corner ch-2 sp.** (1 dc. Ch 2. 2 dc) in corner ch-2 sp. Rep from * twice more, then from * to ** once more. 1 dc in first ch-2 sp. Ch 2. Join. Fasten off. 85 dc each side.
29th rnd: Join C with sl st to corner ch-2 sp. Ch 3. 1 dc in same sp as sl st. [*1 dcfp around post of next dc. 1 dcbp around post of next dc. Rep from * to 1 dc before corner ch-2 sp. 1 dcfp around post of next dc.** (2 dc. Ch 2. 2 dc) in corner ch-2 sp] 3 times. Rep from * to ** once more. 2 dc in first corner ch-2 sp. Ch 2. Join. Fasten off. 89 sts each side.
30th rnd: Join A with sl st to corner ch-2 sp. Ch 1. (1 sc. Ch 2. 1 sc) in same sp as sl st. *1 sc in each st to next corner ch-2 sp.** (1 sc. Ch 2. 1 sc) in corner ch-2 sp. Rep from * twice more, then from * to ** once. Join. Fasten off. 91 sc each side.
31st rnd: Join B with sl st to corner ch-2 sp. Ch 3. 1 dc in same sp as sl st. 1 dc in each sc to corner ch-2 sp. *(2 dc. Ch 2. 2 dc) in corner ch-2 sp. 1 dc in each sc to corner ch-2 sp. Rep from * twice more. 2 dc in first ch-2 sp. Ch 2. Join. Fasten off. 95 dc each side.
32nd rnd: Join A with sl st to corner ch-2 sp. Ch 1. (1 sc. Ch 2. 1 sc) in same sp as sl st. *1 sc in next dc. 1 trfp around 2nd sc 2 rows below. (Skip next dc on working row behind just made st. 1 sc in each of next 3 dc. 1 trfp2tog over same sc as last trfp worked and 4th sc 2 rows below) 22 times. Skip next dc on working row behind just made st. 1 sc in each of next 3 dc. 1 trfp over same sc as last trfp2tog worked. Skip next dc. 1 sc in next dc.** (1 sc. Ch 2. 1 sc) in corner ch-2 sp. Rep from * twice more, then from * to ** once more. Join. Fasten off. 97 sts each side.
TIP • When making hdc corners, mark tops of hdc stitches as you crochet so you can clearly see where sides start and end. This will help you avoid skipping or adding stitches in next round.
33rd rnd: Join D with sl st to corner ch-2 sp. Ch 3. 1 dc in same sp as sl st. [*1 dc in each sc to corner ch-2 sp.** (2 dc. Ch 2. 2 dc) in corner ch-2 sp] 3 times. Rep from * to ** once more. 2 dc in first ch-2 sp. Join with hdc to first dc. Do not fasten off. 101 dc each side.
34th rnd: Ch 1. 1 sc around post of joining hdc. *1 sc in each dc to corner ch-2 sp.** (1 sc. Ch 2. 1 sc) in corner ch-2 sp. Rep from * twice more, then from * to ** once. 1 sc around post of joining hdc. Ch 2. Join. Fasten off. 103 sc each side.
35th rnd: Join C with sl st to corner ch-2 sp. Ch 1. 1 hdc in same sp as sl st. 1 dc in next sc. 1 dcfp around post of first dc 2 rnds below. [*Skip next sc on working row behind just made st. 1 dc in next sc. 1 dcfp around post of next dc 2 rnds below. Rep from * to 1 sc before corner ch-2 sp. 1 dc in next sc.** (1 hdc. Ch 2. 1 hdc) in corner ch-2 sp] 3 times. Rep from * to ** once more. 1 hdc in first ch-2 sp. Join with hdc to first hdc. 105 sts each side.
36th rnd: As 34th rnd. 107 sc each side.
37th rnd: Join D with sl st to corner ch-2 sp. Ch 1. 1 hdc in same sp as sl st. 1 dc in each of next 2 sc. 1 dcfp around first dc 2 rnds below. [*Skip next sc on working row behind just made st. 1 dc in nextsc. 1 dcfp around post of next dc 2 rnds below. Rep from * to 2 sts before corner ch-2 sp. 1 dc in each of next 2 sc.** (1 hdc. Ch 2. 1 hdc) in corner ch-2 sp] 3 times. Rep from * to ** once more. 1 hdc in first ch-2 sp. Ch 2. Join with hdc to first hdc. 109 sts each side.
38th rnd: As 34th rnd. 111 sc each side. Turn.
Houndstooth Stitching Rounds Begin
TIP • Work houndstooth stitch for next 3 rnds. This requires turning Afghan over between rounds (WS and RS) in order to achieve correct houndstooth stitch.
39th rnd: (WS). Join B with sl st to corner ch-2 sp. Ch 1. 1 sc in same sp as sl st. 1 dc in next sc. [*1 sc in next sc. 1 dc in next sc.* Rep from * to * to next corner ch-2 sp. (1 sc. Ch 2. 1 sc) in corner ch-2 sp] 3 times. Rep from * to * to first corner ch-2 sp. 1 sc in first ch-2 sp. Join with 1 hdc to first sc. 113 sts each side. Turn.
40th rnd: (RS). Ch 1. 1 sc around post of joining hdc. 1 dc in next sc. [*1 sc in next dc. 1 dc in next sc. Rep * to next corner ch-2 sp.** (1 sc. Ch 2. 1 sc) in corner ch-2 sp] 3 times. Rep from * to ** once more. 1 sc in first ch-2 sp. Ch 2. Join. Fasten off. 115 sts each side. Turn.
41st rnd: (WS). Join A with sl st to corner ch-2 sp. Ch 1. 1 sc in same sp as sl st. 1 dc in next sc. [*1 sc in next sc. 1 dc in next sc.* Rep from * to * to next corner ch-2 sp. (1 sc. Ch 2. 1 sc) in corner ch-2 sp] 3 times. Rep from * to * once more. 1 sc in first ch-2 sp. Join. Fasten off. 117 sts each side. Turn.
42nd rnd: (RS). Join C with sl st to corner ch-2 sp. Ch 1. (1 sc. Ch 2. 1 sc) in same sp as sl st. *1 sc in each sc to next corner ch-2 sp.** (1 sc. Ch 2. 1 sc) in corner ch-2 sp. Rep from * twice more, then from * to ** once more. Join. Fasten off. 119 sc each side. Do not turn.
43rd rnd: Join D with sl st to corner ch-2 sp. Ch 1. 1 hdc in same sp as sl st. *1 hdc in each sc to next corner ch-2 sp.** (1 hdc. Ch 2. 1 hdc) in corner ch-2 sp. Rep from * twice more, then from * to ** once. 1 hdc in first ch-2 sp. Join. Fasten off. 121 hdc each side.
44th rnd: Join C with sl st to corner ch-2 sp. Ch 1. (1 sc. Ch 2. 1 sc) in same sp as sl st *1 camel st in each hdc to corner ch-2 sp** (1 sc. Ch 2. 1 sc) in corner ch-2 sp. Rep from * twice more, then from * to ** once. Join. Fasten
Week 3 Diagram
Click diagram to save or print.
Week 4 - Houndstooth Stitching Revisited
TIPS
- Next section of Afghan is a mirror image of colors and stitches worked in opposite order.
- When working houndstooth stitch rounds again be sure to turn Afghan as required.
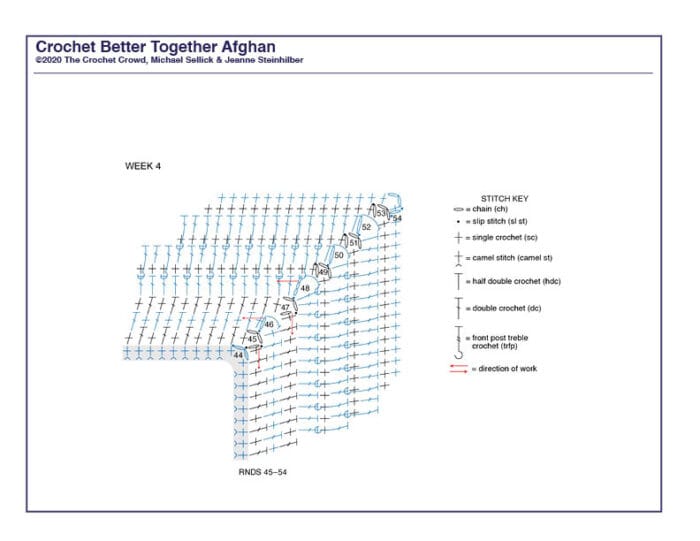
45th rnd: (WS). Join A with sl st to corner ch-2 sp. Ch 1. 1 sc in same sp as sl st. 1 dc in next sc. [*1 sc in next sc. 1 dc in next sc.* Rep from * to * to next corner ch-2 sp. (1 sc. Ch 2. 1 sc) in corner ch-2 sp] 3 times. Rep from * to * to first corner ch-2 sp. 1 sc in first ch-2 sp. Join. Fasten off. 125 sts each side. Turn.
46th rnd: (RS). Join B with sl st to corner ch-2 sp. Ch 1. 1 sc in same sp as sl st.1 dc in next sc. [*1 sc in next dc. 1 dc in next sc. Rep * to next corner ch-2 sp.** (1 sc. Ch 2. 1 sc) in corner ch-2 sp] 3 times. Rep from * to ** once more. 1 sc in first ch-2 sp. Ch 2. Join with 1 hdc to first sc. 127 sts each side. Turn.
47th rnd: (WS). Ch 1. 1 sc around post of joining hdc. 1 dc in next sc. [*1 sc in next sc. 1 dc in next sc.* Rep from * to * to next corner ch-2 sp. (1 sc. Ch 2. 1 sc) in corner ch-2 sp] 3 times. Rep from * to * once more. 1 sc in first ch-2 sp. Join. Fasten off. 129 sts each side. Turn. TIP • Afghan is no longer turned to WS for remainder of this project.
48th rnd: (RS). Join D with sl st to corner ch-2 sp. Ch 3. 1 dc in same sp as sl st. *1 dc in each st to corner ch-2 sp.** (2 dc. Ch 2. 2 dc) in corner ch-2 sp. Rep from * twice more, then from * to ** once. 2 dc in first ch-2 sp. Join with 1 hdc to first sc. 133 dc each side.
49th rnd: Ch 1. 1 sc around post of joining hdc. *1 sc in each dc to corner ch-2 sp.** (1 sc. Ch 2. 1 sc) in corner ch-2 sp. Rep from * twice more, then from * to ** once. 1 sc around post of joining hdc. Ch 2. Join. Fasten off. 135 sc each side.
50th rnd: Join C with sl st to corner ch-2 sp. Ch 1. 1 hdc in same sp as sl st. 1 dc in next sc. 1 dcfp around post of first dc 2 rnds below. [*Skip next sc on working row behind just made st. 1 dc in next sc. 1 dcfp around post of next dc 2 rnds below. Rep from * to 1 sc before corner ch-2 sp. 1 dc in next sc.** (1 hdc. Ch 2. 1 hdc) in corner ch-2 sp] 3 times. Rep from * to ** once more. 1 hdc in first ch-2 sp. Join with hdc to first hdc. 137 sts each side.
51st rnd: Ch 1. 1 sc around post of joining hdc. *1 sc in each dc to corner ch-2 sp.** (1 sc. Ch 2. 1 sc) in corner ch-2 sp. Rep from * twice more, then from * to ** once more. 1 sc around post of joining hdc. Ch 2. Join. Fasten off. 139 sc each side.
52nd rnd: Join D with sl st to corner ch-2 sp. Ch 1. 1 hdc in same sp as sl st. 1 dc in each of next 2 sc. 1 dcfp around first dc 2 rnds below. [*Skip next sc on working row behind just made st. 1 dc in next sc. 1 dcfp around post of next dc 2 rnds below. Rep from * to 2 sts before corner ch-2 sp. 1 dc in each of next 2 sc.** (1 hdc. Ch 2. 1 hdc) in corner ch-2 sp] 3 times. Rep from * to ** once more. 1 hdc in first ch-2 sp. Ch 2. Join with hdc to first hdc. 141 sts per side.
53rd rnd: As 51st rnd. 143 sc each side.
54th rnd: Join A with sl st to corner ch-2 sp. Ch 1. (1 sc. Ch 2. 1 sc) in same sp as sl st. *1 sc in each sc to next corner ch-2 sp.** (1 sc. Ch 2. 1 sc) in corner ch-2 sp. Rep from * twice more, then from * to ** once.
Week 4 Diagram
Click diagram to save or print.
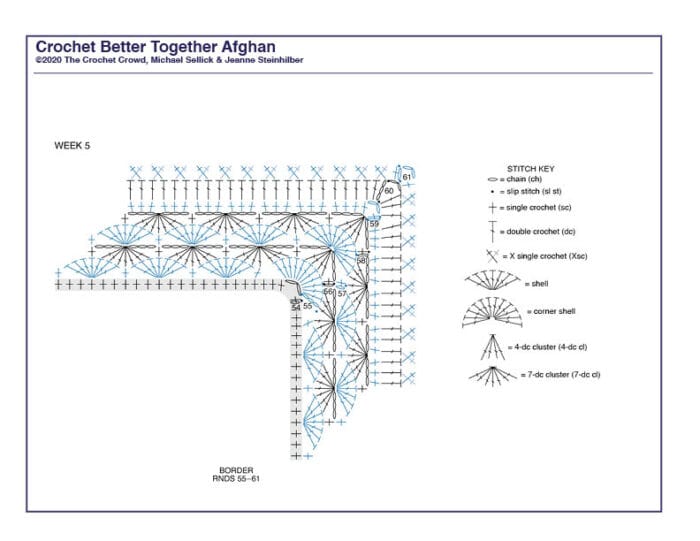
Week 5 - Border
TIP - Next round, skip first 3 sts before starting the first group of 7 dc and skip last 3 sts at end of each side. This brings the wheels into balance.
55th rnd: Join B with sl st to corner ch-2 sp. Ch 3 (counts as dc). 11 dc in same sp as sl st. [Skip next 3 sc. 1 sc in next sc. *Skip next 2 sc. 7 dc in next sc. Skip next 2 sc. 1 sc in the next sc. Rep from * to last 3 sc before corner ch-2 sp.** 12 dc in next corner ch-2 sp] 3 times. Skip next 3 sc. 1 sc in next sc. Rep from * to ** once more. Join. Fasten off. 23 partial top wheels each side.
56th rnd: Join C with sl st to 4th dc of corner 12-dc group. Ch 1. 1 sc in same sp as sl st. [Ch 3. 4-dc cluster over next 4 sts for corner. Ch 3. *1 sc in next st. Ch 3. 7-dc cluster over next 7 sts. Ch 3. Rep from * to corner 12-dc group. 1 sc in next st] 4 times. Join. Do not fasten off. 24 partial bottom wheels each side.
57th rnd: Ch 1. 1 sc in same sp as sl st. [12 dc in 4-dc cluster for corner. *1 sc in next sc. Shell in next 7-dc cluster. Rep from * to last sc before corner 4-dc cluster. 1 sc in next sc] 4 times. Join. Fasten off. 24 partial top wheels each side.
58th rnd: With B, as 56th rnd. 25 partial bottom wheels each side.
59th rnd: Join A with sl st to corner 4-dc cluster. Ch 1. (1 sc. Ch 2. 1 sc) in same sp as sl st. [*3 sc in next ch-3 sp. Skip next sc. Rep from * to next corner 4-dc cluster.** (1 sc. Ch 2. 1 sc) in corner 4-dc cluster] 3 times. Rep from * to ** once more. Join. Fasten off. 158 sc each side.
60th rnd: Join D with sl st to corner ch-2 sp. Ch 3. 1 dc in same sp as sl st. *1 dc in each sc to corner ch-2 sp.** (2 dc. Ch 2. 2 dc) in corner ch-2 sp. Rep from * twice more, then from * to ** once. 2 dc in first ch-2 sp. Ch 2. Join. Fasten off. 162 dc each side.
61st rnd: Join A with sl st to corner ch-2 sp. Ch 1. 1 sc in same sp as sl st. [*Xsc over next 2 dc. Rep from * to next corner ch-2 sp.** (1 sc. Ch 1. 1 sc) in corner ch-2 sp] 3 times. Rep from * to ** once more. 1 sc in first ch-2 sp. Ch 2. Join. Fasten off.
Week 5 Diagram
Click diagram to save or print.
Introduction
Video 1
Video 2
Video 3
Video 4
Video 5
The Cruise Ended
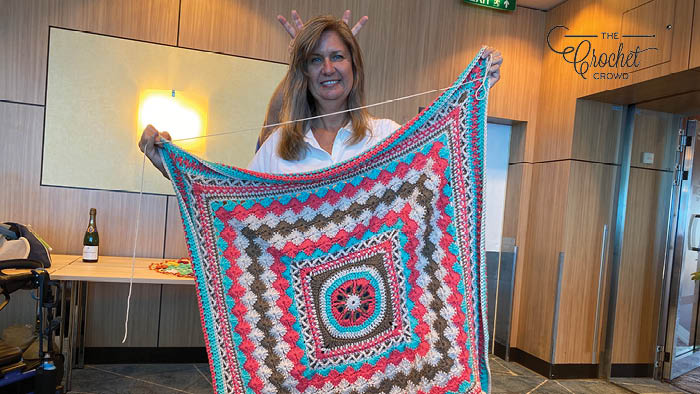
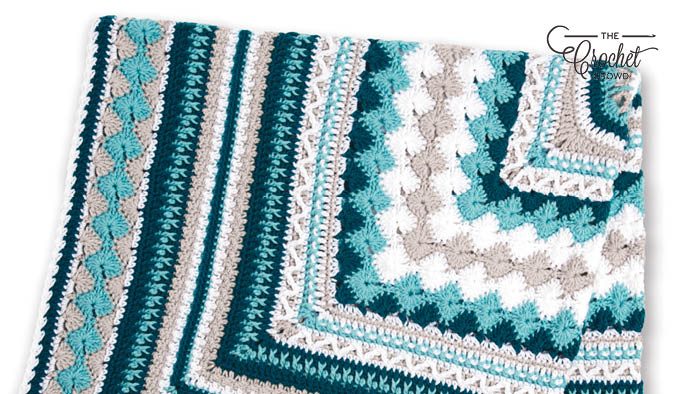
We got this far on the cruise ship and went our own ways. Cruisers onboard were very supportive and didn't take our photos with the afghan to keep it a secret. The afghan came home with me. With me taking this home, Jeanne needed to keep working on the afghan and created a second version in blue.
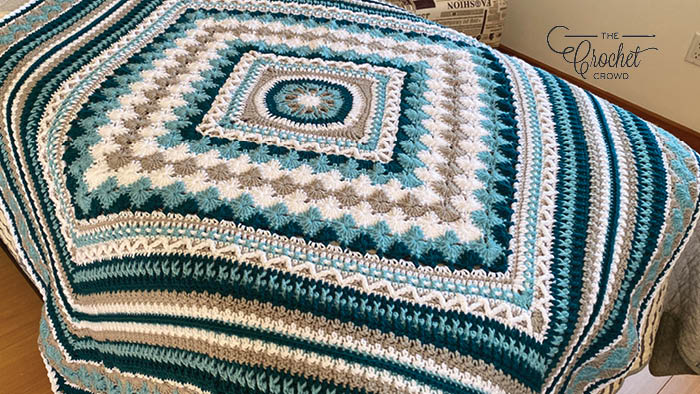
Contrast A White (1001) 2 balls
Contrast B Light Grey (1441) 2 balls
Contrast C Iced Aqua (1502) 2 balls
Contrast D Mallard (1623) 2 balls.
I also started a solo version to retest the pattern in real-time.
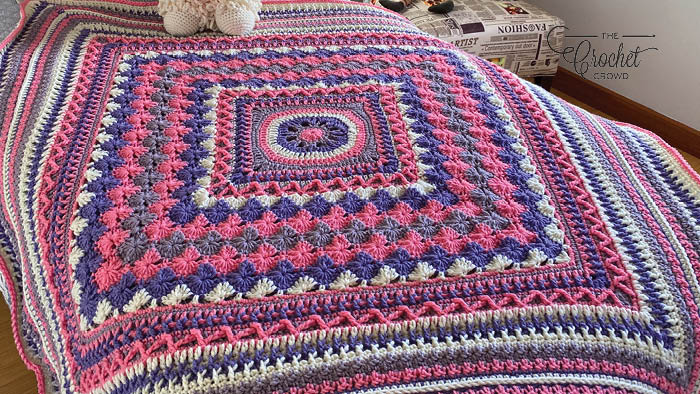
Contrast A - Bubble Gum (1704) 2 balls
Contrast B Dusty Grape (1540) 2 balls
Contrast C Lilac (1538) 2 balls
Contrast D Aran (1303) 2 balls
We continued to build out the afghan. We did so much frogging, it's not even funny. Both of us improving the afghan as we went. We had a rule not to exceed 4 colours and no more than 2 balls per colour. So the colouring was based on maximizing the balls.
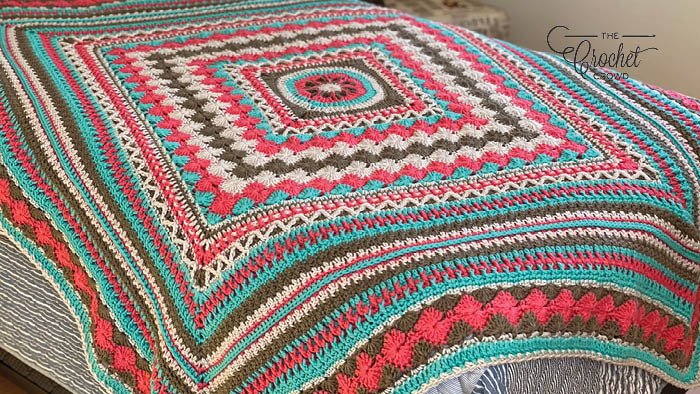
Contrast A Stone (1306) 2 balls
Contrast B Taupe (1970) 2 balls
Contrast C Papaya (1939) 2 balls
Contrast D Wintergreen (1969) 2 balls
Without sounding too much like a self-congratulating fool, I'm really proud of this afghan. It hit parts of a challenging element but also, the final look was much better, in my opinion, than I had anticipated. The final border tied this all together in a stunning way.
What I Learned
We took the idea of surprising each other. Sometimes, and this was more me than anyone, I would underwhelm Jeanne with my new addition. She felt, and she was right, I was cutting corners because I was time-strapped. This afghan could have looked completely different.
Jeanne also had sections where there was a small tweak needed to help prevent the buckling.
So the lesson was to collaborate and discuss more. We were crocheting our samples in real-time finding clues and conceptual ideas along the journey. Truth is, I loved every minute of this collaboration. It really pushed me but I also enjoyed Jeanne's contribution to stitchwork that I would have never considered. I learned stitches along the way.
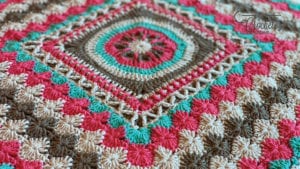
For myself, the Catherine Wheel Stitch in the square format is something I really wanted to put into a stitch along. The trouble with this type of stitch is that it can add a lot of words to the instructions and will crocheters enjoy that fact. We won't really know until it's released.
Which Version Do I Like The Best?
Version 1, the Joint Version between Jeanne and I is my favourite. It's special to me as we both had our own stitchwork into the same afghan. Also, the colours were a pure fluke as I just randomly grabbed 4 colours before the cruise and the way the Papaya plays off the Wintergreen colour in an incredible way.
Jeanne's version of the blues is my second most favourite. Jeanne really loves blue, like really loves blue! In third place is my Bubble Gum / Grape, Version 3.
Tutorial Version
Bernat® Premium™ (198 g / 7.0 oz, 329 meters / 360 yds)
- A - Hot Pink (Leaves about 10 - 15% left of second ball)
- B - Yellow Balloon (Leaves 10 - 15% left of second ball)
- C - Green (You need 2 balls and a small bit of a 3rd)
- D - Taupe Heather (Uses 1.5 balls only) D uses less yarn.
Yarn Substitutions
The original sample is using Red Heart® With Love™ (198 g/7 oz, 338 meters/370 yards). Look to the yardage of the balls when subbing. Note that variegated yarns have less yardage so you may need more variegated balls if you are choosing that.
Find Yarn on Yarnspirations Here
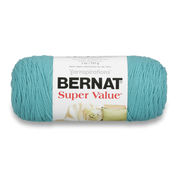
- Bernat Super® Value™ (197g / 7 oz, 389 meters / 426 yards)
- Red Heart® Super Saver™ (198 g/7 oz, 333 meters/364 yards)
- Red Heart® Soft Baby Steps™ (141 g/5 oz, 234 meters/256 yards)
- Caron® One Pound™ (454g / 16 oz, 742 meters / 812 yards)
- Red Heart® Comfort™ (454 g/16 oz, 792 meters/867 yards)
- Red Heart® With Love Metallic™ (127 g/4.5 oz, 183 meters/200 yards)
- Red Heart® Baby Hugs™ (127 g/4.5 oz, 225 meters/247 yards)
- Bernat® Premium™ (198 g / 7.0 oz, 329 meters / 360 yds) - Tutorial Version
We used 2 balls of With Love per colour. 370 yards x 2 = 740 yds per colour.
If we wanted to use Super Saver. 740 yds / 364 yards of Super Saver = 2.03. So you will need just over 2 balls (3 Balls) of Super Saver. If we used Caron One Pound, 1 ball for each colour should be enough.
More Ideas
- Crochet Baby's Hat + Tutorial
- Crochet C2C Stripes Blanket + Tutorial
- Caron Cakes Wavy Afghan Pattern
- Help Us Find Missing Blue Buttons
- 9 Christmas Crochet Blanket Patterns
Giveaway General Guidelines
The giveaway is closed. It ended at 11 pm Atlantic Time on September 15, 2020. Thank you to all who participated.


Tk says
So beginner here... and first crochet along. Thought I was doing well then started lesson 2 this morning and it says I should have 6 shells each side while i only have 5 each side. I must be off a stitch some where in last round (Lesson 1) as there isn’t more spaces to add another shell. Does this mean it is not going to work going forward or does it mean it will just be smaller than yours? Trying to figure out if I have to start over or if I can continue...
Mikey says
Morning, it won't work if you have 5 half shells verses 6. 6 is the target in order to keep the stitch counts consistent for the remaining of the blanket. Unfortunately, I think you need to redo that round. Are the stitch counts proper in the round below. You may be missing stitches.
Pauline says
I am confused by the stitch count in round 13. How do you end up with only 29 stitches per side?
Mikey says
It's 29 single crochet (29 sc). We have made a mistake in calling that out by the stitch as we thought it would be easier to count. The final side is 39 sts which includes the fptr that you also make. We are so sorry about that.
Cathy says
Mikey you and Jeanne are the best!!!!!!
Love your designs and instructions.I have learned so much good stuff. This better together afghan looks amazing signed up early July said I was in. 2nd email said here it is lesson #1
Video only but no pattern. Tried to contact yarnspirations and tried sending email submit button not working. I pray I can get the written pattern sometime. Your instructions are super but I need the pattern and graphs as back up.
Mikey says
Stand by... I need to find email to see what you see. BRB.
Mikey says
There was a DOWNLOAD Lesson 1 button. I'm unsure if don't see that. Here is where that button goes. https://www.yarnspirations.com/on/demandware.static/-/Sites-master-catalog-spinrite/default/dwfc3b0a87/PDF/WEEK-1-BetterTogetherCrochetAfghan.pdf
Cathy says
THANK YOU THANK YOU!!!! I have never left a comment before wasn't sure did it right.
printed pattern checking yarn as soon as done replying. to to many projects going including stop drop roll afghan ,2 shawls 2 other afghans ,2 sweaters,and who knows gotta check those totes
Oh Well, whats one more.hoping I live to finish them all and more too.
stay safe tell Jeanne love her rainbow blanket great paring you too Happy creating