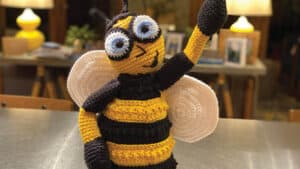
The Crochet Bee Pattern is designed by Mikey is for the love of Nova Scotia living in the Annapolis Valley. Surrounded by orchards.
Inspired by fall and the natural collecting of honey here in the valley. Bees help keep our environment healthy by nurturing trees and flowers alike. A cute bee designed to bring on smiles and be a best friend to someone needing a reminder to be themselves.
Extra Project Bonus Information
- The secret to amigurumi is tight stitches. It helps hide the polyfil and keeps the shape of the object much better. This is why you don’t see the yarn ball band recommended hook size match the pattern. We want tight stitches with thicker yarn strands.
- When doing sc2tog stitches to avoid decreasing lines on a project surface, insert your hook into the next front loop only, maneuver the hook and catch the next front loop stitch. With three loops on hook, (yoh pull through 2 loops) twice. This technique is very handy for things like hats too.
- Watch for the turns at the end of an instruction. The turning allows the seamline to stay in a vertical line instead of the normal spiral joining look.
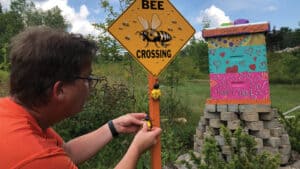
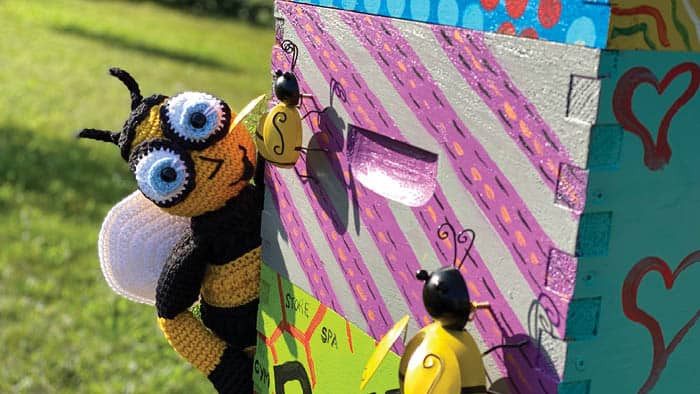
Mikey's Beehive
I created a beehive in summer 2021 for decoration for our grounds. Next year, 2022, it will be ready to hold a family of bees. You can learn more about my beehive here.
More Ideas
- Crochet The Boss Bird Rooster Pattern
- Linked Shell Shawl Pattern
- Crochet Heart Eyes Emoji Pillow Pattern
Abbreviations
- Beg = Beginning
- BLO = Back Loop Only
- Ch = Chain
- Cont = Continue
- Dc = Double Crochet
- FLO = Front Loop Only
- FO = Fasten Off
- Hdc = Half Double Crochet
MC = Magic Circle - Rep = Repeat
- Rnd(s) = Round(s)
- RS = Right Side
- Sc = Single Crochet
- Sc2tog = Single Crochet 2 Together. Draw up a loop around the assigned st and and draw up a loop in next assigned st. Yoh and draw through all 3 loops on hook.
- Scfp = Single Crochet Front Post
- Sl st = Slip Stitch
- Sk = Skip
- Sp = Space
- St(s) = Stitch(es)
- Tr = Treble
- WS = Wrong Side
Materials & Sizing
This project doesn’t require too much yarn and is a great stash-busting if you have the right colours. Don’t ‘bee’ scared to colour your bee as you see appropriate.
Caron® One Pound™ (454 g/16 oz, 742 m/812 yds)
- A - Sunflower - 1 Ball (Starting 470 g)
- B - Black - 1 Ball (starting 402 g)
- C - White - 1 Ball (starting 186 g)
- D - Sky Blue - Just a few yards for Pupils
- Use size 4 mm, U.S. G/6 crochet hook or size needed to obtain gauge.
- Poly-fil stuffing for toys and crafts.
- 2 - 15 mm [0.60 in] Black Safety Eyes
- Measurement approx 11” [28 cm] dia x 6” [15 cm] tall. Small pumpkin approx 7” [18 cm] x 4.5” [11.5 cm].
- Gauge 14 sc and 16 rows = 4” [10 cm].
Pattern Notes
- Join means to sl st to beg st.
- Most of this project uses continuous rounds where there is no slip stitching to finish a round. Use stitch markers to record the rounds as you go.
- When starting a new round it’s assumed the next st is the first st where the join has happened.
Instructions

Starting at the base of the bee, we will build up towards the head.
Base
With B, use MC to begin.
1st rnd: RS. Ch, 1 6 sc in mc. Join. Turn. 6 sts.
2nd rnd: Ch 1, 2 sc in each st around. Join. Turn. 12 sts.
3rd rnd: Ch 1, *1 sc in next st, 2 sc in next. Rep from * around. Join. Turn. 18 sts.
4th rnd: Ch 1, *1 sc in next 2 sts, 2 sc in next. Rep from * around. Join. Turn. 24 sts.
5th rnd: Ch 1, *1 sc in next 3 sts, 2 sc in next. Rep from * around. Join. Turn. 30 sts.
6th rnd: Ch 1, *1 sc in next 4 sts, 2 sc in next. Rep from * around. Join. Turn. 36 sts.
7th rnd: Ch 1, *1 sc in next 5 sts, 2 sc in next. Rep from * around. Join. Turn. 42 sts.
8th rnd: Ch 1, *1 sc in next 6 sts, 2 sc in next. Rep from * around. Join. Turn. 48 sts.
9th rnd: Ch 1, *1 sc in next 7 sts, 2 sc in next. Rep from * around. Join. Turn. 54 sts.
10th rnd: Ch 1, *1 sc in next 8 sts, 2 sc in next. Rep from * around. Join. Turn. 60 sts.
11th rnd: Ch 1, *1 sc in next 9 sts, 2 sc in next. Rep from * around. Join. Turn. 66 sts.
12th rnd: Ch 1, *1 sc in next 10 sts, 2 sc in next. Rep from * around. Join. Turn. 72 sts.
13th rnd: Ch 1, 1 sc in each BLO st around. Join. Turn. Do not fasten off. 72 sts.
Body
Continue with B on. Begins on WS for reference.
Ring 1 - Black
1st and 2nd rnds: Ch 1, 1 sc in each st around. Join. Turn. 72 sts.
3rd rnd: WS. Ch 1, *1 sc in next st, 1 tr in next st. Rep from * around. Join. Turn. 72 sts.
4th rnd: Ch 1, 1 sc in each st around. Join. Turn. 72 sts.
5th rnd: Ch 1, *sc2tog, 1 sc in next 10 sts. Rep from * around. Join. Turn. 66 sts.
6th rnd: Ch 1, 1 sc in each st around. Join. Break. DO NOT turn. 66 sts.
Ring 2 - Sunflower
1st rnd: RS. With A, join to beg st. Ch 1, 1 sc in each BLO st around. Turn. 66 sts.
2nd rnd: Ch 1, *1 sc in next 10 sts, 2 sc in next. Rep from * around. Join. Turn. 72 sts.
3rd rnd and 4th rnds: Same as Ring 1 - 2nd and 3rd rnds. 72 sts.
5th rnd: Ch 1, *sc2tog, 1 sc in next 10 sts. Rep from * around. Join. Turn. 66 sts.
6th rnd: Ch 1, *1 sc in next 9 sts, sc2tog. Rep from* around. Join. Turn. Break. 60 sts.
Ring 3 - Black
1st rnd: RS. Same as Ring 2 - 1st rnd. Turn. 60 sts.
2nd rnd: Ch 1, *1 sc in next 9 sts, 2 sc in next. Rep from * around. Join. Turn. 66 sts.
3rd and 4th rnds: Same as Ring 1 - 2nd and 3rd rnds. 66 sts.
5th rnd: Ch 1, *sc2tog, 1 sc in next 9 sts. Rep from * around. Join. Turn. 60 sts.
6th rnd: Ch 1, *1 sc in next 8 sts, sc2tog. Rep from* around. Join. Turn. Break. 54 sts.
Ring 4 - Sunflower
1st rnd: RS. Same as Ring 2 - 1st rnd. Turn. 54 sts.
2nd rnd: Ch 1, *1 sc in next 7 sts, sc2tog . Rep from * around. Join. Turn. 48 sts.
3rd and 4th rnds: Same as Ring 1 - 2nd and 3rd rnds. 48 sts.
5th rnd: Ch 1, *sc2tog, 1 sc in next 6 sts. Rep from * around. Join. Turn. 42 sts.
6th rnd: Ch 1, *1 sc in next 5 sts, sc2tog. Rep from* around. Join. Turn. Break. 36 sts.
Ring 5 - Black
1st rnd: RS. Same as Ring 2 - 1st rnd. Turn. 36 sts.
2nd rnd: Ch 1, *1 sc in next 4 sts, sc2tog . Rep from * around. Join. Turn. 30 sts.
3rd and 4th rnds: Same as Ring 1 - 2nd and 3rd rnds. 30 sts.
5th and 6th rnds: Ch 1, 1 sc in each st around. Turn. 30 sts. Fasten off.
Body Cap/Hat Make 2 - Black
Rep the base from beginning to 5th rnd. Fasten off leaving a long tail to sew to the body.
The second one is sewn to the top of the head once the eyes are in position.
Stuffing Body
With the cap done, the body is ready to be stuffed and the cap placed on. I tend to use amigurumi as a table topper or part of decor never intended for kids. I put a sealed sandwich bag, sock or nylons that are tied shut. Partially fill with dry pea stone or aquarium stone inside the body first, then apply the stuffing. This gives weight to the bottom so it’s not easy to tip over. If giving to a child, you may want to skip the pea stone so the bee can be washable, if needed.
Stuff the body firm but not exploding with stuffing between the stitches. Stuffing tends to push on the stitches in time and may relax the stitchwork. Make sure the bottom of the bee maintains its flatness, so overstuffing will cause the bottom to balloon out.
Once stuffed, sew the cap to the top to seal the body closed. A tip of using clear tape to help get rid of stray polyfill that is obvious on black yarn is helpful.
Wings Make 4 Panels - White
The wings are made up of four circles. Two circles are sandwiched together and crocheted around to join them.
Make 4 base panels from 1st to 12th rnds. Fasten off.
Wing Border - Attaching the Wing Panels Together
1st rnd: WS facing out. Attach C to any stitch, ch 1. 1 sc in each st holding both wing pieces together. Lightly stuff before completing and join. Fasten off. Leave a long enough tail to sew to body for later.
When doing the second wing, use the first wing as a gauge for how much stuffing to apply for balance.
Head - Sunflower
The head uses a continuous round format. Do not join at the end of the round and use stitch markers to record each round.
Use MC to begin.
1st rnd: 10 sc in mc. 10 sts. Place stitch marker on the last st and continue to move to the last st of each rnd.
2nd rnd: 2 sc in each st around. 20 sts.
3rd rnd: 1 sc in each st around. 20 sts.
4th rnd: *1 sc in next st, 2 sc in next st. Rep from * around. 30 sts.
5th rnd: Rep 3rd rnd. 30 sts.
6th rnd: *2 sc in next st, 1 sc in next 2 sts. Rep from * around. 40 sts.
7th rnd: Rep 3rd rnd. 40 sts.
8th rnd: *1 sc in next 3 sts, 2 sc in next st. Rep from * around. 50 sts.
9th to 14th rnds: Rep 3rd rnd. 50 sts.
15th rnd: *Sc2tog, 1 sc in next 3 sts. Rep from * around. 40 sts.
16th rnd: *1 sc in next 2 sts, sc2tog. Rep from * around. 30 sts.
17th to 19th rnds: Rep 3rd rnd. 30 sts.
20th rnd: *Sc2tog, 1 sc in next st Rep from * around. 20 sts.
21st and 22nd rnds: Rep 3rd rnd. 20 sts. Begin stuffing head.
23rd rnd: Sc2tog around. 10 sts.
24th rnd: 1 sc in each st around. Finish stuffing head. Fasten off and leaving long tail. Collect and gather remaining sts and pull shut.
Eyes
Eyes are the window to the world and many dolls or things people make create faces without expression. Is this doll happy, upset, content or angry?
We need other facial features to tell us what the eyes are saying. When we speak to each other, we tend not to look straight on. We glance from slight angles and our eyebrows share the emotions in real-time. In Santa’s case, the pupils of the eyes are pushed more centre towards the face giving more distance from the white areas around the eyes.This gives him expression versus putting the pupils in the centre of the white area.
He appears to be looking at something versus looking into air space without focus. You can rotate his eyes before sewing so he can glance in all directions.
Most amigurumi that are out of the park amazing are all about the details of nailing some realism while keeping the yarn fantasy.
Eyes Make 2 - White
Rep the base from beginning to 4th rnd. Fasten off leaving a long tail to sew to eye liners once completed. Be sure the middle of the eye is completely closed so there are no gaps in the middle of the circle.
Consider the last rnd as the RS for future reference.
Pupils Make 2 - Sky Blue
Rep the base from beginning to 2nd rnd. Fasten off and weave in ends.
Consider the last rnd as the RS for future reference.
Safety Eyes
With RS facing with both whites of eyes and pupils. With white yarn, embroider 2 lines on an angle as shown in the picture from the centre of pupil and directly into the whites of the eyes. This provides a white reflection. Secure on the backside. Then proceed to place the safety eye.
Place safety eyes directly through the middle of pupils. Then through the white of the eyes as shown in the photos. Once positioned, permanently clip the safety eyes into position. I would caution you to favour positioning so the tail end of the eye whites are in the same position for both eyes for consistency.
Eye Liner - Black
Once the safety eyes are positioned and attached through both the pupils and eye whites, the liner is made and on the final rnd will be crocheted attaching the eye whites and liner together like we did with the wings.
Rep the base from beginning to 4th rnd. DO NOT turn or fasten off.
Position White and Pupils First
Start at the 6 o’clock position where you believe the bottom of the eyes will appear on the face. Both eyes are worked the same way to give the eyes and oval shape at the end.
Next rnd: Ch 1, going through both whites of the eyes and liner at the same time starting where the pupils are closest, 1 sc in each next 7 sts, 1 hdc in next 2 sts, 1 dc in the next 6 sts, 1 hdc in next 2 sts, 1 sc in rem sts.
Fasten off leaving a long tail to sew to the head.
Final Shaping of Head
I used a piece of yellow yarn from the back of the head directly between the eyes.
- Go through the head to between the eyes and come out and go back in catching a stitch where the eyes meet but stay behind the black eye liner.
- Go to the back of the head and tighten and this will pull back the middle of the eyes. Secure and weave in ends.
Sew cap/hat to the top of the head favouring the backside of the head.
Antenna Make 2 - Black
Ch 8
1st row: 3 sc 2nd ch from hook and and 1 sc in each st across. 9 sts. Fasten off with a long tail to sew to the bee hat.
Embroider mouth into position. Tips online for embroidery can be found easily.
Sew Head and Eyes
I purposely tilted the head to provide more expression. I used sunflower as the attached yarn. Follow the neck of the body around and attach to the head shape securely. Ensure the back of the head is lined up with the seam line of the body.
Once completed, sew eyes to the head in a position as shown in the photographs.
Attach Wings
Directly at the back. Sew with the last rnd facing to the front of the bee. Use about 12 sts along the wing directly at the back in a vertical format. Top of wing attaching is the top of the first yellow ring from the head going down on an angle towards the sides of the body and sew going back up for extra security.
Sew the second wing on so both wings appear to be touching each other on the top point at the back.
Arms Make 2
The arms start at the hands. Done in continuous rounds. Use a stitch marker to help keep track.
Use Black, begin with MC.
1st rnd: Ch 1, 6 sc in MC. 6 sts. Place stitch marker on last st and move to last st with each rnd.
2nd rnd: 2 sc in next st, 1 sc in next st, 2 sc in next 2 sts, 1 sc in next st, 2 sc in last st. 10 sts.
3rd rnd: 2 sc in next st, 1 sc in next 3 sts, 2 sc in next 2 sts, 1 sc in next 3 sts, 2 sc in last st. 14 sts.
4th rnd: 2 sc in next st, 1 sc in next 5 sts, 2 sc in next 2 sts, 1 sc in next 5 sts, 2 sc in last st. 18 sts.
5th rnd: 2 sc in next st, 1 sc in next 7 sts, 2 sc in next 2 sts, 1 sc in next 7 sts, 2 sc in last st. 22 sts.
6th to 9th rnds: 1 sc in each st around. 22 sts.
10th rnd: *1 sc in next 9 sts, sc2tog. Rep from * around. 20 sts.
11th rnd: *1 sc in next 8 sts, sc2tog. Rep from * around. 18 sts.
12th rnd: *1 sc in next st, sc2tog. Rep from * around. Join to beg sc with sl st. Fasten off. 12 sts.
13th rnd: Working back loops only, attach sunflower. Ch 1, 1 sc in each st around. 12 sts. Continuous rnds resumes in both loops.
Begin stuffing as you go.
14th to 22nd rnds: 1 sc in each st around. 12 sts. On last rnd, join with sl st to next st. Fasten off.
23rd rnd: With black. Join with sl st to front post of any st. Ch 1, *1 scfp in next st, 2 scfp in next st. Rep from * around. 18 sts. Continuous rnds resumes.
If you want a bent arm, provide less stuffing between 21st and 26th rnds so the arm has options to bend for posing.
24th to 35 rnds: 1 sc in each st around. 18 sts.
Do final stuffing. Review hand flatness for posing. Then fold top of tube shape flat and sew onto the top ring of the body.
Finishing
There is a chopstick in his raised arm from the elbow to the interior of the body to hold his position. His other arm has a knot in the hand to the body to hold his elbow out in a pose.

Testers
- Nancy Elliott
- Diane Suder
- Michele Sanders

tiffany says
grid
Mikey says
THanks
Sandra Sanchez says
Please Mikey do a tutorial on this cute bumble bee, I'm a visual crocheter PRETTY PRETTY PLEASE!!!!!