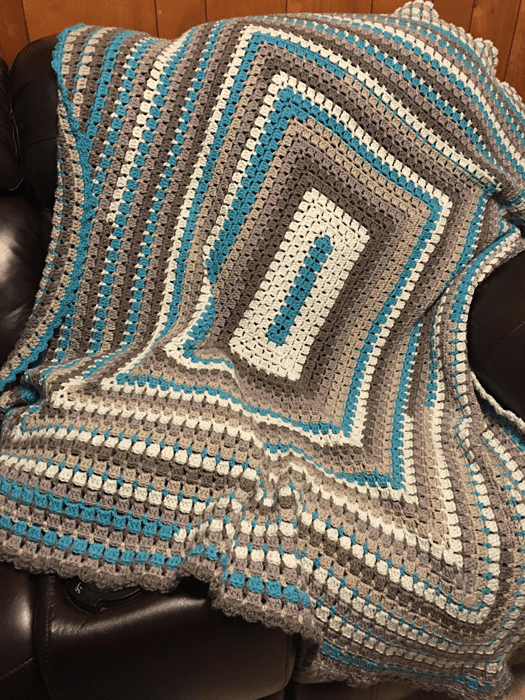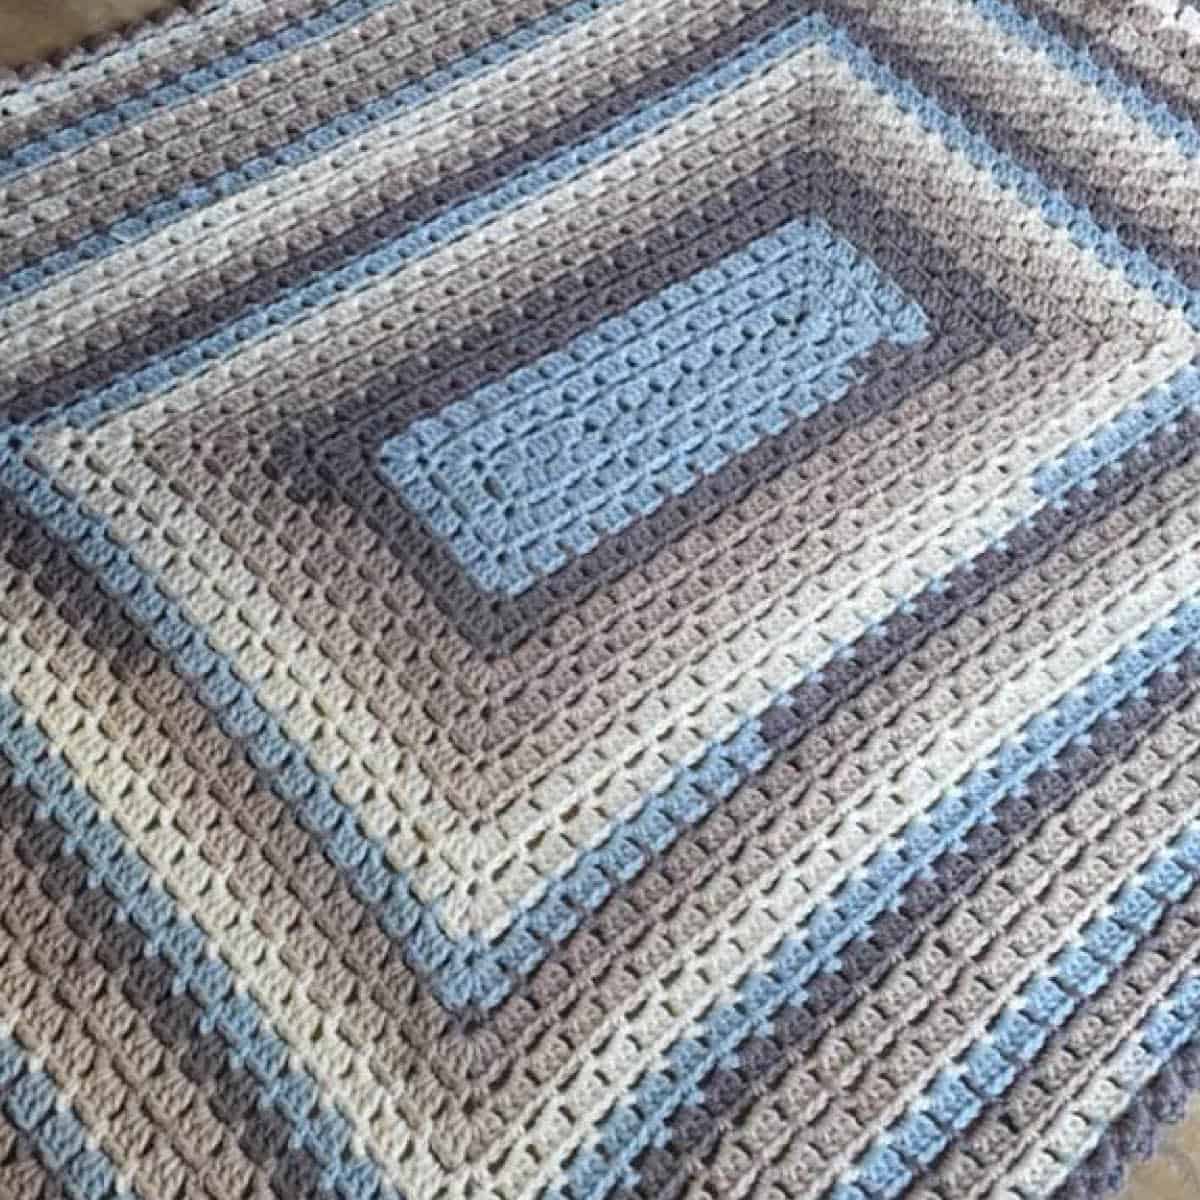
It's the simplicity of a granny square, but I decided to try something a bit different for this one. I'm using the crochet Brick Stitch to create the Crochet Modern Granny Afghan.
The original crochet modern granny has different corners than the updated ones.
In March 2025, we updated the modern granny pattern with crochet diagrams and a new approach for the corners.
I used Caron Cakes in the Cake Pop colorway for this project, but feel free to use any worsted-weight yarn in your favourite colours to create many fun looks. This would be an excellent pattern for your favourite sports team colours at those chilly games.
The original finished size is 52" x 64" using 6 Caron Cakes. If you want a baby version of 35" x 42", only 3 Cakes are needed. The updated pattern will not change the yarn quantity.

.
.
.
Original Pattern as Shown in the 2017 Tutorial
This is a throw size for your sofa or lounging.
Ch 31.
Updated Pattern December 24, 2025
The pattern was updated to 2024 standards of writing patterns. The pattern remains unchanged but has been re-written to bring it into current pattern writing compliance.
Yarn
Caron Cakes, 7.1 oz./ 200g , 383 yd. / 350 m
- 52” x 64” = 6 Balls. Colour shown is Cake Pop.
- 35” x 42” = 3 Balls. Baby Size. (not shown)
Hook: 5 mm / H/8
Gauge: 13 sc and 14 rows = 4” [10 cm]
Abbreviations
- Beg = Begin(ning)
- Bet = Between
- Ch(s) = Chain(s)
- Dc = Double crochet
- Hdc = Half double crochet
- Rep = Repeat
- Rnd(s) = Round(s)
- RS = Right side
- Sc = Single crochet
- Sk = Skip
- Sl st = Slip stitch
- Sp = Space
- St(s) = Stitch(es)
- WS = Wrong side
Instructions
Ch 31.
1st rnd: RS. (2 dc. Ch 1. 3 dc. Ch 1. 3 dc) all in 4th ch from hook - beginning corners made. Sk next 2 ch. *3 dc, sk next 2 ch. Rep from * to last ch. (3 dc. Ch 1. 3 dc. Ch 1. 3 dc) all in last ch - new corners made. Working on opposite side of ch. Sk 2 ch. *3 dc, sk next 2 ch. Rep from * to beg. Sl st to the top of ch-3.
Tip: The double crochet from last round form groups of 3. Every other round, we are using the space between the groups.
2nd rnd: Sl st in next 2 dc. (1 sc. Ch 3. 1 sc) all in ch-1 corner sp. Ch 3, sk next 3 dc, (1 sc. Ch 3. 1 sc) all into next corner ch-1 sp. *Ch 3, sk next 3 dc, 1 sc in sp bet next 3 dc group. Rep from * to next corner sp. (1 sc. Ch 3. 1 sc) all into ch-1 corner sp. Ch 3, sk next 3 dc. (1 sc. Ch 3. 1 sc) all into next ch-1 corner sp. *Ch 3, sk next 3 dc, 1 sc in in sp bet next 3 dc group. Rep from * to beginning sc. Sl st to 1st sc.
3rd rnd: Sl st to next corner ch-3 space. (Ch 3 - counts as dc here and throughout. 2 dc. Ch 1. 3 dc) all into same corner sp. 3 dc into next ch-3 sp. (3 dc. ch 1. 3 dc) all into next corner sp. *3 dc into next ch-3. Rep from * to next corner sp. (3 dc. Ch 1. 3 dc) all into corner sp. 3 dc into next ch-3 sp. (3 dc. Ch 1. 3 dc) all into corner sp. *3 dc into next ch-3. Rep from * to beginning dc. Sl st to the top of ch-3.
4th rnd: Sl st to next corner sp. (1 sc. Ch 3. 1 sc) all into corner sp. Ch 3. [Sk next 3 dc, 1 sc into sp bet 3 dc group, ch 3]. Rep [ ] to next corner sp. *(1 sc. Ch 3. 1 sc) all into corner sp. Ch 3. [Sk next 3 dc, 1 sc into sp bet 3 dc group, ch 3]. Rep [ ] to next corner sp. Rep from * around. Sl st to beg sc.
5th rnd: Sl st into corner corner sp. (Ch 3. 2 dc. Ch 1. 3 dc) all intp corner sp, 3 dc into each ch-3 sp to next corner. *(3 dc. Ch 1. 3 dc) all in next corner sp, 3 dc into each ch-3 sp to next corner. Rep from * around. Join with sl st to top of beg ch-3.
Rep 4th and 5th rnds until you get to the desired size. Complete 4th round once more.
Border: Sl st to next corner sp. Turn around the blanket to the WS to beg. Ch 1, 1 sc in corner sp. [(1 sc. 1 hdc. 1 dc. 1 hdc. 1 sc) all in next ch-3 sp.] Rep [ ] to next corner sp. *1 sc in corner sp. [(1 sc. 1 hdc. 1 dc. 1 hdc. 1 sc) all in next ch-3 sp.] Rep [ ] to next corner sp. Rep from * around. Join with sl st to beg sc. Fasten off.
2024 Updated Version - Square Size
A square can be grown to any size. The photograph shows Bernat Baby Blanket; however, you can use any yarn and hook as long as they work together. The video and instructions below match. You can download the free instructions for the square here.
MATERIALS
Bernat® Baby Blanket (100 g/3.5 oz; 78 m/86 yds)
- A: 03230 (Baby Blue) 2 balls
- B: 03005 (White) 3 balls
- C: 03615 (Baby Yellow) 2 balls
Use 10 mm / US N Hook. Finished sizing is 36" square.
With A, ch 4. Join with sl st to form ring.
1st rnd: Ch 1. (1 sc. Ch 3) 4 times in ring. Join with sl st to first sc.
2nd rnd: Sl st in next ch-3 sp. Ch 3. (2 dc. Ch 3. 3 dc) in same sp as last sl st. *(3 dc. Ch 3. 3 dc) in next ch-3 sp. Rep from * twice more. Join with sl st to top of ch 3. Fasten off.
3rd rnd: Join B with sl st to any corner ch-3 sp. Ch 1. (1 sc. Ch 3. 1 sc) in same sp. Ch 3. Miss next 2 dc. 1 sc between next 2 dc. Ch 3.* (1 sc. Ch 3. 1 sc) in next corner ch-3 sp. Rep from * twice more, then from * to ** once more. Join with sl st to first sc.
4th rnd: Sl st to next ch-3 sp. Ch 3. (2 dc. Ch 3. 3 dc) in same sp. (3 dc in next ch-3 sp) twice.* (3 dc. Ch 3. 3 dc) in next corner ch-3 sp. Rep from * twice more, then from * to ** once more. Join with sl st to top of ch 3. Fasten off.
5th rnd: Join C with sl st to any corner ch-3 sp. Ch 1. (1 sc. Ch 3. 1 sc) in same sp. (Ch 3. Miss next 2 dc. 1 sc between next 2 dc) 3 times.* Ch 3. (1 sc. Ch 3. 1 sc) in next corner ch3 sp. Rep from * twice more, then from * to ** once more. Ch 3. Join with sl st to first sc.
6th rnd: Sl st in next corner ch-3 sp. Ch 3. (2 dc. Ch 3. 3 dc) in same sp. *3 dc in each ch-3 sp to next corner ch-3 sp. (3 dc. Ch 3. 3 dc) in next corner ch-3 sp. Rep from * around, ending with 3 dc in last ch-3 sp. Join with sl st to top of ch 3. Fasten off.
7th rnd: Join B with sl st to any corner ch-3 sp. Ch 1. (1 sc. Ch 3. 1 sc) in same sp. (Ch 3. Miss next 2 dc. 1 sc between next 2 dc) 5 times.* Ch 3. (1 sc. Ch 3. 1 sc) in next corner ch3 sp. Rep from * twice more, then from * to ** once more. Ch 3. Join with sl st to first sc.
8th rnd: Sl st in next corner ch-3 sp. Ch 3. (2 dc. Ch 3. 3 dc) in same sp. *3 dc in each ch-3 sp to next corner ch-3 sp. (3 dc. Ch 3. 3 dc) in next corner ch-3 sp. Rep from * around, ending with 3 dc in last ch-3 sp. Join with sl st to top of ch 3. Fasten off.
Cont as established, working 2 rnds each in the following color sequence: A, B, C, B until Blanket from middle measures approx 18 ins [45.5 cm], ending with 2 rnds of any color.
Fasten off.
2024 Updated Version - Throw Size
I have multiple sizes going out so you can match the starting chain to be different sizes such as queen size, twin size and more sizes. Coming soon. I wrote this on Jan 5, 2024.
The 2017 version will get you a similar result, but I prefer not to slip stitch to a corner to start a new round. I would instead finish in a corner to start fresh in the next rnd. I use a single crochet to join to the top of the first st when double crochet is used.
NOT TESTED BY SOMEONE ELSE YET.
Ch 28. Cradle Size (18" x 33")
Ch 79. Crib Size (28 x 52")
Ch 31. Throw Size (60" x 50")
Ch 58. Twin Size (39" x 75")
Ch 37. Full / Double Size (54" x 75"
Ch 31. Queen Size (60" x 80")
Ch 14. King Size (76" x 84")

1st rnd: In 4th ch from hook, 2 dc, ch 1, 3 dc, (partial beginning corner made); sk 2 ch, *3 dc, sk 2 ch. Repeat * to last ch, 3 dc, ch 1, 3 dc, ch 1, 3 dc all in last ch (corner). Working on opposite side of ch, sk 2 ch, *3 dc, sk 2 ch. Repeat * to where the beginning corner base stitches are. Join using sc (the sc join is considered a ch-1 sp) to the top of beg ch-3.
2nd rnd: Ch 1, (1 sc. Ch 3. 1 sc) in beg corner sp. Ch 3. (1 sc. Ch 3. 1 sc) in next ch-1 corner sp. *Ch 3, sk 3 dc, sc in gap between next dc group. Repeat * to next ch-1 sp corner, (1 sc. Ch 3. 1 sc) into corner ch-1 sp, ch 3, (1 sc. Ch 3. 1 sc) in next ch-1 corner sp. *Ch 3, sk 3 dc, sc in between next dc group. Repeat * to last gap between dc group before corner. Ch 3. Sl st to 1st sc.
3rd rnd: Sl st into corner ch-3 space, ch 3, 2 dc in first corner sp, 3 dc into ch-3 sp, (3 dc. Ch 1. 3 dc) into corner ch-3 sp, *3 dc into ch-3. Repeat to next corner ch-3 sp, (3 dc. Ch 1. 3 dc) into corner ch-3 sp, 3 dc into ch-3 sp, (3 dc. Ch 1. 3 dc) into corner ch-3 sp, *3 dc into ch-3. Repeat * to final ch-3 sp before corner. 3 dc in last corner sp. Join with sc to the top of beg ch-3.
4th rnd: Ch 1, (1 sc, Ch 3. 1 sc) into corner ch-1 sp, ch 3, *sk 3 dc, sc in gap, ch 3. Repeat * to ch-1 sp. (1 sc. Ch 3. 1 sc) into next corner ch-1 sp, then repeat from * again. Continue around to beginning, sl st to beginning sc.
Each side gets bigger with more repeats of the same stitch work between the corners.
5th rnd: Sl st into corner ch-3 space, ch 3, 2 dc in first corner sp, [3 dc into ch-3 sp. Rep [ ] to next corner. *(3 dc. Ch 1. 3 dc) into corner ch-3 sp. Rep [ ] to next corner. Rep from * around. 3 dc in last corner sp. Join with sc to top of beg ch-3.
Continue to repeat rnds 4 and 5 until you get to your desired size.
Border: TURN to wrong side. Into *ch-3, sc, hdc, dc, hdc, sc. Repeat * to corner, sc, hdc, dc, dc, hdc, sc in corner sp. Repeat * again around to beginning. Sl st to beginning sc and finish off.
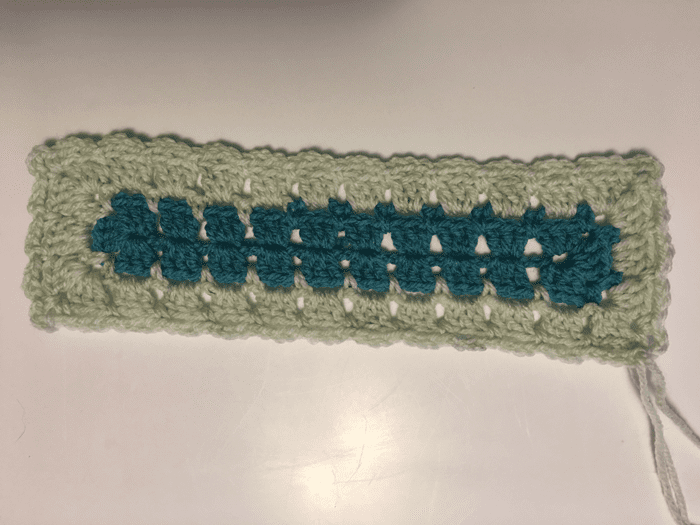
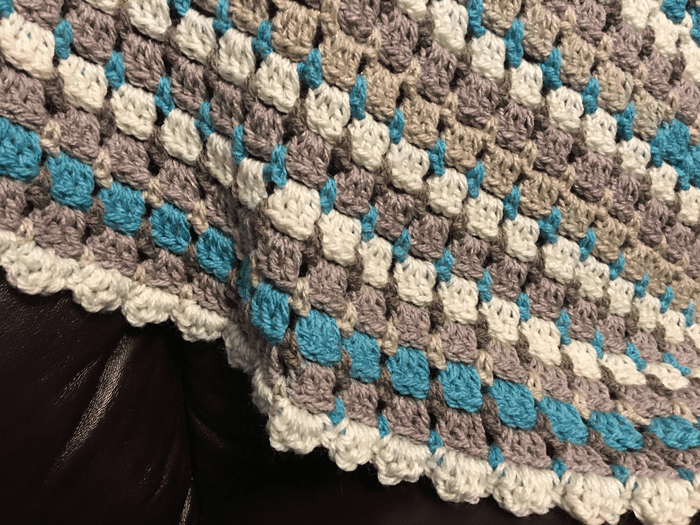
Original Modern Rectangle Granny Blanket Photographic Tutorial
The pattern has been replaced with a downloadable PDF. Pictures below aren't in the pdf in the case you need to refer to them.
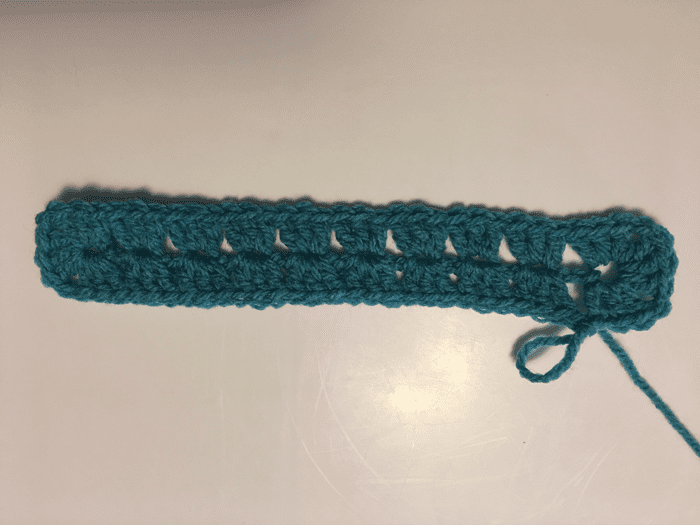
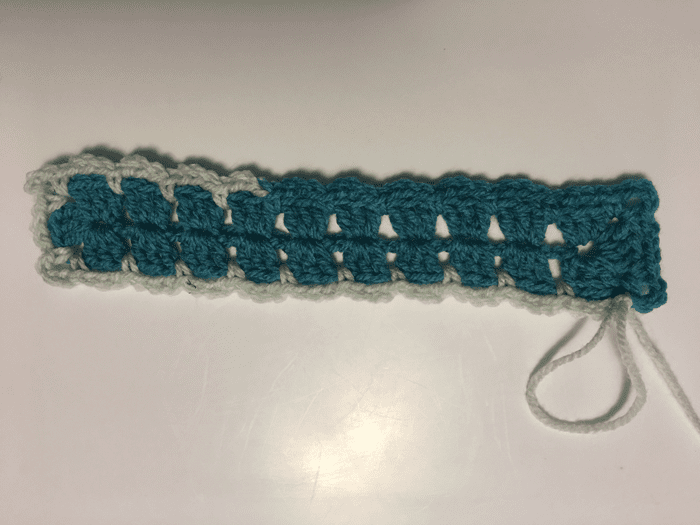
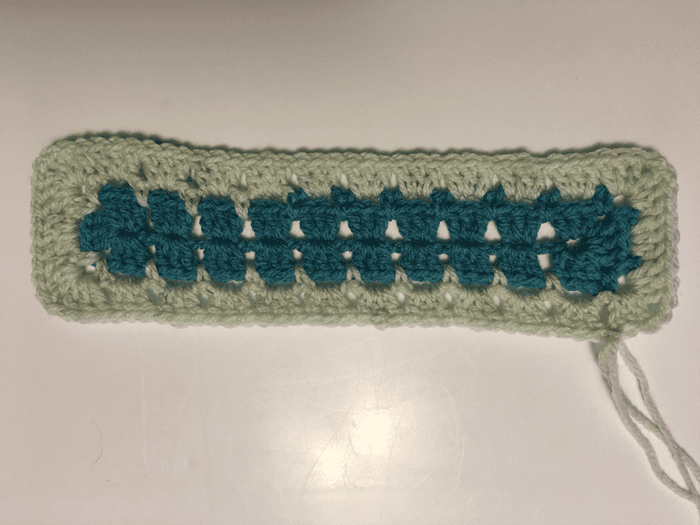
UPDATED VERSION Crochet Diagrams
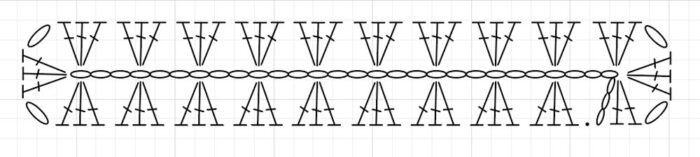
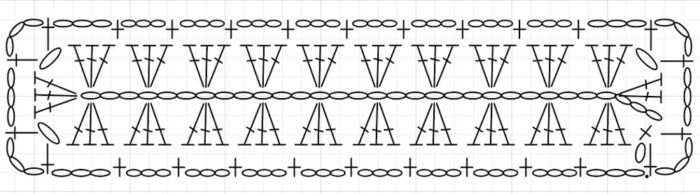
The crochet diagram shows the chain 31 version, the most popular size. You can click on the picture to enlarge it and/or save or print it.


Original Tutorial


Kelly says
Hi Mikey,
I want to teach my friend to crochet and this pattern looks fairly simple for her. I have a kit that has #2 yarns but the pattern is way too hard for her. Will this turn out using the lighter weight yarn? Will I just need to do more rounds?
Mikey says
Correct... It will work and use a much smaller crochet hook and do more rounds. 🙂
ChrisS says
This is such a cute blanket- I am starting one today and already have plans to make another for my grandson. Thanks for the pattern and all the tutorials!
Just a note that the written directions for the MG alternative do not match the chart for row 1. The final ch1 of the first corner- I put in brackets- should be omitted. The directions should start:
1st rnd: In 4th ch from hook, 2 dc, ch 1, 3 dc, [ch 1], (partial beginning
Hope that helps anyone!
Mikey says
Great eye on that Chris... Just updated it now! You have an eye for detail! Thanks so much. Michael
Vicki Jackson says
I can not wait to start my blanket
Melanie says
I have tried new way to make a granny square blanket joining with hdc and sc at the end of a row. Tried this numerous times and used a 5mm hook. After the second row just beginning the stitches turn into a bowl shape. What's the problem here?
Mikey says
Hmmm I really cannot tell why that is happening based on words. That's really odd. I'm sorry, it's hard to know without seeing it. I would go back to the way you are used to doing corners if it helps you out but it shouldn't be bowling up.
Ray says
Could you send me a written pattern for the larksfoot granny afghan please? Thanks
Mikey says
You can find the download here: https://thecrochetcrowd.com/crochet-larksfoot-granny-afghan/
Melissa Ann Brigner says
What am I doing wrong, it's all wonky. ???
Mikey says
I saw this same photograph posted on social media with people offering suggestions. Have you tried just restretching the rectangle. We crochet in a round and tension causes this. What size hook did you use? It just may need to be stretched to realign.
Patti D says
I have made this pattern and it was very easy to make.
Sue Stokes says
Love this pattern. Can't wait to try it out.
Mary Monk says
Dear Jeanne, First let me thank you for all your patterns, I love them. This pattern is a favorite to use up my stash of bits and pieces of skeins. I always have 1/2 or 1/3 skeins left and don't always wanna do hats. Anyway, I use a solid color for the sc rows. I have used charcoal , navy , garnet, & pine. Then I start with my smallest remnants in the middle and just keep hookin'. I make them to donate, but my last one didn't make it into my charity bag. My grandson saw it and claimed it to go on his couch. It was made with all kinds of variegated yarns and the charcoal sc rows. He has never asked me for any crocheted stuff, except beanies. I was tickled that he wanted this piece. You are an inspiration and so talented. Thanks again.
Mikey says
I'll let Jeanne know you have left this comment. She will be honoured. Michael
Jeanne says
I am happy that you enjoy this one. What a super idea of using up your scraps! What a joy to have your grandson claim one for himself. I bet he will treasure it always. 🙂
Amparo says
Hi, Thanks for this pattern, is lovely, is perfect for my aunt. In Pinterest, "Wool Patterns" website shows this pattern in white, gray and pistachio colors, just wondering if you can tell the yarn used for this afghan.
Thanks!
Ann says
No blue button
Marina King says
button added
Marla K Clevenger says
I would like to print out the pattern but when I click on the link, all that I see are the comments.
Thank you for your help.
Mikey says
I'm fixing the website at the moment. I'm sorry.
Anik Farrell says
What kind of stitch are you using for border?
Thank you
Anik farrell says
What stitch are you using for border?
Thank uou
Mikey says
The PDF states the border as Border: TURN to wrong side. Into
*ch-3, sc, hdc, dc, hdc, sc. Repeat *
to corner, sc, hdc, dc, dc, hdc, sc in
corner sp. Repeat * again around to
beginning. Sl st to beginning sc and
finish off.
Ann Roy says
I’m relatively new to crocheting and have completed round 3 of this pattern. I would like to change yarn colors going into round 4. Where would a good place to do this be and how would could this be accomplished? Thanks!!!
Jeanne says
Change at the beginning of any round. I have seen so many color combos.
Michele Hughes says
Can you eexplain the border please
Jeanne - The Crochet Crowd says
I'm not sure how I can help you. What part of the border do you need help with?
Heidi says
Hi Jeanne. I think there is a printing error in the PDF pattern for the border.
It says: Turn to wrong side.
Then: Into ?? *ch-3, sc, hdc,....etc.
I think there are some instructions missing after "into"?
Please help 🙂
Jeanne - The Crochet Crowd says
I see that. The asterisk should be after the ch-3 as you are working into the ch-3 sp. Ch-3 means sp where as ch 3 means action.
Heidi says
Aha! That makes sense! Thank you! 🙂
Kristy Locke says
I have a question, I am currently making a afgan using this pattern. However I have eight skeins of the caron cakes, can someone help me with the measurements of what it would be if I used the eight.
april obray says
Can u use yarn heart yarn I don't have cake yarn yet let me know thanks
april obray says
Red heart yarn
Jeanne - The Crochet Crowd says
Sure, you can use any worsted weight yarn.
Katrina says
I can't find different instructions for the baby size- Do I cast on the same amount? Then just end while it is smaller? Thanks!
Laura Jean Bartholomew says
Yes and only use three cakes Hope that helps -LJ
Lynne says
I am going to make this for my son......I would like to make it longer....just want to confirm that I add sets of three to initial chains to make longer?
Jeanne - The Crochet Crowd says
Sounds about right.
Mimi says
I love this pattern as well. I am a new crocheter. I am using Bernat Blanket yarn and it is turning out to be really cool. Big/Fat/Squishy and looks beautiful! I still cannot read patterns very well and that is where Mikey's tutorials come in for me. I was wondering if there was a nice tutorial for a border that I could use. Partially because I do not want to go out and buy more yarn and I am almost out of one of my colors but have plenty of another to make it as wide as I want it to be by adding the border. Any ideas?
Pernilla says
Thank you for a wonderful pattern! I loved working with it.
Karen Timmins says
Just completed my afghan with your pattern and love it! Had to use sweet rolls as no local access to Caron cakes, as far as I know cannot buy online in Canada either :-(.
Carry on with the great work Jeanne 🙂
Crystal says
How did you get the little bits of color between the stitches?
Jeanne - The Crochet Crowd says
Those come from the sc row. They just peek thru in between the dc row.
Doreen says
This confuses me...where is the sc row?? I do not see it in the written instructions....I haven't watched the tutorials.....I guess I better!!
Doreen says
This confuses me...where is the sc row?? I do not see it in the written instructions....I haven't watched the tutorials.....I guess I better!!
I found out what I was reading wrong...........sorry for the premature question!!
Mikey, The Crochet Crowd says
Round 2 and 4 are the SC rounds.
Tamara says
I am totally in love with this pattern! It is easy to do and fast! I am not sure I will make it to 6 balls but it is going to be a striking addition to my knitting pals living room! I alway try to make an afghan for newlyweds, that I have a strong regard for.
La Dell Ford says
Oh Jeanne!!!! I can't even wait until I finish to thank you for this great pattern and SUPER easy to follow directions!!! I don't even NEED a tutorial!!! That is a FIRST for me hahahaha!!!! Your directions are so clear and easy to follow that I got started without even frogging ONCE!!! I am a pretty basic crocheter and I ALWAYS struggle at the beginning of all my projects! However I'm buzzing right around this thing so fast I'm afraid I'll get stopped and get a speeding ticket! I decided that for this first try I would just use my scrap balls and put two strands together. Another "blankie" for my Fur Babies! I'm using 2 strands together and a 9mm hook. It seems to be working quite well. It's very soft and "squishy." Well enough chattering!! Back to Work!! THANK YOU AGAIN FOR ALL YOU DO TO HELP US HAVE FUN CROCHETING!!!!
Jeanne - The Crochet Crowd says
You are quite welcome. You have made my heart happy and I am smiling for you. 🙂 <3
Marsha Giordano says
Thanks fr the pattern! Is oozing forward to the tutorial and getting back into crocheting !
Nanci Kodweis says
Thanks for the pattern! Guess I'm going to Michael's!
Jeanne - The Crochet Crowd says
Enjoy. 🙂
Amy Thacker says
I am looking forward to the video tutorial for this. I can not wait to make a baby version of this. Thanks for the pattern.