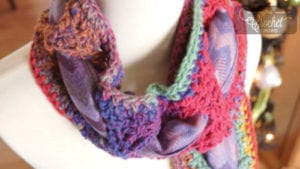
Create the scarf within a scarf crochet scarf. Mikey created a scarf where another pre-made or store-bought scarf could be fed through the centre. This was very popular in the winter of 2012/2013. See how to make your own scarf within a scarf.
The Scarf Within A Scarf concept was developed by Daniel Zondervan (Diva Dan) in the hopes to integrate crochet skills with items that can be store-bought. Essentially, he's created a mixed media fusion with one simple concept. Adding a scarf through your original crochet scarf as demonstrated here is optional.
What is great about this project is the speed at which a scarf can be crocheted. There's a lot of chain work to create the pattern, which simply means many stitches are really quick to crochet.
Here's what the scarf looks like without a premade 'store-bought' scarf fed through it.
Instructions
- 1 Ball of 4 Ply Worsted Medium 4 Weight Yarn. I used 1 Ball of Red Heart Boutique Midnight Yarn. 2.5 oz or 70 g ball. 153 yards. The colour used in this sample is called "Shadow".
- Use 6.0 mm or a Size J Crochet Hook
- Karen's sample (to the right) has been done using 50 g ball of Rico Baby Yarn in Christmassy Red using a 4 mm Crochet Hook.
- Abbreviations are: Ch = Chain, DC = Double Crochet
- Ch 16. Begin DC 3rd Chain from hook all the way across. Turn.
- Ch 2, DC into the first two stitches, Ch 8, DC into the final three stitches of the row. Turn.
- Ch 2, DC into the first two stitches, Ch 8, DC into the final three stitches of the row. Turn.
- Ch 2, DC into the first two stitches, Ch 8, DC into the final three stitches of the row. Turn.
- Ch 2, DC into the first two stitches, Ch 4, SC around the Rows 2 - 4 Chains to link them together, Ch 4, DC into the final three stitches.
- Repeat Rows 2 - 5 until you get the desired length of scarf you want.
- To end this scarf, the final row should be DC all the way across. Fasten off and wave in ends.
Tips:
- If matching to the store-bought scarf, you may want to take into consideration the length of the scarf that will be fed through so it's roughly the same length.
- If some of your stitches in rows 5 are not in the center of your scarf. Pull the scarf on the sides and the stitches will even out.
For Karen's Funky Scarf Crochet Insert:
Use an 8mm crochet hook and work 190 chains, loosely to protect the yarn.
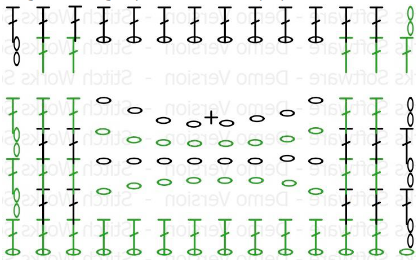
- The chart shows the chains in green in the centre row, starting from the left. The gap represents the length you require to match the Butterfly Scarf and about two feet more for dangling.
- Work two Turning Chains to start the First Row proper; then Treble Crochet all stitches, once through each chain. Work 3 extra stitches in the last chain, to turn the corner, then Treble Crochet all chains again on the opposite side of the chain, finishing with 3 extra stitches in the last chain. In my sample piece, I had started with more chains, so just worked until the yarn ran out, without changing the end result.
- This should produce a piece that feels like a fluffy cat’s tail which you then weave between the diamond-shaped open sections of the Butterfly Scarf. You can of course, wear both pieces independently too – it’s up to you!
Crochet Diagrams
The diagram below shows you the starting point on the bottom left. You keep repeating the chains in the middle throughout the scarf but every 4th you will join the 3 rows of chains under it together.
There is a gap in the diagram showing you at the top on how to finish this scarf.

The diagram below is for a funky yarn insert. This is instead of buying a pre-made scarf to feed through your scarf.

Pattern Suggestions
- Knitting Yarn Placement Tips
- Winter Butterfly Crochet Scarf Pattern
- Crochet Simple Texture Scarf Pattern
- Floral Cami Top Pattern
- Crochet Butterfly Stitch Infinity Cowl Pattern
Julie G says
No blue button ?
Kara says
No blue button
Mikey says
updated.
Suzette says
Love this pattern! Made over a dozen last year for Christmas and had a request for more this year!