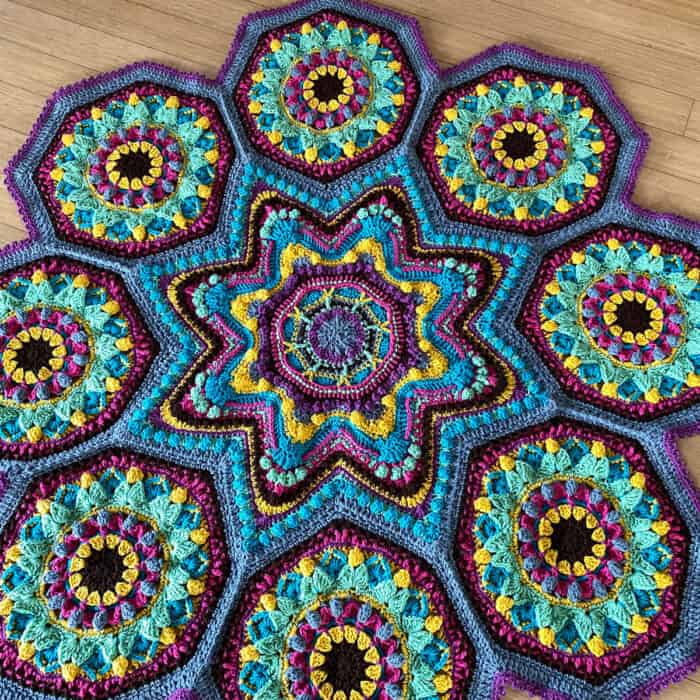
It is the blanket that gives me the honour to claim as being a designer as this throw is an essence of texture and methodical thought. But wait, there's more to the story.
Introducing the Study of Possibilities Afghan designed by Mikey from The Crochet Crowd.
Pattern Yarn and Colours Shown
Materials
- Caron® One Pound™ (454g / 16 oz, 742 meters / 812 yards)
Original Blanket
- Contrast A - Expresso, 1 ball - 183 g/298 m
- Contrast B - Sunflower, 1 ball - 239 g/390 m
- Contrast C - Purple, 1 ball - 142 g/231 m
- Contrast D - Aqua, 1 ball - 265 g/432 m
- Contrast E - Dark Pink, 1 ball - 238 g/389 m
- Contrast F - Grassy Meadow, 1 ball - 260 g/424 m
- Contrast G - Medium Grey Mix, 1 ball - 270 g/440 m
You will use approximately half of each Caron One Pound. If substituting, please follow the gauge to check.
Use size 6 mm, U.S. J/10 hook.
MEASUREMENTS Approx 58” x 58” [147 x 147 cm]
GAUGE 13 sc and 14 rows = 4” [10 cm]
Abbreviations
- Beg = Begin(ning)
- Bet = Between
- Ch(s) = Chain(s)
- Dc = Double crochet
- Dc2tog = Double crochet 2 stitches together
- Dc3tog = Double crochet 3 stitches together
- Dc2tog cl = Using only 2 sts in a row, place 2 dc in each of the 2 sts. [Yoh and insert into stitch, yoh and pull through st. Yoh pull through 2 loops] twice. Rep [ ] in next st. 5 loops on hook, pull through all loops.
- Dcbp = Double crochet back post
- Dcfp = Double crochet front post
- Dc & dcfp 2 tog = Over next 2 stitches, the first stitch will be 1 dc and the next is a dcfp together as 1 stitch. [Yoh and go over top of ch sp and insert into stitch next st in rnd 7, yoh and pull through st. Yoh pull through 2 loops. Yoh and go around next dctog cl st. yoh and pull through st. Yoh pull through 2 loops. 3 loops on hook. Yoh and pull through all loops.
- Dcfp & dc 2 tog = Over next 2 stitches, the first stitch will be 1 dcfp and the next is a dc together as 1 stitch. [Yoh and go around next dctog cl st. yoh and pull through st. Yoh pull through 2 loops. Yoh and go over top of ch sp and insert into stitch next st in rnd 7, yoh and pull through st. Yoh pull through 2 loops. 3 loops on hook. Yoh and pull through all loops.
- Exscfp = Extended single crochet front post. Yoh and insert around the assigned post on the front side. Draw up longer than a usual loop. Yoh, pull through 2 loops.
- Flat Petal St = (1 tr, 5 dc, 1 tr) in same st. This stitch spans over 8 stitches.
- Hdc = Half double crochet
- Hdc2tog = Half double crochet 2 stitches together.
- Hdcbp = Half Double Crochet Back Post
- Hdcbp2tog = Half double crochet back post with 2 stitches together. Yoh and wrap around assigned post. Yoh and pull through. Yoh and wrap around next assigned post. Yoh and pull through. 5 loops on hook, yoh and pull through all loops.
- Picot = Ch 3. Sl st back into last sc worked.
- Popcorn = 5 dc in same st, remove hook. Insert hook from front in the top of the first dc in the group of 5. Put loop on hook and pull through first dc st. Ch 1 to finish.
- Rep = Repeat
- Rnd(s) = Round(s)
- RS = Right side
- Sc = Single crochet
- Sc2tog = Single crochet 2 stitches together
- Sc3tog = Single crochet 3 stitches together
- Scbp = Single crochet back post
- Scfp = Single crochet front post
- Small Popcorn = Work 3 dc into same stitch or space. Drop loop from hook. Insert hook from front to back into first dc of 3 dc group. Pull dropped loop through st. Ch 1 to secure popcorn.
- Small Shell = 5 dc in same st.
- Sk = Skip
- Sl st = Slip stitch
- Sp(s) = Space(s)
- Special 5Tog St = 5 assorted stitches are used together in concave corner. 1 scfp, 1 dc, 1 sc, 1 dc and 1 scfp. Start with small popcorn, next dc in 1st rnd, next dc5tog st, next dc in 1st rnd, scfp in next small popcorn.
- Special Cl = Made up of 1 dc, 1 tr and 1 dc together as a stitch. *Yoh and insert into st, yoh and pull through st, yoh and pull through 2 loops. ** Yoh twice and insert into st, yoh and pull through st, [yoh and pull through 2 loops] twice. Rep from * to **. 4 loops on hook. Yoh and pull through all loops.
- St(s) = Stitch(es)
- Standing dc = Create slip knot and yoh hook. Insert hook into st. Yoh and pull through st. 3 loops on hook. Yoh and pull through 2 loops. Yoh and pull through the remaining 2 loops.
- Standing dcfp = Create slip knot and yoh hook. Wrap around same post as join. Yoh and pull through. 3 loops on hook. [Yoh and pull through 2 loops] twice.
- Standing hdc = Create slip knot and yoh hook. Insert hook into st. Yoh and pull through st. 3 loops on hook. Yoh and pull through 3 remaining loops.
- Standing hdcbp = Create slip knot and yoh hook. Wrap around same post as join. Yoh and pull through. 3 loops on hook. Yoh and pull through 3 remaining loops.
- Standing sc = Create slip knot and insert onto hook. Insert hook into st. Yoh and pull through st. 2 loops on hook. Yoh and pull through 2 remaining loops.
- Standing Scbp = Create slip knot and insert onto hook. Insert hook around assigned back post(s). Yoh and pull through st. 2 loops on hook. Yoh and pull through 2 remaining loops.
- Standing Tr = Create slip knot and (yoh hook) - twice. Insert hook into st. Yoh and pull through st. 4 loops on hook. (Yoh and pull through 2 loops - three times).
- Tr = Treble
- Trfp cl = Treble 2 stitches together in same st.
- WS = Wrong side
- Yoh = Yarn over hook
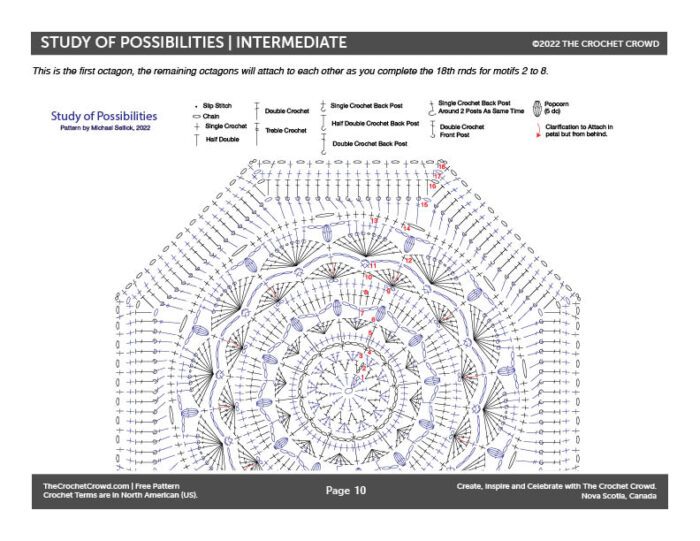
Make 8 Octagons - Part 1
Currently, I want you to end on Rnd 17 the final edging if each motif needs to be finalized before joining them together.
They are approximately 15” across with final edging.
1st rnd: With A, ch 4 (doesn’t count as st). 12 dc in 4th ch from hook. Join with sl st to top of first dc. 12 dc.
2nd rnd: Ch 3, 1 dc into the same st. 2 dc into each st around. Join. Break. 12 - 2 dc groups.
3rd rnd: With B, join with standing dc to any sp bet 2 - 2 dc groups. 2 dc into the same sp. *Sk 2 dc, 3 dc into the sp bet 2 dc. Rep from * around. Join. Break. 12 - 3 dc groups.
4th rnd: With C, join with standing sc to any sp bet 2 - 3 dc groups. Ch 3. *Sk next 3 dc, 1 sc into the sp bet 3 dc groups, ch 3. Rep from * around. Join. Break. 12 sc, 12 ch 3 sps.
5th rnd: With D, join with standing sc to any ch-3 sp. 4 sc into the same sp. *5 sc into next ch-3 sp. Rep from * around. Join. Break. 12 - 5 sc groups.
6th rnd: With E, join with standing dc to the middle sc of a 5 sc group in rnd 5. 5 dc into the same st, exscfp around front post of sc in rnd 4. *Sk to middle sc of next 5 sc group in rnd 5, 6 dc into st, exscfp around front post of sc in round 4. Rep from * around. Join. Break. 12 - 6 dc groups and 12 exscfp sts.
7th row: With G, join with standing scbp around both of the two middle dc together of a 6 dc group. Ch 2, sk next 2 dc, 1 popcorn in next exscfp st, ch 2, sk next 2 dc, *1 scbp using both of next 2 dc posts together. Ch 2, sk next 2 dc, 1 popcorn in next exscfp st, ch 2, sk next 2 dc. Rep from * around. Join. Break. 12 popcorn, 24 ch 2 sps and 12 scbp sts.
8th rnd: With B, join with standing sc in scbp st. 3 sc in next ch 2 sp, sk popcorn, 3 sc in next ch 2 sp, *1 sc in next scbp st. 3 sc in next ch 2 sp, sk popcorn, 3 sc in next ch 2 sp. Rep from * around. Join. Break. 84 sc.
TIP: If customizing colours for the petals. The round before the petals should be the same colour as the petals.
9th rnd: With F, join with standing sc to sc over a scbp in rnd 7. 1 sc in next 6 sts. *Ch 2, 1 sc in next 7 sts. Rep from * around. Ch 2, join. 84 sc and 12 ch 2 petal foundations.
TIP: Petals are in the next round.
10th rnd: With D join with standing sc in next ch 1 sp. 2 sc in same beg corner. *1 dcbp around next 8 sts. 1 hdc2tog, 1 dc2tog, 1 dc in next st, 1 dc2tog, 1 hdc2tog, 1 dcbp in next 8 sts. ** 3 sc in next corner sp. Rep from * 6 more times. Rep from * to ** once. Join with sl st to beg sc. 11 sts per side, 1 sc, 8 dcbp, 1 hdc2tog, 1 dc2tog and 1 sc in convex corner.
11th rnd: With D, join with standing sc to sc bet petals. ch 2, 1 sc in same beg st. Ch 3. 1 sc from behind petal bet 2 middle tr sts into ch 2 sp in rnd 9, ch 3, *(1 sc. Ch 2. 1 sc) in next sc st between petals. Ch 3. 1 sc from behind petal bet 2 middle tr sts into ch 2 sp in rnd 9, ch 3. Rep from * around. Join. Break. 12 petal foundations, 24 ch 3 sps, 12 sc behind petals on rnd 9.
TIP: Petals are in the next round.
12th rnd: With D. Join with standing sc to sc behind petal in rnd 11. (6 dc, ch 2, 6 dc) in next ch 2 foundation sp. *1 sc in next sc behind next petal, (6 dc, ch 2, 6 dc) in next ch 2 foundation sp. Rep from * around. Join. Break. 12 regular petals and 12 sc sts.
Rnd 13: With B, join with standing sc to ch 2 sp of the tip of the rnd 12 petal. 1 scbp in next st, 1 hdcbp in next st, 1 dcbp in next st, ch 2, 1 popcorn in the ch 2 sp of a tip of rnd 10 petal, ch 2, sk first 3 dc on rnd 12 petal, 1 dcbp in next st, 1 hdcbp in next st, 1 scbp in next st. *1 sc in ch 2 sp of tip of rnd 12 petal. 1 scbp in next st, 1 hdcbp in next st, 1 dcbp in next st, ch 2, 1 popcorn in the ch 2 sp of a tip of rnd 10 petal, ch 2, sk first 3 dc on rnd 12 petal, 1 dcbp in next st, 1 hdcbp in next st, 1 scbp in next st. Rep from * around. Join. Break. 84 sts on tips of rnd 12 petals, 12 popcorns on tips of rnd 10 petals, 24 ch 2 sps.
14th rnd: With C, join with standing sc to ch 2 sp after a popcorn. 1 sc in next 7 sts, 1 sc in next ch 2 sp. Ch 1, sk popcorn. *1 in next ch 2 sp. 1 sc in next 7 sts, 1 sc in next ch 2 sp. Ch 1, sk popcorn. Rep from * around. Join. Break. 108 sc and 12 ch 1 sps.
TIP: We are going to prepare to transform the circle into an octagon and need the next 2 rounds to make that happen but also maintain the eye-popping texture of the last petal round.
15th rnd: With E, join with standing tr to any ch 1 sp. Over next 14 sts, include ch 1 sp as a st, place 3 dc, 2 hdc, 3 sc, 2 hdc, 3 dc, 1 tr. *Ch 1. Over next 15 sts, include ch 1 sp as a st, place 1 tr, 3 dc, 2 hdc, 3 sc, 2 hdc, 3 dc, 1 tr. Rep from * around. Join. Break. 8 sides showing with 15 sts per side and 8 ch 1 sp corners.
16th rnd: With A, join with standing hdc to any ch 1 sp corner. 1 dcfp in next st, [1 dcbp in next st, 1 dcfp in next st] rep [ ] to next corner. *(1 hdc, ch 1, 1 hdc in corner sp, 1 dcfp in next st, [1 dcbp in next st, 1 dcfp in next st] rep [ ] to next corner. Repeat from * around. 1 hdc in beg corner sp, ch 1. Join. Break. 8 sides, 17 sts per side.
17th rnd: With G, join with standing sc to any ch 1 sp corner. 1 sc in each st to next corner. *(1 sc. Ch 1. 1 sc) in corner. 1 sc in each st across to next corner. Rep from * around. 1 sc in beg corner sp, ch 1. Join. Fasten off. 8 sides 19 sts per side.
I strongly recommend you lay the motif on a table or floor and use a stitch marker to attach them before you crochet to make sure you connect to the correct side.
Final Edging and Joining Motifs - Part 2
First motif only.
18th rnd: With G, join with standing sc to any ch 1 sp corner. *Sk next st, ch 1, [1 sc in next, ch 1, sk next st.] Rep from [ ] to next corner. ** (1 sc. Ch 2. 1 sc) in corner. Rep from * 6 more times. Rep from * to ** once. 1 sc in beg corner sp. Ch 2. Join. Fasten off.
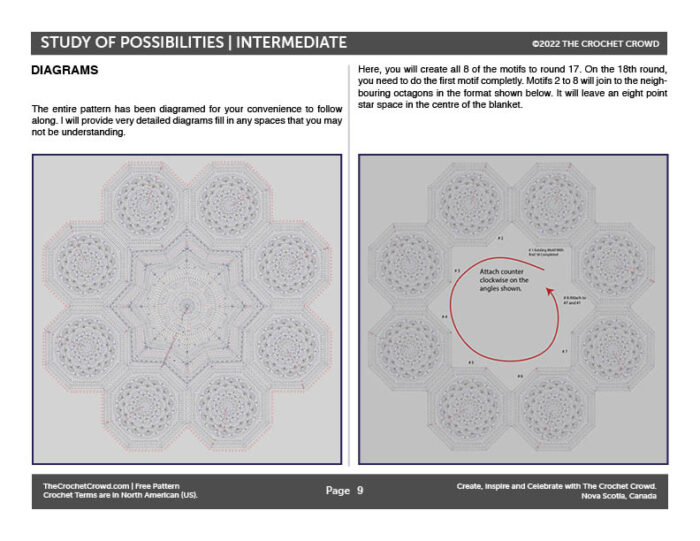
The remaining motifs will be joining to each other. Use the schematic for the layout.
All motifs, except 8th, will be joining each other on the 2nd side in the instructions. Exception the 8th and final motif will be joined on the 2nd and 7th side
I recommend you mark the side edge of the existing motif with stitch markers so that you will be joining to the correct side. Lay down the project to ensure you are marking the correct for the next one to attach to each time you do.
Joining Technique - The ch 1 is substituted for a slip stitch to matching ch 1 sp on the motif you are connecting to. It’s best to have the starting and endings sides not connecting to another motif for best results on corners.
For left handers you need to join as indicated in the schematic below to match the written instructions. Ignore the motif counts as they are opposite for you.
I strongly recommend you lay this out on a table and check the schematic each time you are about to join a new motif to ensure you are capturing the correct side.
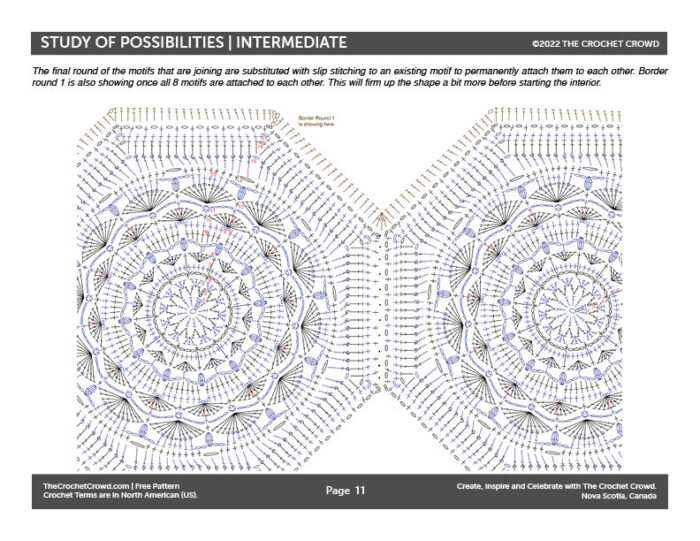
Edging - Motifs 2 - 7 Only (Join on 2nd Side)
18th rnd: With G, join with standing sc to any ch 1 sp corner. Sk next st, ch 1, [1 sc in next, ch 1, sk next st.] Rep from [ ] to next corner. (1 sc. Ch 1, sl st to matching ch 2 sp on connecting motif. 1 sc) in corner. Sk next st, sl st to ch 1 of connecting motif, [1 sc in next, ch 1, sk next st.] Rep from [ ] to next corner. (1 sc. Ch 1, sl st to matching ch 2 sp on connecting motif. 1 sc) in corner. *Sk next st, ch 1, [1 sc in next, ch 1, sk next st.] Rep from [ ] to next corner. ** (1 sc. Ch 2. 1 sc) in corner. Rep from * 4 more times. Rep from * to ** once. 1 sc in beg corner sp. Ch 2. Join. Fasten off.
Edging - Motifs 8 Only (Join on 4th & 7th Sides)
18th rnd: With G, join with standing sc to any ch 1 sp corner. *Sk next st, ch 1, [1 sc in next, ch 1, sk next st.] Rep from [ ] to next corner. ** (1 sc. Ch 2. 1 sc) in corner. Rep from * once, then rep from * to ** once. (1 sc. Ch 1, sl st to matching ch 2 sp on connecting motif. 1 sc) in corner. Sk next st, sl st to ch 1 of connecting motif, [1 sc in next, ch 1, sk next st.] Rep from [ ] to next corner. (1 sc. Ch 1, sl st to matching ch 2 sp on connecting motif. 1 sc) in corner. Rep from * once, then rep from from * to ** once. (1 sc. Ch 1, sl st to matching ch 2 sp on connecting motif. 1 sc) in corner. Sk next st, sl st to ch 1 of connecting motif, [1 sc in next, ch 1, sk next st.] Rep from [ ] to next corner. (1 sc. Ch 1, sl st to matching ch 2 sp on connecting motif. 1 sc) in corner. Rep from * to ** once. 1 sc in beg corner sp. Ch 2. Join. Fasten off.
The motifs will be flimsy when put together, Do 1 complete border rnd to thicken on the join on the outside shape.
The throw now will have two angles that are called Convex and Concave. This exists on the interior of the shape as well. This will make it much easier to understand the rounds going forward.
Generally Speaking
In convex corners, you will have to do an increase of stitches to compensate for the +90 degree turn. For the concave, you will need to decrease stitches.
Outside Border Rnd 1: With G, start in a convex corner just after a concave corner by joining with sl st to ch 2 sp. Ch 4, (counts as 1 dc and ch 1 sp). 1 dc in same beg sp. 1 dc in each sc and ch 1 sp to next corner. (1 dc. Ch 1, 1 dc in corner). 1 dc in each st and ch 1 sp to last 2nd last sc. Dc5tog using next ch 1 sp and next sc before the corner, connecting join, next sc and ch 1 sp of next motif. 1 dc in each sc and ch 1 sp to next corner. *[(1 dc. Ch 1, 1 dc in corner) 1 dc in each sc and ch 1 sp to next corner] twice. (1 dc. Ch 1, 1 dc in corner).] 1 dc in each st and ch 1 sp to 2nd last sc. Dc5tog using next ch 1 sp and next sc before the corner, connecting join, next sc and ch 1 sp of next motif. 1 dc in each sc and ch 1 sp to next corner. Rep from * around. Join with sl st to 3rd chain of beg ch 4. Break.
You will finish the border at the end of the project.
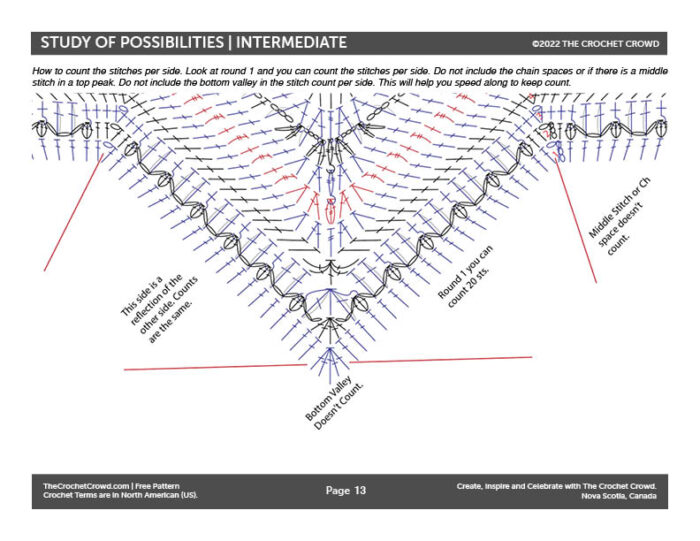
Interior Section - Part 3
NOTES
- It’s assumed that when doing together stitches, it uses the next stitches in sequence unless otherwise stated.
- I found it helpful to add stitch markers to the convex corners.
1st rnd: (RS) With G, start in a convex corner just after a concave corner by joining with sl st to ch 2 sp. Ch 4, (counts as 1 dc and ch 1 sp), *1 dc in same beg sp. 1 dc in each st and ch 1 sp to last 2nd last sc. Dc5tog using next ch 1 sp and next sc before the corner, connecting join, next sc and ch 1 sp of next motif. 1 dc in each sc and ch 1 sp to next corner. **(1 dc. Ch 1, 1 dc in corner). Rep from * 6 more times. Rep from * to ** once. Join with sl st to 3rd ch of beg ch 4. Break G. 20 sts per side, 20 dc per side, 1 dc5tog and 1 ch 1 sp in convex corner.
2nd rnd: With D, join with sl st to next ch 1 sp. Ch 4, 1 dc in same beg sp. *1 dc in next st. [1 small popcorn in next st, ch 3, sk 2 sts.] 5 times. Small popcorn into next st, ch 3, sk 1 st. Dc5tog. Ch 3, sk 1 st. Rep [ ] 5 times. 1 small popcorn in next st, 1 dc in next st. **(1 dc. Ch 1. 1 dc) in ch 1 sp corner. Rep from * 6 more times. Rep * to ** once. Join with sl st to 3rd ch of beg ch 4. Break. 19 sts per side. 6 small popcorn and 2 dc per side. 1 dc5tog and 1 ch 1 sp in convex corner.
TIP: The next rnd, we are going to sandwich the ch 3 between the popcorn down to 1st rnd. As you double crochet between the popcorn, crochet right over the chain so it is enclosed inside the double crochet st.
3rd rnd: With F, join with standing sc in next ch 1 sp. Ch 1, 1 sc in same beg corner. *1 sc in next two dc sts, [1 scfp around small popcorn, 1 dc in next 2 dc sts in rnd 1] 5 times. Special 5tog st. [1 dc in next 2 dc sts in rnd 1, 1 scfp around next small popcorn] 5 times. 1 sc in next 2 sts. ** (1 sc. Ch 1, 1 sc) in next corner sp. Rep from * 6 more times. Rep from * to ** once. Join with sl st to beg sc. Break. 18 sts per side, 3 sc, 5 scfp, 10 dc, 1 special 5tog and 1 ch 1 sps in convex corner.
4th rnd: With C, join with standing sc in next ch 1 sp. Ch 1, 1 sc in same beg corner. *1 sc in next 14 sts, 1 hdc in next 2 sts, dc5tog, 1 hdc in next 2 sts, 1 sc in next 14 sts. ** (1 sc. Ch 1, 1 sc) in next corner sp. Rep from * 6 more times. Rep from * to ** once. Join with sl st to beg sc. Break. 17 sts per side, 14 sc, 2 hdc, 1 dc5tog, and 1 ch 1 sp in convex corner.
5th rnd: With B, join with standing sc in next ch 1 sp. Ch 1, 1 sc in same beg corner. *1 sc in next 13 sts, 1 hdc2tog, 1 dc2tog, 1 tr in dc5tog st, 1 dc2tog, 1 hdc2tog, 1 sc in next 13 sts, ** (1 sc. Ch 1. 1 sc) in next corner. Rep from * 6 more times. Rep from * to ** once. Join with sl st to beg sc. Break. TURN. 16 sts per side, 14 sc, 1 hdc2tog, 1 dc2tog, 1 tr and 1 ch 1 sp in convex corner.
6th rnd: (WS) With A, join with standing dc in next ch 1 sp. Ch 1, 1 dc in same beg corner. *[1 sc in next st, 1 tr in next st] 6 times. 1 hdc2tog, 1 dc2tog, special cl, 1 dc2tog, 1 hdc2tog, [1 tr in next st, 1 sc in next st] 6 times. ** (1 dc. Ch 1, 1 dc) in next corner sp. Rep from * 6 times. Rep from * to ** once. Join with sl st to beg standing dc. Break. TURN. 15 sts per side. 1 dc, 6 sc, 6 tr, 1 hdc2tog, 1 dc2tog and 1 ch 1 sp in convex corner.
7th rnd: (RS) With E, join with standing sc in next ch 1 sp. Ch 1, 1 sc in same beg corner. *1 sc in next 11 sts, 1 hdc2tog, 1 dc2tog, 1 trfp cl, 1 dc2tog, 1 hdc2tog, 1 sc in next 11 sts, ** (1 sc. Ch 1. 1 sc) in next corner. Rep from * 6 more times. Rep from * to ** once. Join with sl st to beg sc. Break. 14 sts per side, 12 sc, 1 hdc2tog, 1 dc2tog, 1 trfp cl and 1 ch 1 sp in convex corner.
8th rnd: With F, join with standing sc in next ch 1 sp. Ch 1, 1 sc in same beg corner. *1 sc in next 2 sts, sk next st, ch 2, [1 sc in next st, ch 2, sk next st] 2 times, 1 dc in next st, [ch 3, sk next st, 1 dctog cl] twice. 1 trfp cl, [1 dctog cl, ch 3, sk next st] twice. 1 dc, ch 3, [sk next st, 1 sc in next st, ch 2] twice, 1 sc in next 2 sts. ** (1 sc. Ch 1. 1 sc) in next corner. Rep from * 6 more times. Rep from * to ** once. Join with sl st to beg sc. Break. 8 sts per side that is a combination of sts and sps, 5 sc, 1 dc, 2 dctog cl, 3 ch 2 sps, 2 ch 3 sps and 1 ch 1 sp in convex corner.
TIP: Like before in rnd 3 when we pushed down the ch sps to be sandwiched between the stitches, the same thing will happen again. We will be stitching to rnd 7 forcing the chains to be enclosed inside the stitch.
9th rnd: With E, join with standing sc in next ch 1 sp. Ch 1, 1 sc in same beg corner. *1 sc in next 3 sts, 1 sc into next st on rnd 7. 1 sc in next sc st, 1 sc into next st on rnd 7. 1 sc in next sc st. 1 dc next st on rnd 7, 1 sc into next st. [Dc & dcfp 2 tog] twice. 1 dcfp. [Dcfp & dc 2 tog] twice. 1 sc in next dc st, 1 dc next st on rnd 7. 1 sc into next st, 1 sc into next st on rnd 7. 1 sc into next sc, 1 sc into next st on rnd 7. 1 sc next 3 sc sts. ** (1 sc. Ch 1. 1 sc) in next corner sp. Rep from * 6 more times. Rep from * to ** once. Join with sl st to beg sc. Break. 12 sts per side, 9 sc, 1 dc, 2 dcfp & dc2tog or 2 dc & dcfp 2 tog and 1 ch 1 sp in convex corner.
TIP: Mark the middle single crochet in a convex corner with a stitch marker.
10th rnd: With D join with standing sc in next ch 1 sp. 2 sc in same beg corner. *1 sc in next 3 sts, 1 dcbp around next 8 sts. 1 hdc2tog, 1 dc2tog, 1 dc in next st, 1 dc2tog, 1 hdc2tog, 1 dcbp in next 8 sts. ** 3 sc in next corner sp. Rep from * 6 more times. Rep from * to ** once. Join with sl st to beg sc. 11 sts per side, 1 sc, 8 dcbp, 1 hdc2tog, 1 dc2tog and 1 sc in convex corner.
11th rnd: Sl st to next st. Ch 1, 1 sc in same st. *1 sc in next 7 sts, 1 dc in next 3 sts, 1 dc3tog, 1 dc in next 3 sts, ** 1 sc in next 8 sts. Rep from * around to the last side. Last side rep from * to **, 1 sc in last 7 sts. Join with sl st to beg sc. Break. 10 sts per side, 7 sc, 3 dc, 1 dc3tog and 1 sc in convex corner.
12th rnd: With B, join with standing scbp in same st as join. *1 scbp around next 3 sts, 1 sc in next 6 sts, 1 sc3tog, 1 sc in next 6 sts, ** 1 scbp around next 4 sts. Rep from * around to the last side. Last side rep from * to **, 1 scbp around last 3 sts. Join with sl st to beg sc. 9 sts per side, 6 sc, 3 scbp and 1 scbp in convex corner.
13th rnd: Ch 1, 1 sc in same st as join. * 1 sc in next 3 sts, 1 popcorn in next st, 1 sc in next 2 sts, 1 dc2tog, 1 dc3tog, 1 dc2tog, 1 sc in next 2 sts, 1 popcorn in next st, *1 sc in next 5 sts. Rep from * around to the last side. Last side rep from * to **, 1 sc in last 4 sts. Join with sl st to beg sc. Break. 7 sts per side, 5 sc, 1 popcorn, 1 dc2tog and 1 sc in convex corner.
14th rnd: With G, join with standing sc in same st as join. *1 sc in next 4 sts, 1 dc2tog, 1 dc3tog, 1 dc2tog, ** 1 sc in next 5 sts. Rep from * around to the last side. Last side rep from * to **, 1 sc in last 4 sts. Join with sl st to beg sc. Break. TURN. 5 sts per side, 4 sc, 1 dc2tog and 1 sc in convex corner.
TIP: The stitch marker for the between the repeats will shift closer over by 1 stitch. It’s due to turning the blanket around. Go with it and shift the stitch marker between the repeats.
15th rnd: (WS) With C, join with standing sc in same st as join. *[1 sc in next st, 1 tr in next st] 5 times. ** 1 sc in next 2 sts. Rep from * around to the last side. Last side rep from * to **, 1 sc in last st. Join with sl st to beg sc. Break. TURN. 5 sts per side, 3 sc, 2 tr, 1 and 1 sc in convex corner.
16th rnd: (RS) With A, join with standing sc in same st as join. *1 sc in next 4 sts, 1 dc3tog, ** 1 sc in next 5 sts. Rep from * around to the last side. Last side rep from * to **, 1 sc in last 4 sts. Join with sl st to beg sc. Break. 4 sts per side, 4 sc and 1 sc in convex corner.
Transitioning to Circle Complete
We are starting to officially be a circle. I still want you to think in terms of the 8 pie slices that make up repeating. If it helps you, continue to move up the stitch markers so you can easily see the repeat. I will give you entire round counts of stitches plus break down of stitches.
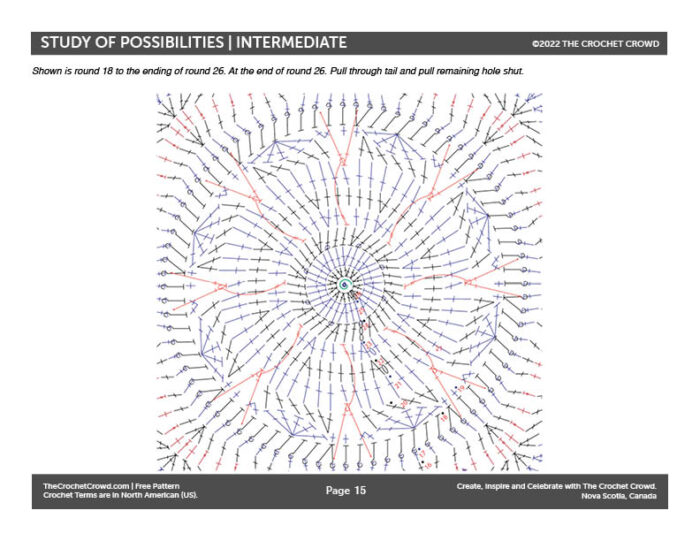
17th rnd: With E, join with standing dc in the same st as the join. 1 dc in each st around. Join with sl st to beg standing dc. Break. 80 sts. 80 dc sts, 10 sts per pie.
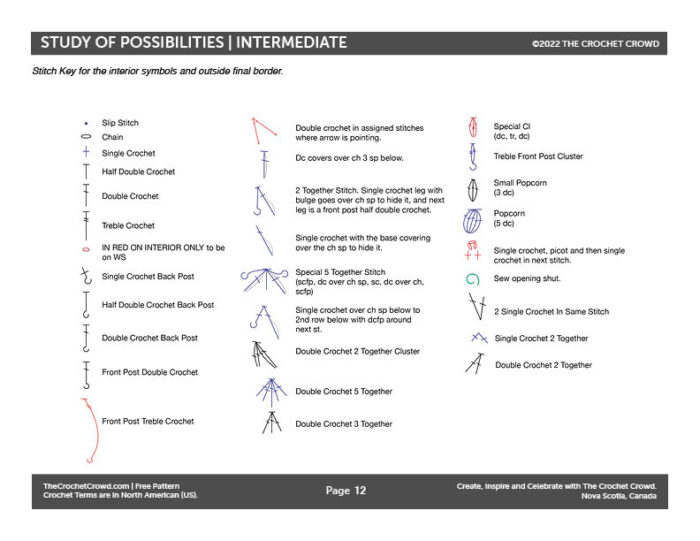
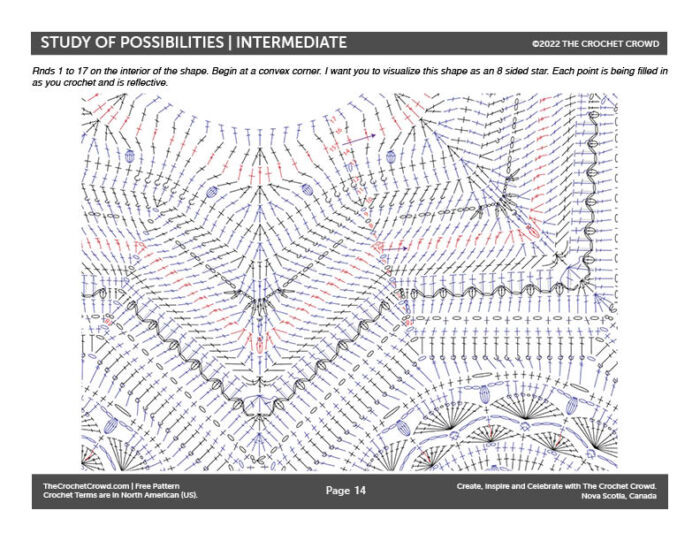
18th rnd: With F, join with standing hdcbp around same post as join. 1 hdcbp around next 7 posts, 1 hdcbp2tog. *1 hdcbp around next 8 posts, 1 hdcbp2tog. Rep from * around. Join with sl st to beg standing hdcbp. Break. 72 sts. 64 hdcbp and 12 hdcbp2tog. 9 sts per pie.
19th rnd: With D, join with standing sc in same st as join. 1 sc in next st, sk 2 sts, 5 dc in next st, sk next 2 sts, 1 sc2tog. *1 sc in next 2 sts, sk 2 sts, 5 dc in next st, sk next 2 sts, 1 sc2tog. Rep from * around. Join with sl st to beg standing sc. Break. 64 sts. 16 sc, 8 sc2tog and 40 dc. 8 sts per pie.
In the next round, we are going to shift the pie slices to the middle dc of the group of 5. That’s where we will start.
The spoke stitches will count as the 2 stitches it will sit in front of.
Beg Spoke St = Complete a dc2tog by following stitch work straight down to 17th round, count back 3 sts and wrap hook. Yoh and pull through, yoh and pull through 2 loops. Count forward 3 sts, yoh and insert into the 3rd stitch. Yoh and pull through, yoh and pull through 2 loops. 3 loops on hook, yoh and pull through all.
Spoke St = Now the beginning spoke st is in. Yoh and insert into the 7th stitch away from the last spoke and pull through, yoh and pull through 2 loops. Count forward 3 sts, yoh and insert into the 3rd stitch. Yoh and pull through, yoh and pull through 2 loops. 3 loops on hook, yoh and pull through all. 9
20th rnd: With B, join with a standing sc to the middle dc of the group of 5. 1 sc in next 2 dc, Beg spoke st, 2 sc in next 2 dc sts. * 1 sc in next 4 sts, spoke st, 2 sc in next dc sts. Rep from * around. Join with a sl st to beg sc. Break. 56 sts, 6 sc and 8 spoke sts. 7 sts per pie.
21st rnd: With G, join with standing sc to the same st as join. 1 sc in each st around. Join with sl st to beg standing sc. Break. 56 sts, 56 sc. 7 sts per pie.
22nd rnd: With A, join with sl st to same st as join. Ch 1. *1 sc2tog, 1 sc in next 5 sts. Rep from * around. Join with sl st to beg sc2tog. Break. 48 sts, 40 sc and 8 sc2tog. 6 sts per pie.
23rd rnd: With F, join with sl st to same st as join. Ch 1. *1 sc2tog, 1 sc in next st. 1 trfp around spoke st in rnd 20. 1 sc in next 2 sts. Rep from * around. Join with sl st to beg sc2tog. Break. 40 sts, 32 sc and 8 trfp. 5 sts per pie.
24th rnd: With C, join with sl st to same st as join. Ch 3 (counts as dc), 1 dc in next 2 sts, 1 dc2tog. *1 dc in next 3 sts, 1 dc2tog. Rep from * around. Join with sl st top of beg ch 3. Break. 32 sts, 24 dc and 8 dc2tog. 4 sts per pie.
25th rnd: With G, join with standing dcfp around same post as join. 1 dc in next st, 1 dc2tog. *1 dcfp in next st, 1 dc in next st, 1 dc2tog. Rep from * around. Join with sl st to beg standing dcfp. 24 sts, 8 dcfp, 8 dc and 8 dc2tog. 3 sts per pie.
26th rnd: Ch 2 (doesn’t count as st), 1 dc2tog around. Join with sl st to beg dc2tog. 12 sts. 12 dctog. 2 sts per pie.
Fasten off with a long enough strand to feed strand through all stitches and pull the circle closed. Secure.
Finishing Touches - Part 4
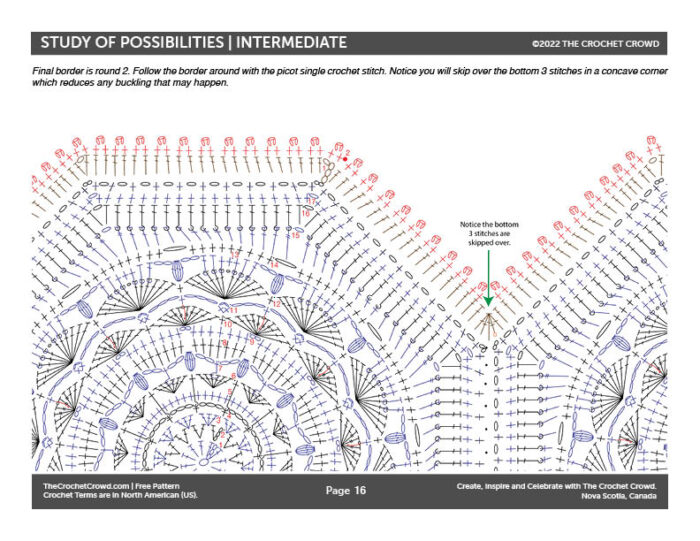
The last final round of the blanket is the picot border. This is my signature look for my blankets. It helps make anything that appears ruffly intentional and looks amazing if the blanket is sitting flat. It’s a win-win out border.
You will use every stitch and space going around. The picot stitch concept works over every 2 stitches
Rnd 2: With C, join to any corner sp on outside edge of throw. Ch 1, 1 sc in same sp as join, picot, 1 sc in next st. *1 sc in next st or sp, picot, 1 sc in next st or sp. Skip the 3 stitches in a concave corner which include the stitch before and after a 5 dctog st. Rep from * around. Join with a sl st to beg sc. Fasten off.
If you are short by a stitch, which isn’t the case in the sample, but if you do, place the last sc in the same st as the first sc.
Tutorials
More to come in early 2022.
Part 1 - Octagons Make 8
Part 2 - Joining the Octagons
Part 3 - Interior Rnds 1 to 17
Releasing April 3rd.
Part 4 - Interior Rnds 18 to 26 Then Finish Border
Releasing April 15, 2022 at 2 PM ET.
The Push For Possibilities - Back Story
Diva Dan has the natural ability to point, suggest and also be the antagonist to do better. He can tell when I skimp versus trying my best. Sometimes that doesn't work in my favour as, at times, I am okay with settling. With this blanket, he kept saying to me, "You know it's possible, figure it out!"
He gave his marching orders to do up 8 octagons and put them together and work backwards! Like who does that! Pahlease!
BACKWARDS? Is he sucking the yarn fumes a bit much... gee wiz!
I protested, more like whined and said, but that's a lot of work. He says you want to be a designer, prove it. Here's the challenge. He asks me, do you think it can be done and I thought, "Yeah, anything is possible but the question is my own personal motivation and what if people hate the idea!"
He told me to knock off the doubt and stop caring what others think in the design. You've done well if one person likes the design.
Stop being 'like that' and just try. I'm going to try, but I am so scared of failure! It's better not to try, therefore you don't face failure! He says stop playing games, try and see what happens!
The March Forward
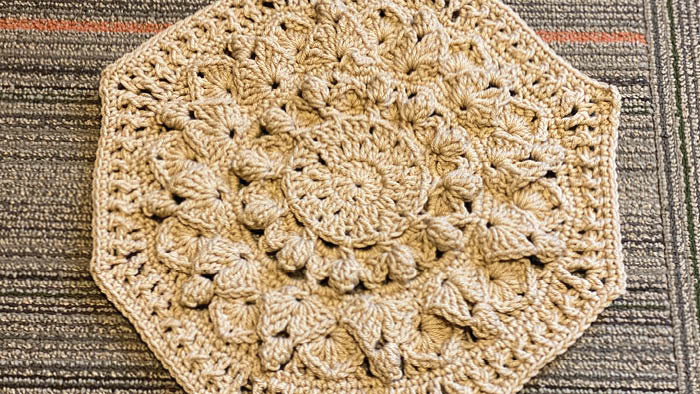
I crocheted the first example in a solid colour, which is typical so I can see the design without the influence of colour.
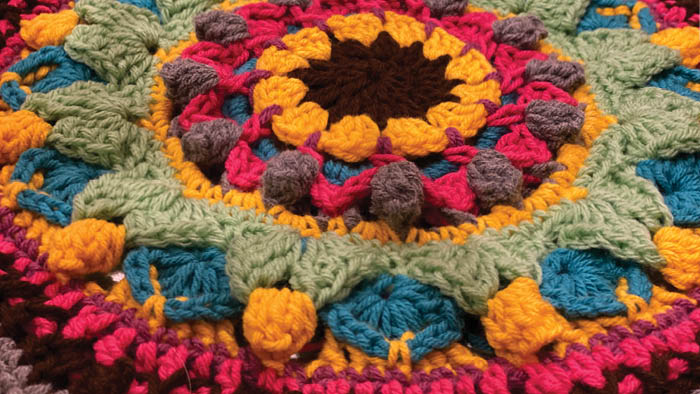
Daniel picked 7 colours from the Caron One Pound Line for me to try. Later the same day after the design was completed for the octagon, I mixed up the colours the best I could and it became the layout for the design.
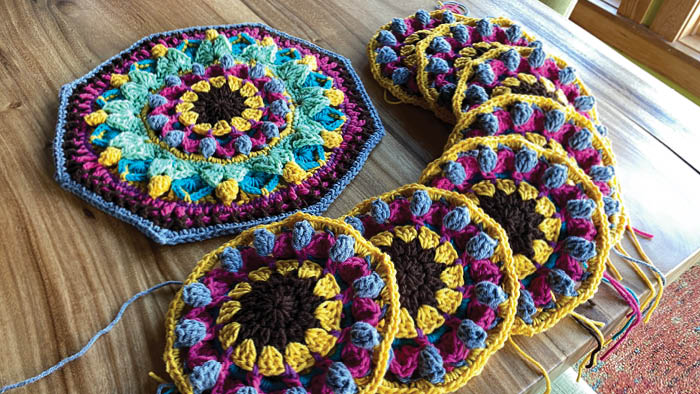
Like anything I do in this field, I do everything like an assembly line so I don't have to refer to the instructions often. With 1 motif completely done as the role model for the rest. I did the other 7 over 3 - 4 evenings. I started Dec 22, 2020 to put this in perspective.
I was anxious to see how on earth it will look puzzled together. So with eagerness now, I am hooked on the project. Don't tell Diva Dan now, I need to play the 'feel sorry for me card' as much as I can, you know!
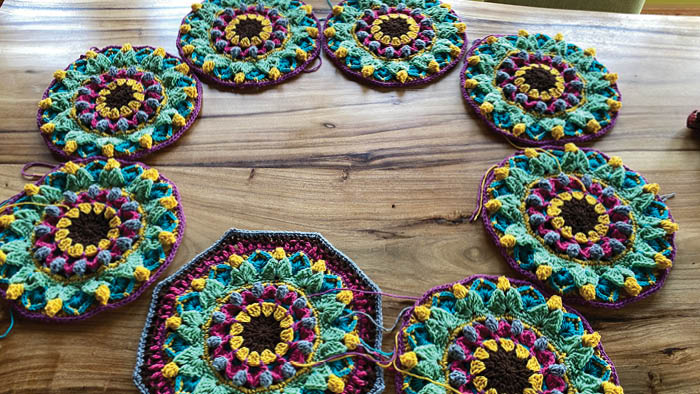
Of course, I have to lay this out once in a while to see the vision. Diva Dan has foresight, I have don't have the ability which is why I cannot decorate or pick colours. I lack imagination at times in this area. I can see stitches and stuff come together, but the colouring is beyond me.
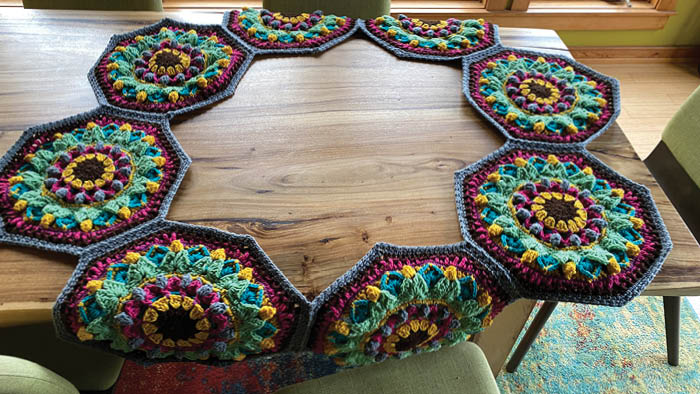
I Blew Out Brain Cells
I blew out brain cells trying to figure this UFO project! OMG, I thought I was going to have a bitch fit. How do I start! Daniel would walk by.
"Figure it out!" OMG, say that to me one more time... don't test me! I'm not in the mood for your games!
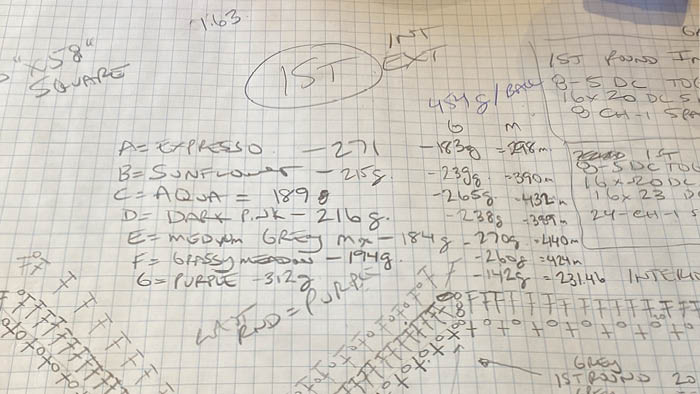
I graph everything and fill in data as I go. I figured out the outside perimeter first because it's something I could do.
I turned the graph paper upside down and forced myself to think backwards. I know how to do this, how do I get to step before this?
Like a good boy, I started the first row of going backwards inside the wide gaping hole that is the bain of my existence! Mathematically it charted fine and lawd have mercy, it worked! You know that moment where you realize fear can be overcome if you try! Again, don't tell Diva Dan I said that! Might give him a big head!
Over 2 Days
Diva Dan would check on me to see progress. Like just get out of my space Satan, let Daddy do her work. In a gay house, our adjectives can be backwards, very much like this UFO.
In the obscene words of RuPaul. Daniel says I'm worried that you are going to cheapen the design by skipping textures and your signature look. You have so many possibilities and but in the wise words of RuPaul... "Good luck and don't fu$% it up!"
That's the spirit! Encourage me with a threat! MMMM Hmmmm! Seriously have to re-evaluate this working relationship!
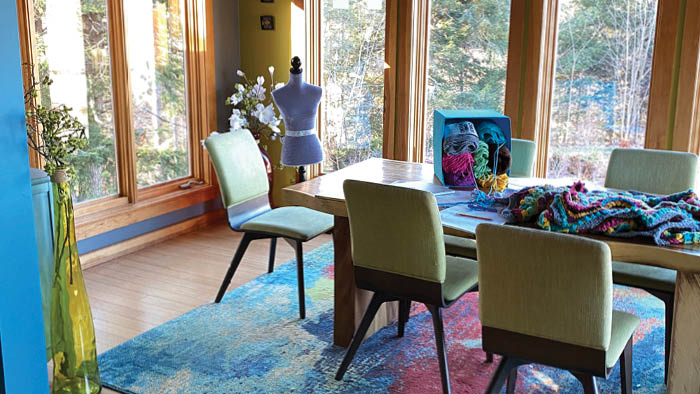
The Fear Hit Me
I got the living fear hitting me after Diva Dan's final critique. I got this far and gawd, it was so amazing. Diva Dan was so amazed. You are doing so good, keep on going and see what other stitches you can toss in here!
Brain freeze! More stitches? Are you for real? Oh please honey, take a seat!
The final pattern was ready for the JOANN Spring Stitch Along and this got shelved! Thank gawd! So it has been sitting since the beginning of January looking like this until this past week.
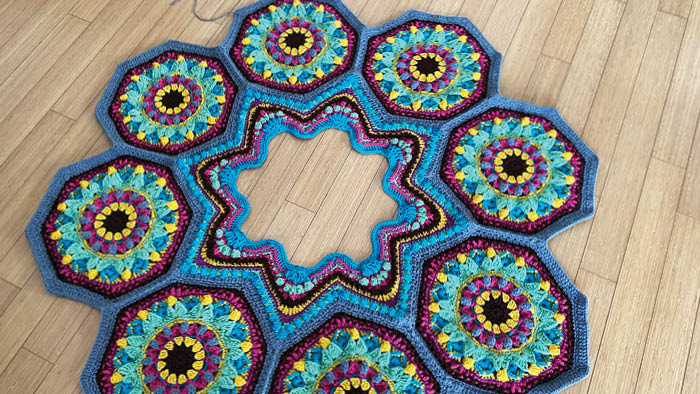
The Nova Scotian Holiday
It was a holiday earlier this week and was a holiday in Ontario where Yarnspirations is. This means it's technically a day-off. So I thought, now is the time to bring this back out from the pits of hell and see if I can figure this out.
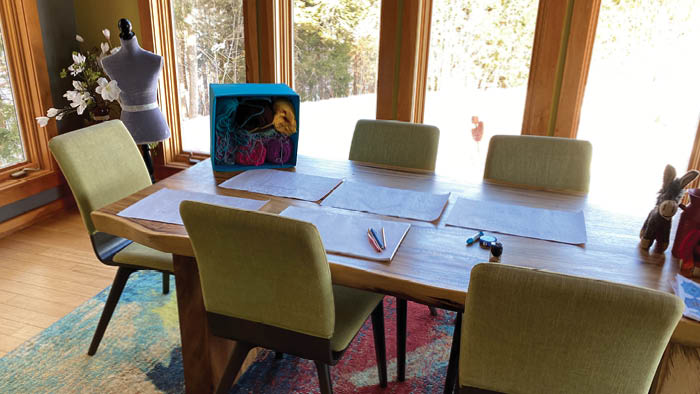
I pulled out my graph paper from before and my box of yarn so I haven't interfered with the yardage and weights of the existing balls of yarn.
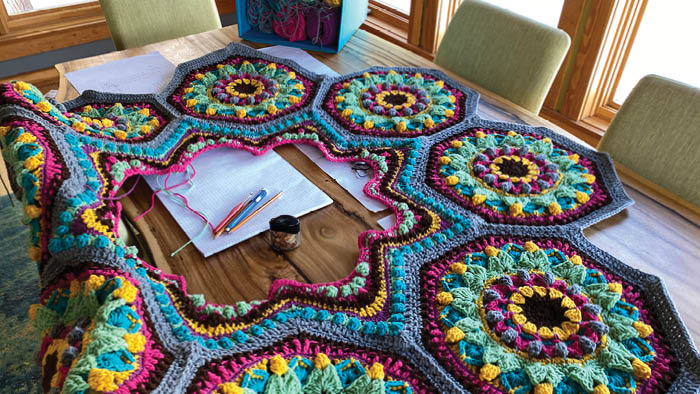
I was constantly checking to ensure it was staying flat but on graph paper, it was working out mathematically with each round I did.
I literally finished the blanket the same day I picked this back up. The fear was so strong and yet my solution was to sit down, think and keep going.
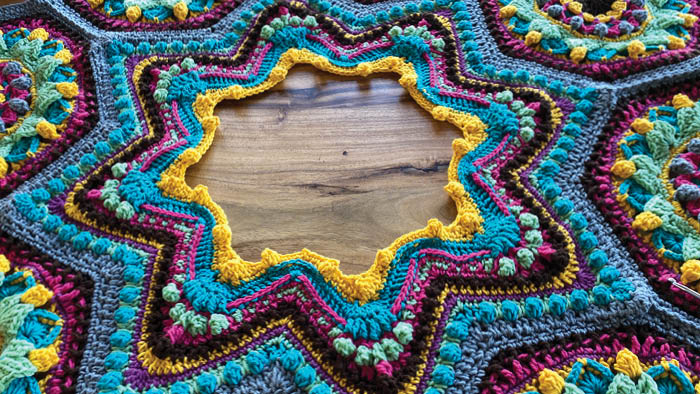
Taking pictures in major milestones on how it was coming together.
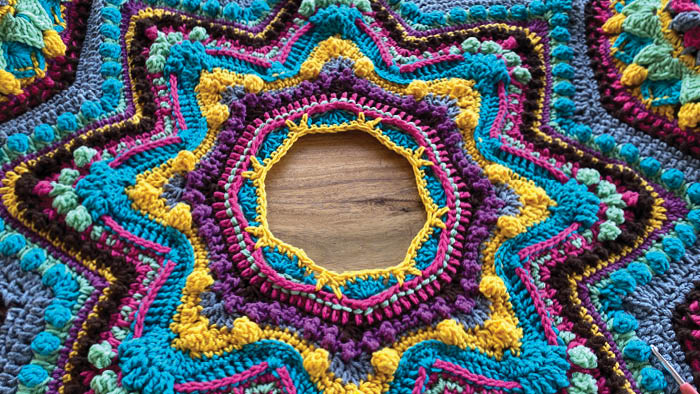
What you may have not realized, the closer you get to the centre, the faster the revolution. So for those doing this, the work gets less and less as you get to the middle.
We are used to speedy starts of blankets and then getting slower. This is backwards.
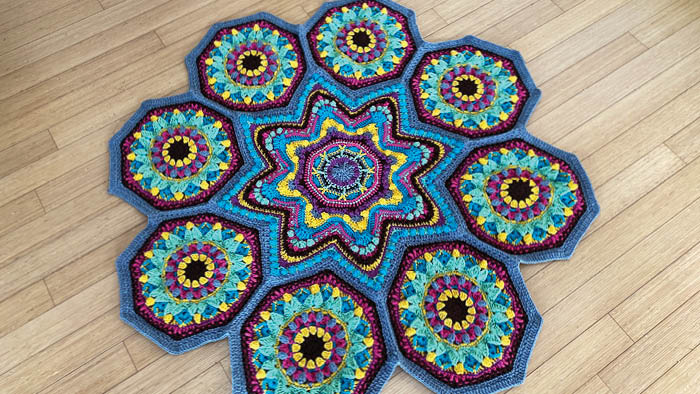
The damn thing sat flat throughout the process! I mean, that's just nuts! So it came time for the border. Our team has discussed borders when a border is too much and when it's not enough.
I felt that the crocheter will want to finish this soon after the middle is done. So it's just 2 rounds for the border. Batta Boom, Batta Bing!
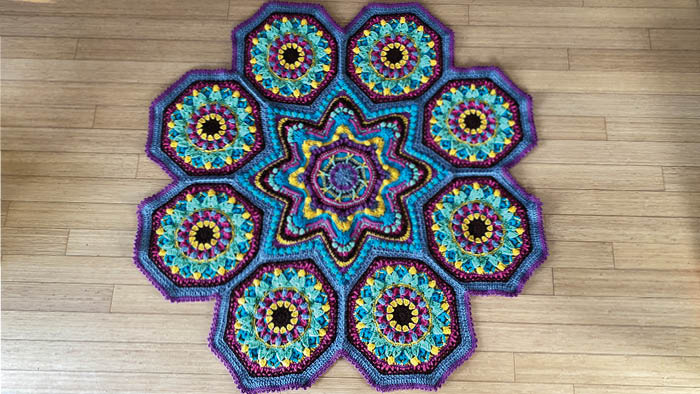
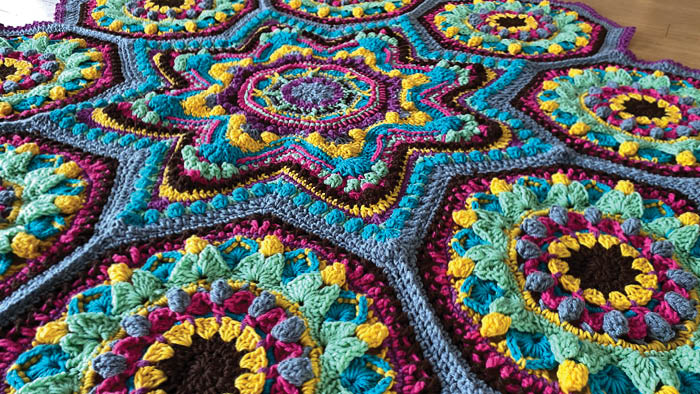
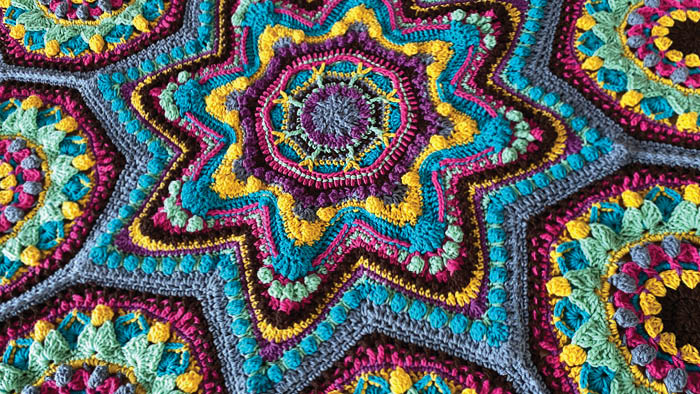
At This Point...
I'm in process of converting my graphs to written words. It's been 3 days already.
I prefer to work at the dining room table away from my computer and office so I can concentrate. Eventually, the graph will have to be done on the computer and pulled from my notes.
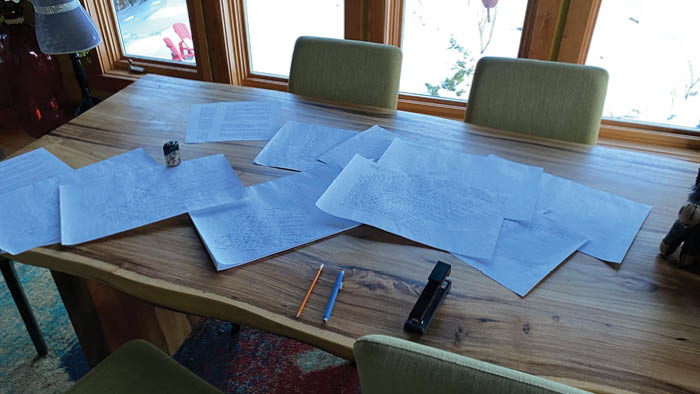
The testing team hasn't been activated yet because I am still writing the words. I figured out how to do the middle without the hexagons. Just using 1 colour so I can test my graphs I had written during the design.
I am writing the instructions from the original graph round first. Then try it on this sample to ensure the math is right. Once confirmed, I do the entire round.
Then restart again for the next round. So the writing is really slow but speeding up as I get closer to the middle. The stitch markers are fabulous!
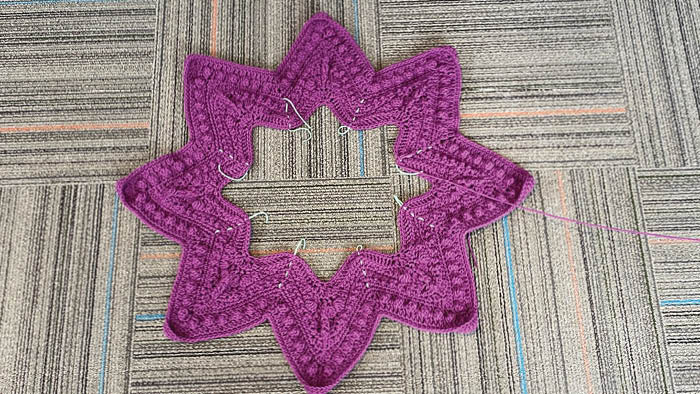
I am not going to rush to push this out. I need to ensure the pattern is going to work and be properly tested without pressure. We don't require testers as our team is full.
Tutorials
More to come in early 2022.
Michelle says
I absolutely loved this pattern! Your tutorial was easy to follow and I love your sense of humour. Thank you for all the time and effort you have put into such a beautiful piece of art!