Crochet berets have become and gone out of style over the years. Sometimes, they are hot; other times, they are not. It's really up to your style. Some things I wear are not in trend, and I don't care because it's who I am and what I enjoy wearing.

Some of the choices below will have a matching tutorial in the future.
Crochet Kroy FX Socks Beret
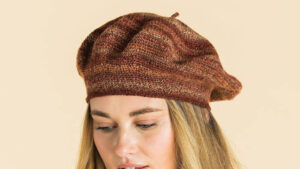
The Classic Beret using Kroy Socks FX yarn is new for 2021. Sock yarn has nylon which makes the pattern last longer and has natural stretch.
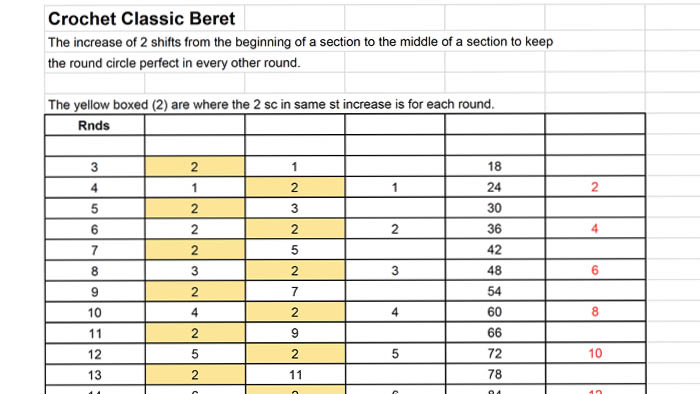
Included with the free pattern is a separate worksheet that I made to help myself get past the 12th rnd. It shows the sequential increases so you can easily check it off the list. The worksheet is posted below.
This is an easy-to-make beret that's the thinner yarn for a more refined elevated look. Using the Patons Kroy Sock FX yarn, you will see subtle transitions in the yarn colouring that is really sharp-looking.
Pattern Correction - Decrease Section
11th rnd: *1 sc in each of next 11 sc. Sc2tog. 1 sc in each of next 11 sc. Rep from * around. 138 sc.
12th rnd: *Sc2tog. 1 sc in each of next 21 sc. 132 sc.
13th rnd: *1 sc in each of next 10 sc. Sc2tog. 1 sc in each of next 10 sc. Rep from * around. 126 sc.
14th rnd: *Sc2tog. 1 sc in each of next 19 sc. 120 sc.
15th rnd: *1 sc in each of next 9 sc. Sc2tog. 1 sc in each of next 9 sc. Rep from * around. 114 sc.

Tutorial Worksheet
You can click the worksheet to download the two free pages used in the tutorial or click here.
Crochet Awesome Blossom Beret

This hat starts off just after the crown of the hat and is crocheted to the brim (forehead). This is the Crochet Awesome Blossom Beret.
You can pretty much use value-based yarns for this choice and it's an easy one to do.
The design is for kids ages from 2/4, 6/8 and 10/12.
Crochet Brigette's Beret
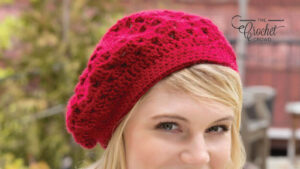
This Crochet Bridgette's Beret is a standard beret pattern for crocheters to enjoy.
It starts off at the top of the head and expands outward and then comes back in for the forehead.
If you want something a bit more snug, you can roll in the brim and put in a stretchable fabric elastic inside the brim so it has that form-fitting feel.
Tutorial
Crochet Classic Beret

This Classic Crochet Beret has been around a long time and is using a smaller than normal crochet hook.
The stitchwork is nice and tight and the seamline for this hat nearly goes invisible as well.
An easy repeating stitchwork as it grows outward and then comes back in to form the brim in the end.
Mikey's Notes

The pattern standard is to say the next rounds after doing a section. I have added in round numbers so it can match my tutorial. I cannot alter the real PDF but recording it here if it's helpful for others to know.
Ch 6. Join with sl st to first ch to form a ring.
1st rnd: Ch 1. 12 sc in ring. Join with sl st to first sc.
2nd rnd: Ch 1. (1 sc in next sc. 2 sc in next sc) 6 times. Join with sl st to first sc. 18 sc.
3rd rnd: Ch 1. (1 sc in each of next 2 sc. 2 sc in next sc) 6 times. Join with sl st to first sc. 24 sc.
4th rnd: Ch 1. (1 sc in each of next 3 sc. 2 sc in next sc) 6 times. Join with sl st to first sc. 30 sc.
5th rnd: Ch 1. (1 sc in each of next 4 sc. 2 sc in next sc) 6 times. Join with sl st to first sc. 36 sc. I have written out the instructions for those who are unsure what to do next.
The pattern states to continue in the same manner. The following are the instructions that I have added here only. Indicated in RED.
6th rnd: Ch 1. (1 sc in each of next 5 sc. 2 sc in next sc) 6 times. Join with sl st to first sc. 42 sc.
7th rnd: Ch 1. (1 sc in each of next 6 sc. 2 sc in next sc) 6 times. Join with sl st to first sc. 48 sc.
8th rnd: Ch 1. (1 sc in each of next 7 sc. 2 sc in next sc) 6 times. Join with sl st to first sc. 54 sc.
9th rnd: Ch 1. (1 sc in each of next 8 sc. 2 sc in next sc) 6 times. Join with sl st to first sc. 60 sc.
10th rnd: Ch 1. (1 sc in each of next 9 sc. 2 sc in next sc) 6 times. Join with sl st to first sc. 66 sc.
11th rnd: Ch 1. (1 sc in each of next 10 sc. 2 sc in next sc) 6 times. Join with sl st to first sc. 72 sc.
12th rnd: Ch 1. (1 sc in each of next 11 sc. 2 sc in next sc) 6 times. Join with sl st to first sc. 78 sc.
13th rnd: Ch 1. (1 sc in each of next 12 sc. 2 sc in next sc) 6 times. Join with sl st to first sc. 84 sc.
14th rnd: Ch 1. (1 sc in each of next 13 sc. 2 sc in next sc) 6 times. Join with sl st to first sc. 90 sc.
15th rnd: Ch 1. (1 sc in each of next 14 sc. 2 sc in next sc) 6 times. Join with sl st to first sc. 96 sc.
16th rnd: Ch 1. (1 sc in each of next 15 sc. 2 sc in next sc) 6 times. Join with sl st to first sc. 102 sc.
17th rnd: Ch 1. (1 sc in each of next 16 sc. 2 sc in next sc) 6 times. Join with sl st to first sc. 108 sc.
18th rnd: Ch 1. (1 sc in each of next 17 sc. 2 sc in next sc) 6 times. Join with sl st to first sc. 114 sc.
19th rnd: Ch 1. (1 sc in each of next 18 sc. 2 sc in next sc) 6 times. Join with sl st to first sc. 120 sc.
In blue is what is written on the pattern below. I have added rnd numbers for convenience.
20 - 21st rnds: Next 2 rnds: Ch 1. 1 sc in each sc around. Join with sl st to first sc at end of 2nd rnd.
22th rnd: Next rnd: Ch 1. 1 sc in each of first 18 sc. Draw up a loop in each of next 2 sc. Yoh and draw through all loops on hook - Sc2tog made. *1 sc in each of next 18 sc. Sc2tog. Rep from * 4 times more. Join with sl st to first sc. 114 sts.
23rd rnd: Next rnd: Ch 1. *1 sc in each of next 17 sts. Sc2tog. Rep from * 5 times more. Join with sl st to first sc. 108 sts.
24th rnd: Next rnd: Ch 1. *1 sc in each of next 7 sts. Sc2tog. Rep from * 11 times more. Join with sl st to first sc. 96 sts.
25th rnd: Next rnd: Ch 1. *1 sc in each of next 10 sts. Sc2tog. Rep from * 7 times more. Join with sl st to first sc. 88 sts.
26th rnd: Next rnd: Ch 1. *1 sc in each of next 9 sts. Sc2tog. Rep from * 7 times more. Join with sl st to first sc. 80 sts.
27th rnd: Next rnd: Ch 1. *1 sc in each of next 6 sts. Sc2tog. Rep from * 9 times more. Join with sl st to first sc. 70 sts.
28th rnd: Next rnd: Ch 1. *1 sc in each of next 5 sts. Sc2tog. Rep from * 9 times more. Join with sl st to first sc. 60 sts.
29th rnd: Next rnd: Ch 1. *1 sc in each of next 8 sts. Sc2tog. Rep from * 5 times more. Join with sl st to first sc. 54 sts.
30 - 32nd rnds: Next 3 rnds: Ch 1. 1 sc in each st around. Join with sl st to first sc. Fasten off.
Tutorial
Gauge Check Promised in Classic Beret Tutorial.
My First Crochet Beret
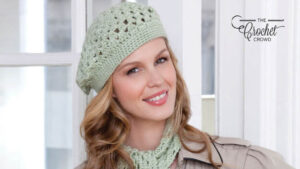
This is the My First Crochet Beret pattern. It's the classic standard design of a beret using Red Heart Soft.
Easy to crochet for starting on the top of the hat and going to the forehead.
Tutorial - Beret Only
Red Heart Beret
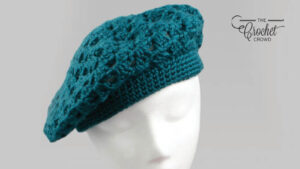
This is just a standard Crochet Beret sized for adults.
This is also using Red Heart Soft yarn for this concept. This is easy to make, easy to wear.
The colours and potential yarn choices are endless.
Tutorial
Crochet Slouchy Beret
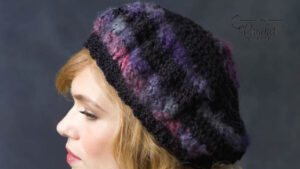
This is the Crochet Slouchy Beret. It is solid in construction. The yarn choice was Red Heart Magical but that yarn is discontinued. The yarn had a mix of several different strands inside that included boucle and other fibres. It was fun to work with but not everyone's cup of tea.
This is still a free pattern today.
Crochet Track Stitch Beret

This Crochet Track Stitch Beret is actually designed as a flat panel with a seam line to sew up at the end... BUT WAIT... I really don't like that approach. It's a personal choice, of course. I will be filming you a video tutorial on how to change that element to make it in the round. I used Red Heart Melange with mine with fun colours and because the colours are self-striping, the way I did it, you will see what I would have done. The sewing at the end would be obvious for those who want to use variegated or self-striping yarns. I can show you how to avoid that.
More Ideas
- Crochet Rustic Textures Blanket Pattern
- Crochet Beanie Slouchy Pattern
- Crochet Rainbow Brim Beanie Hat Pattern
- Red Heart Super Saver Metallic Yarn
- Crochet Dream Big Baby Patterns


Sara Bailey says
I just did the Awesome Blossom beret in about two hours or less. It was so quick. My 8 year old daughter is excited that she got to pick out her own yarn and design. When I showed her your website she saw the blogs related to hats and then said, "Hey there's Berets! I love berets." So 8 year olds are ahead of the market research curve. I'll post a photo on CC soon, just have to make the flower to add to it.
Cynthia L Horton says
Well ? what Yarnspirations said, I like most of them ☺
Mikey says
That's based on market research as a general overview. It's not specific to a design. 😀
Gwen says
Berets are a favorite of my mine,