
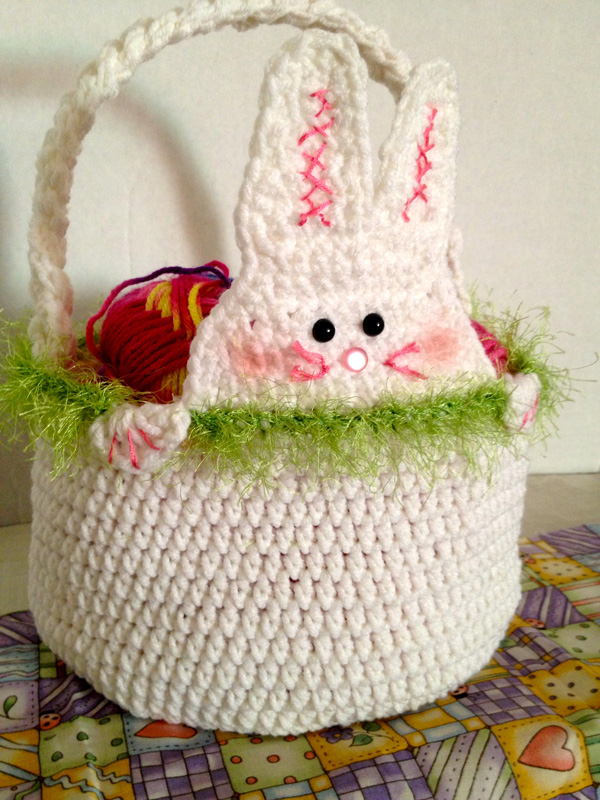
Peek A Boo Rabbit Easter Basket
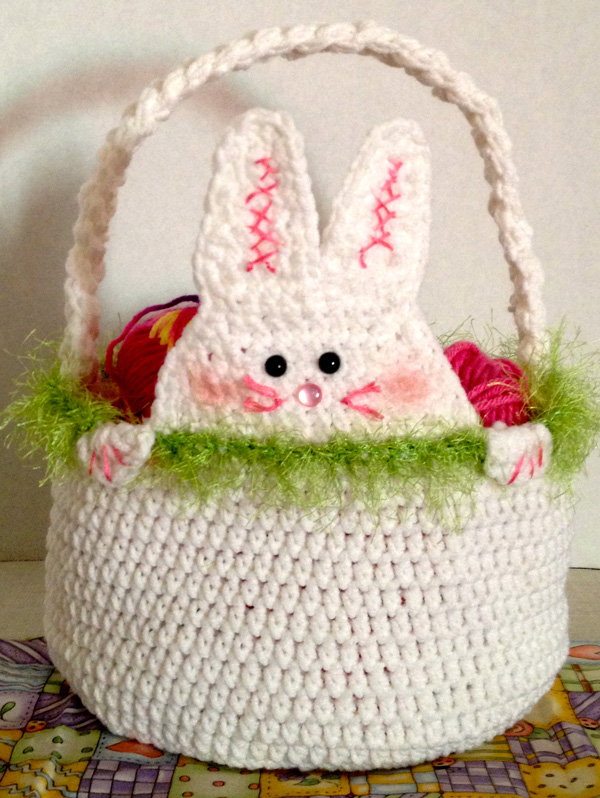
Need a super cute Easter Basket Crochet Pattern? Look no further as our Executive Assistant, Cathy Cunningham has created another free pattern to share with you.
If you can crochet a hat, this basket is very similar to the same concept. The bunny is flat and pops up from the side leaving plenty of room to stuff the basket with Easter chocolate and gifts.

Pattern Suggestions
- Pop Out Birds for Bird Houses
- Crochet Butterfly Stitch Scarf Pattern
- Crochet Family Blanket Pattern
- Crochet Alaskan Fjords Cowl Pattern
- New Born Colourful Braided Ear Flap Hat
Materials List
- Size H Crochet Hook or 5.00 mm
- 1 Ball of 4 ply Red Heart Super Saver or equivalent yarn.
- Optional buttons, ribbons.
- Fun Fur Yarn or equivalent for a fluffy cute edge to the rim of the basket.
Definitions
CH - Chain, DC- double crochet, HDC - Half Double Crochet, SC - Single Crochet, SL ST - Slip Stitch, BEG - Beginning, REP - Repeat, 2TOG sc decrease- 2 sc together to decrease, 2TOG HDC Decrease - 2 hdc stitches together to decrease,
Free Pattern
This pattern works in rounds.
- Ch 4 and SL ST to the Beg CH to form a ring.
- Ch 2, then HDC 9 times around the ring. (Ch 2 counts as 1 HDC = 10 HDC). SL ST at the end to the top of the Beg Ch 2.
- Ch 2, then 1 HDC into the same joining stitch. 2 HDC into each stitch around the circle. SL ST at the end to the top of the Beg Ch 2.
- Ch 2, *1 HDC into the next stitch and then 2 HDC into the next. Repeat from * all the way around. SL ST at the end to the top of the Beg Ch 2.
- Ch 2, *1 HDC into the next 2 stitches, 2 HDC into the next. Repeat from * all the way around. SL ST at the end to the top of the Beg Ch 2.
- Ch 2, *1 HDC into the next 3 stitches, 2 HDC into the next. Repeat from * all the way around. SL ST at the end to the top of the Beg Ch 2.
- Ch 2, *1 HDC into the next 4 stitches, 2 HDC into the next. Repeat from * all the way around. SL ST at the end of the top of the Beg Ch 2.
- Ch 2, *1 HDC into the next 5 stitches, 2 HDC into the next. Repeat from * all the way around. SL ST at the end of the top of the Beg Ch 2.
- Ch 2, * 1 HDC into the next 6 stitches, 2 HDC into the next. Repeat from * all the way around. SL ST at the end of the top of the Beg Ch 2.
- Ch 2, *1 HDC into the next 7 stitches, 2 HDC into the next. Repeat from * all the way around. SL ST at the end of the top of the Beg
- Ch 1, SC in back loops only around. SL ST at the end of the top of the Beg CH 1
- Ch2, * HDC in each stitch around. SL ST at the end of the top of the Beg ch 2 repeat * around for 9 more rows
- Ch 1, * SC in each stitch around. SL ST at the top of each of the top of the Beg Ch 1. Repeat from * around for 3 more rows.
- Fasten off and weave in ends.
Strap
 Chain 80 or 90. HDC in the second stitch from the hook and HDC across to end, cast off, Make 3
- Braid these three pieces together tight enough so the strap keeps its shape but not too tight so it will buckle.
- Fold basket in half with the front and back of basket together to find the sides of your basket. Make sure your seam is in the back of the basket in the middle. Sew ends of the braided strap to the insides of the basket with a needle and yarn as even as you can.
Alternative Strap Option
Instead of a strap, you could chain 10- 12, SC into the first chain from the hook and across, then attach the loop to the back of the basket to use for hanging it.
Optional Add a Peek-a-boo Animal face to your Basket (with new corrections)
Fold basket in half putting the sides of your basket together to find the middle of the front of the basket with the seam in the back. From middle stitch count over 8 or 9 stitches and attach yarn with a sl st.
Note: Ch 1 counts as a st going forward
1. *Ch 1, then make 16 sc across, repeat from * for rows 2-5 (17)
6. Ch1, sc2tog over the first 2 sts, then sc across until the last 2 sts for a sc2tog over the last 2 sts (15)
7. *Ch1, sc across to the end of the row, repeat from * for rows 8 and 9 (15)
10. *Ch1, sc2tog over the first 2 sts, then sc across until the last 2 sts for a sc2tog over the last 2 st(13), repeat from * for row 11 (11)
12. sc across to end of row (11) Do not tie off
as you will continue the first ear:
Ears:
(ch 1 doesn't count as first st going forward)
1. *Ch1, Sc for 5 st, repeat from * for rows 2-7(5)
8. Ch1, Sc2tog over the first 2 st, 1 SC into the next st, sc2tog over the last 2 st (3)
9. Ch1, sc across (3)
10. Ch 1, 2sctog 1sc(2)
11. 2sctog(1)
Sl st at end of the ear, pull tight, tie off weave in end.
For 2nd ear: (ch1 doesn't count as st) you will still be working right to left in this row.
Going into the very next st after the 5th st of the ear already made, attach yarn with a sl st
1. *Ch1, Sc for 5 st, repeat from * for rows 2-7(5)
8. Ch1, Sc2tog over the first 2 st, 1 SC into the next st, sc2tog over the last 2 st (3)
9. Ch1, sc across (3)
10. Ch 1, 2sctog 1sc(2)
11. 2sctog(1)
Sl st at end of the ear, pull tight, tie off weave in end.
Making Faces
Cheeks
Final Touches to Clean Up Face Edges
When face and ears are done, attach yarn and SC around the face and ears to make a nice clean finished look all the way around the face. Fasten off and weave in ends.
Rabbit Paws
Fun Fur Edge
- At end of wing/paw, work from back or inside of the top of baskets edge work sc around using fun fur to paw on the other side.
- To work fun fur under character fold animal down inside the basket and use stitches in front of the basket underneath the face of the animal to sc. fun fur on across in-between paws/wings
Enjoy your new Easter Basket.
Easter Pattern Ideas
- Date
- Title
- Popular post
Designed by Cathy Cunningham from The Crochet Crowd®.
©2013 The Crochet Crowd
Ann says
No blue button
Marina King says
button added
Michele Sanders says
Can this pattern be included on a printable PDF? It's really cute!