The extended moss crochet stitch is a really easy repeating pattern that thickens up the works as the extended double crochet goes over the ch-1 spaces and buries it inside the double crochet stitches.
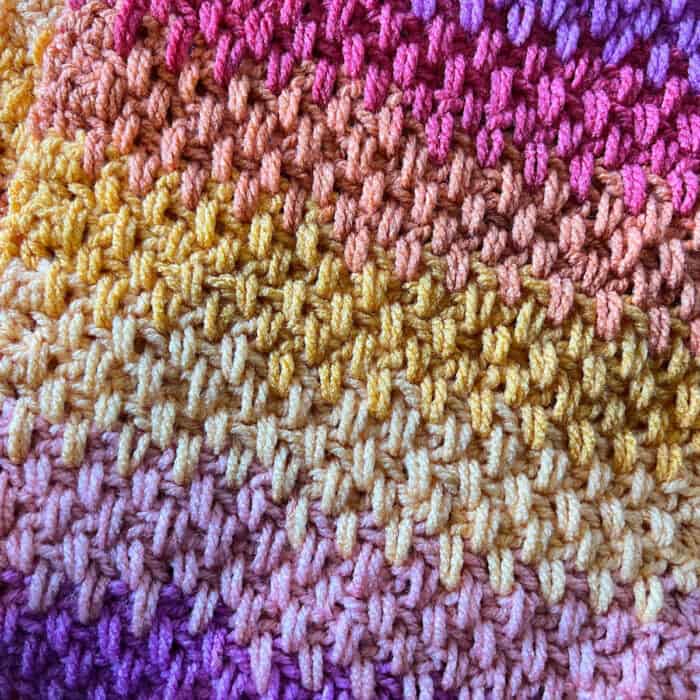
What makes this stitch amazing in its look is how the extended part of the double crochet bulges outward. I can see this stitch being amazing for afghans, smaller projects and more.
Instructions
Caron Cinnamon Swirl Cakes. 454 g/16 oz, 372 m/407 yds
Colour is Maiti.
I used 4.5 mm / G/6 hook but yarn requires 5 mm / H/8 hook which can be used. Ensure the hook matches the ball brand recommendation.
Abbreviations
- Ch(s) = Chain(s)
- Ext Dc = Extended double crochet. Double crochet 2 rows below trapping the ch-1 inside the stitch. Give a bit of slack when completing the double crochet.
- Hdc = Half Double Crochet
- Rem = Remain(ing)
- Rep = Repeat
- RS = Right Side
- Sc = Single Crochet
- Sk = Skip
Instructions
Note: This stitch is double-sided.
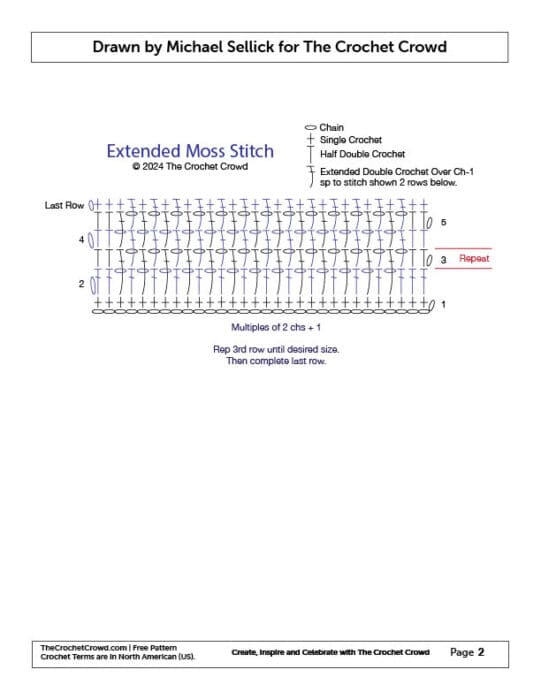
Chain in multiples of 2 chs + 1. Scarf shown is chain 31.
1st row: RS. 1 sc in 2nd ch from hook and in each ch across. Turn.
2nd row: Ch 1 (doesn’t count as st), 1 dc in first 2 sc. Ch 1, sk next sc. *1 dc in next sc, ch 1, sk next st. Rep from * across until 3 sc rem. 1 dc in last 3 sc. Turn.
The next row is the same for the entire project until you want to finish with the last row.
3rd row: Ch 1, 1 hdc in first 2 sts. *Ch 1, sk next st, 1 ext dc 2 rows below. Rep from * across until 2 sts rem. 1 hdc in last 2 sts. Turn.
Rep 3rd until size desired.
Last row: Ch 1, 1 sc in first 3 sts, 1 ext dc 2 rows below. *1 sc in next st, 1 ext dc 2 rows below. Rep from * across. 1 sc in last 2 sts. Fasten off.
.
.
Pattern Suggestions
- Crochet Tea Pot Cover Pattern
- Crochet Arrow Criss Cross Scarf Pattern
- Baby Sneaker Booties Crochet Pattern
- Crochet Baby's First Gown
- Multiples Stitches for Starting Chain
To Make Different Sizes
Multiple of 2 sts + 1.
Remember the + number at the end of the sentence means that you are to add chains at the very end to maintain the pattern as written.
Nancy says
LOVE YA MIKEY!!!!!! I enjoy all ur videos, but could you pleaseeeeee, put in the written directions also, thanks so much
Laurie says
Correction: I would sc in current row instead of ch 1, and extended sc 2 rows below instead of extended dc. That will close the holes and give a sc row at the end like you have in the beginning.
Laurie says
I too learn best from a written pattern. What I do is open Notebook and watch the video, stopping it every couple of stitches and typing it in Notebook. It takes a bit longer, but works great.
For those asking about the last row to eliminate the holes; the logical thing is to do the last row in the same manner, except use sc instead of dc. Hope that helps.