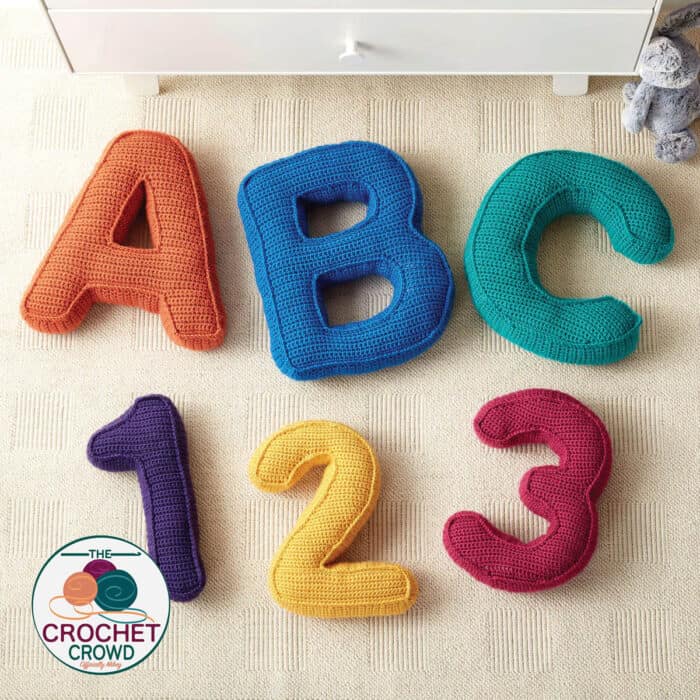
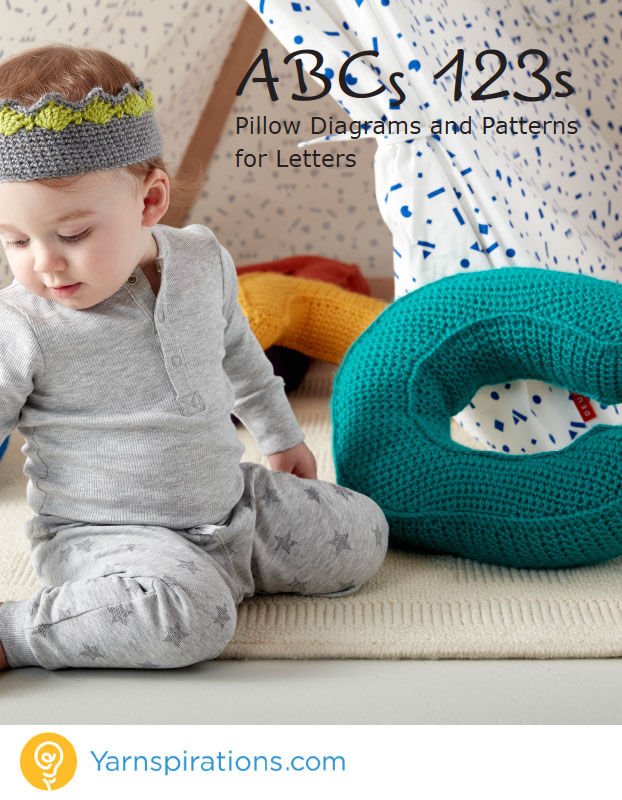
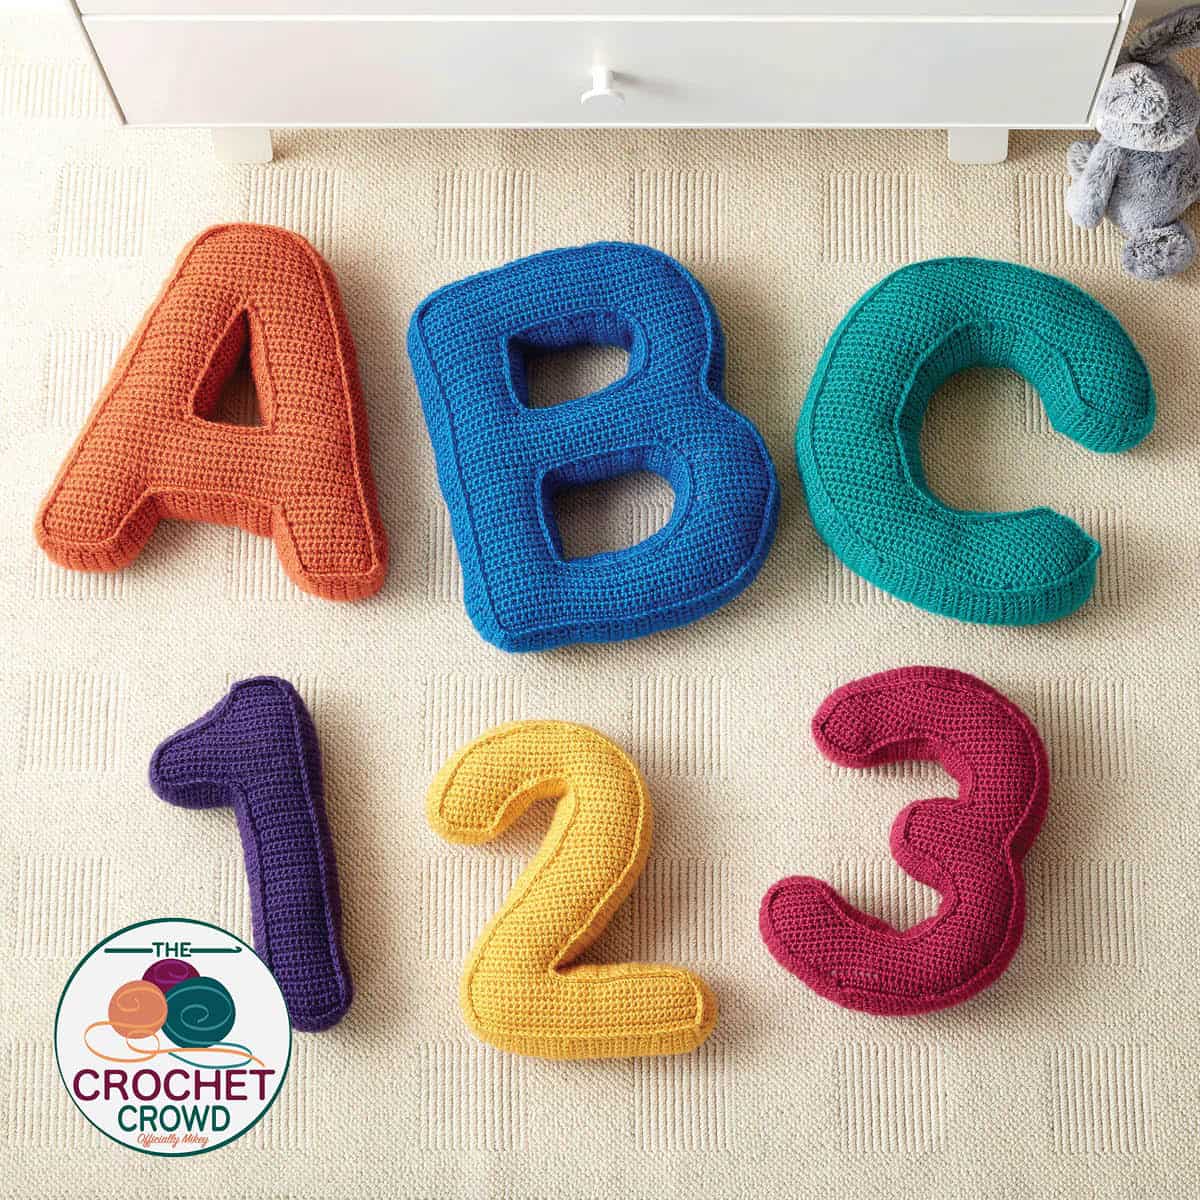
Crochet these adorable balloon-like Alphabet & Letter Pillows by Yarnspirations. They are 13" tall and consistent across the entire alphabet pattern provided.
Letters A to Z are provided in the pattern. This allows you to choose initials that dare spell entire names in pillow format.
Free video course is added to the bottom of this article.
Updated March 2025 are new printable PDFS exclusively here on The Crochet Crowd. Mikey went through the diagrams and marked each letter and number when there was something to call your attention to.
New Diagrams Overview
You can print the letters and numbers you need. The original pattern is also available without the changes in the diagrams.
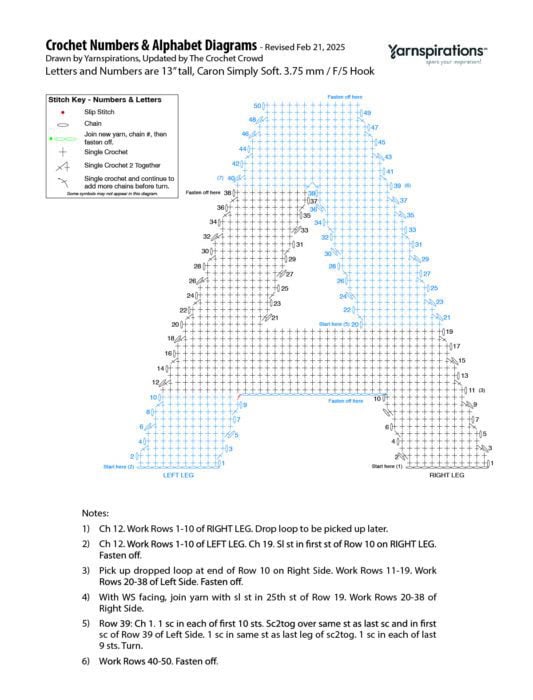
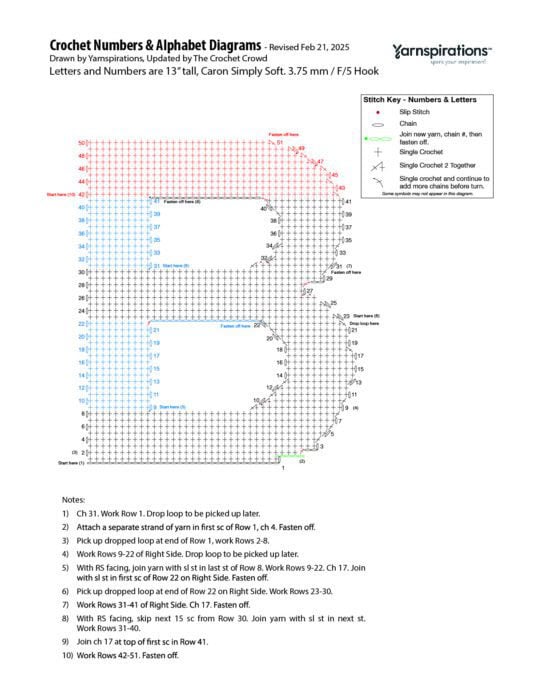
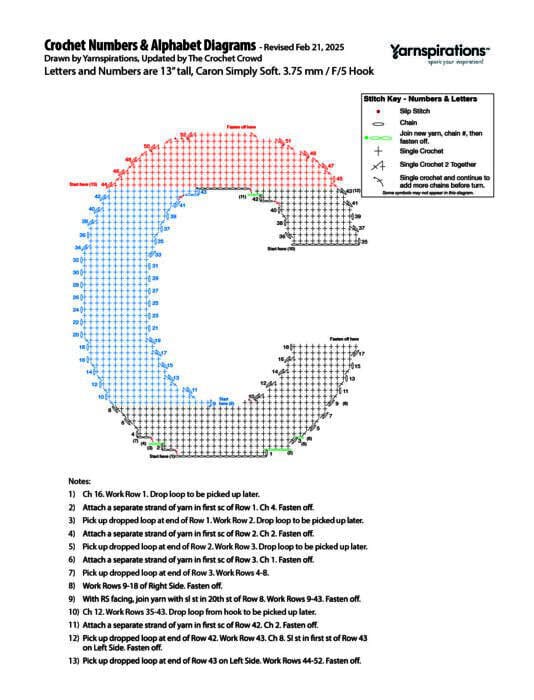
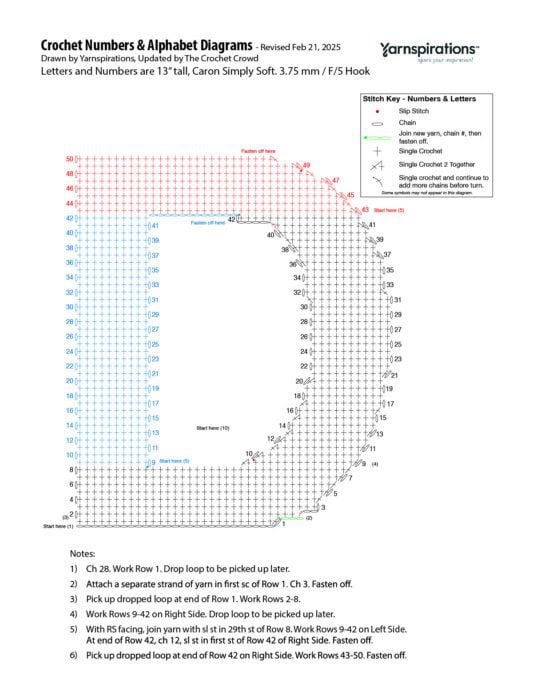
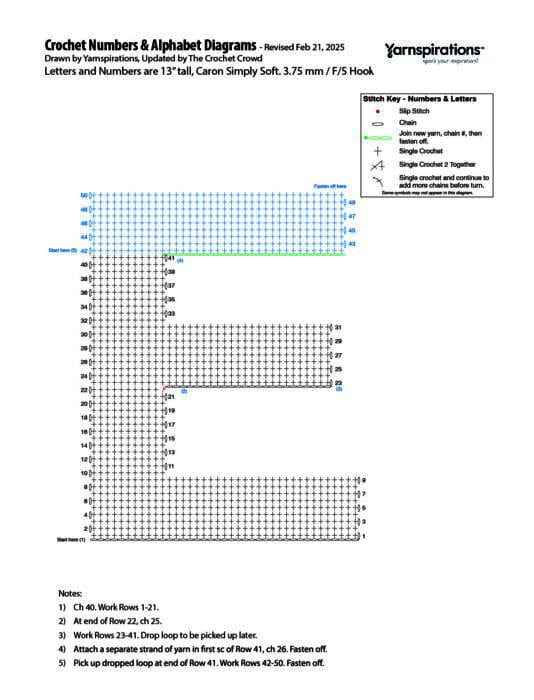
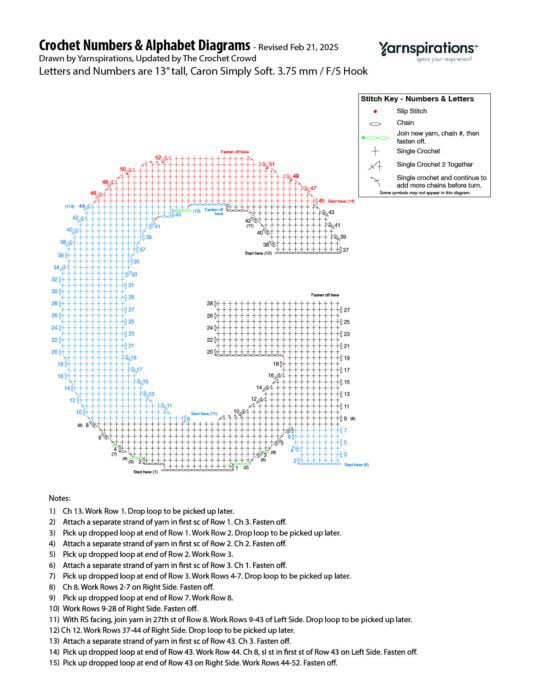
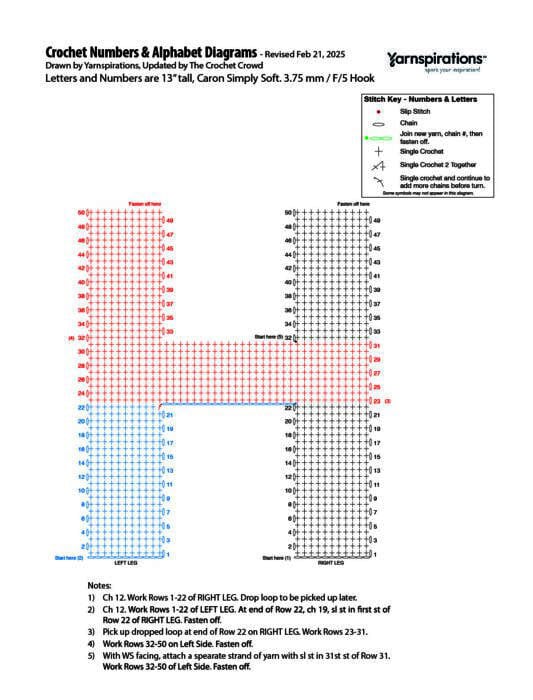
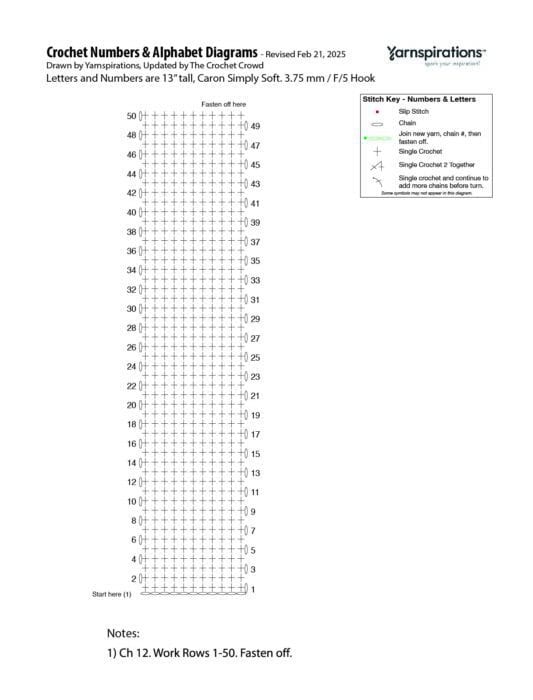
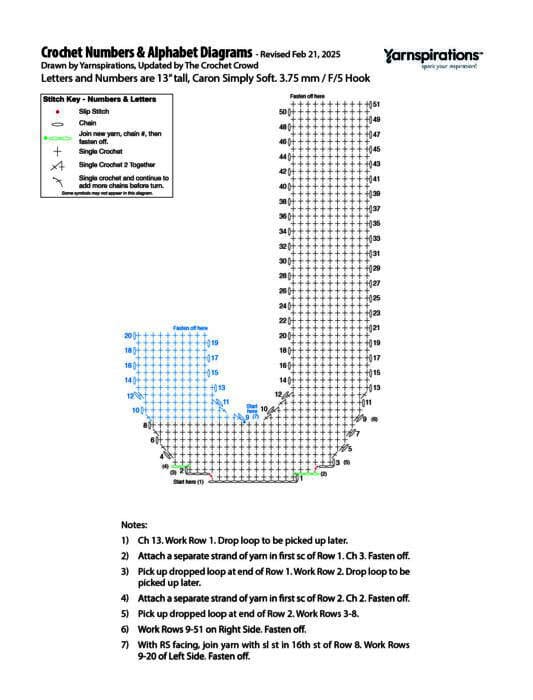
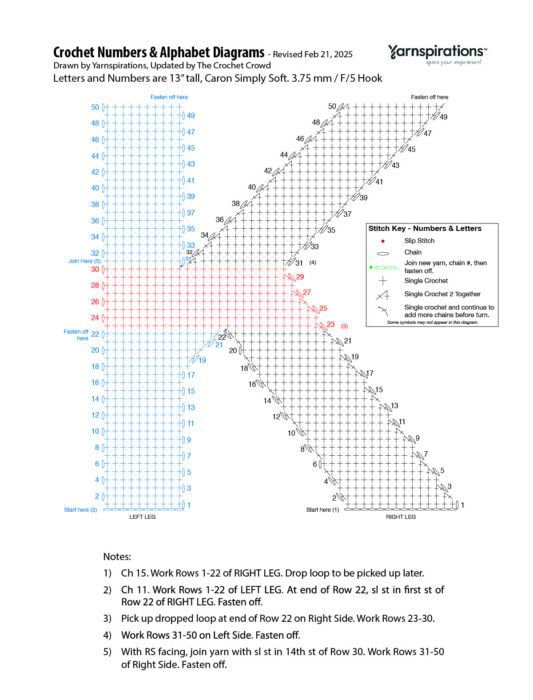
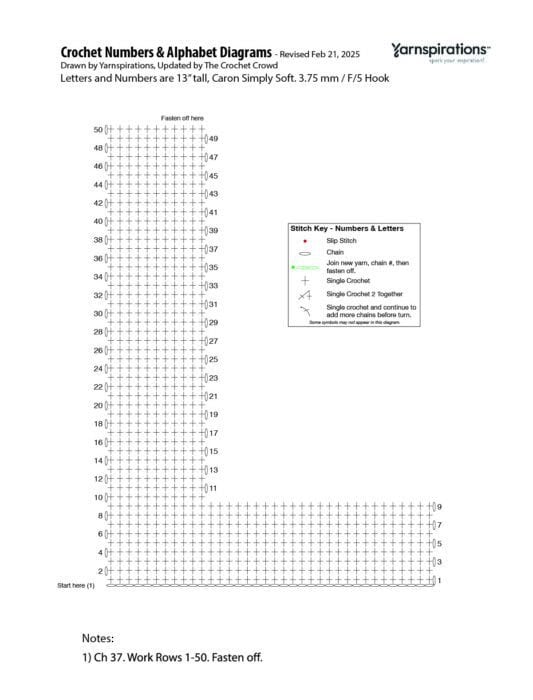
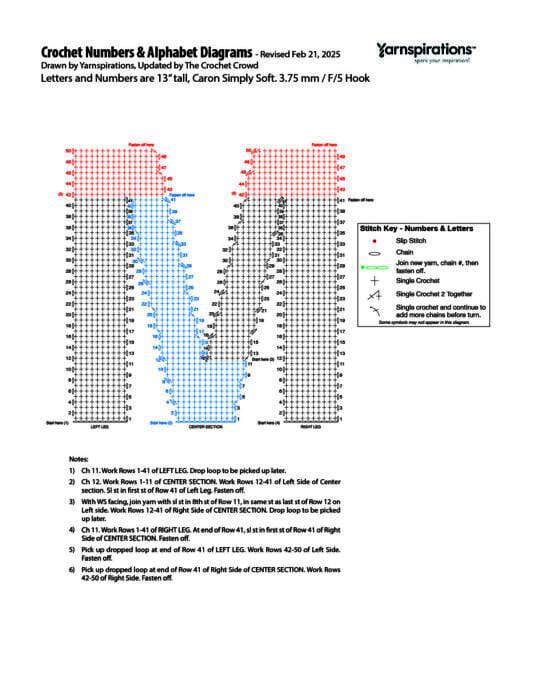
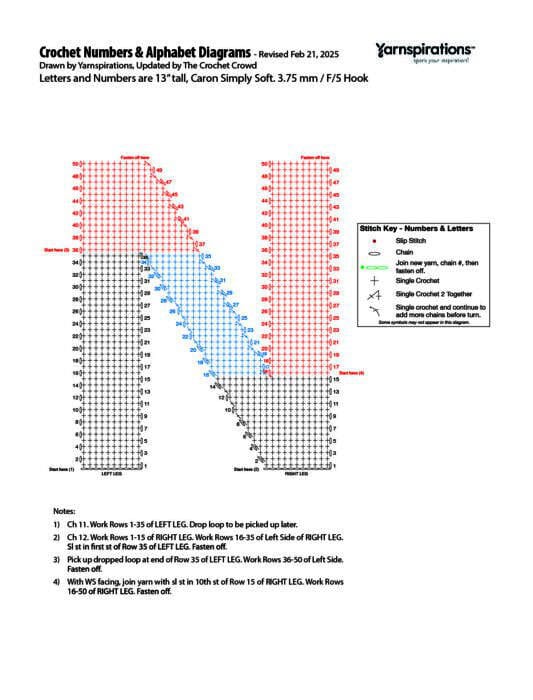
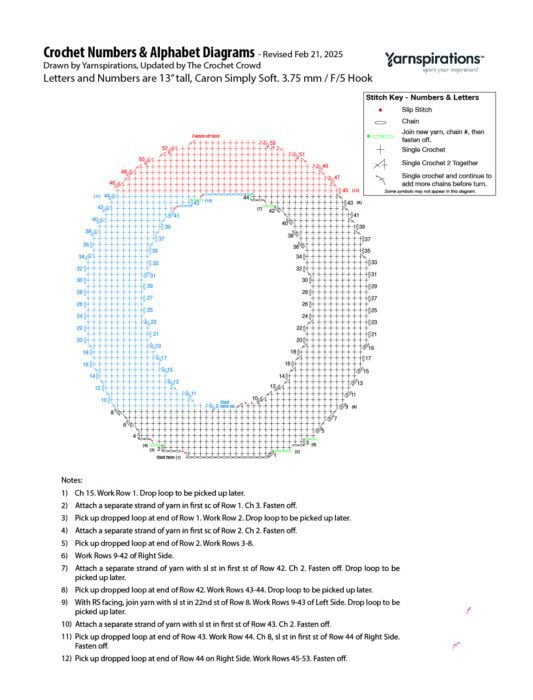
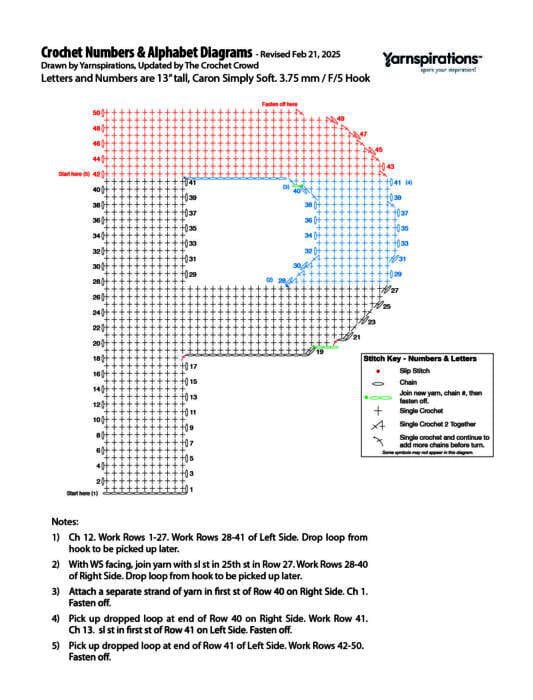
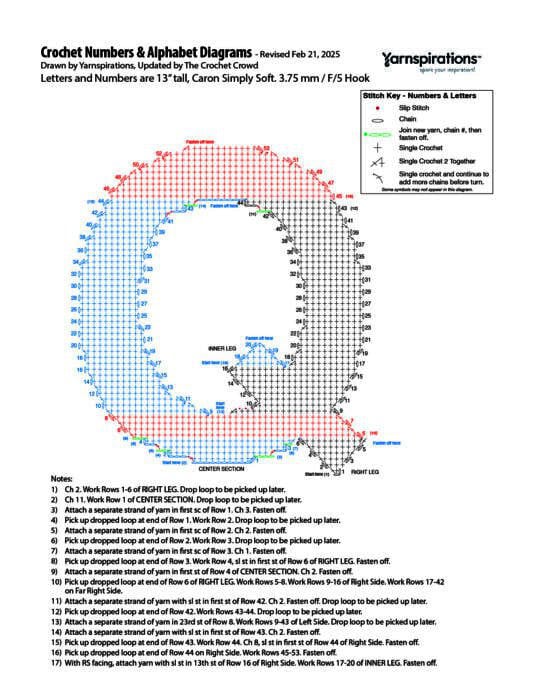
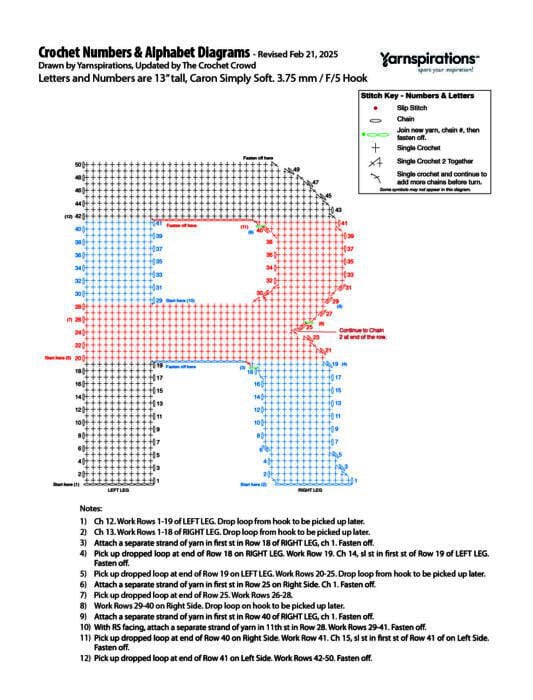
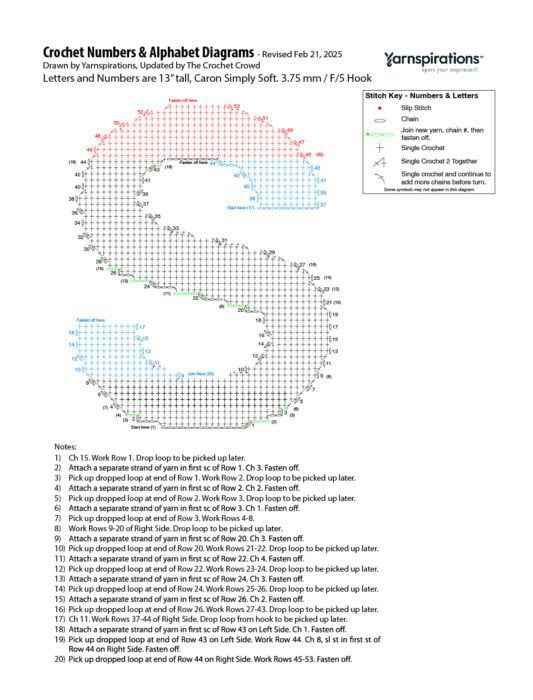
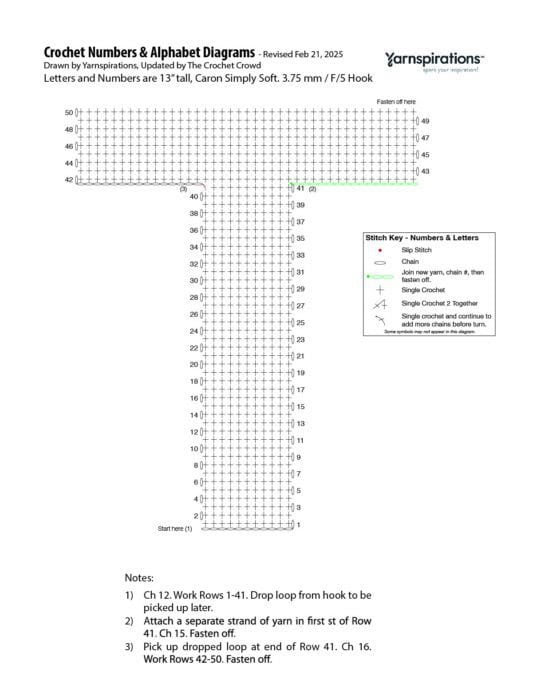
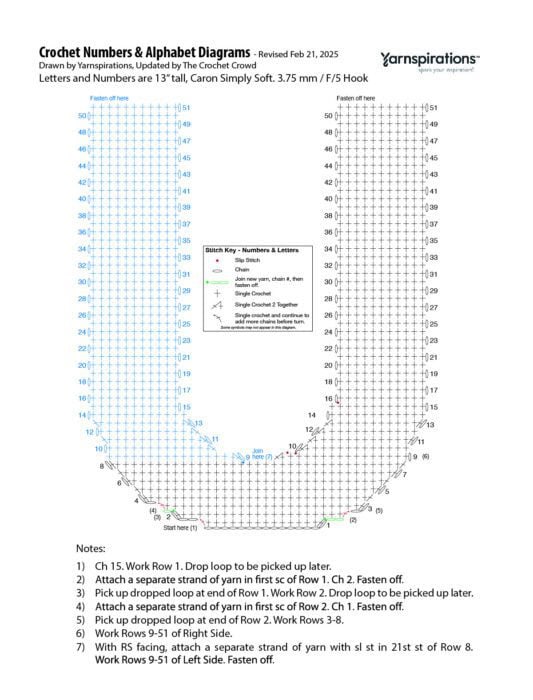
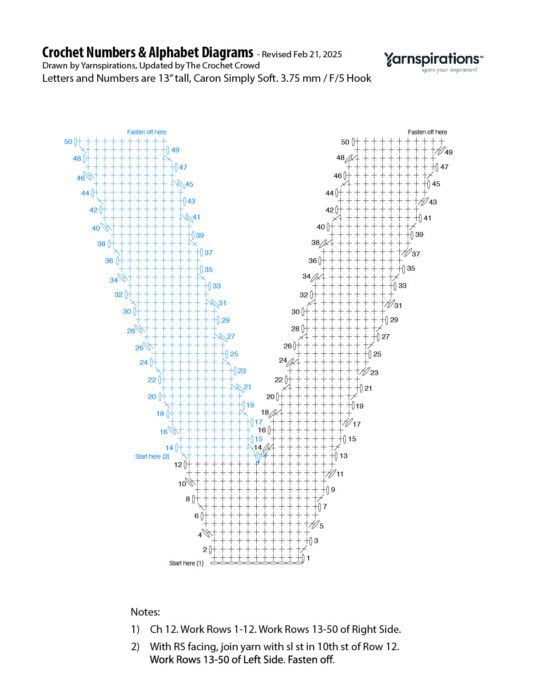
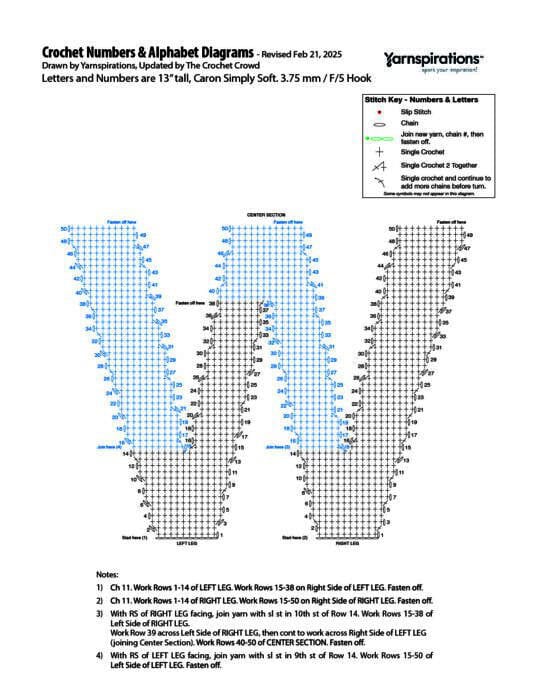
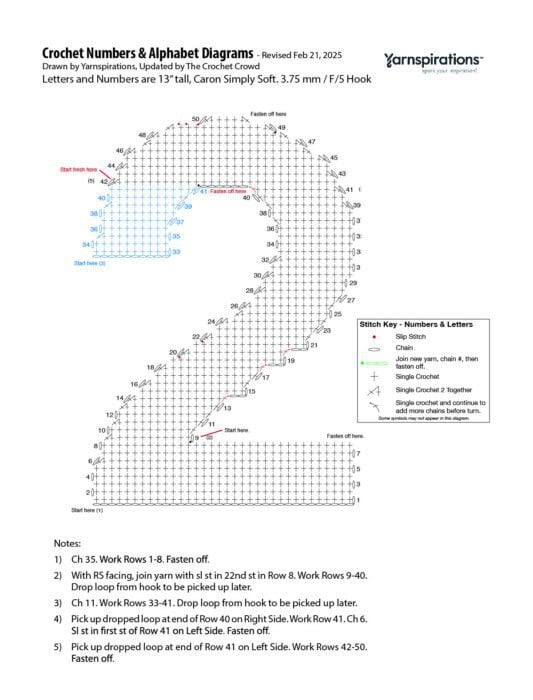
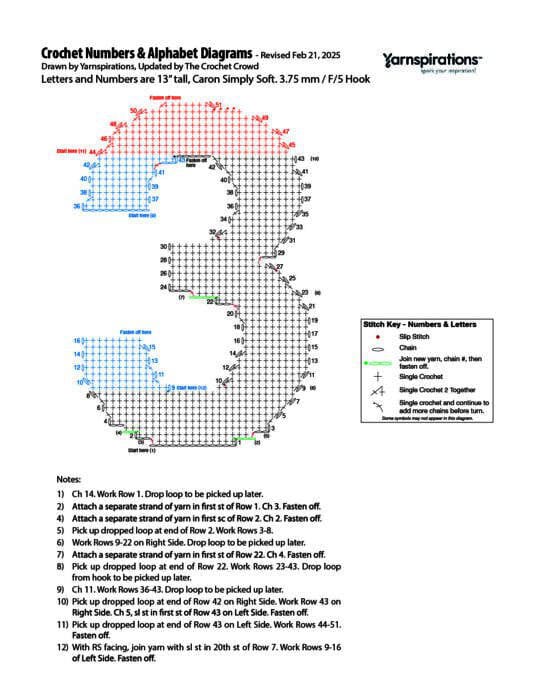
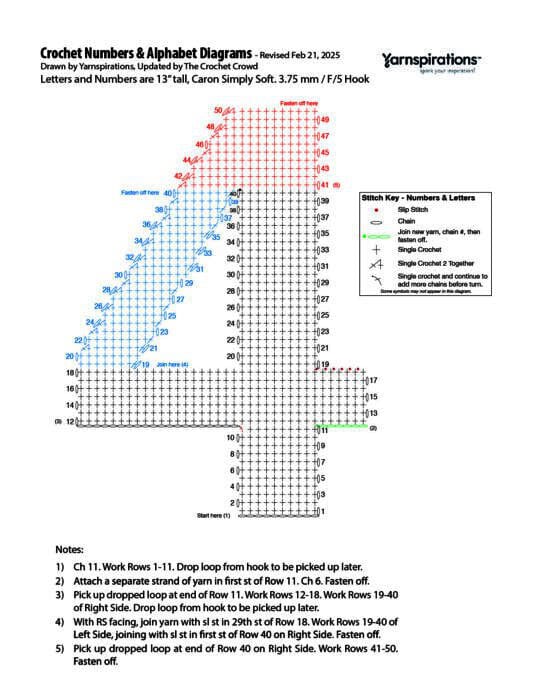
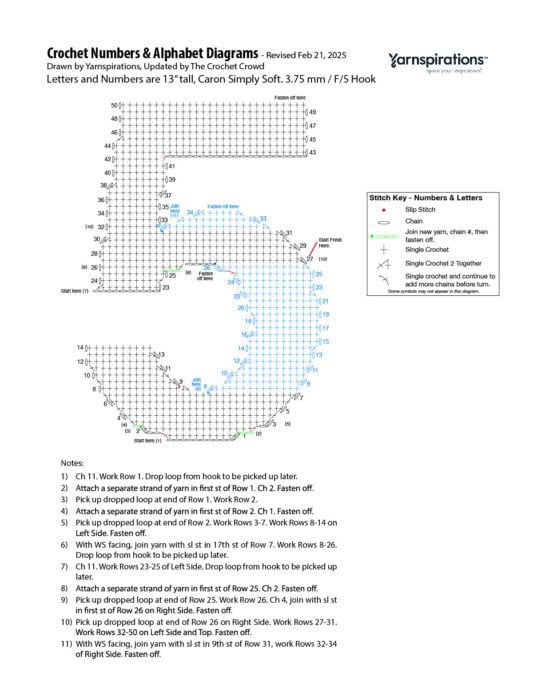
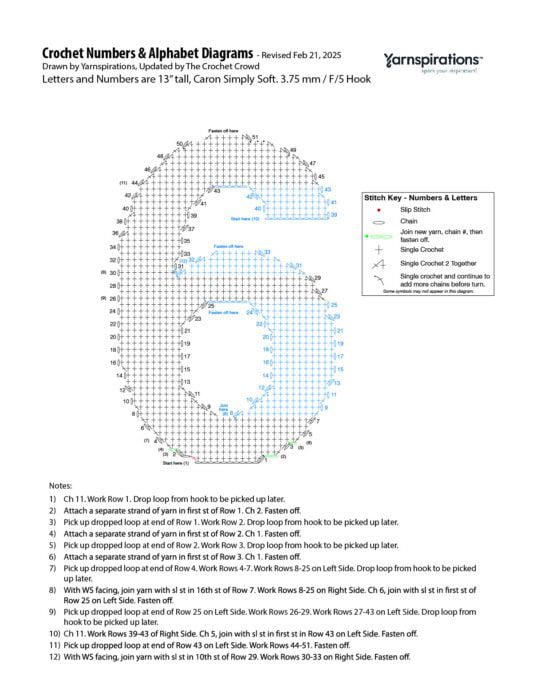
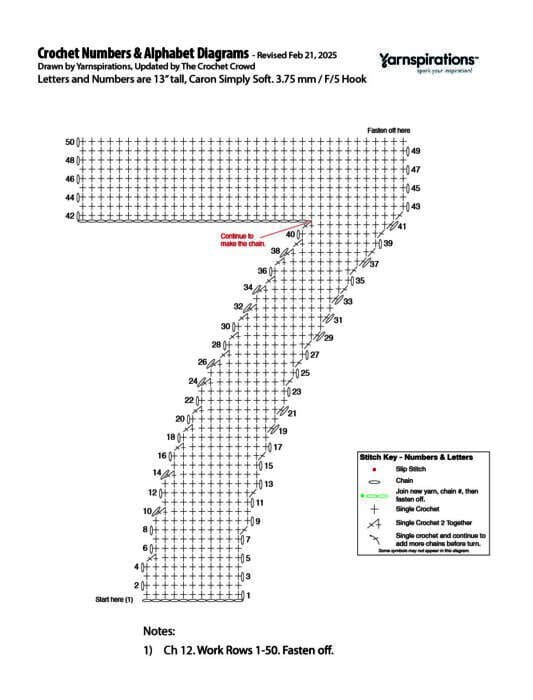
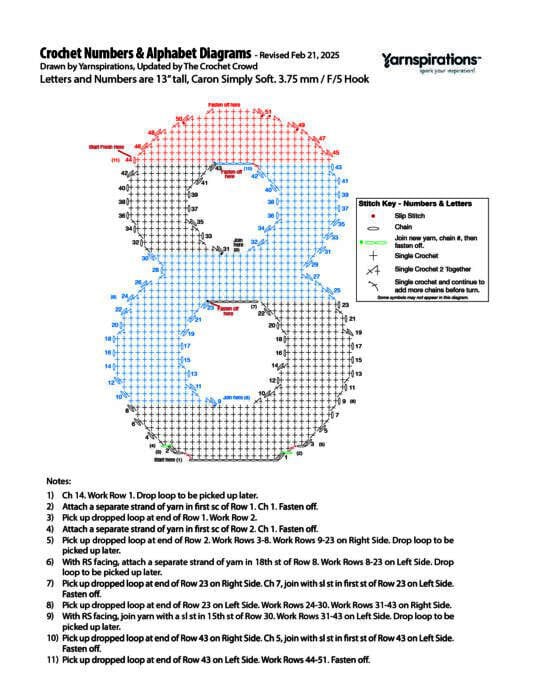
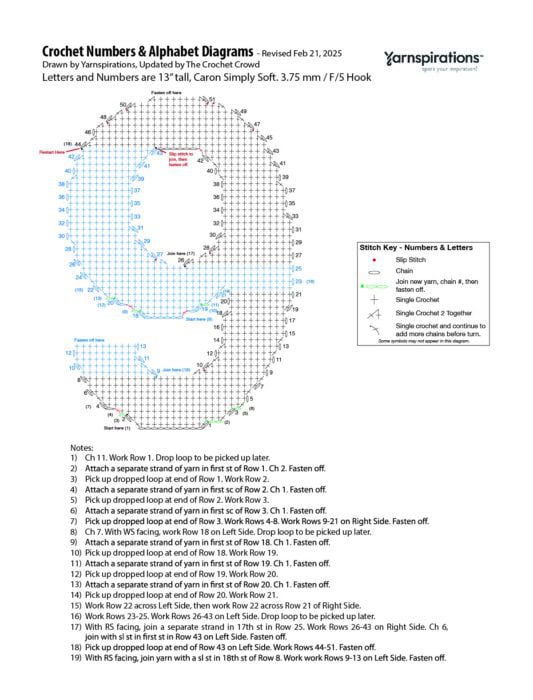
Each letter and number has a stitch key. Some letters and numbers require extra attention to build chains and create the letters in sequence. The letters are always built from bottom to top.
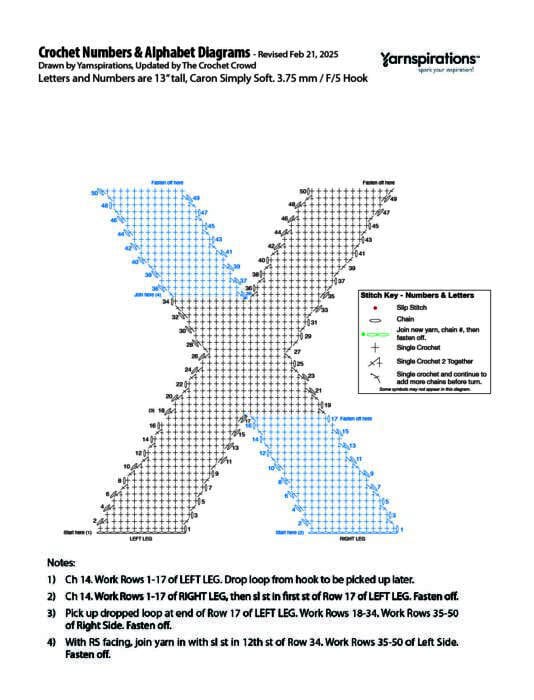
- The left leg of A is created first and then stopped at the end of the long chain.
- The right leg starts by picking up the chain, going across to the right leg, building up on the left, and stopping at the blue.
- The last section picks up on the right and goes to the top, crossing the previous section to finish.
I visualize these as learning resources for teaching children colours and the alphabet simultaneously. Imagine these hanging up in a classroom or lining the upper walls in a school for children to help them learn. I remember many classrooms I was in as a child where the letters and numbers were above the chalkboards to help me.
.
.
Course Workshop Download
This is shown in the videos on how to read the diagrams.
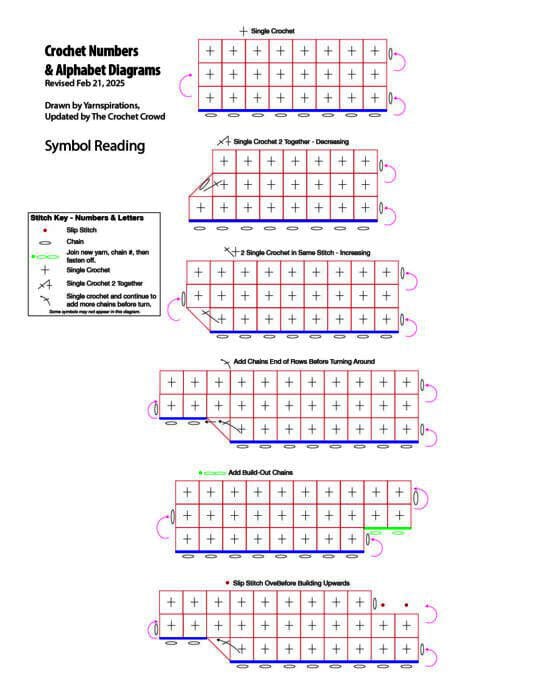
These patterns are not complex. You must know how to read crochet diagrams to follow these. I will have tutorials for each letter available. I have provided a link below on reading crochet diagrams to help you solve this.
Pattern Suggestions
- Crochet Granny Floor Cushion Pattern
- Rich Textures Cable Tote Bag Pattern
- Table Top Crochet Wreath Pattern
- Crochet Snowflake Pillow Pattern
- All Crochet Blanket/Afghan Sizes
Print or Use the Revised Diagrams
Click on the letters or numbers you need to save or print them.
Letter A
Letter B
Letter C
Letter D
Letter E
Letter F

Letter G
Letter H
Letter I
Letter J
Letter K
Letter L
Letter M
Letter N
Letter O
Letter P
Letter Q
Letter R
Letter S
Letter T
Letter U
Letter V
Letter W
Letter X
Letter Y

Letter Z
Numbers
Number Zero
Number 1
Number 2
Number 3
Number 4
Number 5
Number 6
Number 7
Number 8
Number 9
Original Booklet from 2016
Daniel has made a mini booklet of all 26 letters in the alphabet, blown up to 1 letter per page. This will help you read the diagrams better. You can download this PDF booklet and/or print the letters you want specifically.

This booklet was made possible with the help of Yarnspirations. You can only find this booklet here in this article to download.
Free Video Course
The course is meant to be played in order. Left-handed versions start on Lesson 14 to the end.
Left Handed Version
These start in lesson 14 to the end.
Jackie Hopwood says
Hi I am making the letter P but desperately need help. I've done row 18 and am up to the chain that follows but I'm so confused about the end of row 18, starting row 19, where the SS goes and the end of row 21 and start of 22.Could you please explain this to me? Any help is much appreciated
Mikey says
Row 18.... You will do the sc but then continue to add the 20 chains to the end of the row. Break Yarn there...
Start Row 19 with a slip stitch to the fourth chain back... 2 sc in next chain and sc in each chain and sc back to the other side.
Row 20... CH 1, 1 sc in each of the sc across and single crochet in the remaining 3 chains left over. Then add 2 chain.
Row 21... 2 sc in 2nd chain from hook and 1 sc in each sc back to the other side.
I would use a highlighter and highlight the lines. If you see the slip stitch like you do in row 19. Follow the row of chains and see how they used the same chain created in row 18.
BTW, Thanks for providing a screen shot so I could examine this further.
Jackie Hopwood says
Thank you so much for getting back to me and breaking it down. It completely makes sense now. Appreciate your help 😀
Ai Garanganao says
Hi! I started making the letter F for my god daughter. Can you please teach me how to go from the end of row number 30 to row number 31? Thank you.
Mikey says
I answered this question already on YouTube I believe. This same question came across there as well.
Ai Garanganao says
Oh... ok... I’ll check it out. Thank you. ?
Carolynne says
I noticed an error on the actual pattern for the letter R. Can you please direct me to where I go to let the designer know? Thanks.
Jeanne says
Here is a link to the contact section of Yarnspirations.