Crochet Vintage Fan Ripple Scarf
Learn how to crochet this exquisite vintage stitch called the Vintage Fan Ripple Stitch. I crocheted a scarf using this same technique for stitches. I also have a diagram and more to show you how to do it.
The scarf has 3 sets of stitches. In the instructions below, I share with you the sets. This is the Vintage Fan Ripple Scarf pattern.

I used 3 balls of Safari by Miss Tricot Faliti of Italy. Here is a link for this yarn to view.
The scarf is 6 feet long. It has 24 fan rows altogether. The ending has 3 rows of single crochet across to balance it.
For my version, I used 4 mm or Size G... the yarn was 3 - Light or Double Knit. I have to locate this yarn to figure it out. I've not had luck finding it online.
Pattern Suggestions
- Water Waves Throw Crochet Pattern
- Easy Crochet Wool Scarf Pattern
- Crochet A Shades of Grey Scarf Pattern
- Vintage Fan Ripple Stitch Pattern + Video Tutorial
- Crochet Christmas Wave Afghan Pattern
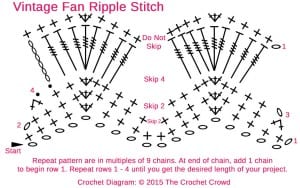
Crochet Diagram
So let me give you some resources to help you. Firstly, here is a crude crochet diagram I made to show you where the stitches fall into place when making this stitch. You are welcome to print off this diagram if it helps you.


- The pattern consists of 4 repeating rows. Rows 1 – 4. The chain is just to get you started.
- When creating your base chain, keep the counts in multiples of 9. Once you get to your desired width for a chain, add 1 to the chain so you can single crochet 2nd chain from the hook and keep your project in balance.
Written Instructions
- Use yarn and hook that compliment each other. You can refer to the yarn band label to see the suggested hook size to go with the yarn.
Chain in sets of 9 until you get to the desired width. At the end of the chain add 1 more chain.
- SC 2nd chain from hook and then SC in the next 3 chains. * 3 SC into the next chain. SC into the next 8 chains and repeat * across. Final 4 chains will be 1 SC into each. Turn.
- Ch 1, skip 1st stitch and SC into the next 4 sts. * 3 SC into next st. SC into next 4 sts, skip 2, SC into next 4 sts. Repeat * across. Final 4 stitches will be 1 SC into next 3 stitches and then SC 2 TOG for the final. Turn.
- Repeat Row 2.
- Slip Stitch 2 stitches, then CH 6. Triple Treble (TTR) into the next 2 stitches. * 3 TTR into next and then 1 TTR into next 3 stitches. Skip 4 stitches, 1 TTR into next 3 stitches, Repeat * across. Final stitches will be 1 TTR in 3 stitches. (You will notice the TTR does not extend all the way to the end of the row. This is what we want.)
- If changing colour, this is where you would do it before doing the next repeat rows.
- Repeat Row 2 - 3 Times.
- Repeat Row 4.
- Continue to repeat steps 6 - 7.
- To keep it balanced, the ending should be repeating step 6.
The tassels 3" long. There are 10 strands of 7" strands folded in half and secured.
See the video tutorial below to make it easier for you to follow if you have any questions.
Video Tutorial
The tutorial is showing 4 sets. The scarf is only 3.
Ann says
No blue button
Mikey says
Added
Mary Caouette says
The instructions states in step 6 repeat Row 2 - 3 times and step 7 states repeat Row 4 but in the diagram and video it states repeat Rows 1-4. I am confused should I follow the instructions or the diagram. The diagram follows the video.
Tina McDaniel says
The directions say to triple treble but your video says double treble. Can you clarify?