

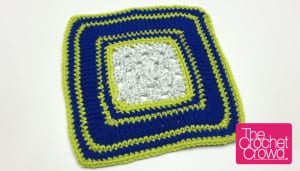
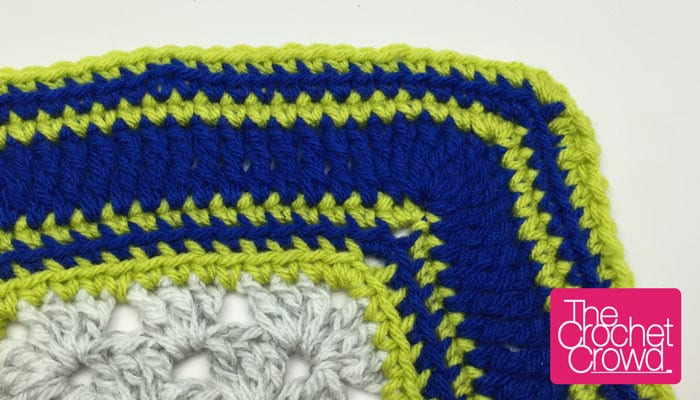
Picture Frame Granny Border
The following are instructions for a border for a typical granny square. Many crocheters decide to do one large granny square instead of doing multiple and sewing them together. My personal goal was to come up with several designs that can be applied to a typical granny square.
Instructions Granny Square Itself
The instructions are for changing colour as indicated in the Christmas Granny Square Afghan as found on Yarnspirations. You can change colours as often or as little as you wish.

Note: Ch 6 at beg of rnd counts as dc and ch 3.
- With A, ch 5. Join with sl st to first ch to form a ring.
- 1st rnd: Ch 6. (3 dc. Ch 3) 3 times in ring. 2 dc in ring. Join with sl st to 3rd ch of ch 6. (Four groups of 3 dc, four ch-3 sps forming corners).
- 2nd rnd: Sl st in next ch-3 sp. Ch 6. 3 dc in same sp as last sl st. *Ch 1. (3 dc. Ch 3. 3 dc) in next ch-3 sp. Rep from * twice more. Ch 1. 2 dc in first ch-3 sp. Join with sl st to 3rd ch of ch 6. Fasten off.
- 3rd rnd: Join B with sl st in any ch-3 sp. Ch 6. 3 dc in same sp as last sl st. Ch 1. 3 dc in next ch-1 sp. *Ch 1. (3 dc. Ch 3. 3 dc) in next ch-3 sp. Ch 1. 3 dc in next ch-1 sp. Rep from * twice more. Ch 1. 2 dc in first ch-3 sp. Join with sl st to 3rd ch of ch 6.
-
4th rnd: Sl st in next ch-3 sp. Ch 6. 3 dc in same sp as last sl st. 3 dc in each ch-1 sp to next corner ch-3 sp. *Ch 1. (3 dc. Ch 3. 3 dc) in next ch-3 sp. Ch 1. 3 dc in each ch-1 sp to next corner ch-3 sp. Rep from *twice more. Ch 1. 2 dc in first ch-3 sp. Join with sl st to 3rd ch of ch 6. Fasten off.
-
Rep last rnd, working 2 rnds each of A, B, C, D and E, until square measures approx 36″ [91.5 cm], ending with 2 rnds of any color. Fasten off.

Instructions for the This Border
This border has 7 rounds that complete. It will be approximately 3″. This design can also be used for solid granny granny designs as well.
- Join to any ch-3 corner space. Ch 1, 3 sc into the same space. *1 sc into each st and ch-1 spaces across to the next corner. 3 sc into next corner. Repeat * around. Join with a sl st to the beg sc. Fasten off.
- Fasten on next colour to the middle sc of a corner. Ch 1, 3 sc into the same stitch. * 1 sc into each st across to next corner. Middle sc of next corner will get 3 sc. Repeat * around. Join with a sl st to the beg sc. Fasten off.
- Fasten on next colour to the middle sc of a corner. Ch 4, 6 trebles into same stitch, 1 treble into each st across to next corner. Middle sc of next corner will get 7 trebles. Repeat * around. Join with with a sl st to top of beg ch 4. Fasten off.
- Fasten on next colour to the middle treble of a corner. Ch 1, 3 sc into the same stitch. * 1 sc into each st across to next corner. Middle sc of next corner will get 3 sc. Repeat * around. Join with a sl st to the beg sc. Fasten off.
- Fasten on next colour to the middle sc of a corner. Ch 1, 3 sc into the same stitch. * 1 sc into each st across to next corner. Middle sc of next corner will get 3 sc. Repeat * around. Join with a sl st to the beg sc. Fasten off.

Video Demonstration of a Typical Granny Square