DOWNLOAD TUTORIAL DIAGRAMS HERE

The Crochet Stars and Stripes Ripple Blanket currently has a few errors in this which impacts the success level. I will share with you where the revisions are and I have submitted those to Yarnspirations.
I have attempted to do this pattern 3 times and I get hung on the stars. Having learned how to generate diagrams on the computer, I figured instead of hand drawing this, draw it out on the computer. It took me 6 hours to draw this and cross-reference the pattern. I was able to find the errors to fix this.
The corrections are not on the original pdf at this time but I will show you where they are below.
Corrections
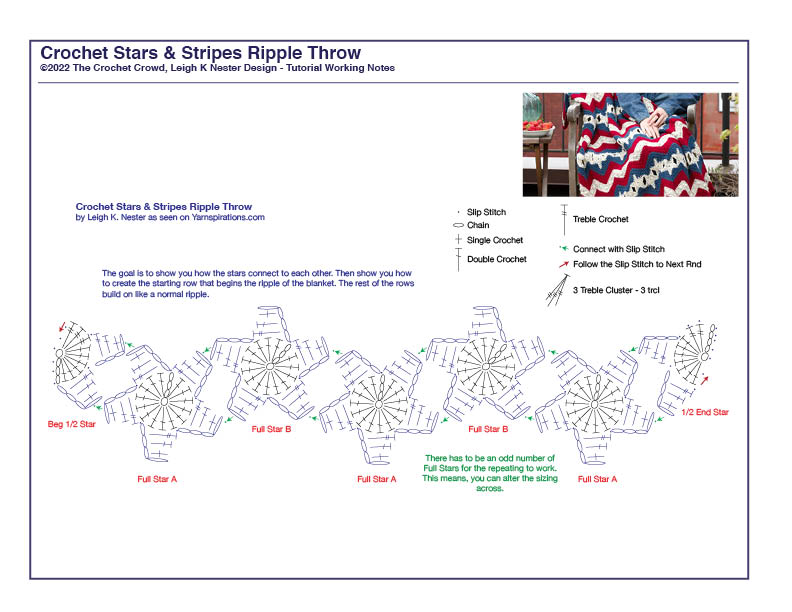
Connecting the Stars
I was very confused by the connections of the stars based on some information missing. The diagrams will help you see the orientation of the stars and the goals to create the ripple with the stars. You can have as many stars as you prefer but there must be an odd number of full stars to make this pattern work.
I would connect these as you go on a flat surface so you don't get the wrong points.
The pattern references refer to connection points but the connection points are not suggested to be marked on Full Star A or B, so the diagram will help you out.
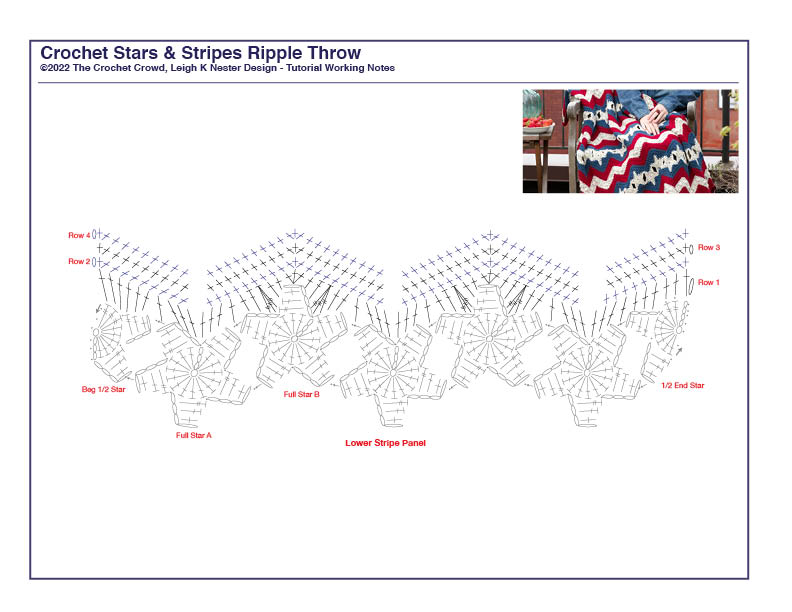
Lower Stripe of Panel Row 1
Due to not connecting the stars properly, I found the Lower Stripe of Panel impossible. The diagram has the orientation now for you but there is an error that needs to be corrected.
Lower Stripe of Panel-Row 1: With right side facing, join C in top of ch-4 of End ½ Star; ch 1, sc in same st, sc in next 2 tr, slip slip st, (This should say skip slip stitch.) sc in next 3 sts of point, sc in slip st between points, sc in next 3 sts of next star point, skip slip st between points, * sc in next 3 sts of point, sc in slip st between points **, sc in next 2 sts, 3 trcl, dc in next st, sc in next st, 3 sc in tip of point; sc in next 2 sts, 3 trcl, dc in next st, sc in next st, sc in slip st between points, sc in next 3 sts, skip slip st between points **; repeat from * to last point (Begin ½ Star), end at **; sc in next 3 sts of ½ star point, skip slip st, sc in last 3 tr; turn.
I verified the error with the counting and everything else acts like a regular ripple stitch from this point with this small correction.
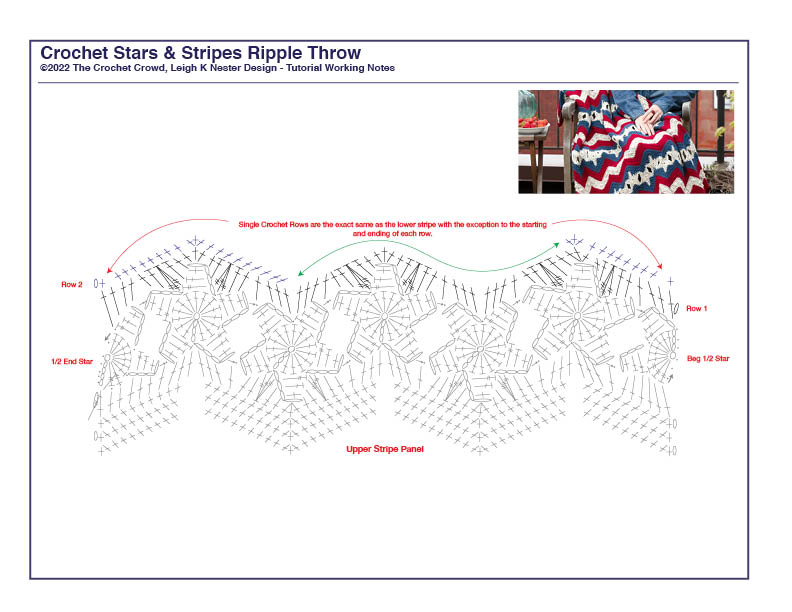
I didn't draw all of the rows as the critical spot is the connection and first row across the tops and bottoms of the stars.
Keep in mind, the Upper Stripe Panel is different in the repeating information. So what you will learn on the lower stripe going across isn't the same information. You will see that on the diagram as well.
Unknown Information

People usually want to know the sizing changes, maybe make this to a baby blanket. I don't know how many stars you need to change the sizing. So I recommend just crocheting an odd number of full stars and laying it down and seeing how wide it will be. That's the best I can offer for advice.
Crochet Diagrams
You can go to the top of the article and click the download tutorial diagrams to get all three in one click.


More Ideas
- Crochet Puffy Stitch Blanket Pattern(Opens in a new browser tab)
- Figure Out Stitch Multiples(Opens in a new browser tab)
- Crochet Alphabet Series
- Bah-Bra The Big Sheep Amigurumi
- Garden Screwballs Ornament in Wood (none crochet-related)
Tutorial
Karen Armstrong says
Grid
Mikey says
THanks
Rhonda says
Thank you so much for adding a diagram and being specific with the corrections. I have wanted to make this, but the original pattern from yarnspirations was confusing. Much appreciated.