
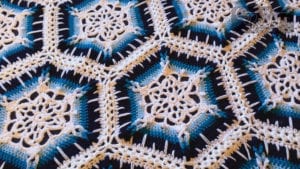
Designed by Daniel and finished by Mikey, it is called the Crochet Winter Blizzard Afghan. A tutorial for this version is available.
This has an amazing centre that does colour stepouts with Jacob's ladder effects. It's a join-as-you-go concept, so there is no sewing.
You can opt to drop down the icles or leave them off.
In This Article
Yarn Details
Bernat Super Value Yarn, 197g/7 oz, 389 m/ 426 yds
- MC - White - 3 Balls
- B - Sky - 1 Ball
- C - Peacock - 1 Ball
- D - Navy - 2 Balls
Size: 55” x 60” - 19 Motifs, Motifs are 11.5” across flats.
Hook: 5.5 mm / I/9
Abbreviations
- Ch = Chain
- Dc = Double Crochet
- Hdc = Half Double Crochet
- Rep = Repeat
- Rnd = Round
- Sl st = Slip Stitch
- St(s) = Stitch(es)
Instructions
Top Tip
The assembly line method is more straightforward when working on this design. This means completing all of the motifs in sequence based on colour. Do all 19 motifs using white in rounds 1 - 6. Then go back and do all motifs for round seven and so on. You will find that you remember the pattern quicker and do this faster.
Also, if you dislike the spiked stitch representing icicles, leave it out. I will give that option as well. Some crocheters don’t like the element of randomness.
With (MC) ch 6 and sl st in 1st ch to form ring.
Rnd 1: Ch 1, 12 sc in ring and join with sl st to the first sc. (12 sc
Rnd 2: Ch 1, sc in same stitch as join, ch 5, sc in next sc, sc next sc, ch 5, sc in next sc. Repeat around . Join with sl st in 1st sc. (6 ch-5 loops)
Rnd 3: Ch 1 *sc, ch 3, dc , ch 3, sc all into same ch-5 sp. ch 2, repeat from * 5 times. Ending with sl st into 1st sc in 1st ch-5 sp. (12 ch-3 spaces)
Rnd 4: Ch 1, *4 sc in next ch-3 sp, ch 2, 4 sc in next ch-3 sp, sc into ch 2 sp. Repeat from * 5 times. Ending with sc in ch 2 sp. Do not join with a with a slip stitch.
Rnd 5: Ch 6 (counts as dc + ch 3), *2 sc in next ch-2 sp of previous round, ch 3, skip to 5th sc and dc, ch 3, repeat from * around. Join with a sl st on top of beginning ch-3.
Rnd 6: Jacobs Ladder MC Technique Begins. Ch 1, 4 sc in next ch-3 sp, 2 dc into sc of pervious round, ch 10, sl st into 1st chain, 2 dc into next st, 4 sc in same ch-3 sp, [ch 3 sl st from 3rd ch from hook to form picot], sk dc from per-vious rd, repeat from 5 times, Ending with picot, sl st into beginning sc. Fasten off MC. Weave in ends.
Rnd 7: Jacobs Ladder Colour B. With Colour B, sl st at any sc after ch-10 sp. ch 3 (counts as dc), 1 dc in same st, *1 dc in next 6 sc skipping over picot, 2 dc in next sc before previous rd ch-10 sp, ch 10, 2 dc in next sc after previous rnd ch-10 sp, repeat from * 4 times. Ending, 1 dc in next 6 sc skipping over picot, 2 dc in next sc before previous rd ch-10 sp, ch 10, sl st into beginning ch 3. Fasten off Colour B. Weave in ends.
Rnd 8: Jacobs Ladder Colour C. With colour C, sl st in any dc after ch-10 sp. ch 3 (counts as dc), 1 dc in same dc * 1 dc in next 8 dc, 2 dc in next dc before pervious rnd ch-10 sp, ch 10, 2 dc in next dc after pervious rd ch-10 sp, repeat from 4 times* Ending 1 dc in next 8 dc, 2 dc in last dc before previous rnd ch-10 sp, ch 10, sl st in top of beginning ch 3. Fasten off Colour C. Weave in ends.
Rnd 9: Jacobs Ladder Colour D. With colour D sl st in any dc after ch-10 sp, ch 3 (counts as dc), 1 dc in same dc) * 1 dc in next 10 dc, 2 dc in next dc before pervious rd ch-10 sp, ch 10, 2 dc in next dc after previous rd ch-10 sp, repeat from * 4 times. ending 1 dc in next 10 dc, 2 dc in last dc before previous rnd ch-10 sp, ch 10, sl st from top of beginning ch 3. Do not fasten off.
Making the Loops Preparation: Rounds 6, 7, 8, and 9 have the ch-10 loops. With the motif facing right side up, lay down Round 6 and feed round 7's ch-10 loop up through the loop. Then feed round 8 up through the round 7 loop. Finally, feed the round 9 loop up through the round 8 loop. The Jacobs Ladder is complete for the corner. Repeat the same steps for the remaining five corners.
Please be careful. You are weaving these through without locking them into position. Just be gentle so the Jacob's Ladder doesn’t fall apart. Next round, we are going to lock the Jacob's Ladder permanently into position.
Rnd 10: With same colour D, ch 3 (counts as dc), dc in same dc) * 1 dc in next 12 dc, 2 dc in last dc before ch 10 loop. ch 1 insert hook through the last ch-10 loop and sc, ch 1 2dc into next dc, repeat from * 4 times. ending with 1 dc in next 12 dc, 2 dc in last dc before ch-10 loop. ch 1 insert hook into the ch-10 loop and sc into it, ch 1, sl st from top of beginning ch 3. Fasten off Colour D.
Optional Spiked Stitch Overview
Using Colour MC. The round uses a random mix of half double crochet and half double crochet spikes. HDC Spikes are created by yarn over the hook and inserting the hook into any of the rows directly below. Insert the hook through the project and yarn over. Pull the yarn through and give it slack to extend it back to the top of the row. Yarn over and pull through all loops on the hook. Crocheters can use their creativity in this round to determine how far they want to drop down for the Half Double Crochet Spikes.
Being random will give this round an incredible look. You can drop down between 1 and 3 rows below. If you prefer not to have any spikes, you can just use HDC around as per the instructions. We have suggested layers for being random, and they truly are random. Tip: The first 3 and last 3 stitch spaces on each side should be a regular HDC as the stitch is too close to the corner to drop straight down.
Rnd 11 Option 1: Join to Ch-1 space at any corner. Ch 1, *hdc into this space, 1 hdc into next 2 stitches. Next 12 stitch-es are your free choice on mixing hdc and hdc spiked stitches. See diagram for hints. Next 2 stitches are 1 hdc and final ch-1 space is hdc. Ch 2, skip to next ch-1 space and repeat from * around. Fasten off.
Rnd 11 Option 2: If you don’t want spiked stitches. Join to Ch-1 space at any corner. Ch 1, *hdc into this space, 1 hdc in each st across to next corner. *(1 hdc. Ch 2. 1 hdc) in next corner. 1 hdc in each st to next corner. Repeat * 4 more times. 1 hdc in final corner sp. Ch 2 and join to the 1st hdc. Fasten off.
Complete all motifs to round 11. Then, work on assembling your afghan. The first motif must be completed completely, as it is the foundation round for all of them.
First Motif Only - No Joining Together with Anything
Rnd 1: Using MC, fasten onto any sc after a corner. Ch 1, sc into the same stitch, *ch 3, skip one stitch and sc into next. Continue * to the next corner. Ch 4 to jump over the corner and sc into the next sc on the other side. Continue * once again and keep going around in this fashion. There will be 8 ch-3 spaces along each side plus 1 ch-4 gap for each corner. Fasten off and weave in ends.
Join the Rest of the Motifs Together
As you finish the next round, you will attach to the foundation motif and continue to build outward.
Now that your first motif is done, the rest join together as you go. Some motifs will have one, two, or three neighbours who join at the same time. Plan ahead. Think about it like building a brick wall: You need to be strategic.
When doing the revolutions, you must also have 8 ch-3 spaces along the side and 1 ch-4 space on each corner. If you have missed a count, saying that you have too many or not enough stitches, fake it so you don’t have to frog it. There are a few spots in our sample where we missed a stitch, and we faked the final joining round to make it work. You don’t notice it unless I tell you to look for it.
The instruction to join is straightforward; where the sides join together, you will substitute the instruction of that particular side. Instead of sc, ch 3, skip one stitch, sc into next. You will do the following:
Rnd 1: Join with sl st to beg corner motif that is about to be attached to existing motif. Ch 1, st st around joining motif ch-3 gap space that matches, ch 1, skip one stitch and sc into the next. In corners, you will change the stitching from ch 4 to ch 2, slip stitch around the same ch-4 gap space on the joining, ch 2 and then sc into the next sc on the other side of the corner. Match motif joins each other at 10 spots. This includes the 8 ch-3 gap spaces and the two corner spaces.
When nothing is to be attached to, continue as if it were the first motif to create the gap spaces.
Continue until all motifs are joined together. The final perimeter order is written so you can change your project's shape or motif counts.
Final Border
The final border is easy, as Daniel has designed it so that you can change the shape of the final afghan, and the border still follows around. There are four rounds in total for the border. The first round is the one to watch for, as it has to add more stitches in the peaks and do a treble in the bottom.
Round 1 of Border
Join B to any ch-4 corner. Ch 3, 4 dc into the same space. *Skip to next ch-3 space and put 2 dc into space. Repeat * until you get to the next corner. The next corner could be a similar corner that is more than 180 degrees or less.
If the corner is less than 180 degrees, you must put a Treble where the two motifs are joined together. This prevents a huge gap. Continue to the next ch-3 gap and do 2 dc into each gap space until the next corner.
If the corner is more than 180 degrees, you must add 5 dc into the ch-4 space so it can turn the corner properly.
Continue to the next ch-3 space and do your 2 dc into each gap space until the next corner. Continue around, deciding each corner on what to do. Fasten off B and weave in ends when all the way around.
Rnd 2 of Border
Join Colour C to any middle of grouping of 5 DC. Ch 1, 3 sc into same stitch. Place 1 sc in each stitch going around with the exceptions to the groups of 5 dc. When going over a group of 5 dc, ensure the middle one has 3 sc. Continue around and fasten off.
Note that 2 sc tog is not required for the valleys. The sc will follow around without any trouble in the valleys. You only need to add 3 sc to the top of the hills to keep them sitting flat. Fasten off Colour C and weave in ends.
Round 3 of Border
With Colour C, fasten onto any SC. Ch 1, 1 sc in same stitch, *ch 1, skip one stitch and sc into next. * Continue all the way around. You do not need to add or subtract stitches to make this work. At the end, ch 1 and sl st to beg sc. Fasten off.
Round 4 of Border
Fasten Colour D onto any Ch -1 space. Ch 1, (1 sc. Ch 4. Sl st in 3rd ch from hook.Ch 1. 1 sc – extended picot made) in same sp as last sl st. Skip next sc. *Extendedpicot in next ch-1 sp. Skip next sc. Rep from * around. Join with sl st to first sc. Fasten off.
More Crochet Patterns
- Crochet Swirl Hat Pattern + Tutorial
- Crochet Fall Apple Wreath Pattern + Tutorial
- Crochet Study of Texture Shawl Pattern
- Crochet Woven Scarf Pattern
- BOO Halloween Wreath Pattern
Tutorial


Jennifer Viksush says
Re: Winter Blizzard Afghan.
The pattern should be updated to state that 2 skeins or navy are needed, not 1.
🙂
Mikey says
As a precaution, I'll update to state 2 balls just in case others end up with the same issue. THanks for letting me know.
V.Bell says
Are there written instructions? You tube videos are difficult for our group to follow.
Mikey says
Yes, a link was provided in the article. Im sorry my videos are not working for you.
Karen Armstrong says
grid
Mikey says
Thanks
Ellie says
Your video tutorials are amazing! I actually learned how to crochet a few years ago by watching you. I print the instructions too so I can get better at reading crochet directions. I’ve gotten a few of the hexagons finished on this one and it’s shaping up to be one of my absolute favorite crochet projects ever. Thank you again for what you do! I’m so glad I found you! Keep it up, I’m here waiting for the next project to work on with you!