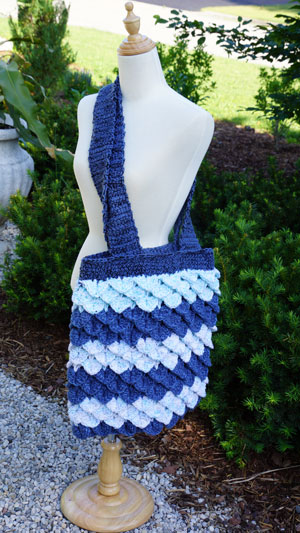
Create your own oversize beach bag using an inexpensive yarn. The straps of this bag were designed to be extremely long. Usually, when people go to the beach they are lugging with them a beach chair and other miscellaneous goods. This design allows you to throw the bag over your shoulder and wear your bag to free up your hands. This is the Crocodile Stitch Beach Bag.
The design of this crocodile stitch is meant for airy gaps behind the scales of the crocodile. This allows sand to fall out. I wouldn't recommend your keys to be left inside this bag.
Learn A New Stitch
Beach Bag Measurements:
- The base of the beach bag is 18" high by 16" across.
- Straps are approximately 37" long x 3" wide.
- Total Height from top to bottom, when assembled, is 34".
Materials List:
- Size K or 6.5 MM Crochet Hook
- 1 Ball Super Saver Blue 7 oz 100% Acrylic Yarn
- 1 Ball Super Saver White 7 oz 100% Acrylic Yarn
- 2 Balls Red Heart Delft Classic Crochet Thread, 350 YD/ 320 MM.
The Super Saver and crochet thread are crocheted together at the same time so that you have the durability of the Super Saver and added security strength provided by the crochet thread to make this a long-lasting and durable beach bag.
The top white band of the bag has an oceanic blue tinge due to the crochet thread being changed to a different colour. Feel free to mix and match your crochet threads to make this bag fit to your personality. You may also change the colours to other Red Heart Super Saver colours to fit your lifestyle. 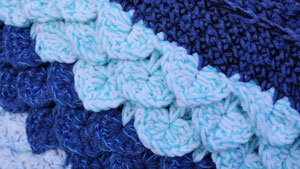
Special Instructions:
- The Crocodile Stitch is very easy to form. See my video for visual instructions on creating this stitch. The crocodile stitch is formed by putting in 5 DC's going down the first post, ch 1, then 5 DC's going up the neighboring post. The posts are grouped in twos which makes them easy to locate and work with.
- Stitch sets for starting this project is in groups of 6. Some say to use sets of 3 but if you don't end on the right set of 3, you will end up with an odd scale left out. 6 keeps that from happening and one scale is stretched over 6 stitches to help you visualize this.
Abbreviations:
Beach Bag Base Instructions:
- Using both Super Saver Blue and Crochet Thread together, Chain 14 sets of 6 = 84 chains. Join BEG CH ensuring not to twist chain.
- Chain 3, DC into the base of the CH 3. *Chain 2, Skip 2 Chains, Put 2 DC into the next stitch, Repeat from * all the way around the chain. At the end of the row, you will CH 2 and SL ST to the top of the BEG CH 3. (There will be 28 groups of 2 DC's together)
- Chain 3, DC 4 Times down the first Front Post (FP). Chain 1, DC 5 times going up the next FP. *CH 1. SKIP the next group of 2 DC's on the row. 5 DC's down the first FP, CH 1, 5 DC's going up the next FP. Repeat from * all the way. You will end up with 14 scales altogether. The final CH 1 will be SL ST'd to the 3rd CH of the BEG 3 CH. This will hold down the scale from curling forward.
- You will slip stitch your way to the left (if crocheting right-handed, vice versa if left-handed) so that you end up in the centre of the below scale. CH 3, DC into the same central area. *CH 2, 2 DC's in between the next group of 2 DC's seen on the below line (this will be between the two scales), CH 2, 2 DC's in centre of the next scale. Repeat from * all the way across, final will be CH 2 and SL ST to top of BEG CH.
- For changing colour, this is where it is done. If wanting solid colours or not wanting to change colour, just carry on. If you are using the crochet thread, you can just carry that thread yarn on into the next colour.
- Repeat Steps 3 & 4 for the duration of this purse. Each 1 scale line requires steps 3 & 4 to be completed.
Top Beach Bag Band:
- Fasten on the opposite colour that you finished the base of the purse with. In my case, I used blue. Be sure to add in the crochet thread in as well.
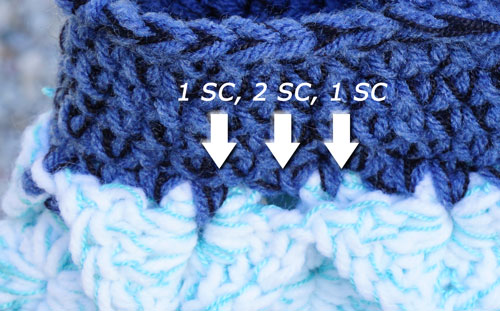
- Fasten to the middle of any scale, CH 1 and *2 SC into the CH 2 Gap, SC into the next gap between the two DC's on the line below. Repeat * all the way around, See the picture above to help you visualize this step. SL ST to the BEG CH 1.
- CH 1, SC into each stitch below, all the way around. SL ST to BEG CH at the end.
- Repeat Step 3 - 4 More Times. Fasten off.
Sealing The Bottom of The Bag
- Lay the bag flat on a surface. If you have any imperfections on your bag of the SL ST'ing on the top band, position the bag in a way that those imperfections appear on a folded side edge. It's easy to conceal those imperfections on a folded edge then leaving them so they are in the middle of a flat surface when people see your bag.
- Fasten on the same colour super saver and thread yarn that you have used on the bottom of the bag. Seal shut using the SC method. SC using both stitches on both sides of the bag to close it off.
- Fasten off the yarn and do an extra tie to ensure it's sturdy. Weave in tails as normal.
Strap - Create 2
- The sample shown is using dark blue to conceal any dirt on your hands or suntan lotion staining. Super Saver and Crochet Thread together again.
- Leave a 24" tail before starting your slip knot. We are going to use this as a sewing string afterwards.
- CH 11, SC 2nd from the hook and all the way down the row. Turn
- CH 1, DC into each stitch all the way down the row. Repeat this until line until you get the desired length.
- Leave a 24" tail on afterwards to use as a sewing string for the final step.
- I have 96 Rows on my strap, measuring 37" long.
Attaching Straps
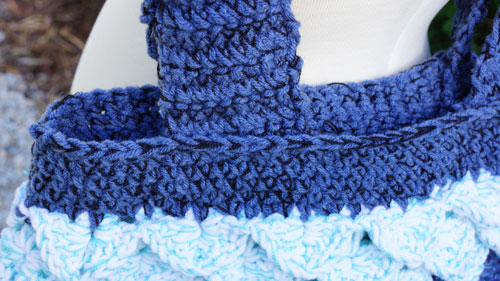
- Laying purse flat. The straps are positioned 3" away from the edge of the bag on both sides.
- The straps end at the base of the top band of this bag.
- Using 4 rows of SC, firmly hand sew the stitch using the same super saver yarn colour and crochet thread.
- When sewing the strap into place, ensure to grab only the yarn in the top band that is on the inside of the bag. Your sewing string should never go through the band to the exterior of this purse.
- I sewed this together using three separate lines from the top of the band to the lowest part so that the entire strap is sealed in. It is sewn so well together there is no evidence of yarn stress or fatigue by the yarn on the outside of this bag. You should also not see any visual indications of the sewing yarn strand on the outside of this bag. See pic above to prove that.
Karen Armstrong says
grid
Mikey says
Thanks
Susan Adam's says
I figured out that if you want a more solid matrix for a crocodile stitch, you can do matrix and scales all at once. Just plan on an odd number of stitches between nodes. For example 2 double crochet stitches then 2 in 1 stitch. Work down the post in the direction you are going chaining out 3 then double crochet down one side and up the other and chain back to the middle. Do 2 more double crochet stitches and then another scale. If working flat as opposed to in the round, the next row , the scales would be worked back post. Alternating rows between front post and back post keeps the scales on the same side of the work. So far I have only made a swatch to make sure it would work. The size of stitches may need to be played with, possibly using some treble stitches to avoid gaps. The top edge of the scales can be caught when working the row above.