DOWNLOAD FREE PATTERN
The Study of Texture Stitch Along
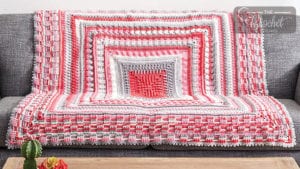
If you love crochet texture, you may just fall in love with the Study Of Texture Afghan Pattern It is in 8 different sections using Bernat POP! yarn. Using self-striping yarn like Caron Cakes, you can let the colourwork itself out. It turns out lovely.
Revision on August 5, 2019. The diagram shown in week 4 of the basketweave was incorrect in the tutorial. It was accidentally redrawn again incorrectly. I have provided my working notes for this diagram in the download. Please ignore the starting section for week 7 in the video. The starting stitch counts are wrong but you can see how the concept is done.
Thousands of crocheters have made this design and the results are so awesome.
Yarn & Sizing
- Bernat® POP!™ (5 oz/140 g; 280 yds/256 m) Lipstick on Your Collar (84002) or shade of your preference - 10 balls
- Size U.S. I/9 (5.5 mm) crochet hook or size needed to obtain gauge.
- 11 dc and 6 rows = 4" [10 cm].
Abbreviations
- Approx = Approximately
- Beg = Begin(ning)
- Ch = Chain(s)
- Dc = Double crochet
- Dcbp = Yoh and draw up a loop around post of next stitch at back of work inserting hook from right to left. (Yoh and draw through 2 loops on hook) twice
- Dcfp = Yoh and draw up a loop around post of next stitch at front of work inserting hook from right to left. (Yoh and draw through 2 loops on hook) twice
- Hdc = Half double crochet
- Picot = Ch 3. Sl st back into last sc worked.
- Popcorn = 5 dc in same stitch. Drop loop of last dc and insert hook into top of first dc. Pick up dropped loop and pull through.
- Rep = Repeat
- Rnd(s) = Round(s)
- Sc = Single crochet
- Sl st = Slip stitch
- Sp(s) = Space(s)
- St(s) = Stitch(es)
- Tog = Together
- Trbp = (Yoh) twice and draw up a loop around post of next stitch at back of work inserting hook from right to left. (Yoh and draw through 2 loops on hook) 3 times
- Trfp = (Yoh) twice and draw up a loop around post of next stitch at front of work inserting hook from right to left. (Yoh and draw through 2 loops on hook) 3 times
- Yoh = Yarn over hook
Measurements
- Week 1 - Approx 51/2" [14 cm] Square
- Week 2 - Approx 12" [30.5 cm] Square
- Week 3 - Approx 18" [46 cm] Square
- Week 4 - Approx 221/2" [57 cm] Square
- Week 5 - Approx 29" [75.5 cm] Square
- Week 6 - Approx 40" [101.5 cm] Square
- Week 7 - Approx 51" [129.5 cm] Square
- Week 8 - Approx Final 52" [132 cm] Square
Notes
- Ch 2 at beg of rnd does not count as hdc.
- Ch 3 at beg of rnd counts as dc.
- Working from the center of the ball, match outside color of previous ball with next ball of yarn to achieve best results.
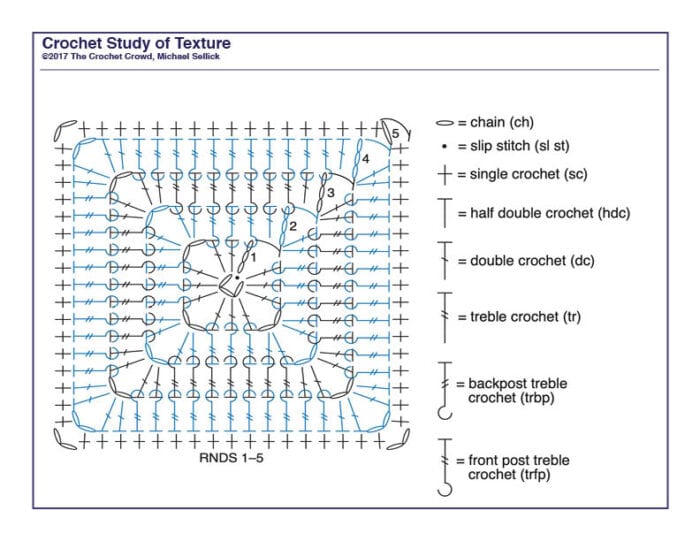
Week 1 - Old Town Square
Ch 3. Join with sl st to first ch to form ring.
1st rnd: Ch 3. 2 dc in ring. (Ch 2. 3 dc in ring) 3 times. Join with hdc to top of ch-3. 12 dc.
2nd rnd: Ch 3. 1 dc around post of joining hdc. *1 trfp around next dc. 1 trbp around next dc. 1 trfp around next dc.** (2 dc. Ch 2. 2 dc) in next ch-2 sp. Rep from * twice more, then from * to ** once. 2 dc in last corner sp. Join with hdc to top of ch-3. 7 sts between corners.
3rd rnd: Ch 3. 1 dc around post of joining hdc. *(1 trfp around next st. 1 trbp around next st) 3 times. 1 trfp around next dc.** (2 dc. Ch 2. 2 dc) in next ch-2 sp. Rep from * twice more, then from * to ** once. 2 dc in last corner sp. Join with hdc to top of ch-3. 11 sts between corners.
4th rnd: Ch 3. 1 dc around post of joining hdc. *(1 trfp around next st. 1 trbp around next st) 5 times. 1 trfp around next dc.** (2 dc. Ch 2. 2 dc) in next ch-2 sp. Rep from * twice more, then from * to ** once. 2 dc in last corner sp. Join with hdc to top of ch-3. 15 sts between corners.
5th rnd: Ch 1. 1 sc around post of joining hdc. *1 sc in each st to next corner ch-2 sp.** (1 sc. Ch 2. 1 sc) in next ch-2 sp. Rep from * twice more, then from * to ** once. 1 sc in last corner sp. Join with hdc to top
Week 1 - Diagram
Click the picture to save or print it.
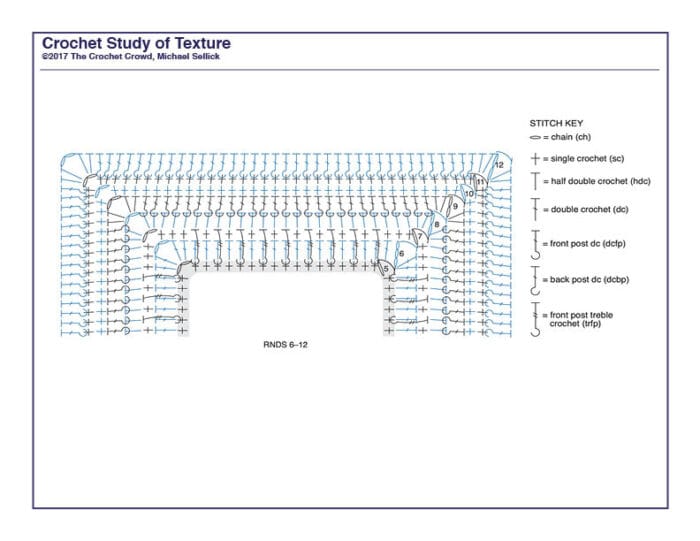
Week 2 - Picket Fences Make for Great Neighbours
6th rnd: Ch 3. 1 dc around post of joining hdc. *1 dc in each st to next ch-2 sp.** (2 dc. Ch 2. 2 dc) in next ch-2 sp. Rep from * twice more, then from * to ** once. 2 dc in last corner sp. Join with hdc to top of ch-3. 21 sts between corners.
7th rnd: Ch 1. 1 sc around post of joining hdc. *1 sc in each of next 2 dc. (Trfp around next sc 2 rnds below in 5th rnd. Skip next dc. 1 sc in next dc. Skip next sc of 5th rnd) 9 times. 1 sc in next dc.** (1 sc. Ch 2. 1 sc) in next ch-2 sp. Rep from * twice more, then from * to ** once. 1 sc in last corner sp. Join with hdc to first sc. 23 sts between corners.
8th rnd: Ch 2. 2 hdc around post of joining hdc. *1 hdc in each st to next ch-2 sp.** (2 hdc. Ch 2. 2 hdc) in next ch-2 sp. Rep from * twice more, then from * to ** once. 2 hdc in last corner sp. Join with hdc to first hdc. 27 sts between corners.
9th rnd: Ch 2. 2 hdc around post of joining hdc. *(1 dcfp around next st. 1 dcbp around next st) 13 times. 1 dcfp around next st.** (2 hdc. Ch 2. 2 hdc) in next ch-2 sp. Rep from * twice more, then from * to ** once. 2 hdc in last corner sp. Join with hdc to first hdc. 31 sts between corners.
10th rnd: Ch 1. 1 sc around post of joining hdc. *1 sc in each st to next ch-2 sp.** (1 sc. Ch 2. 1 sc) in next ch-2 sp. Rep from * twice more, then from * to ** once. 1 sc in last corner sp. Join with hdc to first sc. 33 sts between corners.
11th rnd: Ch 1. 2 sc around post of joining hdc. *1 sc in each st to next ch-2 sp.** (2 sc. Ch 2. 2 sc) in next ch-2 sp. Rep from * twice more, then from * to ** once. 2 sc in last corner sp. Join with hdc to first sc. 37 sts between corners.
12th rnd: Ch 2. 2 hdc around post of joining hdc. *1 dcbp around each st to next ch-2 sp.** (2 hdc. Ch 2. 2 hdc) in next ch-2 sp. Rep from * twice more, then from * to ** once. 2 hdc in last corner sp. Join with hdc to first hdc. 41 sts between corners.
Week 2 - Diagram
Click picture to save or print it.
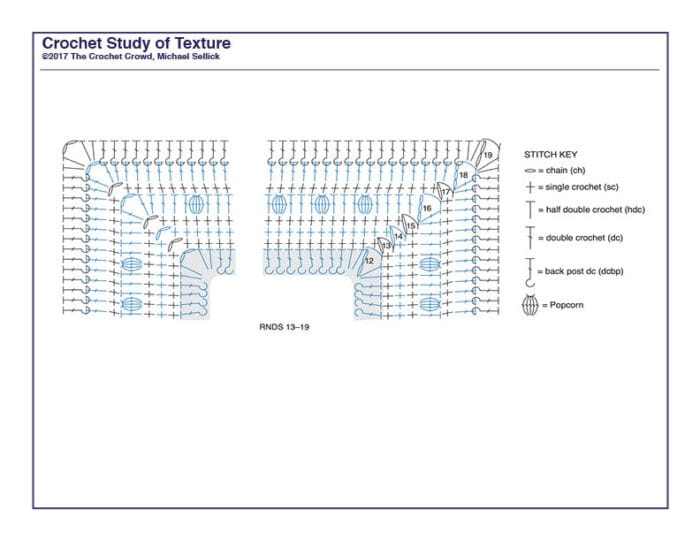
Week 3 - Cheap Night at The Movies
13th to 15th rnds: Ch 1. 1 sc around post of joining hdc. *1 sc in each st to next ch-2 sp.** (1 sc. Ch 2. 1 sc) in next ch-2 sp. Rep from * twice more, then from * to ** once. 1 sc in last corner sp. Join with hdc to first sc. 47 sts between corners at end of 15th rnd.
16th rnd: Ch 3. 1 dc around post of joining hdc. *1 dc in each of next 3 sc. (Popcorn in next sc. 1 dc in each of next 3 sc) 11 times.** (2 dc. Ch 2. 2 dc) in next ch-2 sp. Rep from * twice more, then from * to ** once. 2 dc in last corner sp. Join with hdc in top of ch-3. 11 popcorns between corners.
17th rnd: As 13th rnd. 53 sc between corners.
18th rnd: Ch 3. 1 dc around post of joining hdc. *1 dc in each sc to next ch-2 sp.** (2 dc. Ch 2. 2 dc) in ch-2 sp. Rep from * twice more, then from * to ** once. 2 dc in last corner sp. Join with hdc to top of ch-3. 57 dc between corners.
19th rnd: Ch 2. 2 hdc around post of joining hdc. *1 dcbp around each dc to next ch-2 sp.** (2 hdc. Ch 2. 2 hdc) in next ch-2 sp. Rep from * twice more, then from * to ** once. 2 hdc last corner sp. Join with hdc to first hdc. 61 sts between corners.
Week 3 - Diagram
Click picture to save or print it.
Week 4 - Ants Marching Two by Two Hurrah
20th rnd: Ch 3. 1 dc around post of joining hdc. *1 dc in each dc to last dc before ch-2 sp. 2 dc in last dc.** (2 dc. Ch 2. 2 dc) in ch-2 sp. Rep from * twice more, then from * to ** once. Join with hdc to top of ch-3. 66 sts between corners.
A common email we get is about round 20. Please notice there is an extra stitch applied in the end of each side so the next rounds will evenly align. Most people don't realize there is an extra stitch here. I have circled it.
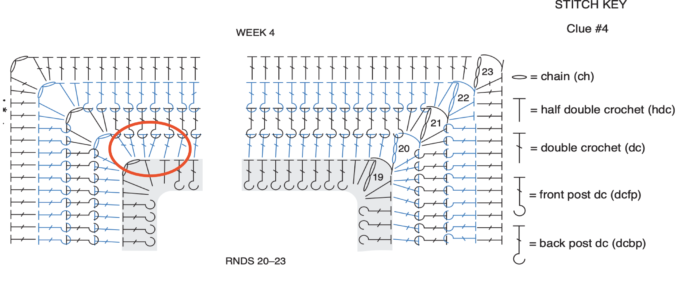
21st rnd: Ch 2. 2 hdc around post of joining hdc. *(1 dcfp around each of next 2 dc. 1 dcbp around each of next 2 dc) 16 times. 1 dcfp around each of next 2 dc.** (2 hdc. Ch 2. 2 hdc) in next ch-2 sp. Rep from * twice more, then from * to ** once. 2 hdc in last corner sp. Join with hdc to first hdc. 70 sts between corners.
22nd rnd: Ch 2. 2 hdc around post of joining hdc. *(1 dcbp around each of next 2 dc. 1 dcfp around each of next 2 dc) 17 times. 1 dcbp around next dc.** (2 hdc. Ch 2. 2 hdc) in next ch-2 sp. Rep from * twice more, then from * to ** once. 2 hdc in last corner sp. Join with hdc to first hdc. 74 sts between corners.
23rd rnd: Ch 3. 1 dc around post of joining hdc. *1 dc in each st to next ch-2 sp.** (2 dc. Ch 2. 2 dc) in ch-2 sp. Rep from * twice more, then from * to ** once. 2 dc in last corner sp. Join with hdc to top of ch-3. 78 sts between corners.
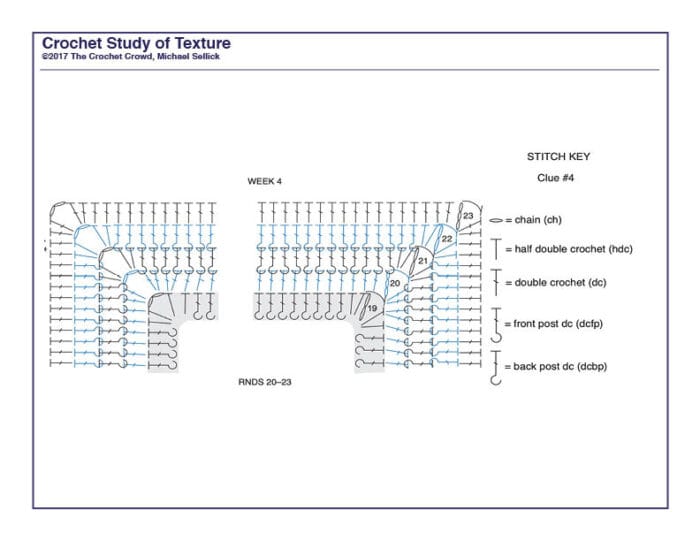
Week 4 - Diagram
Click picture to save or print it.
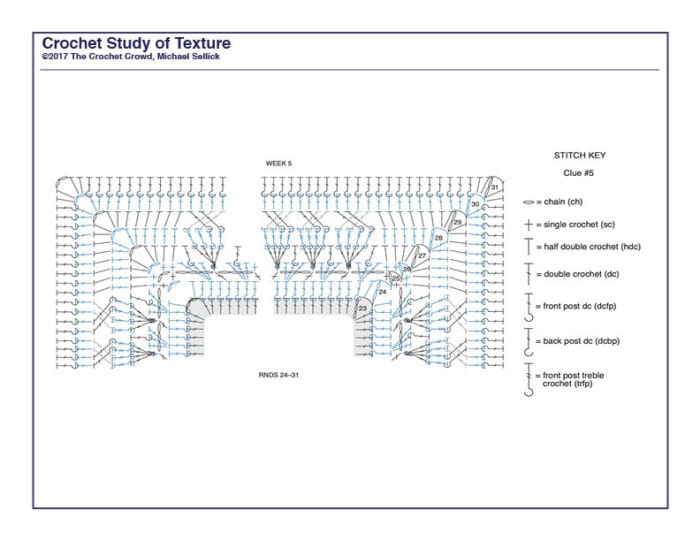
Week 5 - Yarn Coloured Eggs
24th rnd: Ch 2. 1 hdc around post of joining hdc. *1 dcbp around each dc to next ch-2 sp.** (1 hdc. Ch 2. 1 hdc) in next ch-2 sp. Rep from * twice more, then from * to ** once. 1 hdc in last corner sp. Join with hdc to top of first hdc. 80 sts between corners.
25th rnd: Ch 1. 1 sc around post of joining hdc. *(Ch 3. Skip next 3 sts. 1 sc in next st) 19 times. Skip next 4 sts. Ch 3.** (1 sc. Ch 2.1 sc) in next ch-2 sp. Rep from twice more, then from * to ** once. 1 sc in last corner sp. Join with hdc to first sc. 20 ch-3 sps between corners.
26th rnd: Ch 1. 1 sc around post of joining hdc. 1 sc in next sc. *[Working over ch-3 sp of last rnd, skip next st of 25th rnd. 3 dc in next st (center of 3 sts). Skip next st. 1 sc in next sc of 25th rnd] 20 times.** (1 sc. Ch 2. 1 sc) in next ch-2 sp. Rep from * twice more, then from * to ** once. 1 sc in last corner sp. Join with hdc to first sc. 20 groups of 3-dc between corners.
27th rnd: Ch 2. 2 hdc around post of joining hdc. *1 hdc in each of next 2 sts. (Skip next dc. 1 dcbp around next dc. Skip next dc. 4 trfp around next sc 1 row below) 19 times. Skip next dc. 1 dcbp around next dc. Skip next dc. 1 hdc in each of next 2 sts.** (2 hdc. Ch 2. 2 hdc) in next ch-2 sp. Rep from * twice more, then from * to ** once. 2 hdc in last corner sp. Join with hdc to first sc. 19 trfp groups between corners. 4 hdc at beg and end of each side.
28th rnd: Ch 3. 1 dc around post of joining hdc. 1 dc in each of next 4 sts. *Skip next dcbp. (1 trfp around each of next 4 trfp. Skip next dcbp) 19 times. 1 dc in each of next 4 sts.** (2 dc. Ch 2. 2 dc) in next ch-2 sp. Rep from * twice more, then from * to ** once. 2 dc in last corner sp. Join with hdc in top of beg ch-2.
29th rnd: Ch 2. 2 hdc around post of joining hdc. 1 hdc in each of next 6 dc. *(Skip next 2 sts. 1 dcfp around each of next 2 sts. 1 dcfp. Working in front of last 2 dc just worked, 1 dcfp around each of 2 skipped sts – crisscross st made) 19 times. 1 hdc in each of next 6 dc.** (2 hdc. Ch 2. 2 hdc) in next ch-2 sp. Rep from * twice more, then from * to ** once. 2 hdc in last corner sp. Join with hdc to first hdc. 19 criss-cross sts between corners.
30th rnd: Ch 3. 1 dc around post of joining hdc. *1 dc in each st to next ch-2 sp.** (2 dc. Ch 2. 2 dc) in next ch-2 sp. Rep from * twice more, then from * to ** once. 2 dc in last corner sp. Join with sl st to top of ch-3.
31st rnd: Ch 2. 2 hdc around post of joining hdc. *1 dcbp around each dc to next ch-2 sp.** (2 hdc. Ch 2. 2 hdc) in next ch-2 sp. Rep from * twice more, then from * to ** once. 2 hdc in last corner sp. Join with hdc to first hdc.
Week 5 - Diagram
Click picture to save or print it.
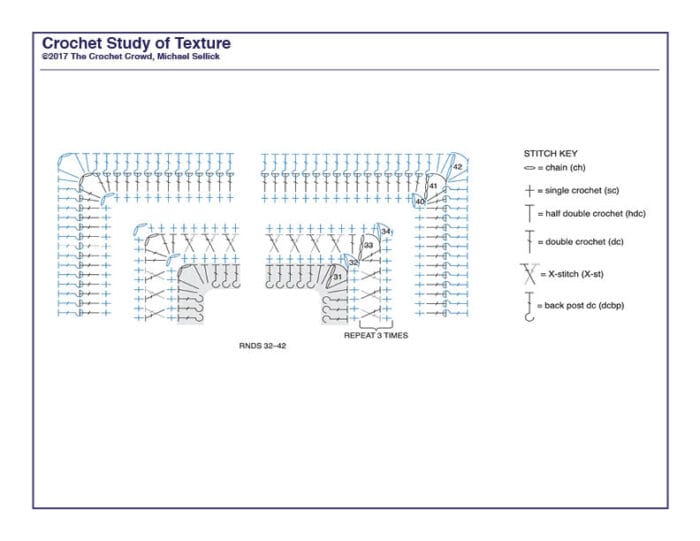
Week 6 - Crisscross Apple Sauce
32nd rnd: Ch 1. 1 sc around post of joining hdc. *1 sc in each st to next ch-2 sp.** (1 sc. Ch 2. 1 sc) in next ch-2 sp. Rep from * twice more, then from * to ** once. 1 sc in last corner sp. Join with hdc to first sc. 102 sts between corners.
33rd rnd: Ch 3. 1 dc around post of joining hdc. *[Skip next sc. 1 dc in next sc. Working behind last worked dc, 1 dc in skipped st - X-st made]. Rep from [ to ] to next ch-2 sp.** (2 dc. Ch 2. 2 dc) in next ch-2 sp. Rep from * twice more, then from * to ** once. 2 dc in last corner sp. Join with hdc to top of ch-3. 106 sts between corners.
34th rnd: Ch 1. 1 sc around post of joining hdc. *1 sc in each st to next ch-2 sp.** (1 sc. Ch 2. 1 sc) in next ch-2 sp. Rep from * twice more, then from * to ** once. 1 sc in last corner sp. Join with hdc to first sc. 108 sts between corners.
35th to 40th rnds: Rep 33rd and 34th rnds 3 times more. 126 sts between corners at end of 40th rnd.
41st rnd: Ch 3. 1 dc around post of joining hdc. *1 dc in each st to next ch-2 sp.** (2 dc. Ch 2. 2 dc) in next ch-2 sp. Rep from * twice more, then from * to ** once. 2 dc in last corner sp. Join with hdc to top of ch-3. 130 sts between corners.
42nd rnd: Ch 2. 2 hdc around post of joining hdc. *1 dcbp around each st to next ch-2 sp.** (2 hdc. Ch 2. 2 hdc) in next ch-2 sp. Rep from * twice more, then from * to ** once. 2 hdc in last corner sp. Join with hdc to first hdc. 134 sts between corners.
Week 6 - Diagram
Click picture to save or print it.
Week 7 - 'Summery Picnics
43rd rnd: Ch 2. 2 hdc around post of joining hdc. *1 dcfp around next st. 1 dcbp around each of next 4 sts. [1 dcfp around each of next 4 sts. 1 dcbp around each of next 4 sts]; rep from [ to ] to last st before next ch-2 sp. 1 dcfp around next st.** (2 hdc. Ch 2. 2 hdc) in next ch-2 sp. Rep from * twice more, then from * to ** once. 2 hdc in last corner sp. Join with hdc to first hdc. 138 sts between corners.
44th rnd: Ch 2. 2 hdc around post of joining hdc. *1 dcfp around each of next 3 sts. 1 dcbp around each of next 4 sts. [1 dcfp around each of next 4 sts. 1 dcbp around each of next 4 sts]; rep from [ to ] to last 3 sts before next ch-2 sp. 1 dcfp around each of next 3 sts.** (2 hdc. Ch 2. 2 hdc) in next ch-2 sp. Rep from * twice more, then from * to ** once. 2 hdc in last corner sp. Join with hdc to first hdc. 142 sts between corners.
45th rnd: Ch 2. 2 hdc around post of joining hdc. *1 dcbp around next st. 1 dcfp around each of next 4 sts. [1 dcbp around each of next 4 sts. 1 dcfp around each of next 4 sts]; rep from [ to ] to last st before next ch-2 sp. 1 dcbp around next st.** (2 hdc. Ch 2. 2 hdc) in next ch-2 sp. Rep from * twice more, then from * to ** once. 2 hdc in last corner sp. Join with hdc to first hdc. 146 sts between corners.
46th rnd: Ch 2. 2 hdc around post of joining hdc. *1 dcbp around each of next 3 sts. 1 dcfp around each of next 4 sts. [1 dcbp around each of next 4 sts. 1 dcfp around each of next 4 sts]; rep from [ to ] to last 3 sts before next ch-2 sp. 1 dcbp around each of next 3 sts.** (2 hdc. Ch 2. 2 hdc) in next ch-2 sp.** Rep from * twice more, then from * to ** once. 2 hdc in last corner sp. Join with hdc to first hdc. 150 sts between corners.
47th rnd: Ch 2. 2 hdc around post of joining hdc. *1 dcbp around next st. 1 dcfp around each of next 4 sts. [1 dcbp around each of next 4 sts. 1 dcfp around each of next 4 sts]; rep from [ to ] to last st before next ch-2 sp. 1 dcbp around next st.** (2 hdc. Ch 2. 2 hdc) in next ch-2 sp. Rep from * twice more, then from * to ** once. 2 hdc in last corner sp. Join with hdc to first hdc. 154 sts between corners.
48th rnd: Ch 2. 2 hdc around post of joining hdc. *1 dcbp around each of next 3 sts. 1 dcfp around each of next 4 sts. [1 dcbp around each of next 4 sts. 1 dcfp around each of next 4 sts]; rep from [ to ] to last 3 sts before next ch-2 sp. 1 dcbp around each of next 3 sts.** (2 hdc. Ch 2. 2 hdc) in next ch-2 sp. Rep from * twice more, then from * to ** once. 2 hdc in last corner sp. Join with hdc to first hdc. 158 sts between corners.
49th rnd: Ch 2. 2 hdc around post of joining hdc. *1 dcfp around next st. 1 dcbp around each of next 4 sts. [1 dcfp around each of next 4 sts. 1 dcbp around each of next 4 sts]; rep from [ to ] to last st before next ch-2 sp. 1 dcfp around next st.** (2 hdc. Ch 2. 2 hdc) in next ch-2 sp. Rep from * twice more, then from * to ** once. 2 hdc in last corner sp. Join with hdc to first hdc. 162 sts between corners.
50th rnd: Ch 2. 2 hdc around post of joining hdc. *1 dcfp around each of next 3 sts. 1 dcbp around each of next 4 sts. [1 dcfp around each of next 4 sts. 1 dcbp around each of next 4 sts]; rep from [ to ] to last 3 sts before next ch-2 sp. 1 dcfp around each of next 3 sts.** (2 hdc. Ch 2. 2 hdc) in next ch-2 sp. Rep from * twice more, then from * to ** once. 2 hdc in last corner sp. Join with hdc to first hdc. 166 sts between corners. Basketweave stitches will now switch places.
51st to 54th rnds: As 43rd to 46th rnds, noting 4 sts will be increased between corners on each rnd (as before). 182 sts between corners at end of 54th rnd.
Week 7 - Diagram
Click picture to save or print it.

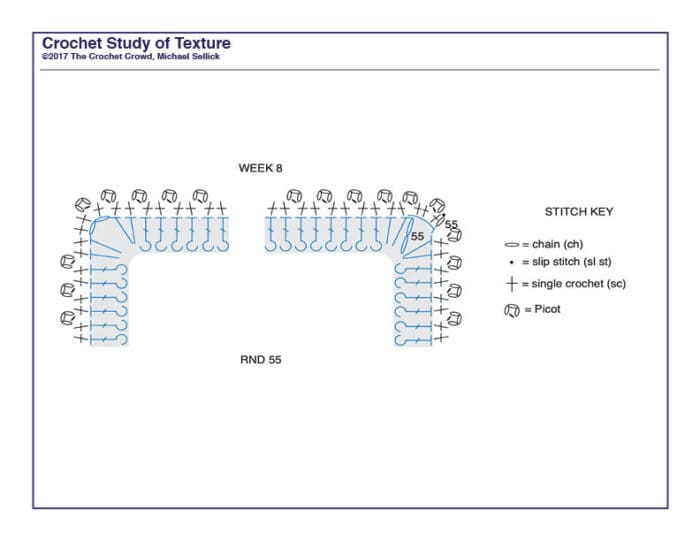
Week 8 - Final Exam
55th rnd: Ch 1. 1 sc around post of joining hdc. Picot. 2 sc in same sp as first sc. Picot. *[1 sc in each of next 2 sts. Picot]; rep from [ to ] to next ch-2 sp.** (2 sc. Picot. 2 sc. Picot) in next ch-2 sp. Rep from * twice more, then from * to **. Join with sl st to first sc. Fasten off.
Week 8 - Diagram
Click picture to save or print it.

More Patterns to Enjoy
- Crochet Study of Texture Shawl
- Crochet Plush Moss Blanket + Tutorial
- What To Do With Bernat POP! Yarn
- Crochet Breakaway Waves Blanket
- Crochet Intermediate Projects
Bernat POP! can be found at Walmart but the latest colours that are out are exclusively on Yarnspirations Website at this time but will trickle to the stores in the next few weeks. Getting 10 balls may be difficult at the retail store, so you can skip the hassle and just order through Yarnspirations Website to make it easier from Yarnspirations direct to you through UPS Courier.
Tutorial
Please note that you can either follow the tutorial 100% or follow the written words 100%. You cannot cross compare the two as changes were made to the written words that conflict with the tutorial. You can just the tutorial as a guide but choose either to follow the instructions in the tutorial or written words, but definitely not both at the same time.
elizabeth says
Hi Mikey, I am working on this beautiful afghan now & want to make it larger. Do u have any suggestions as to which rows or repeats I could do to enlarge this blanket? Thanks so much for this lovely textured pattern! Next I want to do the WORLD of Texture blanket!
with much appreciation, elizabeth
Mikey says
This pattern would need a redesign if you are looking to make it bigger. I'm sorry. I don't have any quick answers without redoing the pattern from scratch to accommodate that. I'm sorry.
Erica says
I am looking for the instructions for thr rectangle instead of the square. I have made this blanket many many times and want to change it up but I can't seem to find thr pattern for the rectangle one anywhere. Please help!!!
Mikey says
I ironically got email over night about the same issue. I'm looking into it this morning.
Tracey says
Almost done w/ the Study of Texture - starting week 7. I’m pretty good reading a pattern/following a diagram, but I always watch Mikey’s videos just to make sure I am understanding correctly. The video & the written pattern/diagram do not match. Which do I follow???? I’ve tried reading comments, looking on The Crochet Crowd website & searching Facebook. I see the same question posed, but no clear answer. Help!
Mikey says
If you have only been following the videos, follow the video. If you have been using the written words and diagrams, follow that. You may be able to fudge it as well.