Crochet Felted Purse
Create your amazing round purse using the instructions provided. There is also a matching Video Tutorial for those who need a visual on how to do this purse. A lady came up to me in a store after I had made this and offered me $80 for this purse. I never sold it off because I loved it that much, but it certainly was popular. This is the Round Crochet Felted Purse pattern.

Materials Needed
- Size 5.5 MM Crochet Hook or Size J
- 1 Ball - Patons Classic Wool - Burgandy
- 1 Ball - Patons Classic Wool - Bright Red
- 1 Ball - Patons Classic Wool - Jade Heather
- 1 Ball - Patons Classic Wool - Yellow
- 1 Ball - Patons Classic Wool - Paprika
- 1 Ball - Patons Classic Wool - Leaf Green
Felting process will need 1 washing machine, 2 tablespoons of baking soda and 1 pair old jeans for agitation.
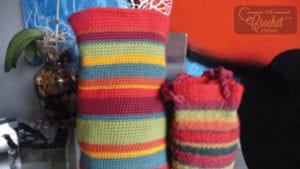
Final Dimensions are 8" Diameter by 13" tall. After felting is about 7" and 10" Tall.
The above picture is before felting the purse on the left. The below picture is after felting. The shrinkage factor is considerable.
Definitions
CH - Chain, SC - Single Crochet, DC - Double Crochet, SL ST - Slip Stitch, BEG - Beginning, Free Pattern:
Starting at Base and working your way up.
Start with Paton's Classic Wool - Bergandy until I tell you to change colour.
- Ch 2 then 11 SC into the beginning chain to form circle. SL ST at the end to the beginning CH to complete circle.
- CH 1, then *1 SC in the next stitch, then 2 SC into the next, then repeat from *all the way around. SL ST at the end
- CH 1, then *1 SC in the next two stitches, then 2 SC into the next. Repeat from * all the way around. SL ST at the end.
- CH 1, then *1 SC in the next three stitches, then 2 SC into the next. Repeat from * all the way around. SL ST at the end.
- CH 1, then *1 SC in the next four stitches, then 2 SC into the next. Repeat from * all the way around. SL ST at the end.
- CH 1, then *1 SC in the next five stitches, then 2 SC into the next. Repeat from * all the way around. SL ST at the end.
- CH 1, then *1 SC in the next six stitches, then 2 SC into the next. Repeat from * all the way around. SL ST at the end.
- CH 1, then *1 SC in the next seven stitches, then 2 SC into the next. Repeat from * all the way around. SL ST at the end.
- CH 1, then *1 SC in the next eight stitches, then 2 SC into the next. Repeat from * all the way around. SL ST at the end.
- CH 1, then *1 SC in the next nine stithces, then 2 SC into the next. Repeat from * all the way around. SL ST at the end.
- CH 1, then *1 SC in the next ten stitches, then 2 SC into the next. Repeat from * all the way around. SL ST at the end.
- CH 1, then *1 SC in the next eleven stitches, then 2 SC into the next. Repeat from * all the way around. SL ST at the end.
- CH 1, then *1 SC in the next twelve stitches, then 2 SC into the next. Repeat from * all the way around. SL ST at the end.
- CH 1, then *1 SC in the next thirteen stitches, then 2 SC into the next. Repeat from * all the way around. SL ST at the end.
- CH 1, then *1 SC in the next fourteen stitches, then 2 SC into the next. Repeat from * all the way around. SL ST at the end.
- CH 1, then *1 SC in the next fifteen stitches, then 2 SC into the next. Repeat from * all the way around. DO NOT SLIP STITCH.
- 3 Rows - Bright Red
- 6 Rows - Jade Heather
- 2 Rows - Yellow
- 3 Rows - Paprika
- 8 Rows - Leaf Green
- 6 Rows - Burgandy
- 3 Rows - Bright Red
- 1 Row - Yellow
- 3 Rows - Paprika
- 6 Rows - Jade Heather
- 3 Rows - Yellow
- 4 Rows - Leaf Green
- 1 Row - Jade Heather
- 3 Rows - Burgandy
- 1 Row - Organge
- 6 Rows - Red - Finish off with the final 3 stitches of the the final row with SL ST.
Felting
- Place project in washing machine with an old pair of jeans or something equivalent. You don't want to use a towel and need the abbrasiveness of jeans to form felting.
- Place 2 Table Spoons of Baking Soda in washing machine.
- Set washing machine to hot wash with cold rinse.
- Remove at end, roll project with dry towel to remove extra water.
- Form purse and let dry in the shape you need.
- The purse will shrink and settles to a 11" tall x 7" Diameter.
Free Pattern by Mikey. ©2011, The Crochet Crowd
Ann says
No blue button
Mikey says
added
Teresa Flores says
Very informational ....some very awesome creations I must try, thanks for all you do in making and staying creative.
Teresa