Inspired by a crocheter on Facebook, she took the centre of the Study of Determination. Rounds 1 to 12 were on the first week of the Stitch Along, and she made some squares herself. This captivated me as I don't usually look at the centre of my blankets to make alternative options like that.
This is to have a mini booklet for the Crochet Cruisers to bring with them in November 2025, but the pattern, including the booklet, will be available to everyone for free.
Crochet Cruise Homework
Cruisers, you are printing out the booklet for this community blanket when it becomes available. Complete only 12 squares for a 3 x 4 square blanket.
The blanket with a border is 42 x 32", and each square is approximately 9" x 9".
You will not be changing squares with each other. You will work on putting this together and the final border on the cruise with us. You will work on this throughout the cruise, along with other projects we have. If you plan not to do homework, please bring with you an alternative pattern to work on during stitch socials and gatherings, especially on the first evening of either cruise for mix' n mingle.
Rounds 1 to 12 on the Stitch Along had the colours changing, which changed the starting and stopping points when you used a solid strand, as I did in the sample.
I realized I had to change the instructions for the square sample I did due to the location of where the yarn needs to finish up for the best results.
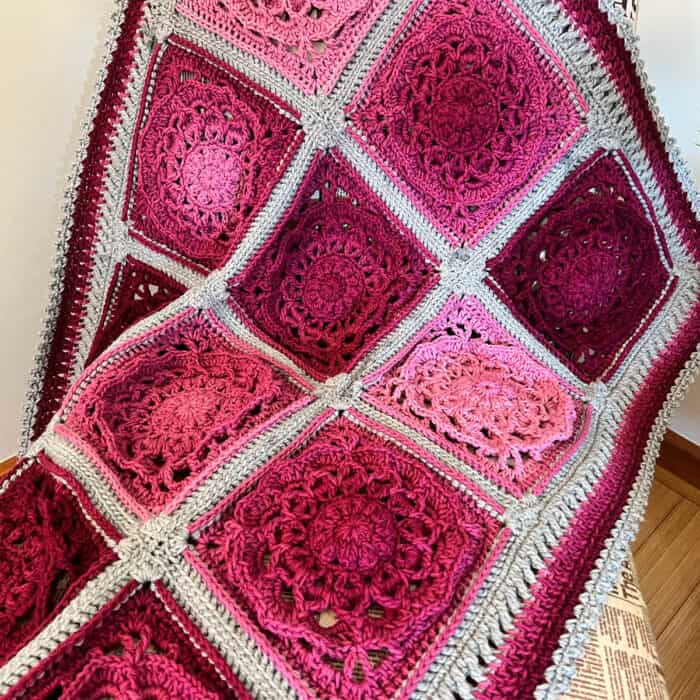
New Sample
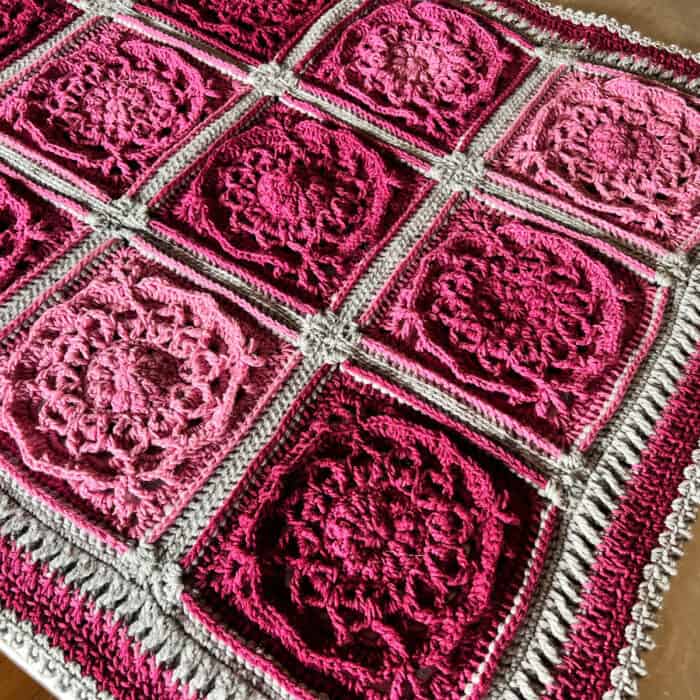
There are 12 squares in all with a whip-stitch invisible join.
I also used a similar border to the Mystery Stitch Along back in 2015. Edie Eckman created The Border initially, but I changed it a few things for simplicity. I adapted her design, which I shared with Yarnspirations, to change it to make it faster.
Original Pattern:
Red Heart® Comfort™ (16 oz/454 g; 867 yds/792 m)
Contrast A Charcoal (3220) 1 Ball
Contrast B Gray (3150) 1 Ball
Contrast C Goldenrod (3126) 1 Ball
Contrast D Petal Pink (3205) 1 Ball
Contrast E Hot Pink (3207) 1 Ball
Contrast F Peacock (3193) 1 Ball
ABBREVIATIONS
- Approx = Approximately
- Beg = Beginning
- Ch = Chain(s)
- Dc = Double crochet
- Dcbp = (Double crochet back post). Yoh and draw up a loop around post of next st at back of work inserting hook from right to left. (Yoh and draw through 2 loops on hook) twice - 1 dcbp made.
- Ext sc = (Extended single crochet). Insert hook in indicated stitch. Yoh and draw up a loop. Yoh and draw through one loop only. Yoh and draw through 2 loops.
- Hdc = Half double crochet
- V-st = (1 dc. Ch 2. 1 dc) in indicated stitch
- Petal = (1 sc. 4 dc. 1 sc) all in indicated space
- Picot = Ch 3. Sl st back into last sc worked.
- Popcorn = 3 dc in indicated stitch. Drop loop from hook. Insert hook from front to back under top 2 loops of first dc of 3-dc group. Grab dropped loop with hook and pull it through. Ch 1 to close.
- Rem = Remain(ing)
- Rep = Repeat
- Rnd(s) = Round(s)
- RS = Right side
- Sc = Single crochet
- Scbp = (Single crochet back post). Draw up a loop around post of next st at back of work inserting hook from right to left. Yoh and draw through 2 loops on hook.
- Sk = Skip
- Sl st = Slip stitch
- Sp(s) = Space(s)
- St(s) = Stitch(es)
- Tr = Treble crochet
- Tr2tog = (Treble crochet 2 together). (Yoh) twice and draw up a loop in indicated space. (Yoh and draw through 2 loops on hook) twice. (Yoh) twice and draw up a loop in next indicated space. (Yoh and draw through 2 loops on hook) twice. Yoh and draw through all 3 loops on hook.
- Trfp-xst = (Treble front post cross stitch). Skip next stitch. 1 trfp around post of next stitch. Working behind last stitch made, 1 dc in skipped stitch.
- WS = Wrong side
- Yoh = Yarn over hook
MEASUREMENT
Hook: 5 mm / H/8
Gauge: 13 sc and 14 rows = 4" [10 cm].
Notes:
- Ch 3 at beg of rnds counts as dc.
- Skip st behind ext sc or ex dc unless otherwise stated in pat.
- Unlike most designs, this blanket stays in an even count from rnd 10 and beyond.
With A, ch 4. Join with sl st to beg ch to form ring.
1st rnd: Ch 2. 12 dc in ring. Join B with sl st to top of first dc. Fasten off A. 12 dc.
2nd rnd: With B, ch 2. Popcorn in same sp as sl st. Ch 1. *Popcorn in next dc. Ch 1. Rep from * around. Join with sl st to top of first popcorn. 12 popcorns and 12 ch-1 sps.
3rd rnd: Sl st to next ch-1 sp. Ch 1. 3 sc in same sp as last sl st. *3 sc in next ch-1 sp. Rep from * around. Join with sl st to first sc. 36 sc.
4th rnd: Sl st to next sc. Ch 5 (counts as dc and ch-2 sp). 1 dc same sp as last sl st. Ch 1. *Skip next 2 sc. V-st in next sc. Ch 1. Rep from * around. Join C with sl st to 3rd ch of beg ch-5. 12 V-sts. Fasten off B.
5th rnd: With C, sl st in next ch-2 sp. Ch 1. Petal in same sp as last sl st. *Petal in next ch-2 sp. Rep from *around. Join with sl st to first sc. 12 petals.
6th rnd: Sl st in each of next 2 dc. Ch 1. 1 sc in same sp as last sl st. 1 sc in next dc. Ch 4. *Skip next 4 sts (dc, 2 sc, dc). 1 sc in each of next 2 dc (center of next petal). Ch 4. Rep from * around. Join with sl st to first sc. 24 sc and 12 ch-4 sps.
7th rnd: Ch 1. Tr2tog over last ch-1 sp of 5th rnd and next ch-1 sp (between next 2 petals) of 5th rnd. *7 sc in next ch-4 sp. Tr2tog over last ch-1 sp where last tr2tog was made of 5th rnd and next ch-1 sp (between next 2 petals) of 5th rnd. Rep from * around to last ch-4 sp. 7 sc in last ch-4 sp. Join with sl st to top of first tr2tog. 12 tr2tog and 84 sc. Fasten off C.
8th rnd: Join D with sl st to 4th sc of 7-sc group. Ch 3. 2 dc in same sp as sl st. 1 dc in each of next 2 sc. Skip next sc. 1 scfp around post of next tr2tog. *Skip next sc. 1 dc in each of next 2 sc. 3 dc in next sc. 1 dc in each of next 2 sc. Skip next sc. 1 scfp around post of next tr2tog. Rep from * around. Skip next sc. 1 dc in each of next 2 sc. Join E with sl st to top of beg ch-3. 84 dc and 12 scfp. Fasten off D.
9th rnd: With E, sl st to next dc (middle of 3-dc group). Ch 6 (counts as tr and ch 2). 1 tr in the same sp as sl st. Ch 3. Skip next 3 dc. 1 dcbp around post of next scfp. (Ch 3. Skip next 3 dc. 1 scbp around next st) 3 times. Ch 3. Skip next 3 dc. 1 dcbp around next scfp. Ch 3. Skip next 3 dc. *(1 tr. Ch 2. 1 tr) in next dc. Ch 3. Skip next 3 dc. 1 dcbp around next scfp. (Ch 3. Skip next 3 dc. 1 scbp around next st) 3 times. Ch 3. Skip next 3 dc. 1 dcbp around next scfp. Ch 3. Skip next 3 dc. Rep from * twice more. Join with sl st to 4th ch of beg ch-6. 24 ch-3 sps, 4 ch-2 sps, 8 tr, 8 dcbp, and 12 scbp.
Note: Stitch counts going forward are per side.
10th rnd: Sl st to next corner ch-2 sp. Ch 3. (1 dc. Ch 2. 2 dc) in same sp as last sl st. Skip next tr. 3 dc in next ch-3 sp. Skip next st. 3 hdc in next ch-3 sp. (Skip next st. 3 sc in next ch-3 sp) twice. Skip next st. 3 hdc in next ch-3 sp. Skip next st. 3 dc in next ch-3 sp. Skip next st.* (2 dc. Ch 2. 2 dc) in next corner ch-2 sp. Rep from * twice more, then from to ** once. Join with sl st to top of beg ch-3. 10 dc, 6 hdc, and 6 sc. Fasten off E. 22 sts between corner ch-2 sps.
11th rnd: Join B with sl st to any corner ch-2 sp. Ch 3. (1 dc. Ch 2. 2 dc) in same sp as sl st. 1 dc in each st to next corner ch-2 sp.*(2 dc. Ch 2. 2 dc) in next corner ch-2 sp. Rep from * twice more, then from * to ** once. Sl st to top of beg ch-3. Fasten off B. 26 dc between corner ch-2 sps.
12th rnd: Join A with sl st to any corner ch-2 sp. Ch 1. (2 ext sc. Ch 2. 2 ext sc) in same sp as sl st. 1 dcbp around post of each dc to next corner ch-2 sp.* (2 ext sc. Ch 2. 2 ext sc) in next corner ch-2 sp. Rep from * twice more, then from * to ** once. Join with sl st to first ext sc. Fasten off A. 30 sts between corner ch-2 sps.
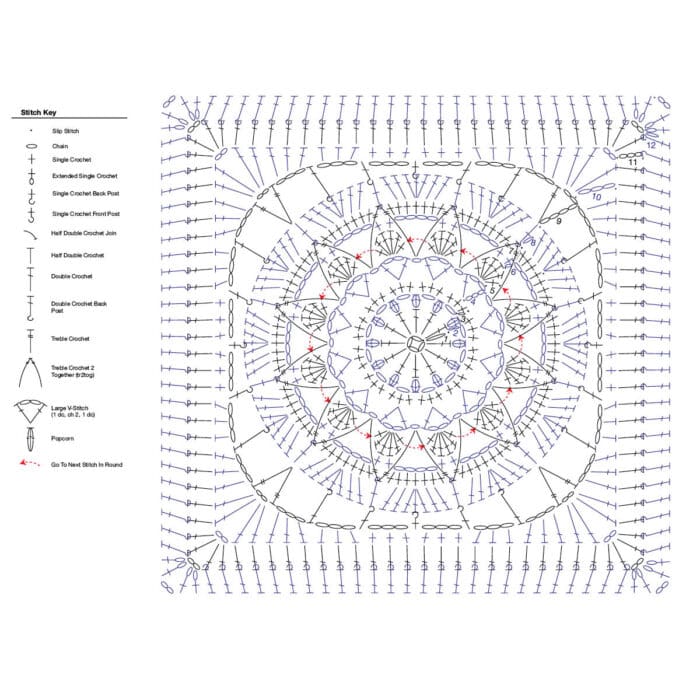
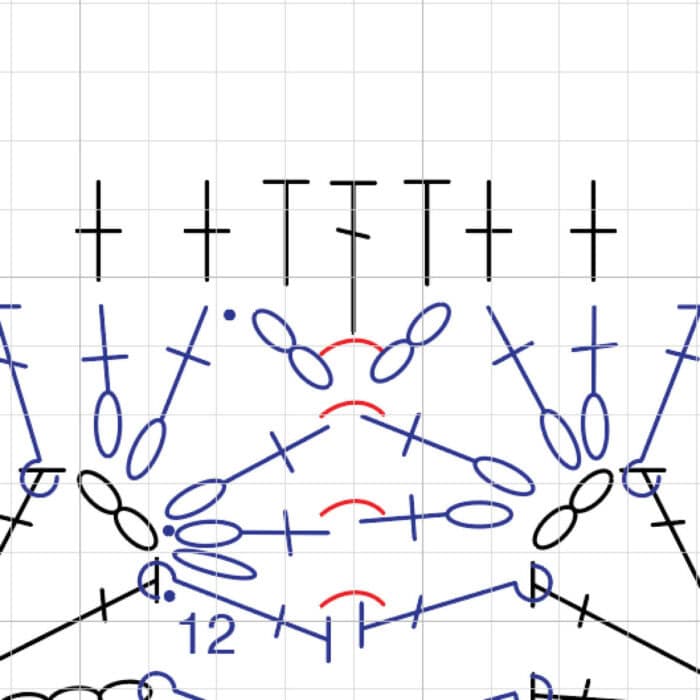
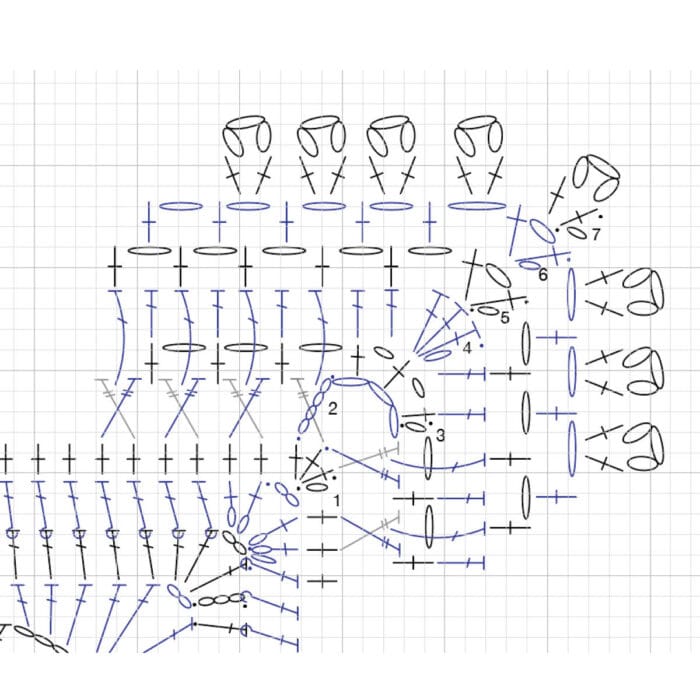
Crochet Diagram
You can download the crochet diagram for your convenience.

Non Changing Colour Squares
This version below has changes in the slip stitching due to being no colour change. Due to using Red Heart Super Saver Ombre, the colours transition on their own giving each square it's unique appearance without fusing with colours.
Using the same hook, you will need three balls of Red Heart Super Saver Ombre in the colour called Anemone. You will need at least two balls of Caron One Pound in the Soft Gray Mix colour. Bring partially used and unused yarn with you to finish on the cruise ship.
You will take this blanket home to save for a souvenir, gift to a family/friend or charity box you may have. This is just before Christmas 2025; you can make this a gift.
Colours
- Colours MC = Red Heart Super Saver Ombre - Anenome
- B = Caron One Pound - Soft Gray Mix
Notes:
- Ch 3 at beg of rnds counts as dc.
- Skip st behind ext sc or ex dc unless otherwise stated in pat.
- Unlike most designs, this blanket stays in an even count from rnd 10 and beyond.
With Red Heart Super Saver Ombre, ch 4. Join with sl st to beg ch to form ring.
1st rnd: Ch 2. 12 dc in ring. 12 dc.
2nd rnd: Ch 2. Popcorn in same sp as sl st. Ch 1. *Popcorn in next dc. Ch 1. Rep from * around. Join with sl st to top of first popcorn. 12 popcorns and 12 ch-1 sps.
3rd rnd: Sl st to next ch-1 sp. Ch 1. 3 sc in same sp as last sl st. *3 sc in next ch-1 sp. Rep from * around. Join with sl st to first sc. 36 sc.
4th rnd: Sl st to next sc. Ch 5 (counts as dc and ch-2 sp). 1 dc same sp as last sl st. Ch 1. *Skip next 2 sc. V-st in next sc. Ch 1. Rep from * around. Join C with sl st to 3rd ch of beg ch-5. 12 V-sts.
5th rnd: Sl st in next ch-2 sp. Ch 1. Petal in same sp as last sl st. *Petal in next ch-2 sp. Rep from *around. Join with sl st to first sc. 12 petals.
6th rnd: Sl st in each of next 2 dc. Ch 1. 1 sc in same sp as last sl st. 1 sc in next dc. Ch 4. *Skip next 4 sts (dc, 2 sc, dc). 1 sc in each of next 2 dc (center of next petal). Ch 4. Rep from * around. Join with sl st to first sc. 24 sc and 12 ch-4 sps.
7th rnd: Ch 1. Tr2tog over last ch-1 sp of 5th rnd and next ch-1 sp (between next 2 petals) of 5th rnd. *7 sc in next ch-4 sp. Tr2tog over last ch-1 sp where last tr2tog was made of 5th rnd and next ch-1 sp (between next 2 petals) of 5th rnd. Rep from * around to last ch-4 sp. 7 sc in last ch-4 sp. Join with sl st to top of first tr2tog. 12 tr2tog and 84 sc.
8th rnd: Ch 1. 1 scfp around post of tr2tog below. Skip next sc. 1 dc in each of next 2 sc. 3 dc in next sc. 1 dc in each of next 2 sc. Skip next sc. *1 scfp around post of next tr2tog. Skip next sc. 1 dc in each of next 2 sc. 3 dc in next sc. 1 dc in each of next 2 sc. Skip next sc. Rep from * around. Join with sl st to beg scfp. 84 dc and 12 scfp.
9th rnd: Ch 6 (counts as tr and ch 2). 1 tr in the same sp as sl st. Ch 3. Skip next 3 dc. 1 dcbp around post of next scfp. (Ch 3. Skip next 3 dc. 1 scbp around next st) 3 times. Ch 3. Skip next 3 dc. 1 dcbp around next scfp. Ch 3. Skip next 3 dc. *(1 tr. Ch 2. 1 tr) in next dc. Ch 3. Skip next 3 dc. 1 dcbp around next scfp. (Ch 3. Skip next 3 dc. 1 scbp around next st) 3 times. Ch 3. Skip next 3 dc. 1 dcbp around next scfp. Ch 3. Skip next 3 dc. Rep from * twice more. Join with sl st to 4th ch of beg ch-6. 24 ch-3 sps, 4 ch-2 sps, 8 tr, 8 dcbp, and 12 scbp.
Note: Stitch counts going forward are per side.
10th rnd: Sl st to next corner ch-2 sp. Ch 3. (1 dc. Ch 2. 2 dc) in same sp as last sl st. Skip next tr. 3 dc in next ch-3 sp. Skip next st. 3 hdc in next ch-3 sp. (Skip next st. 3 sc in next ch-3 sp) twice. Skip next st. 3 hdc in next ch-3 sp. Skip next st. 3 dc in next ch-3 sp. Skip next st.* (2 dc. Ch 2. 2 dc) in next corner ch-2 sp. Rep from * twice more, then from to ** once. Join with sl st to top of beg ch-3. 10 dc, 6 hdc, and 6 sc. 22 sts between corner ch-2 sps.
11th rnd: Sl st to next corner ch-2 sp. Ch 3. (1 dc. Ch 2. 2 dc) in same sp as sl st. 1 dc in each st to next corner ch-2 sp.*(2 dc. Ch 2. 2 dc) in next corner ch-2 sp. Rep from * twice more, then from * to ** once. Sl st to top of beg ch-3. Fasten off MC. 26 dc between corner ch-2 sps.
12th rnd: Join A with sl st to any corner ch-2 sp. Ch 1. (2 ext sc. Ch 2. 2 ext sc) in same sp as sl st. 1 dcbp around post of each dc to next corner ch-2 sp.* (2 ext sc. Ch 2. 2 ext sc) in next corner ch-2 sp. Rep from * twice more, then from * to ** once. Join with sl st to first ext sc. Fasten off A. 30 sts between corner ch-2 sps.
Join Squares
Join the squares using an Invisible Seam Line with the colour the same as the last round in each square for the best results. Join the squares so they are 4
Final Border
I AM CURRENTLY WRITING THE BORDER
To prevent buckling and sinking look, handle the joins like I suggest below. You will get a nicer result. When a blanket states to do 1 single crochet evenly across, the divit space causes the border to sink at the joins.
Single crochet along until you get close to the join spot. Apply 1 half double crochet in the space in the corner. 1 double crochet at the connection spot where the square are joined. 1 half-double crochet in the next corner space. Then, continue to single crochet along. This will keep the top of the stitches even. I also recommend doing this in the colour of the final edge of each square to hide it best.
TIP
For the first rnd, you numbers between the corners need to be an ODD NUMBER that doesn't include the 3 sc on each corner. If you are making more squares, an odd number will work. Handle the join as just in the diagram above for the best results. I will state to do single crochet across but substitute with the extra tip above.
In the real sample, there is 93 single crochet on the short edge and 129 single crochet on the long edge. Do not count the 3 sc in each corner as part of this count. Use the tops of each one of the stitches in every square.
1st rnd: With the RS facing up and starting across the shorter side. Join A with sl st to top right ch-2 sp corner of assembled afghan. Ch 1. 3 sc in same ch-2 sp. 1 sc evenly spaced across (93 sc) to next corner. 3 sc in ch-2 corner sp. 1 sc evenly spaced across the longer side (129 sc) to next corner. 3 dc in ch-2 corner sp. 1 sc evenly spaced across (93 sc) to next corner. 3 sc in ch-2 corner sp. 1 sc evenly across the longer side (129 sc) to beg corner. Join with sl st to first sc.
2nd rnd: Sl st over next 2 sts. Ch 4 (counts as tr). Working behind ch just made, 1 tr in marked st (to the right). *Skip next sc. 1 tr in next sc. Working behind tr just made, 1 tr in skipped sc – Crossed tr made. Rep from * 45 times more. Skip next sc. 1 tr in corner sc. Working behind tr just made, 1 tr in skipped sc. Ch 3. 1 tr in ext sc. Working behind tr just made, 1 tr in corner sc (already worked once) – corner Crossed tr made (worked over 3 sts). (Crossed tr over next 2 sc) 63 times. Corner Crossed tr over next 3 sts. (Crossed tr over next 2 sc) 45 times. Corner Crossed tr over next 3 sts. Rep from ** to ** once more. Join with sl st top of ch 4. Fasten off A. 48 X sts per short side and 66 X sts per long side.
3rd rnd: Join MC with sl st to any corner ch-3 sp of 2nd rnd. Ch 1. **[(1 sc. Ch 1) twice.1 sc] in corner ch-3 sp. Ch 1. Skip next Crossed tr pair. *1 sc in next sp between next Crossed tr pairs. Ch 1. Skip next Crossed tr pair.* Rep from * to * to next corner ch-3 sp. Rep from ** around. Join with sl st to first sc.
4th rnd: Sl st to corner sc (center sc of group worked into ch-3 sp). Ch 1. 3 dc in same sp as last sl st. [Dc in next ch-1 sp. 1 dc in next sc. *1 dc in middle of X st 2 rows below. 1 dc in next sc. Rep from * to * to ch-1 sp before next corner sc, 1 dc in ch-1 sp. 3 dc in next corner sc] 3 times. Rep from * to * around. Join with sl st to top of ch-3.
5th rnd: Sl st to first middle dc of any corner 3-dc group of 4th rnd. Ch 1. (1 sc. Ch 1. 1 sc) in same st. Ch 1. Sk next st. *[1 sc in next dc. Ch 1. Skip next dc.] Rep from [ ] to next corner 3-dc group. (1 sc. Ch 1. 1 sc) in middle dc of corner. Ch 1, skip next dc. Rep from * around. Join with sl st to first sc.
6th rnd: Sl st next ch-1 corner sp. Ch 1. (1 sc. Ch 1. 1 sc) in same sp as last sl st. [Ch 1. Skip next sc. 1 sc in next ch-1 sp. Rep from * to * to next corner ch-1 sp. (1 sc. Ch 1. 1 sc) in next corner ch-1 sp] 3 times. Rep from * to * to end of rnd. Join with sl st to first sc. Fasten off.
7th rnd: Join A with sl st to any ch-1 sp. Ch 1. (1 sc. Picot. 1 sc) in ch-1 sp. *Sk to next ch-1 sp. (1 sc. Picot. 1 sc) in same ch-1 sp. Rep from * around. Join with sl st to first sc. Fasten of

Claire Hills says
I am going to use the ombre yarn. Do you have a picture of one of those squares? Also any chance you have the pattern that doesn’t have ads that i can print out? Thank you for sharing your skills and designs.
Blessings,
Claire
Mikey says
This is on my list but I haven't got to it yet.
Jennifer Johnston says
This is perfect! I did The Study of the Journey for the first however many pounds that I lost starting 4/15/23. I’ll still have just over 40 lbs. left to go when I finish The Study of Determination. This should do the job nicely.