
In September 2013, my technique and the way I finished my projects were forever changed. The way I was finishing off my projects with just a simple sleight of hand and weaving in my ends was okay but I wouldn’t say that it was ‘Fabulous’.
Now that I changed my technique and know a better way, I would say my old way was lazy and leaving me a bit stressed.
While at Spinrite Factory Outlet in September 2013, I was finishing off my ends. My friend Michelle, manager of Spinrite Factory Outlet, asked me if I knew how to finish off so that you don’t worry about your yarn tails falling out or doing a peek a boo maneuver? I was like not really, show me something new.
Michelle demonstrated the technique I am showing below in my video tutorial. I should have already known this but I didn’t. It was new information.
Since that very moment, my finishing technique was changed because I realized the way she showed me was a professional way and you never have to worry about yarn tails falling out. Even today, I start off with extra-long tails of yarn so I can finish off my project professionally.
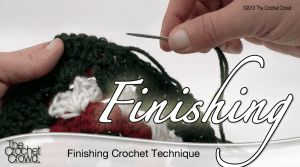
With the technique, you use a darning needle and run the tail end through a section of the finishing area. You slide back and forth under the stitches 3 times. Due to the yarn being slid back and forth 3 times, the yarn will never pop out as it cannot wiggle its way out.
So today, I spend an extra minute doing this technique at the end. It has changed me and the way I do my projects forever. Today, when grabbing my yarn, pattern, hook and pencil, I automatically grab my darning needle as I tend to weave in my tails as I go… in certain cases like afghans, I wait until the end. It just makes sense.
Pattern Suggestions
- Crochet Poker Chip Blanket Pattern
- Crochet Wedding Umbrella Pattern + Tutorial
- Tunisian Entrelac in a Square Afghan + Tutorial
- Planned Pooling Pattern
- Crochet Double Layered Braided Cowl Pattern
See my technique below… it may just change how you finish your projects too!
That is how I end my projects as well. I admit I’m a little OCD and sometimes the weave in really looooong ends. Just in case 😉
One other tip I was given is that if your needle goes ‘through’ some of the already stitched yarn, the weave will be that much more snug. So, going through the stitches, yes, but actually spitting the yarn in a couple of places (which usually happens naturally anyway) and pulling the tail through.
I also prefer to use metal needles over the enamel or plastic ones. The metal cuts through much smoother 🙂
Mickey check out Walmart they have little knitting needle with a nylon loop on the end which makes this even easier. They are in the same area as the darning needle you were using. Everyone that I have passed this on to loves them.
Sorry I spelled your name incorrectly Mikey
This tutorial is a lifesaver! I’m finishing all of my crocheting like this now and it makes SUCH a difference! Thank you for sharing this wonderful tip!
I guess I’m lost. Because as a cross stitcher and plastic canvas(for 20+ years) that is how I started and finish my work and whenever I came over to crochet 2 years ago it seamed natural to do that. But thaxs everyone for sharing yr stories because I was starting to get lazy and not go in 2 or 3 times and I woud just go crazy if my work did that
Yaaayyyy! Thanks, Mikey! Going that extra weave is perfect, especially for baby stuff!
I go down a row too. It hidess the bulk. I love the way you did it, it seemed to be a bit faster than mine. Great tip.
Thank you, thank you, thank you Mikey! This will be such a big help for me as I am finishing up four children’s sweaters, a reader’s wrap for my dad, and a cowl for my sister! Love your site—keep up the good work!
Great tip also for changing colors in a project that has large spaces or a lacy design. I have always had problems weaving in the ends in projects like that; if it was all one color I just crocheted over it, but it looked sloppy when using different colors. Now I know how to avoid that.
Great tip, Mikey! I’ve been crocheting for 35 years and this is a new technique for me. Just goes to show you can learn something new every day! I’ve learned so much from your tutorials; thank you!
Many, many years ago I read about this technuqye in an afghan book I was using. It made sense and I’ve been using it ever since. I taught myself to crochet with a book my mom bought me, a crochet hook, and yarn. I made every pattern stitch in the book. When I mastered a stitch I took it apart and went on to the next one. I’m 73 years old and still love to crochet. Unfortunately, between my career and crocheting, my hands have paid a high price – I’ve had 12 surgeries on them. But I continue to crochet and love it. Love your blog. I do enjoy it so much!
Thanks, great tip!
Thank you, it looks very neat and strong.
Another technique I started to use when changing
yarn is the Russian Join. There are a few you tube
videos showing this technique, it is really strong
And easy to do.
Mikey I always finish my projects this way wether it be crochet knitting or crosstitch I have found it the best way xx
I have a baby blanket that I made for my nephew that was passed down to another nephew and back to me when I had my son. After three babies, the ends have begun to creep out and it has been driving me crazy! I am going to use this technique to weave them in once and for all! Thank you bunches!
Great new way to finish off….I love it
Three times isn’t really necessary. Twice works well too. If I have a chance to stitch over the tail I do then only have to weave the tail once in the opposite direction. Great work saver when creating lots of granny squares.
I recently started using this finishing technique after watching Mikey’s YouTube demonstration. I now feel quite confident and satisfied that all my hard work will stay intact after numerous uses and washes. And thank you to Michelle for sharing.
I learned this from my first online crochet guru, Paula Daniele, at Crochet Hooks You. She always says, hook, scissors and darning needle! 🙂
I am so glad to learn this. Thanks!
This is exactly what I needed to learn. My work would be beautiful but then the ends would start coming loose. I learned to crochet from you and now I have a better way to finish my pieces. I love crocheting and all the great tips and lessons I have learned from you and the team. Yall “Rock” as I like to say in the south!
It’s amazing the little things you learn when you least expect it 🙂
My grandmother, who immigrated to the US from Finland in the 40’s, taught me this technique when I was a child 🙂
It’s amazing the little things you learn unexpectedly 🙂 My grandmother, who immigrated to the US from Finland in the 40’s, taught me this technique when I was a child 🙂
It’s amazing the things you learn when you least expect it 🙂 My grandmother that taught me how to crochet immigrated to the US from Finland – this is the technique she taught me.
awesome
I have been doing this..Yeah me. 🙂 Thks for posting it and making me feel like i have been doing it correctly! Happy New Year u 2! Hugs
even better than this, Mickey , is the split plastic needles that us older folks were can use to get the yarn into easier. I learned this technique just recently too. Don’t beat yourself up- we are all students til the day we die. Thanks for all you do.
Wow, cool. Turns out I figured this one out on my own! LOL I’ve always done this because it just made sense to me. I always thought I was doing it weird but I liked the result.
I’ve been doing this type of finishing for years! I didn’t like the fact that the tails would work themselves out eventually with other finishing techniques so I played around with what I thought were inventive and effective ways to finish and this is the one I liked best!
Oh, the only thing I do differently is that I “sew” the yarn down to the previous row and then finish this way so that it doesn’t make the edge bulky and if I need to join squares or another skein of yarn, I’m working with “normal” stitches rather than stitches with extra yarn in them.
I use a slight variation of this technique. Split or separate the yarn. I then weave the first section vertically and the last section horizontally. You get less bulk and you have even more security that your work will not come loose ♥
Has anyone ever tried to go back and fix afghans where ends have popped out? They are so short it seems impossible.
Been doing it this way since I started crocheting. My mom always did it.
I am just about three quarter of the way thru a ripple afghan for a friend. I just did three color changes using this technique and WOW, what a difference! I hate those peek-a-boo pieces and this is FAB-U-LOUS!!!!Thanks for sharing and making color changing enjoyable for me! 🙂
Thanks Mikey! Will do this from now on. I learned to crochet young and every once in a while would crochet something until recently. Now I am a true hooker!!! 🙂 Working on something constantly!(often 2 products at once) But I have a question – why are there so many outstanding advanced patterns in Chinese, Russian and Spanish! Why is it so HARD to find beautiful, quality patterns for skirts, dresses etc. in the US and in English? Their things SEEM so much more advanced also?
I’ve been doing this in my crochet for a few years after learning that there was a better way myself. However, I recently started working with Tunisian, specifically the stitch that looks like knit, and am having a hard time finishing off when changing color. Because of the way the stitch is developed there isn’t any “meat” to dig into and hide the yarn working in a horizontal direction. Any tips, tricks, or pointers?
I have been doing this from the beginning….In Newfoundland, where I am from, I learnt to “Darn” a sock…….this is the same technique, weaving in and out using different points to start and to end as you weave or darn…….if you are darning a sock, you put a piece of cardboard or even an empty toilet roll under the wool as you work, then you can see better thru the wool……and this makes it much easier…
I’ve been doing this for around 5-6 years now. I somehow figured it out when my sister first asked me to make her a doll. I had never done one before and was terrified! At the end of some of the pieces I was wondering how I would keep the ends in and ended up weaving them into the stitches! Been doing it ever since!
Yes, I love doing that now. I was always embarrassed when giving a project away & seeing that end staring at me when they held it up. Another thing I learned & love doing is the Russian join when adding another skein of yarn. It’s the little things that help more than you know.
So glad I watched this on how to finish the ends. I also have spent alot of time on a project and than slowly watched the ends come out so now I will only do it this way. Thanks for sharing.
I’ve started finishing my pieces like this since I saw your tutorial on YouTube and it has made such a difference. I’ll never forget the first Granny Square afghan I made. It took me almost 2 years to finish and then in about 6 months the ends started to creep out. It broke my heart that is was ruined. But now I can work in my ends like this and they won’t go anywhere. I’m so glad you shared it with us.