The Crochet Crowd

  • PATTERNS
  • STITCH ALONGS
  • TUTORIALS & STITCHES
  • COMMUNITY & EVENTS
  • ABOUT
menu icon
go to homepage
  • PATTERNS
  • STITCH ALONGS
  • TUTORIALS & STITCHES
  • COMMUNITY & EVENTS
  • ABOUT
    • Facebook
    • Instagram
    • YouTube
  • search icon
    Homepage link
    • PATTERNS
    • STITCH ALONGS
    • TUTORIALS & STITCHES
    • COMMUNITY & EVENTS
    • ABOUT
    • Facebook
    • Instagram
    • YouTube
  • ×
    Home » Free Crochet and Knit Patterns by Brand » Caron Yarn Patterns » Caron Cakes Yarn Patterns

    Crochet Larksfoot Granny Afghan
    Sharing is caring!

    • Facebook
    • Email

    Crochet Larksfoot Granny Afghan

    Larksfoot Granny Afghan by Jeanne Steinhilber
    Larksfoot Granny Afghan by Jeanne Steinhilber

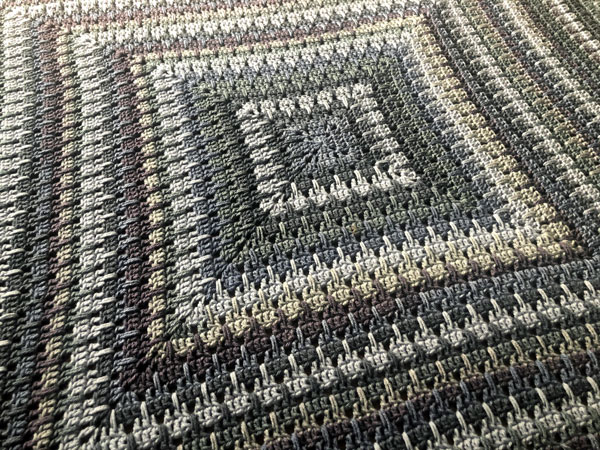
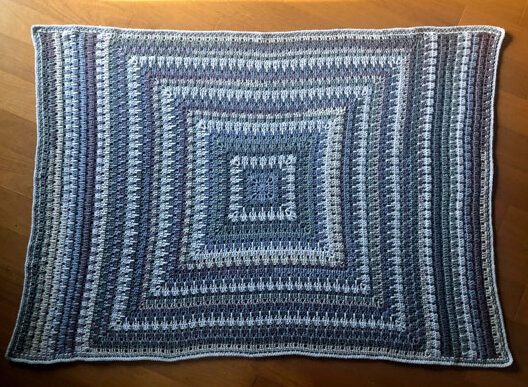
    The Crochet Larksfoot Granny Afghan is a FTM (from the middle) design, starting with a square, but then changing to a rectangle.

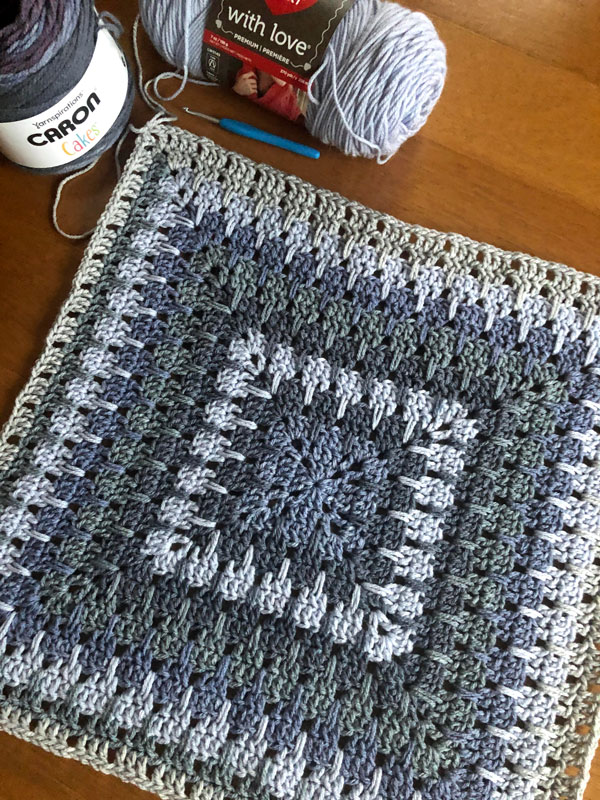
    For this project, I used Caron Cakes with Red Heart With Love yarn and they really worked well together.  I have been wanting to design a square to rectangle blanket like this for a while now.  The square is lengthened on 2 ends working in rows after the square is completed.  But if you enjoy the square, in the case of a bed topper blanket, just keep going until you reach your desired size.

    I want to add a disclaimer to this blog.  I am just an amateur when it comes to photography.  I use the natural light that comes in thru my window.  When I zoom in, the colors change from when I pull back.  All of the photos you see here are the same blanket.  The last 2 photos at the bottom of this post are the closest to the true colors.  But don't focus on my colors!  Use your imagination to create your own color story.  I can't wait to see what other combinations you all will come up with.

    When you upload your project to The Crochet Crowd Stitch Social Group or Instagram, feel free to tag me so I can see what you have crocheted.  Follow me on Instagram @ jeannestein or on Facebook.  My designs can also be saved in your Ravelry favorites by following me HERE.

    Get-Crochet-Crowd-Pattern-PDF
    Free Pattern: Larksfoot Granny Afghan

    Tutorial


    Larksfoot Granny Afghan by Jeanne Steinhilber
    Larksfoot Granny Afghan by Jeanne Steinhilber

    Larksfoot Granny Afghan

    Designed by Jeanne Steinhilber

    Caron® Cakes™ Lovely Layers™ (240 g/8.5 oz, 407 m/445 yds)

    Color A - Sugar Plums - 4 balls

    Red Heart® With Love™ (150 g/5.29 oz, 271 m/296 yards)

    Color B - Oxford - 3 balls

    Size U.S. H/8 (5.0  mm) crochet hook.

    Measurements Approx 45" x 63" [114 x 160 cm]. 

    Abbreviations List 

    Beg = Begin(ning)

    Ch = Chain

    Dc = Double crochet

    Hdc = Half double crochet

    Rem = Remains

    Rep = Repeat

    Rnd(s) = Round()

    Sk = Skip

    Sl st = Slip stitch

    Sp = Space

    St(s) = Stitch(es)

    Special Stitches

    When working double crochet in space 2 rounds below, pull loop up to match height of current round.

    Instructions

    1st rnd: (RS) With A, ch 4, in first ch, 2 dc, ch 2, [3 dc, ch 2] 3 times, hdc join to beg ch. 3 dc per side.

    2nd rnd: Ch 4 (counts as dc and ch 1), *1 dc in next 3 sts, ch 1,** (1 dc, ch 2, 1 dc, ch 1) in ch-2 sp; rep from * twice, then from * to ** once, 1 dc in beg sp, hdc join to 3rd ch. 5 dc, 2 ch-1 sps per side.

    3rd rnd: Ch 3, 1 dc in same sp, *1 dc in next st, ch 1, 1 dc in next 3 sts, ch 1, 1 dc in next st,** (2 dc, ch 2, 2 dc) in ch-2 sp; rep from * twice, then from * to ** once, 2 dc in beg sp, hdc join to beg ch. 9 dc, 2 ch-1 sps per side.

    4th rnd: Ch 3, 1 dc in same sp, *1 dc in next st, ch 1, sk next st, [1 dc in next st, 1 dc in sp 2 rnds below, 1 dc in next st, ch 1, sk next st] twice, 1 dc in next st,** (2 dc, ch 2, 2 dc) in ch-2 sp; rep from * twice, then from * to ** once, 2 dc in beg sp, hdc join to beg ch. 12 dc, 3 ch-1 sps per side.

    5th rnd: Ch 4, *1 dc in next 3 sts, [ch 1, sk ch-1 sp, 1 dc in next 3 sts] to corner, (ch 1, 1 dc, ch 2, 1 dc, ch 1) in ch-2 sp; rep from * twice, then from * to ** once, ch 1, 1 dc in beg sp, hdc join to 3rd ch. Break A. 14 dc, 5 ch-1 sps per side.

    6th rnd: Attach B in any corner sp, ch 4, *1 dc in next st, 1 dc in sp 2 rnds below, 1 dc in next st, [ch 1, sk next st, 1 dc in next st, 1 dc in sp 2 rnds below, 1 dc in next st] to corner,** (ch 1, 1 dc, ch 2, 1 dc, ch 1) in ch-2 sp; rep from * twice, then from * to ** once, ch 1, 1 dc in beg sp, hdc join to 3rd ch. 17 dc, 6 ch-1 sps per side.

    7th rnd: Ch 3, 1 dc in same sp, *1 dc in next st, ch 1, sk ch-1 sp, [1 dc in next 3 sts, ch 1, sk ch-1 sp] until 1 st rem before corner, 1 dc in next st,** (2 dc, ch 2, 2 dc) in ch-2 sp; rep from * twice, then from * to ** once, 2 dc in beg sp, hdc join to beg ch. Break B. 21 dc, 6 ch-1 sps per side.

    8th rnd: Attach A in any corner sp, ch 3, 1 dc in same sp, *1 dc in next st, ch 1, sk next st, [1 dc in next st, 1 dc in sp 2 rnds below, 1 dc in next st, ch 1, sk next st] until 1 st rem before corner, 1 dc in next st,** (2 dc, ch 2, 2 dc) in ch-2 sp; rep from * twice, then from * to ** once, 2 dc in beg sp, hdc join to beg ch. 24 dc, 7 ch-1 sps per side.

    9th rnd: Ch 4, *1 dc in next 3 sts, [ch 1, sk ch-1 sp, 1 dc in next 3 sts] to corner,** (ch 1, 1 dc, ch 2, 1 dc, ch 1) in ch-2 sp; rep from * twice, then from * to ** once, ch 1, 1 dc in beg sp, hdc join to 3rd ch. 26 dc, 9 ch-1 sps per side.

    10th rnd: Ch 4, *1 dc in next st, 1 dc in sp 2 rnds below, 1 dc in next st, [ch 1, sk next st, 1 dc in next st, 1 dc in sp 2 rnds below, 1 dc in next st] to corner,** (ch 1, 1 dc, ch 2, 1 dc, ch 1) in ch-2 sp; rep from * twice, then from * to ** once, ch 1, 1 dc in beg sp, hdc join to 3rd ch. 29 dc, 10 ch-1 sps per side.

    11th rnd: Ch 3, 1 dc in same sp, *1 dc in next st, ch 1, sk ch-1 sp, [1 dc in next 3 sts, ch 1, sk ch-1 sp] until 1 st rem before corner, 1 dc in next st,** (2 dc, ch 2, 2 dc) in ch-2 sp; rep from * twice, then from * to ** once, 2 dc in beg sp, hdc join to beg ch. 33 dc, 10 ch-1 sps per side.

    12th rnd: Ch 3, 1 dc in same sp, *1 dc in next st, ch 1, sk next st, [1 dc in next st, 1 dc in sp 2 rnds below, 1 dc in next st, ch 1, sk next st] until 1 st rem before corner, 1 dc in next st,** (2 dc, ch 2, 2 dc) in ch-2 sp; rep from * twice, then from * to ** once, 2 dc in beg sp, hdc join to beg ch. 36 dc, 11 ch-1 sps per side.

    13th rnd: Ch 4, *1 dc in next 3 sts, [ch 1, sk ch-1 sp, 1 dc in next 3 sts] to corner,** (ch 1, 1 dc, ch 2, 1 dc, ch 1) in ch-2 sp; rep from * twice, then from * to ** once, ch 1, 1 dc in beg sp, hdc join to 3rd ch. Break A. 38 dc, 11 ch-1 sps per side.

    14th - 37th rnds: Repeat 6th thru 13th rounds.

    Begin working in rows with RS facing up.

    1st row: Attach B in any corner sp, ch 3, 1 dc in next st, 1 dc in sp 2 rnds below, 1 dc in next st, [ch 1, sk next st, 1 dc in next st, 1 dc in sp 2 rnds below, 1 dc in next st] to corner, 1 dc in ch-2 sp. Turn. 113 dc, 36 ch-1 sps.

    2nd row: Ch 3, 1 dc in next 3 sts, [ch 1, sk ch-1 sp, 1 dc in next 3 sts] until 1 st rem, 1 dc in last st. Change to A. Turn.

    3rd row: Ch 3, 1 dc in next st, [ch 1, sk next st, 1 dc in next st, 1 dc in sp 2 rnds below, 1 dc in next st] until 3 sts rem, sk next st, 1 dc in last 2 sts. Turn.

    4th row: Ch 3, 1 dc in next st, ch 1, sk ch-1 sp, [1 dc in next 3 sts, ch 1, sk ch-1 sp] until 2 sts rem, 1 dc in last 2 sts. Turn.

    5th row: Ch 3, 1 dc in next st, 1 dc in sp 2 rnds below, 1 dc in next st, [ch 1, sk next st, 1 dc in next st, 1 dc in sp 2 rnds below, 1 dc in next st] to corner, 1 dc in ch-2 sp. Turn. 

    6th row: Ch 3, 1 dc in next 3 sts, [ch 1, sk ch-1 sp, 1 dc in next 3 sts] until 1 st rem, 1 dc in last st. Turn.

    7th row: Ch 3, 1 dc in next st, [ch 1, sk next st, 1 dc in next st, 1 dc in sp 2 rnds below, 1 dc in next st] until 3 sts rem, sk next st, 1 dc in last 2 sts. Turn.

    8th row: Ch 3, 1 dc in next st, ch 1, sk ch-1 sp, [1 dc in next 3 sts, ch 1, sk ch-1 sp] until 2 sts rem, 1 dc in last 2 sts. Change to B. Turn.

    9th row: Ch 3, 1 dc in next st, 1 dc in sp 2 rnds below, 1 dc in next st, [ch 1, sk next st, 1 dc in next st, 1 dc in sp 2 rnds below, 1 dc in next st] to corner, 1 dc in ch-2 sp. Turn. 

    10th row: Ch 3, 1 dc in next 3 sts, [ch 1, sk ch-1 sp, 1 dc in next 3 sts] until 1 st rem, 1 dc in last st. Change to A. Turn.

    11th - 16th rows: Rep 3rd - 8th row. Fasten off.

    Repeat 1st - 16th rows on opposite end of blanket.

    Border

    1st rnd: Attach B in any ch-2 corner with a standing sc, ch 2, 1 sc in same sp, 1 sc in each st and evenly across ends of rows, working (1 sc, ch 2, 1 sc) in the corner sps, sl st to beg sc. Break B.

    2nd rnd: Attach A in any ch-2 corner with a standing sc, ch 2, 1 sc in same sp, *[sk next st, 1 sc in next st, 1 sc in skipped st] to corner,** (1 sc, ch 2, 1 sc) in ch-2 sp; rep from * twice, then from * to ** once, sl st to beg sc. Break A.

    3rd rnd: Attach B in any ch-2 corner with a standing sc, 2 sc in same sp, *1 sc in each st to corner,** (3 sc) in ch-2 sp; rep from * twice, then from * to ** once, sl st to beg sc. Fasten off.
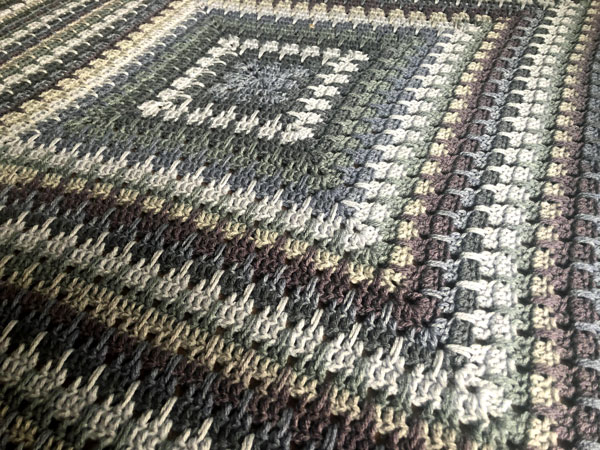
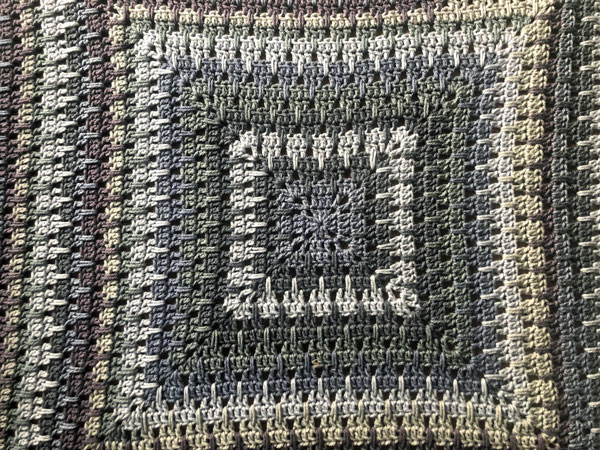
     

    Larksfoot Granny Afghan by Jeanne Steinhilber
    Larksfoot Granny Afghan by Jeanne Steinhilber
    Larksfoot Granny Afghan by Jeanne Steinhilber
    Larksfoot Granny Afghan by Jeanne Steinhilber
    Larksfoot Granny Afghan by Jeanne Steinhilber
    Larksfoot Granny Afghan by Jeanne Steinhilber
    Larksfoot Granny Afghan by Jeanne Steinhilber
    Larksfoot Granny Afghan by Jeanne Steinhilber

    Designs by Jeanne

    [the_grid name="Designs by Jeanne"]

    Like this:

    Like Loading…

    Related

    More Caron Cakes Yarn Patterns

    • When Yarn Became a Journey: Caron Cakes 10th Anniversary
    • Crochet Gingerbread Christmas Toss Throw Pattern + Tutorial
    • Crochet Holiday Cheer Blanket Pattern + Tutorial
    • Crochet Christmas Candy Lane Blanket + Tutorial

    Filed Under: Caron Cakes Yarn Patterns, Caron Yarn Patterns, Crochet Granny Blanket Patterns, Crochet Patterns by Jeanne Steinhilber, Easy Crochet Patterns, Exclusive Crochet Crowd Knit and Crochet Patterns, Red Heart With Love Yarn Patterns

    Comments

      Have you completed this project. Show me! Cancel reply

      Your email address will not be published. Required fields are marked *

      The maximum upload file size: 360 MB. You can upload: image, document. Links to YouTube, Facebook, Twitter and other services inserted in the comment text will be automatically embedded. Drop file here

    1. Ryan Kaz. says

      February 20, 2021 at 10:59 am

      Should 10th rnd read (ch1, 1dc, ch2, 1dc, ch1) in ch-2 sp? Both ch1's are currently missing. Without them it puts grouping of 4 dc's(instead of usual 3) together before and after corner. Thanks.

      Reply
      • Jeanne says

        February 21, 2021 at 7:34 am

        You are correct! I know several have completed this project and you are the first to catch that missing ch 1. I'm updating website now and will update PDF a bit later today. Thank you very much.

        Reply
    2. Ashley H. says

      February 13, 2021 at 9:45 pm

      Anyone figured out a youtube tutorial yet? I can get the first step started but the second step is confusing to me and i cant get it right.

      Reply
      • Mikey says

        February 14, 2021 at 2:16 pm

        I haven't had time yet. I have had some serious deadlines that I cannot push off my desk until I get them done. The stitch along coming up as my all tied up still. I'm sorry.

        Reply
    3. Laura H says

      February 01, 2021 at 5:43 pm

      In corrected version 2 it shows us using color A for only 5 rounds. I think that's where the confusion comes in.

      Reply
      • Jeanne says

        February 01, 2021 at 7:12 pm

        Color B is used on rounds 6 & 7, then Color A is used on rounds 8 - 13, which is 6 rounds. Then repeat 6 thru 13.

        Reply
    4. Peggy says

      January 28, 2021 at 7:36 pm

      It looks like there are more colors in the photo than what you give us in the directions. Please explain or update your color selections!.

      Reply
      • Mikey says

        January 29, 2021 at 8:09 am

        We are not camera professionals here. We try our best. It's the same project just in different lighting conditions. You are the second to mention this. I'm going to see if we can eliminate the photos that appear different from each other to avoid confusion. Thanks for the heads up.

        Reply
        • Noreen says

          February 06, 2021 at 3:07 pm

          Hi Mikey. I’m feeling really challenged starting this pattern. Do you think you could do a YouTube video tutorial showing the start of this pattern. It would really help a lot. I’m having a hard time following the pattern. Much appreciated

        • Mikey says

          February 06, 2021 at 4:26 pm

          Let me see how much prep time I will need to put in advance.

      • Jeanne says

        January 29, 2021 at 8:14 am

        I'm so very sorry. I am not very good at photo editing. I mostly work straight out of the camera. There is only one blanket. I struggle with photographing the blankets. The smallest WIP is probably the truest to the colors. I hope you are not disappointed.

        Reply
        • Noreen says

          February 06, 2021 at 3:04 pm

          Hi Jeanne, could you or Someone in the Crochet Crowd please provide a YouTube tutorial for getting this pattern started. It would really help me understand the beginning. I would really appreciate it

        • Mikey says

          February 06, 2021 at 4:27 pm

          I received your other message. Same response.

    5. Lisa Harvey says

      January 23, 2021 at 5:43 pm

      The Oxford and Plum is beautiful but what is the 2nd color pairing you used? I really like that combination with the grey . Thanks

      Reply
      • Jeanne says

        January 24, 2021 at 9:44 am

        The last photo, when it was in the WIP stage, is the best example of the colors.

        Reply
    6. Daneris Moran says

      January 23, 2021 at 5:09 pm

      Please review change of colors for rounds 11, 12,13. The instructions read to brake A on round 11 and 12
      Thanks

      Reply
      • Lisa Harvey says

        January 23, 2021 at 9:21 pm

        There are two afghans pictured on the pattern & the website. One is obviously Plum & Oxford. The other photo is not. I wanted to know what was the other combination? Is it a trick of the light because it doesn't look like light blue. Thanks

        Reply
        • Jeanne says

          January 24, 2021 at 8:11 am

          I am sorry, but I do my own photography and I am only a hobbyist. I do not have any pro lighting equipment, and that is the same blanket in all of the photos.

      • Jeanne says

        January 24, 2021 at 8:18 am

        Thank you, I will look at that this morning.

        Reply
      • Jeanne says

        January 24, 2021 at 8:51 am

        The 11th round is the one that is wrong. Color A is worked for 6 rounds, then color B is worked for 2 rounds, and repeated. Thank you so much. I will be updating now.

        Reply
        • Daneris says

          January 24, 2021 at 8:58 am

          Thanks a lot!!!

        • KATHRYN N CAMPBELL says

          January 30, 2021 at 7:23 pm

          Jeanne, I am so confused. I printed this out days before I saw these comments stating that the 11th round is wrong. That color A is worked for 6 rounds and color B for 2 rounds. I noticed today that the pattern is the same as the one I printed. Can you please verify for me. Thank yo so much.

        • Jeanne says

          January 30, 2021 at 8:12 pm

          This is the corrected version - https://thecrochetcrowd.com/wp-content/uploads/2021/01/Larksfoot-Granny-Afghan-Pattern-V.2.pdf

    Michael Sellick May 2026

    Welcome!

    I'm Mikey. Join me in learning crochet as I am always learning, too!

    More about me
    Mikey Stitch Studio Browse Patterns
    The Crochet Crowd Design

    AI Design

    Learn about our designs. Why don't we use AI to design?

    Designing
    • Crochet Love Letter to USA Blanket Pattern + Tutorial
    • Mikey, Daniel & Jonathan - Hawaii Knit and Crochet Cruise Collab
    • Crochet Cruise Transatlantic 2028
    • Unexpected Left Overs Bernat Blanket Pattern with Tutorial Help
    • Easy Crochet Bramble & Stone Asymmetrical Shawl + Tutorial
    • The Crochet Crowd Patterns
    • Crochet Twisted Headband Pattern + Tutorial
    • Crochet Rose Garland Pattern
    • Crochet Large Christmas Tree Skirt Pattern + Tutorial
    • How to Crochet Earphone Cover Pattern + Tutorial
    • Stitch Along: Crochet Diamond Dancer Blanket + Tutorials
    • Crochet Men's Sweater Stitch Along with Mikey + Tutorials for Everything
    • Crochet C2C Bobble Pillow Pattern + Tutorial
    • How To Crochet Mermaid Tears Purse Pattern + Tutorial
    See more Crochet Stitch Along Patterns →

    Footer

    Stitch Alongs With Mikey

    • Crochet Christmas Ornament Blanket Pattern + Tutorial
    • Stitch Along: Crochet Hat, Scarf & Dog Coat + Tutorials
    • Crochet Study of Variegated Blanket Pattern + Tutorial
    • Free Lily Sugar'n Cream Crochet Garden Tote Bag Pattern + Tutorial
    • Crochet Beach Bag Pattern + Tutorial
    See more Crochet Stitch Along Patterns →
    ↑ back to top

    Explore

    • About
    • Before 2023
    • 2023 Patterns
    • 2024 Patterns
    • 2025 Patterns
    • 2026 Patterns

    More

    • FAQ
    • Contact
    • Privacy Policy

    The website has been active since 2010. Articles and patterns are reviewed from time to time. Some patterns get updated with newly written instructions, photography and keeping the patterns current.

    Copyright © 2026 The Crochet Crowd • Some links may contain affiliate connections.

    %d