DOWNLOAD FREE PATTERN
Dream Time Baby Blanket
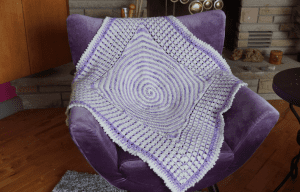
This Dream Time Baby Blanket has two major concepts to bring this together. Firstly, the centre has an amazing spiral effect that eventually forms itself into the perfect square.
Once the mail spiral is completed. We then use traditional granny square techniques to make a thick granny circumference and then polish it off with a really nice border.
Crochet Crochet Patterns to Consider
- Easy Crochet Baby Blanket Pattern
- Crochet Pipsqueak Yarn
- Dyeing Yarn with Kool-aid
- Crochet Baby Tiles for Miles Blanket + Tutorial
- Beans & Bobbles Afghan Pattern
Using a combination of Caron and Bernat Baby Yarns, this afghan is exceptionally soft and would make the ideal baby blanket for a newborn.
This baby blanket measures 33" x 33" total. For your information, the interior spiral is 19" x 19" on its own.
Materials
- 5.5 mm or I Crochet Hook
- 3 Balls of Caron Simply Baby, 100 g, 3.5 oz. White.
- 2 Balls of Bernat Li'l Tots, 100 g, 3.5 oz. Sweet Pea.
- Tapestry Needle
General Notes
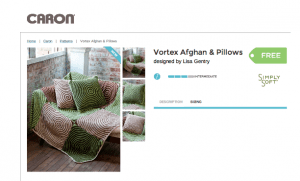
This pattern is a combination of my own design plus an established design from Yarnspirations.com. With permission, the pattern has been modified for this baby blanket. The original spiral design is by Lisa Gentry for Caron Yarns.
The original design is called the Vortex Spiral Afghan & Pillow.
The spiral is a combination of two yarns that spiral around each other. There is no slip stitching. The key technique is to place your stitch markers and move the stitch markers as you complete each instructional line. You will begin to recognize early on the repetitive nature of the pattern and you will begin to speed yourself up.
Once you have completed the spiral square, the remainder of the afghan is standard granny square techniques.
The instructions look pretty daunting but when you go step by step, you will see you can whiz along pretty quickly.
Spiral Square Instruction
Note: The A-WHITE spiral is worked in double crochet, and the B-PURPLE spiral is worked in single crochet.
With B, ch 2.
- Round 1 (RS): Work 3 sc in 2nd ch from hook, drop loop from the hook but do not fasten off; draw up a loop of A in same ch (following the 3 B-colored sc) and work (sc, hdc, dc) in the same ch; do not join and do not turn—6 sts.
- Round 2: Working in back loops only; continue with A, 2 dc in next 3 (B-colored) sc, drop A, place marker in the last dc made; pick up dropped loop of B, 2 sc in next 3 (A-colored) sts, drop B, place marker in last sc made—12 sts.
- Round 3: Pick up A, 2 dc in next 6 sts, drop A, move marker up to the last dc made; pick up B, 2 sc in next 6 sts, drop B, move the marker to last sc made—24 sts.
Note: In following rounds, continue to move marker to last st made, as each marker is reached.
Spiral Increasing: You will have two stitch markers going on at one time. When you start an instruction, DO NOT remove the stitch marker until the next round goes over it. You will find by leaving the stitch markers in place, you will automatically crochet and realize you stop where you run into the next stitch marker. Once you start this project, this will make sense. This project is not possible without the use of stitch markers to guide your way through it.
Half Circle Increments: The spirals are worked on the opposite side of each other. For example, you will complete ½ of the circle with the first set of instruction and then using the second colour, you will complete the 2nd half. No where in the instruction you will crochet around the entire circle which makes it much easier for stitch counts and following along. In fact, you will count 22 rounds but you will truly only have the spiral go around 11 times because you are working each instruction in half circle increments.
Speed Hint: Above, I highlighted Round 3 showing you colour A instruction and Colour B in red. Notice how both of the instructions have the exact same instruction... the only difference is that main colour is using Double Crochet and the second colour is using Single Crochet. These instructions are like this for every round of instructions up until Round 21. It makes it very easy to follow when you can identify that first half of the instruction is the same as the second half of the instruction for the stitch counts.
- Round 4: Pick up A, [dc in next st, 2 dc in next st] 6 times, drop A; pick up B, [sc in next st, 2 sc in next st] 6 times, drop B—36 sts.
- Round 5: Pick up A, [dc in next 2 sts, 2 dc in next st] 6 times, drop A; pick up B, [sc in next 2 sts, 2 sc in next st] 6 times, drop B—48 sts.
- Round 6: Pick up A, [2 dc in next st, dc in next 3 sts] 6 times, drop A; pick up B, [2 sc in next st, sc in next 3 sts] 6 times, drop B—60 sts.
- Round 7: Pick up A, [dc in next 2 sts, 2 dc in next st, dc in next 2 sts] 6 times, drop A; pick up B, [sc in next 2 sts, 2 sc in next st, sc in next 2 sts] 6 times, drop B—72 sts.
- Round 8: Pick up A, [2 dc in next st, dc in next 5 sts] 6 times, drop A; pick up B, [2 sc in next st, sc in next 5 sts] 6 times, drop B—84 sts.
- Round 9: Pick up A, [dc in next 3 sts, 2 dc in next st, dc in next 3 sts] 6 times, drop A; pick up B, [sc in next 3 sts, 2 sc in next st, sc in next 3 sts] 6 times, drop B—96 sts.
- Round 10: Pick up A, [dc in next 4 sts, 2 dc in next st, dc in next 3 sts] 6 times, drop A; pick up B, [sc in next 4 sts, 2 sc in next st, sc in next 3 sts] 6 times, drop B—108 sts.
- Round 11: Pick up A, [2 dc in next st, dc in next 8 sts] 6 times, drop A; pick up B, [2 sc in next st, sc in next 8 sts] 6 times, drop B—120 sts.
- Round 12: Pick up A, dc in next 60 sts, drop A; pick up B, sc in next 60 sts, drop B.
- Round 13: Pick up A, [dc in next 5 sts, 2 dc in next st, dc in next 4 sts] 6 times, drop A; pick up B, [sc in next 5 sts, 2 sc in next st, sc in next 4 sts] 6 times, drop B—132 sts.
- Round 14: Pick up A, dc in next 66 sts, drop A; pick up B, sc in next 66 sts, drop B.
- Round 15: Pick up A, [dc in next 5 sts, 2 dc in next st, dc in next 5 sts] 6 times, drop A; pick up B, [sc in next 5 sts, 2 sc in next st, sc in next 5 sts] 6 times, drop B—144 sts.
- Round 16: Pick up A, dc in next 72 sts, drop A; pick up B, sc in next 72 sts, drop B.
- Round 17: Pick up A, [2 dc in next st, dc in next 11 sts] 6 times, drop A; pick up B, [2 sc in next st, sc in next 11 sts] 6 times, drop B—156 sts.
- Round 18: Pick up A, dc in next 78 sts, drop A; pick up B, sc in next 78 sts, drop B.
- Round 19: Pick up A, [dc in next 6 sts, 2 dc in next st, dc in next 6 sts] 6 times, drop A; pick up B, [sc in next 6 sts, 2 sc in next st, sc in next 6 sts] 6 times, drop B—168 sts.
- Round 20: Pick up A, dc in next 84 sts, drop A; pick up B, sc in next 84 sts, drop B.
- Round 21: Pick up A, [2 dc in next st, dc in next 13 sts] 6 times, drop A; pick up B, [2 sc in next st, sc in next 13 sts] 6 times, DO NOT drop B—180 sts.
- Row 22: Continue with B, sc in the next 84 sts. Fasten off B. Remove marker for B.
You will now have a circle spiral and we need to make the spiral into a square. It's time now to finish off the corners. You have 4 corners.
Spiral Corners
Helpful Tips
- Fasten off at the end of each row.
- Begin each row with RS facing.
- Beginning ch-1 counts as the first stitch.
- The first and last few stitches of the previous row are left unworked.
Corner 1
- Row 1 (RS): Pick up A and remove marker, dc in next 15 sts, 2 dc in next 4 sts, dc in next 13 sts, hdc in next st, sc in next st—38 sts. Fasten off A. Sk next 11 sts following last sc worked, place marker in next st (for the beginning of next corner, to be worked later).
- Row 2 (RS): Join B with sl st in 3rd st of Row 1, ch 1, sc in next 32 sts, sl st in next st—34 sts (including beginning ch-1). Fasten off B.
- Row 3: Join A with sl st in 4th st of Row 2, ch 1, sc in next st, hdc in next st, dc in next 9 sts, 2 dc in next 4 sts, dc in next 9 sts, hdc in next st, sc in next st, sl st in next st—32 sts. Fasten off A.
- Row 4: Join B with sl st in 5th st of Row 3, ch 1, sc in next 22 sts, sl st in next st—24 sts. Fasten off B.
- Row 5: Join A with sl st in 5th st of Row 4, ch 1, sc in next st, hdc in next st, dc in next 3 sts, 2 dc in next 4 sts, dc in next 3 sts, hdc in next st, sc in next st, sl st in next st—20 sts. Fasten off A.
- Row 6: Join B with sl st in 5th st of Row 5, ch 1, sc in next st, hdc in next st, dc in next 2 sts, tr in next 2 sts, dc in next 2 sts, hdc in next st, sc in next st, sl st in next st—12 sts. Fasten off B.
Corners 2, 3 & 4
- Row 1: Join A with sl st in marked st, ch 1, sc in same st, hdc in next st, dc in next 13 sts, 2 dc in next 4 sts, dc in next 13 sts, hdc in next st, sc in next st—38 sts. Fasten off A. Sk next 11 sts following last sc worked, place marker in next st (for the beginning of next corner, this step is not necessary when working 4th corner).
Rows 2–6: Work Rows 2–6 of corner #1.
Spiral Square is now Complete. It's time for the Granny Square Portion of the entire square.
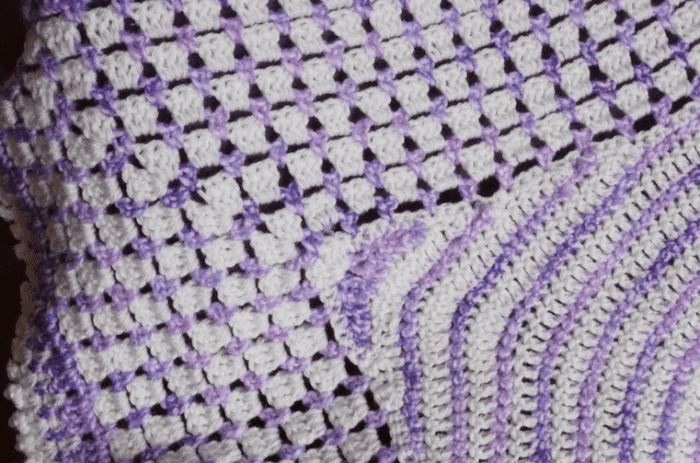
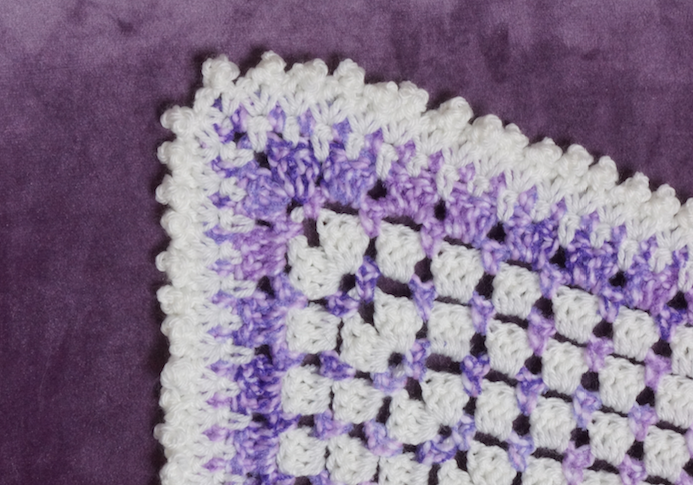
Granny Square Around the Spiral Square
- Join white to any corner of the spiral square. Ch 3, 2 DC, CH 2, 3 DC into space. *SC the remaining stitches across until the next corner. 3 DC, CH 2, 3 DC into corner space. Repeat * Around. Join with a slip stitch to the top of the ch 3. Fasten off
- Join secondary colour into any corner space. Ch 1, SC, CH 2, SC into the same space. * Skip 2 stitches, SC into the next. Repeat * around. In corners, 1 SC, CH 2, 1 SC into space. Join with a slip stitch to the beginning SC and fasten off.
- Join White to any corner. Ch 3, 2 DC, CH 2, 3 DC into space. *3 DC into next Ch-2 space. Repeat * across. In corners, 3 DC, CH 2, 3 DC into corner space. Join with a slip stitch to top of beginning ch 3.
- Join secondary colour to any corner space. CH 1, SC, CH 2, SC into space. *CH 2 and single crochet between the groups of 3 DC's in the row below. Repeat * around. In corners, 1 SC, CH 2, 1 SC. Join with a slip stitch to the beginning single crochet.
- Repeat Steps 3 & 4 - 5 More Times. See the picture above.
- Repeat Step 3 using Secondary Colour. Fasten off.
- Join White in any corner. CH 1, SC, CH 2, SC into the same corner space. *CH 1, 1 SC into the middle of the group of the next 3 DC's in the row below. CH 1, 1 SC into the space between the groups of 3 DC's in the row below. Repeat * around. In corners, SC, CH 2, SC. Join with a slip stitch to beginning single crochet. Fasten off.
- Join secondary colour into any corner. CH 1, SC, CH 1, SC into the same space. * CH 1, SC into next CH-1 SPACE in the row below. Repeat * around. In corners, SC, CH 2, SC into space. Join with a slip stitch to beginning single crochet.
- Join white in corner space. Ch 1, SC, Ch 3, SC into the same space. Skip next ch 1 space and then SC, Ch 3, SC into next ch-1 space. Repeat all the way around which includes the corners. Fasten off.
heather says
grid
Mikey says
Thankx
Nicole says
No Blue Button
Kara says
No blue button