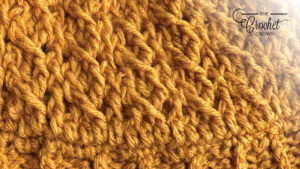
Are you able to crochet a hat without knowing what it looks like first? It's a mystery crochet hat.
There picture here has clues on what could be going on. Hmmm. What do they mean exactly?
Truth is, I wanted to design a texture hat that was unique to me. It took me two major tries to get it right and batta boom, batta bing. A new hat.
Do you have the courage to continue without knowing what it looks like first?
More Ideas
- 5 Crochet Textured Hats Pattern
- 2016 - 3 Crochet Stitch Along Patterns
- Crochet Along Mystery Project
- Crochet Along Bernat Mystery Blanket Pattern
Yarn
Red Heart® Super Saver Ombre™ (4283 g/10 oz, 440 m/482 yds)
- 1 Ball - Blue Tiful
Sizing
- Use size 5 mm, U.S. H/8 crochet hook or size needed to obtain gauge.
- Fits an average adult head. I don’t have this designed in smaller sizes.
- Toque Measurement approx 20” circumference x 9” tall.
- Beanie Measurement is approx 20” circumference x 7.5” tall.
- Gauge 15 sc and 15 rows = 4” [10 cm]
Abbreviations
- Beg = Beginning
- Ch = Chain
- Dc = Double Crochet
- Dcbp = Double Crochet Back post. Yoh and draw up a loop around the assigned post at the back, inserting the hook from right to left if right-handed or left to right is left-handed. (Yoh and draw through 2 loops on the hook) 2 times.
- Dcfp = Double Crochet Front Post. Yoh and draw up a loop around the assigned post at the front, inserting the hook from right to left if right-handed or left to right is left-handed. (Yoh and draw through 2 loops on the hook) 2 times.
- Dcfp2tog = Double Crochet Front Post 2 Together. Yoh and draw up a loop around the assigned post, inserting the hook from right to left if right-handed or left to right is left-handed. Yoh and draw through 2 loops on the hook. 2 loops now on the hook. Yoh and draw up a loop around the next assigned post, inserting hook the same way. Yoh and draw through 2 loops on the hook. 3 loops on hook. Yoh and draw through all loops on the hook.
- Dc/tr-tog fp = Double crochet and treble crochet front post. Using dcfp between the braid, you will join it together with the first treble that reaches over into the 2nd st of the braid. - Yoh and insert into the front post of the dcfp between the braids and pull loop through, yoh and pull through 2 loops. Yoh twice and skip next st, insert hook it front post, yoh and pull loop around. (Yoh and pull through 2 loops) - 4 times.
- Hdc = Half Double Crochet
- Rep = Repeat
- RS = Right Side
- Sc = Single Crochet
- Sl st = Slip Stitch
- Sk = Skip
- St(s) = Stitch(es)
- Trfp = Treble Crochet Front Post. (Yoh) twice and draw up a loop around the assigned post below, inserting the hook from right to left if right handed or left to right is left handed. (Yoh and draw through 2 loops on the hook) 3 times.
- WS = Wrong Side
Instructions
Notes:
If you prefer a solid colour brim, use a solid colour of Red Heart Super Saver and then use the Ombre for the remainder of the hat for the transition look.
Join means to sl st to beg st.
Ch 2 at beg of row does not count as st.
The hat body is worked back and forth and joined at the end of each row. So it is classified in rows, not rounds.
At the start of the row, the next stitch is the first st at the beg join.
The project is turned at the end of each round so the hat can grow without a spiral.
Alternate rounds are used in a pattern when the same instructions are used again between rows or rounds that have something different between them. You will see rows where there is a rnd number missing between them. Those are the alternate rounds to do and make the pattern easier to read and less complicated.
Ribbed Brim Band
- Beanie or Toque Version
Leaving a long tail before the slip knot to use to sew brim closed at the end.
With A, ch 12.
1st row: RS. 1 hdc in 3rd ch from hook. 1 hdc in each ch to the end of the chain. Turn. 10 hdc.
Mark RS with stitch the marker.
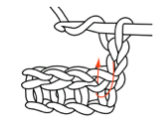
2nd row: Ch 2. Work 1 hdc in horizontal bar created below st in previous row (bar is below loops normally worked on WS – see diagram) in each hdc to end of row. Turn.
Rep last row until Ribbing measures approx 21” [53.5 cm] long when slightly stretched, ending on a WS row.
- Pull up a loop on the last row and let it rest.
- Pick up the yarn tail on the starting row and sew the two ends together to form the band.
- Place loop back onto hook and proceed to the body with RS facing out.
Body of Hat
Tip: When evenly spacing stitches around an existing edge. To avoid a lot of frustration, mark the halfway point around with a stitch marker. Your goal is to get 36 sc up to the stitch marker. If you are getting to the stitch marker and you need to get more stitches in to equal 36, it simply means you are single crocheting too far apart from each other. If you are getting all 36 in and you need more stitches to get to the stitch marker, it means you are putting the stitches too close together. Try again. Once you get to the halfway point and firm. Do the second half the same way getting in the remaining 36 sc.
1st row: RS. Ch 1, work 72 sc evenly around the side edge of ribbing. Join. 72 sc.
2nd row: RS. Ch 2, 1 dc in each st around. Join to beg dc. Turn. 72 dc.
3rd rnd all alternating rows: WS. Ch 1, 1 sc in each st around. Join. Turn. 72 sc
4th row: RS. Working 2 rows below. Ch 1. *1 dcfp in dc, (sk next st, 1 trfp around next 2 sts, 1 trfp in front around skipped st) - cable braid made. Rep from * around. Join to beg dcfp. Turn. 18 cable braids and 18 dcfp.
6th row: RS. Working 2 rows below. Ch 1. 1 dcfp in each st 2 rows below. Join to beg dcfp. Turn. 72 dcfp.
Options Beanie or Toque
Beanie Version - Rep 4th to 7th rows once for beanie version.
Toque Version - Rep 4th to 7th rows twice for toque version.
Top of Hat
Both versions pick up in this section.
Tip: In the next round, we are going to create a 2 together stitch using the dcfp post and 2nd dcfp of the braid. This will eliminate the dcfp between the braids for rnd 12.
Notice every other round is still an alternative round.
1st row: RS. Working 2 rows below. Ch 1. *Dc/tr-tog fp, 1 trfp around next st 2 rows below, 1 trfp around skipped st. Rep from * around. Join to beg dc/tr-tog fp st. Turn. 18 cable braids. 54 sts total.
3rd row: RS. Working 2 rows below. Ch 1. *1 dcfp in each of the next 4 sts, dcfp2tog. Rep from * around. Join with to beg fpdc. Turn. 45 sts.
5th row: RS. Working 2 rows below. Ch 1. *1 dcfp in each of the next 3 sts, dcfp2tog. Rep from * around. Join with to beg fpdc. Turn. 36 sts.
7th row: RS. Working 2 rows below. Ch 1,*1 dcfp in each of the next 2 sts, dcfp2tog. Rep from * around. Join with to beg fpdc. 27 sts.
9th row: RS. Working 2 rows below. Ch 1, *1 dcfp in next st, dcfp2tog. Rep from * around. Join with to beg fpdc. 18 sts.
11th row: RS. Ch 1, dcfp2tog around. Join with to beg fpdc. 9 dcfp2tog.
Fasten off, leaving a long tail. Draw end through remaining sts and secure tightly.
Finishing
Using a pom pom maker that is 3” [7 cm]. Generously wrap the maker and form the pom-pom. Use a bow tie to join to the hat so the recipient of the hat can remove it for washing or if they don’t prefer it.
Testers
- Nancy Elliott
- Diane Suder

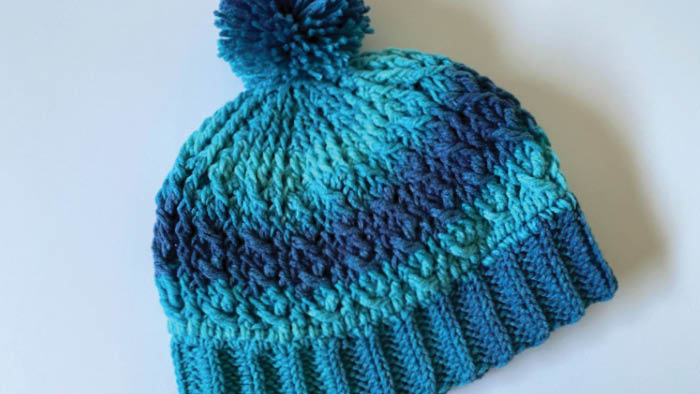
Spoil the Mystery Here - Ombre Version
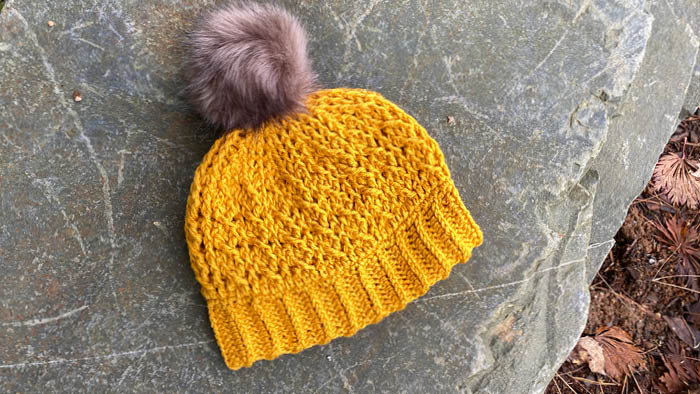
Spoil the Mystery Here - Super Saver Gold Version
Cindy Arnold says
Thanks for answering my question even though you answered in in your video. Sorry ? I’m very thankful for the video. I love having written directions but I need to see how to follow them especially intermediate designs. It’s an absolutely lovely hat. I can’t wait until my yarn gets here to try to make it!
Cindy Arnold says
What is the difference between a toque and a beanie? Searches seem to indicate they’re the same.
Mikey says
The toque has extra space at the top where a beanie forms the shape of the skull. Usually, a toque has a pom pom on it.