An interesting find in Nova Scotia is the piles of pine cones that seem to happen in the fall amongst the over 100-year-old great eastern pine trees. We have several on our property.
In the fall, you hear pine cones falling from the trees onto the house roof with random clunking sounds. It’s rather annoying early in the morning. Squirrels jumping up and down knocking the pine cones off the trees. It’s nature doing its magic.
In spring clean-up, the piles are very different. The scales have been taken off the core and are scattered like something spitting sunflower seed shells out.
It’s said that red squirrels collect about 10,000 pine cones into piles in the fall. Throughout the winter months, they are ripping apart the cones to access the seeds. Pulling back a layer of these discarded scales lives the insects thriving off of the squirrels’ work.
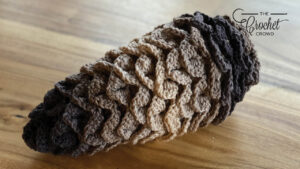
This pine cone was designed as an ornamental decor item as the pine cones mature in fall. A homage to the red squirrels in helping to keep our woods organized and healthy.
Materials
- A - Red Heart® Red Heart Super Saver Ombre™ (283 g/10 oz, 440 m/482 yds) - Hickory, 1 Ball, 148 g/5.2 oz for large version. 73 g/2.6 oz. You can do one large and small with one ball or 3 smalls with one ball.
Use size 5 mm, U.S. H/8 crochet hook or size needed to obtain gauge.
Measurement large pine cone approx 11” [28 cm] long x 6” [15 cm] dia. Small pine cone is 7” [18 cm] x 4.5” [11.5 cm ] dia. Stems not included.
Gauge 15 sc and 15 rows = 4” [10 cm].
Notes:
- Join means to sl st to beg st.
- At the start of the round, the next stitch is the first st as the join.
- Stitch counts are given per full rnd. An example is 5 sts. 5 stitches for the entire round.
Large Pinecone
Downloadable has pictures and diagrams to follow.
Notes
- Work in a continuous round. Use a stitch marker to mark your rounds.
- There is no intentional colour play with these cones, the yarn colour naturally comes out the ball in the shades.
**With A, ch 2.
1st rnd: RS. 6 sc in 2nd chain from hook. Do not join, work in a spiral. 6 sc. Top of pine cone.
2nd rnd: 2 sc in each st around. 12 sts.
3rd rnd: *2 sc in next st, 1 sc in next st. Rep from * around. 18 sts.
4th rnd: *1 sc in next 2 sts, 2 sc in next st. Rep from * around. 24 sts.**
5th rnd: *2 sc in next st, 1 sc in next 3 sts. Rep from * around. 30 sts.
6th rnd: 1 hdc in the first 2 sts, 1 dc in rem sts around. 30 sts.
7th rnd: 1 dc in each st around. 30 sts.
8th rnd: *2 dc in first st, 1 dc in next 4 sts. Rep from * around. 36 sts.
9th rnd: 1 dc in each st around. 36 sts.
10th rnd: *1 dc in next 5 sts, 2 dc in next st. Rep from * around. 42 sts.
11th and 12th rnds: 1 dc in each st around. 42 sts.
13th rnd: *Dc2tog, 1 dc in next 5 sts. Rep from * around. 36 sts.
14th and 15th rnds: 1 dc in each st around. 36 sts.
16th rnd: *Dc2tog, 1 dc in next 4 sts. Rep from * around. 30 sts.
17th and 18th rnds: 1 dc in each st around. 30 sts.
19th rnd: *Dc2tog, 1 dc in next 3 sts. Rep from * around. 24 sts.
20th rnd: 1 dc in each st around. 24 sts.
Begin stuffing your pine cone shape. Do not overstuff. Continue to add stuffing as you work towards the end.
21st rnd: *Dc2tog, 1 dc in next 2 sts. Rep from * around. 18 sts.
22nd rnd: *Dc2tog, 1 dc in next st. Rep from * around. 12 sts.
23rd rnd: Dc2tog all the way around. 6 sts. Fasten off leaving and extra long tail. Use the tail to gather the rem sts in the open hole and pull closed. This is the top of the pinecone for future reference.
You know what appears to be an oversized potato that resembles the shape of a pine cone. It is approximately 11” [28 cm] x 4.5” [11.5 cm] dia at its widest point.
Small Pinecone
As ** to ** for large pine cones.
5th rnd: 1 hdc in the first 2 sts, 1 dc in rem sts around. 24 sts.
6th rnd: *2 dc in next st, 1 dc in next 3 sts. Rep from * around. 30 sts.
7th to 9th rnds: 1 dc in each st around. 30 sts.
10th rnd: *Dc2tog, 1 dc in next 3 sts. Rep from * around. 24 sts.
11th rnd: 1 dc in each st around. 24 sts.
Begin stuffing your pine cone shape. Do not overstuff. Continue to add stuffing as you work towards the end.
12th rnd: *Dc2tog, 1 dc in next 2 sts. Rep from * around. 18 sts.
13th rnd: *Dc2tog, 1 dc in next st. Rep from * around. 12 sts.
14th rnd: Dc2tog all the way around. 6 sts. Fasten off leaving and extra long tail. Use the tail to gather the rem sts in the open hole and pull closed. This is the top of the pinecone for future reference.
You know what appears to be a potato that resembles the shape of a pine cone. It is approximately 6.5” [16.5 cm] x 3.5” [9 cm] dia at its widest point.
Pine Cone Scales
The scales are made in a continuous spiral all the way back to where the double crochet stitches began on the 6th round. We need to spiral back starting at the tip and the scales will naturally overlap as you continue to circle around the interior core.
- Turn the pine cone so the top of the cone is facing up.
- The stitches with double crochet posts will be upside down and start with the first post where you have ended.
- Keep in mind that stitches that appear to be 2 together stitches should be treated as 1 post.
Continuous Spiral Scales
With A, attach to the first last post you finished in the last portion. Ch 3, work 4 dc on the same post going down. Ch 1, 5 dc going up the next post. *Sk 3 posts, 5 dc down the next post, ch 1, work 5 dc up the next post. Rep from * in a continuous spiral back to where the sc stitches will start. At the end, you will end up at the top of the pine cone. Sl st to a st to hold down the final scale.
Don’t be scared to use your own creative license if you believe that the 3rd post isn’t right. I wouldn’t go beyond skipping 3 posts but you could skip only 2 posts if it helps with your alignment. You are the artist, you will know best.
Cap for Top of Pinecone
Both caps for the small and large pine cones are here. Notice in 5th round that there are instructions for the small cap.
With A, make an adjustable ring.
1st rnd: RS. 6 sc in adjustable ring. Join. 6 sc.
2nd rnd: Ch 1. 2 sc in each st around. Join. 12 sts.
3rd rnd: Ch 1. *2 sc in next st, 1 sc in next st. Rep from * around. Join. 18 sts.
4th rnd: Ch 1. *1 sc in next 2 sts, 2 sc in next st. Rep from * around. Join. 24 sts.
5th rnd: Ch 1. *2 sc in next st, 1 sc in next 3 sts. Rep from * around. Join. 30 sts. The small pine cone ends here for growth, jumping to the 7th rnd next.
6th rnd: Ch 1. *1 sc in next 4 sts, 2 sc in next st. Rep from * around. Join. 36 sts.
7th rnd: Ch 1. 1 reverse sc in each st around. Join. Fasten off leave a long yarn tail to sew to the bottom core of pine cone
When sewing the cap to the core, use the 6th round and partially cover over the first layer of scales so it appears the scales are partially growing out of the core base.
Squat the Pine Cones
Cut a strand from the A ball about 24”. Place on a tapestry needle and secure on the middle of the cap and run it up through the inside to outside the top of the pinecone and then back down to the middle of the cap again. Pull on the strand so the pine cone will squat down up to 2” [5 cm] and secure. Weave in ends.
Stem
With A, ch 8.
1st row: 1 sc in 2nd ch from hook. 1 sc in each ch across. 7 sts. Fasten off and weave in ends. Sew to middle of the cap.
More Ideas
- How Caron One Pound Yarn is Made
- Crochet Ice Cream Rattle Pattern
- Crochet Mermaid Cowl Pattern
- Crochet Beach Bag Pattern

Tutorial
Not at this time.
Leave me your thoughts...