
Crochet Ocean Waves Afghan
The Crochet Ocean Waves Afghan is pretty straight forward once you get the pattern in your mind. It’s a repeating of just 2 rows over and over once you get started and established.
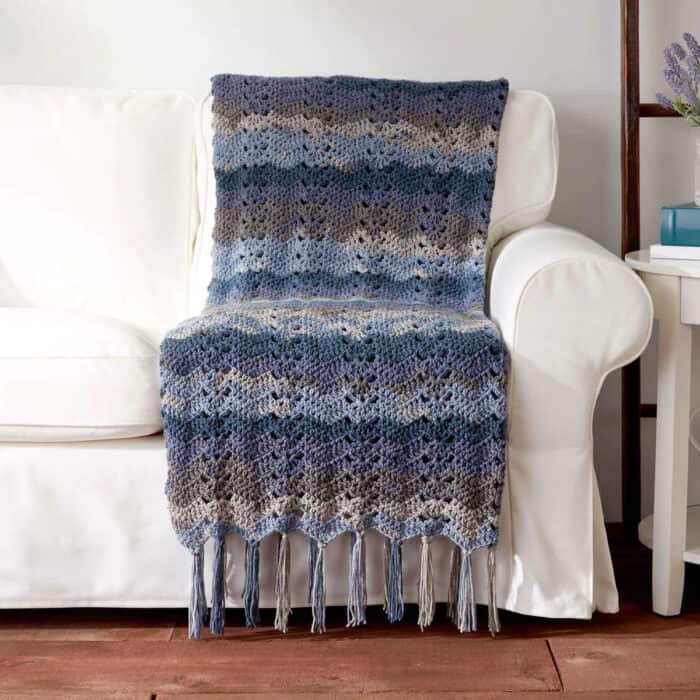
The key thing to watch for is the extended rows. Both sides of the project are not equal to make this an easy level. In the tutorial, I show you that because, during my initial trials of this pattern, I kept screwing up until the designer set me straight. Her version was simpler but I was thinking in one direction when in fact, it’s something different.
If you can read patterns and skip my tutorial, you may want to review the synopsis on the tutorial to understand this even more. Up to you.
This is using Caron Big Cakes Yarn. The striping you see is directly from the yarn ball with no alterations of cutting strands to make it look great. So it’s easy and let the yarn ball do the self-striping for you.

Pattern Suggestions
- Crochet Mosaic Baby Blanket Pattern
- Crochet Baby Car Seat Blanket Pattern
- Crochet Watch Me Grow Blanket Pattern
- Crochet Bat Dishcloth Pattern
- Crochet Outdoor Mat Pattern
Just wanting to confirm – I cast on 154 but then the first row increases the stitch count to 171?
Stand by. I am reading the pattern now.
Starting with chain 154. The stitch counts are not given for the rows. I’m unsure the number you will end up with. I’m sorry. I don’t usually count the stitches myself but just follow the pattern and it ends up to what it’s supposed to. I’m sorry, I’m not much of a help today.
No worries 🙂 I was struggling with the pattern but your video was very helpful! I had to get my head around the idea the side edge wasn’t straight. It’s a beautiful pattern!
Ah… so you had a break through moment. Good for you. 🙂 Michael
No blue button
button added
If, as you watch and crochet, you write down on your printed directions the TIME on the video where the rows change and the time where you shut off the video it will help you to not get lost. I was fine until I shut it off and had to return the next day. I had not noted the time where I left off. You will be able to go to exactly the correct spot to start (or review) where you left off. The video is a huge help. Watching it at half speed is even better for those like me who are left handed and insecure about exactly where to insert the hook! Get ready for some giggles when you hear Mikey talking at half speed! To change the speed clock on the SETTINGS icon at the bottom of the video screen. MICHAEL, I LOVE YOU!!! The design really is easy and goes quickly after you show us how!
I got completely lost on the second row. You went at a slow enough speed in the first row but went to fast on the second. I got frustrated and wanted to cry
Hi Mashi – have you tried slowing down the tutorial? Here is a link that shows you how. -LJ
I just started this and have ripped it out 5 times because at the end of row one I have a chain 5 shell and then 4 stitches left to the end. This doesn’t line up with the directions for row 2 which seem to need a chain 3 in next 3, chain 3 in 1, then Chain 3 to end the first row in order to work. I am beyond frustrated and it seems as if you get no help or response when you have an issue!
I can’t even begin to follow this. I end up short a stitch in the first row just as you did in the video and I know I didn’t skip any stitches. I wish if you make an error in the video rather than just throw a stitch in, re-do it because this is completely confusing. Usually very pleased with your videos, but I’ll be looking for a different video for this pattern!
The Canadian link doesn’t work…?
Working on that with Michaels Store. We do have the International – American Link up and going as of 9-27-2017
Even with the tutorial I am completely confused. I wish the wagon wheel instructions were a little clearer. Very frustrated right now!
Thank you so much for this tutorial! I bought the cranberry crisp and loved the ocean waves blanket. The first time I started it I did something funky and pulled it out. Second time I realized the rows weren’t even, pulled it all out. I admit I was on the verge of giving it up but decided to look for the tutorial. I finally got my half wagon wheels right and discovered the ends aren’t even naturally! Score! Thank you again.
I followed the video for the first row using 154 chain to begin. I pulled it all out twice because the row would end up with only 8 shells and too many chains leftover. Then the 3rd time, I got 9 shells but no stitches left on the end. What am I doing wrong? I should end at the bottom of the hill, yes? Help! I am an experienced hooker….lol…but this foundation row is killing me.
Any luck figuring that out? I have the same problem.
I am having the same problem!! I have done row 1 like 4 times now. Any luck on an answer here?
Lisa – that pattern has been updated on both the Michaels website in Canada as well as the US and international site. Sorry for the confusion.
The 5 dc + ch1s…. the last [5th] dc…. is there a ch1 on the last before you skip 4 onto the 3 dcS
tried to do this from the written pattern on michaels.com. th
There seemed to be a problem. Step one does not tell you how to get the shell. Step two has you crocheting into the chain one space except step one never tell you how to get the chain one space. Can someone look at the pattern on the website and see if i totally missed it or is it actually missing.
Might be me but seems like there may be a difference between video and the written instructions in Row 2. Video seems to suggest chain ones on the second row “hills” but the written does not have that. See extract below.
“2nd row: Ch 3 (counts as dc). 1 dc in each of next 3 dc. 3 dc in next dc. 1 dc in each of next 3 dc. *Skip next 2 dc. 1 sc in next ch-1 sp. (Ch 3. 1 sc in next ch-1 sp) 3 times. Skip next 2 dc. 1 dc in each of next 3 dc. 3 dc in next dc. 1 dc in each of next 3 dc. Rep from * to last dc and turning ch. Turn.”
Not sure which is correct (or if I am misunderstanding something?)