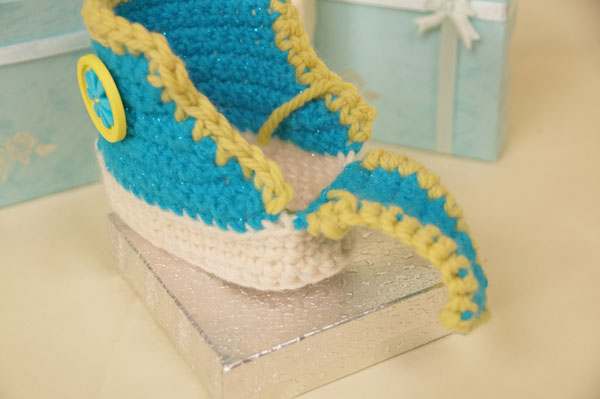
Sweet High Top Baby Booties
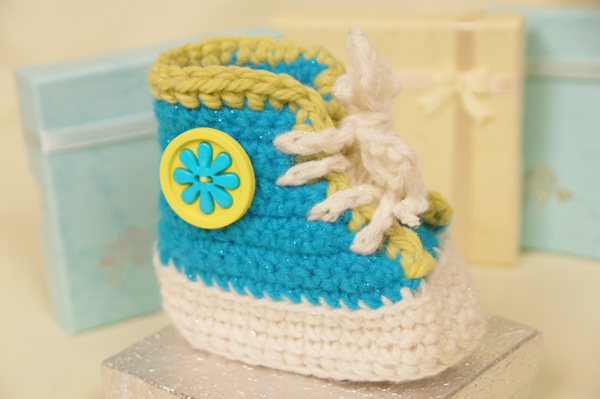
These little high top booties are Mikey's favourite. These are a Converse Look-A-Like and have an amazing finish on them. You can use regular yarn like Red Heart Super Saver. Mikey chosen his side emblem and then picked the yarn to match. The yarn in the picture is Red Heart Shimmer that is soft and has some sparkle to it. This pattern comes in 4 sizes, newborn to 4 years old child.

Pattern Suggestions
- Crochet Flower Flip Flops + Tutorial
- Crochet Double Layered Braided Cowl Pattern + Tutorial
- Crochet Preemie Hat Pattern + Tutorial
- Crochet Hugs & Kisses Car Seat Cover Pattern
- 5 Top Crochet Projects for Kids
4 Sizes of Booties Based on Hook Size - Choose Your Hook Size Below
According to Bev at Bev's Country Cottage, baby's feet range in sizes by pounds and age of the baby or toddler.
- Newborn to 3 months, use a size F or 3.75 mm Crochet Hook.
- 3 - 6 months, use 4" - 4.5", use size G, or 4.5 mm Crochet Hook.
- 6 months - 18 months, use size H or 5 mm Crochet Hook.
- 18 months - 4 years, use size K or 6.5 mm, Crochet Hook.
Select an appropriate hook size to get the size of baby/toddler booty you want. The pattern doesn't change for the different sizes. Simply choose the right size hook and get the size instantly. The hook sizes change the tension of the stitches and make it bigger naturally without having to count extra stitches or do anything different.
Materials Required
- 1 Hook Size chosen from the above options.
- 3 Crochet Markers or spare string to mark stitches for quicker completion.
- 2 Different Colours. I used Red Heart Shimmer, The sole is using Ivory and the top is Turquoise. As you can see, the yarn sparkles and is nice and soft.
- Button for the side of booty if desired. OR do a circle in crochet to be sewn on at the end. Buttons used by Mikey are under the brand of Dress it Up.
- Scissors
- Needle and Thread
It's Just a Suggestion
- The colours used in this pattern are cool but you can opt to change the colours to suit the personality of the child.
- You are the crochet artist, don't be scared to experiment and try other colour options.
Abbreviations
Instructions
Crocheting the Bottom of the Sole
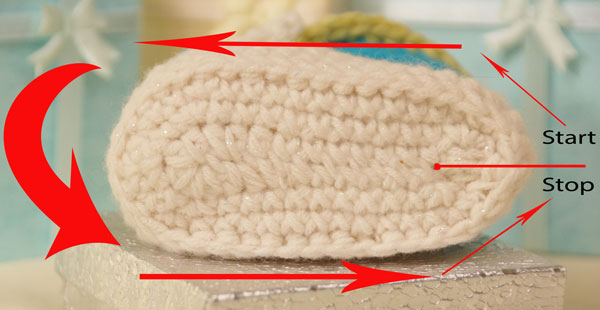
The starting and stopping point of the sole is at the back of the booty.
- You will be working in a complete rectangular circle, see picture to the right: Using white, CH 12, SC in 2nd ch from hook, then SC in next 7 Sts, HDC in next, 2 HDC in next, 5 HDC in the last chain. Rotate and now crochet on the opposite side, 2 HDC in next, HDC in next, SC in next 7 Sts then 2 SC in final stitch. Join with a SL ST to the beginning stitch.
- CH 1, 2 SC in 1st Stitch, then SC in next 10 stitches, next is *2 SC then 1 SC in next. Repeat from * 2 more times. SC in next 9 stitches, 2 SC in the second final stitch, then SC in the last stitch. Join with a SL ST to the beginning stitch.
- Ch 1, 2 SC in 1st stitch, SC in next 11 Sts, *2 SC in the next, then SC into the next. Repeat from * 3 more times. Then SC in next 11 sts, 2 SC in next, then SC into the final stitch. Join with a SL ST to the beginning stitch.
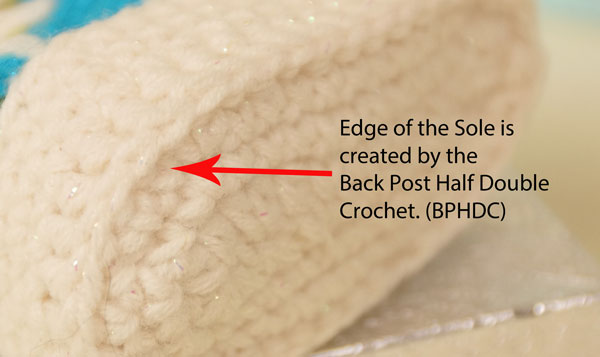
- This row forms a ridge for the sole. Ch 1, then BPHDC into each stitch all the way around. SL ST to the beginning stitch at the end. It is imperative to carefully go around as the posts for Single Crochet are small and easy to miss. Missing one will show in your work afterwards. See this video on doing back post. Be advised the video is for Back Post Double Crochet, you need to do the same method but using Half Double Crochet Instead.
- We are now ready to move onto the sides of the sole, do not fasten off the yarn. Continue below.
Sides of Sole
Optional: It's assumed you wanted the white sole to continue up the side. If you wanted just the bottom of the sole to be a different colour, fasten off the yarn used in the bottom and now begin with another colour for the sides of the sole.
- Continuing from the bottom of the sole, you will CH 1, then SC into each stitch going around. At the end of the round, Join with an SL ST. Repeat this Step 2 More Times.
- Fasten off and weave in the ends.
Your booty is now halfway done.
When the sole is done, you are now ready to build the booty by using the sole as a foundation. The top of the booty consists of 2 parts. You have a tongue and the rest of the booty that surrounds the ankles and back of the foot.
Locate the Front of the Booty
- At this moment, you appear to have a crocheted bathtub. Ensure the outside has that sole bottom edge line as indicated in Bottom of the Sole, Step 4, is on the outside. With the back of the sole to your chest area and the front of the sole away from you. (As depicted on the right). Look down and find the very top stitch of the front edge of the sole. Follow the bottom center line up or position it as one stitch will be at the very top. Mark it with a stitch marker.
TIP: From my experience, if I give you an exact stitch count to what the centre stitch should be and you have skipped or added stitches, the tongue will not be centred to your booty sole. It is extremely obvious when you are done and the booty will not sit or look proper. Eyeing it up is a safe shot of the shoe coming outright.
- Once you have determined the very centre of the front of the sole. Count to the right 3 stitches and mark with at stitch marker.
- Go back to the centre marker and count left 3 stitches and mark with at stitch marker.
- The 7 front stitches have been marked from start to finish.
- LOOK AT IT A SECOND TIME and ensure you are in the centre of the sole. If not, adust it.
Crochet the Tongue
- Turn the booty so you are looking at the front of the sole to begin.
- You will fasten on the top booty colour yarn you want to use to the back loop of the left or right stitch marker. Begin on either right or left-hand side stitch indicated by the stitch marker. If right-handed, you will start on the right, if left-handed you will start on the left. SC in each BACK LOOP going across the front of the sole to the stitch marker on the other side of the centre line. Total of 7 Stitches. Turn.
- CH 1, and SC into each stitch across. Repeat this step, 11 more times.
- Fasten off yarn and weave in ends and remove the stitch markers from the front of the sole.
Ankle and Back of Booty
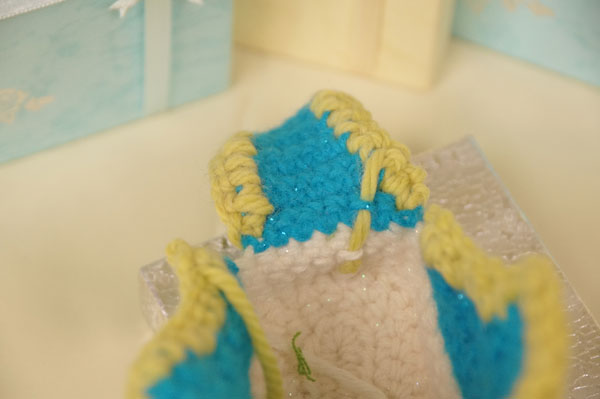
If you are right-handed, you will turn the booty sole and tongue exactly as you see it in the photo to the right. If you are left-handed, the booty will be turned in the opposite direction.
- Fasten on the yarn for the shoe colour that you want to the same BACK LOOP stitch of where the tongue stops. (This means there will be two stitches sharing one stitch to make the finish nicer.)
- SC across the top of the sole (going left for right-handers and going right for left-handers) using the BACK LOOPS only and stop on the stitch that the tongue on the other side is using. Turn.
- CH 1, SC across. Turn.
- We are now going to start creating the angle that defines the shoe shape. Ch 1, skip 1st Stitch and next still will be a 2 SC TOG, then SC the remaining stitches UNTIL you get to the final 2 stitches where you make another 2 TOG SC. Turn. Repeat this step 3 More Times. Each row is going to define the angle and build upward, making each row shorter on both edges.
- CH 1, SC across. Turn. Repeat this Step, 4 More Times.
- Fasten off yarn and weave in ends.
Finishing Edges
- Tongue Edge: Fasten on complementary colour for a trim around the tongue. SC into the side of the tongue, working into the top of the tongue and back down the other side. Fasten off and weave in ends. Be sure not SC trim anywhere attaching to the sole. Stay within the top body colour of the booty only.
- Ankle /Back of the Booty: Fasten on the same colour to the bottom edge near where the tongue is starting and work SC along the edge going up to the back and around back to the tongue on the other side. Fasten off and weave in ends.
Side Emblem Shape / Button
Typically an emblem only goes on the outside of the booty. So you will need to put one of these emblems on both booties on the outside only.
- Pick an appropriate size button. I've chosen the colour of the yarn based on the colour of the button I wanted to use. Keep in mind that these could be choking hazards. Some people sew on the buttons and then hot glue the back of the button to the crochet project for extra security. Please exercise your judgement if doing buttons on any projects for young children.
- Create a crochet circle in the colour of your choice. CH 2, then put in 7 SC into the beginning Ch 2 to form a circle. Fasten off and weave in ends. Sew securely to the side.
Booty Laces
- Pick a yarn colour for the Booty Laces Ch 85 and fasten off.
- Lace-up the booty like a regular shoe. I opted to pull the laces through the 2nd gap space in from the edge and it's between a row of stitches.
Option: You can use Ribbon is you prefer over crochet laces.
TIP: If you are too close to the trim, you lose the cool effect of the booty laces. Also, if you look at the picture, you can see the laces are placed between two rows of stitches.
Start all over again for the 2nd booty. One booty takes me just over 1 hour.
Tutorial
https://www.youtube.com/watch?v=kmXwSbfOrBQ&t=524s
https://www.youtube.com/watch?v=kmXwSbfOrBQ
Veronica GIBBONS says
Michel eres una maravilla I AM CHILE (lejos verdad? ) un beso y abrazo, a mis amigas les cuento de tus preciosos trabajos, así como también, tus abras benéfica vivo en USA, Y TE ADMIRO
XOXO [email protected] GIBBONS
Veronica GIBBONS says
Mikee I Love you eres genial.
[email protected]
Darcy says
Love this pattern. Thanks so much! Now I can make them for all my nieces.