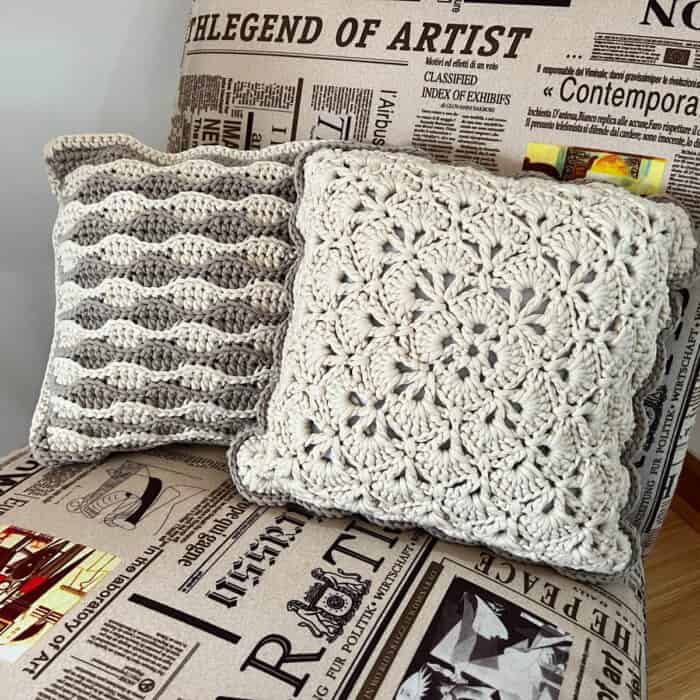
I created this set of 5 Textured Pillows for very personal reasons. The pillows can be solo but work together as a terrific 12" pillow set.
5 Unique Crochet Patterns for Pillows
I've been mentally struggling within. I needed a project that I could do for myself. I use crochet to self-heal from the psychological damage I feel in the social media realm. I wanted a project that I could do for my own home. Something personal that will give me a mini sense of accomplishment. So these pillows are self-healing pillows to work through my hurt and disappointment and try to find my balance.
I initially crocheted these to make an evening project feel like I am contributing something for my enjoyment. It was suggested to use these for my guest room. I didn't realize they matched my guest room.
I felt such joy in the first pillow of the Simple Textured Pillow. I felt the ambition to go to Michaels to self-commit to creating a set of 5. You have no idea the joy I felt making these. It pushed my feelings aside and gave me the mental break I needed.
So yes, here are five textured pillows. However, I present to you my set with such joy. I've given consent for others to steal my joy, and now I am taking it back for myself. Sorry, this is deep. Crochet for me is personal.
Click the Pics Below to Get the Free Patterns in PDF Format.
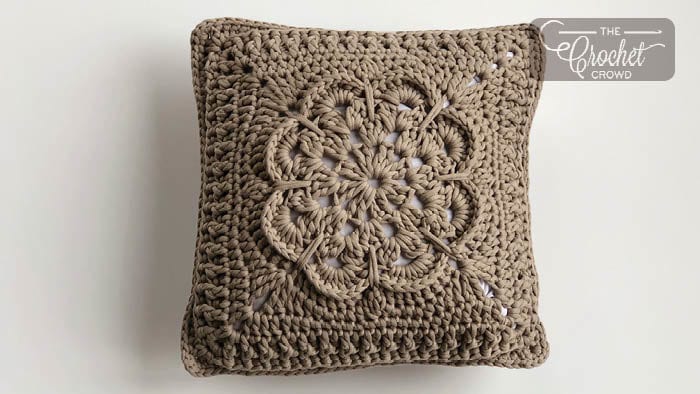
I picked up the first design from the afghan called From the Middle. It was super easy to follow and you can just change the size to make it a square pillow.
1st rnd: [(1 dc. Ch 1) 7 times] all in 4th ch from hook. Join with sl st to 3rd ch of beg ch 4. (8 dc and ch-1 sps).
2nd rnd: Ch 1. 1 sc in first ch-1 sp. (7 dc in next ch-1 sp. 1 sc in next ch-1 sp) 3 times. 7 dc in next ch-1 sp. Join with sl st to first sc.
3rd rnd: Ch 4. (1 dc. Ch 3. 1 dc. Ch 1. 1 dc) - beg Shell made all in same sc as last sl st. *Ch 5. Skip next 7 dc. 1 dc. Ch 1. 1 dc. Ch 3. 1 dc. Ch 1. 1 dc) - Shell made all in next sc. Rep from * twice more. Ch 5. Skip next 7 dc. Join with sl st to 3rd ch of beg ch 4.
4th rnd: Sl st in next ch-1 sp. Ch 3. 6 dc in same ch-1 sp as last sl st. 1 sc in next ch-3 sp. 7 dc in next ch-1 sp. *1 sc in 4th dc of 7 dc in 2nd rnd, working sc over ch-5 of previous rnd. 7 dc in next ch-1 sp. 1 sc in next ch-3 sp. 7 dc in next ch-1 sp. Rep from * twice more. 1 sc in 4th dc of 7 dc in 2nd rnd, working sc over ch-5 of previous rnd. Join with sl st to 3rd ch of beg ch 3.
5th rnd: Sl st in each of next 6 dc and 1 sc. Beg Shell in same sc as last sl st. *Ch 5. Skip next 7 dc. (1 dc. Ch 1. 1 dc) in next sc. Ch 5. Skip next 7 dc. Shell in next sc (corner). Rep from * twice more. Ch 5. Skip next 7 dc. (1 dc. Ch 1. 1 dc) in next sc. Ch 5. Skip next 7 dc. Join with sl st to 3rd ch of beg ch 4.
6th rnd: Sl st in next ch-1 sp. Ch 3. 6 dc in same sp as last sl st. 1 sc in next ch-3 sp. 7 dc in next ch-1 sp. 1 sc in 4th dc of 7 dc group of 4th rnd, working sc over ch-5 of previous rnd. 7 dc in next ch-1 sp. 1 sc in 4th dc of 7 dc group of 4th rnd, working sc over ch-5 of previous rnd.* 7 dc in next ch-1 sp. 1 sc in next ch-3 sp. 7 dc in next ch-1 sp. Rep from twice more, then from * to ** once. Join with sl st to top of ch 3.
7th rnd: Sl st in each of next 6 dc and 1 sc. Shell in same sc as last sl st. [Ch 5. Skip next 7 dc. (1 dc. Ch 1. 1 dc) in next sc] twice. Ch 5. Skip next 7 dc.* Shell in next sc (corner). Rep from * twice more, then from * to ** once. Join with sl st to 3rd ch of beg ch 4.
8th rnd: Sl st in next ch-1 sp. Ch 3. 6 dc in same sp as last sl st. 1 sc in next ch-3 sp. 7 dc in next ch-1 sp. (1 sc in 4th dc of 7 dc group of 6th rnd, working sc over ch-5 of previous rnd. 7 dc in next ch-1 sp) twice. 1 sc in 4th dc of 7 dc group of 6th rnd, working sc over ch-5 of previous rnd.* 7 dc in next ch-1 sp. 1 sc in next ch-3 sp. 7 dc in next ch-1 sp. Rep from twice more, then from * to ** once. Join with sl st to top of ch 3.
9th rnd: Sl st in each of next 6 dc and 1 sc. Shell in same sc as last sl st. [Ch 5. Skip next 7 dc. (1 dc. Ch 1. 1 dc) in next dc] 3 times. Ch 5. Skip next 7 dc.* Shell in next sc (corner). Rep from * twice more, then from * to ** once. Join with sl st to 3rd ch of beg ch 4.
10th rnd: Sl st in next ch-1 sp. Ch 3. 6 dc in same sp as last sl st. 1 sc in next ch-3 sp. 7 dc in next ch-1 sp. (1 sc in 4th dc of 7 dc group 2 rnds below, working sc over ch-5 of previous rnd. 7 dc in next ch-1 sp) 3 times. 1 sc in 4th dc of 7 dc group 2 rnds below, working over ch 5 of previous rnd.* 7 dc in next ch-1 sp. 1 sc in next ch-3 sp. 7 dc in next ch-1 sp. Rep from * twice more, then from * to ** once. Join with sl st to top of ch 3.
Cont in pat as established, working 1 more “[Ch 5. Skip next 7 dc. (1 dc. Ch 1. 1 dc) in next dc]” before each corner on odd numbered rnds and 1 more “[1 sc in 4th dc of 7 dc group 2 rnds below, working sc over ch-5 of previous rnd. 7 dc in next ch-1 sp]” before each corner on even numbered rnds until blanket measures approx 12”. Fasten off.
Pillow has 12 rounds total but you can continue to go bigger if you prefer to cover a larger pillow form or even make a crochet afghan.
Assembly
Have 12” pillow form ready to insert.
Put both motifs together with the wrong side facing each other. Matching stitch for stitch. Do not attach directly to a corner to hide the attaching better. Attach to a single crochet about 5 sts before a corner. Insert hook through front motif and pick up the same stitch on the back motif. Sl st to fasten on the yarn. Ch 1, 1 sc in same st. 1 sc in each st around. In corners, place 3 sc to make the turn. Follow the motifs around for 3 sides. Insert pillow form and then finish final 4th side. Fasten off and weave in ends.
Bernat Maker Home Dec, 250g / 8.8 oz, 317 yards / 290 m A - Cream - 1 Ball B - Clay - 1 Ball
Hook 6.5 mm / K/10.5
Abbreviations
Beg = Begin(ing) Ch = Chain Hdc = Half Double Crochet Rep = Repeat RS = Right Side Sc = Single Crochet Sl st = slip stitch St(s) = stitch (stitches
Instructions
Make two pieces.
Ch 39
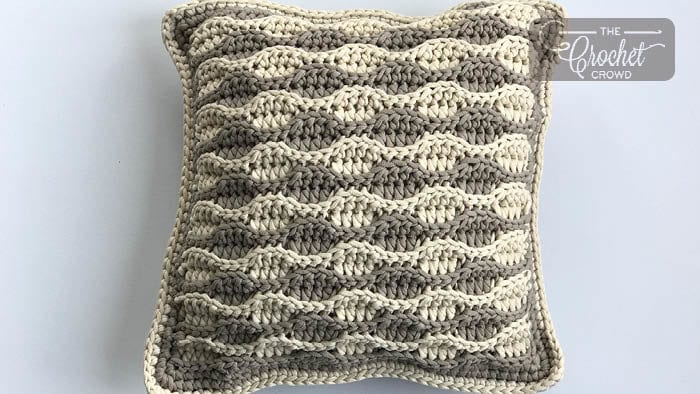
1st row: (RS). Sl st in 2nd ch from hook and each of next 5 ch. *1 hdc in each of next 5 ch. Sl st in each of next 5 ch. Rep from * to last ch. Sl st in last ch. Turn. 38 sts.
2nd and 3rd rows: Ch 2. Working in back loops only, 1 hdc in each of first 6 sts. *Sl st in each of next 5 sts. 1 hdc in each of next 5 sts. Rep from * to last st. 1 hdc in last st. Turn
4th and 5th rows: Working in back loops only, sl st in each of first 6 sts. *1 hdc in each of next 5 sts. Sl st in each of next 5 sts. Rep from * to last st. Sl st in last st. Turn. Rep 2nd to 5th rows for pat until work from beg measures 11”, ending on a WS row. Do not fasten off.
Tip: Finish one and cross-compare the second to ensure it matches. Picture on page 2 of a finished face to compare the colours.
Border
Rnd 1: Ch 1, 3 sc in same last st. Eveningly space 1 sc down the side of the motif. 3 sc in corner st. 1 sc across each st across the bottom. 3 sc in the corner. 1 sc evenly spaced up the next side. 3 sc in the corner. 1 sc across the top of the pillow. Join with sl st to beg sc.
Rnd 2: Ch 1, 1 sc in each st around. Place 3 sc in middle stitch of a corners as you pass them. Join with sl st to beg sc. Fasten off.
Make 2 Pillow Faces. When doing border of the second face, try to get the same stitch count on the sides so they match for the final assembly.
Assembly
Have 12” pillow form ready to insert. Put both motifs together with the wrong side facing each other. Matching stitch for stitch. Do not attach directly to a corner to hide the attaching better. Attach to a single crochet about 5 sts before a corner.
Insert hook through front motif and pick up the same stitch on the back motif. Sl st to fasten on the yarn. Ch 1, 1 sc in same st. 1 sc in each st around. In corners, place 3 sc to make the turn. Follow the motifs around for 3 sides. Insert pillow form and then finish final 4th side. Fasten off and weave in ends.
The diagram has been provided in the downloadable. Click the picture below to get full access to the free pattern.
Beg = Beginning Ch = Chain Dc = Double Crochet Rep = Repeat Sc = Single Crochet Sl st = Slip Stitch Sp = Space St = Stitch
Project Size - 11” x 11”
Instructions
A - Darker Pink B - Dusty Rose C - Grass Green D - White
Recommending invisible joins when fastening off each colour for a seamless appearance.
Make 2 Pieces
Using C. Ch 4, sl st to beg ch to form ring.
Rnd 1: Ch 3 (counts as dc here and throughout), dc in ring, ch 1. *2 dc into ring, ch 1. Repeat * 7 more times. Sl st to top of beg ch-3. Fasten off C. - 16 dc, 8 ch-1 spaces.
Rnd 2: Attach B in Ch-1 space. Ch 3, 3 dc in same ch-1 space. *4 dc in next ch-1 space. Repeat * 7 more times. Join with sl st to top of beg ch-3. Fasten off B. - 32 sts
Rnd 3: Attach A in between the groups of 4 dc. Ch 2, 2 dc tog , ch 3, 3 dc tog in same space, ch 1. *In next space between groups of 4 dc. (3 dc tog, ch 3, 3 dc tog) ch 1. Repeat * around. Join with sl st to top of beg ch-2.
Rnd 4: Sl st to next ch-3 space. Ch 3, 8 dc in same ch-3 space. *9 dc in next ch-3 space. Repeat * around. Join with sl st to top of beg ch-3. Fasten off A. - 72 sts
Rnd 5: Fasten on D in around back post of 1st stitch of group of 9. Ch 3 (counts as dcbp), dcbp in each next 8 dc. Long sc over rounds 3 & 4 into the middle space of the group of 4 dc. *dcbp in each of the next 9 sts, long sc over rounds 3 & 4 into the middle space of the group of 4 dc. Repeat * 6 more times Join with a sl st to top of ch-3 space. Fasten off D.
Rnd 6: Attach C to any long sc st. Ch 4 (counts as treble), tr, ch 2, 2 tr in space long sc stitch. Dc next 2, hdc next 2, sc next 3, hdc, 3 dc tog over next 3 sts, hdc, sc next 3, hdc next 2, dc next 2, *(2 tr, ch 2, 2 tr) in next long sc st. * Dc next 2, hdc next 2, sc next 3, hdc, 3 dc tog over next 3 sts, hdc, sc next 3, hdc next 2, dc next 2. Repeat * 2 more times. Join with a sl st to top of beg ch4. 84 sts
Rnd 7: Sl st to next ch-2 space corner. Ch 3, dc, ch 2, 2 dc in same space. Dc in next 2, hdc next 3, sc next 11, hdc next 3, dc next 2. * (2 dc, ch 2, 2 dc) in next ch-2 space corner, Dc in next 2, hdc next 3, sc next 11, hdc next 3, dc next 2. Repeat * 2 more times. Fasten off C. - 100 sts.
Rnd 8: Attach D to next ch-2 space corner. Ch 3, dc, ch 2, 2 dc in same space. Dc in each st across to next corner. * (2 dc, ch 2, 2 dc in corner ch-2 space. Dc in each st to next corner. Repeat * 2 times. Fasten off D. 116 sts.
Rnd 9: Attach A to ch-2 space corner. Ch 1, 3 sc in ch-2 space corner. Dcfp in next, * dcbp in next. dcfp in next. Repeat * across to next corner. *3 sc in ch-2 space, start with dcfp, dcbp until next corner. Repeat * 2 more times. Fasten off A.
Rnd 10: Fasten on D in middle of corner sc. Ch 2, hdc, ch 2, 2 hdc in same join. Dcbp in each st across. *(2 hdc, ch 2, 2 hdc) in middle sc in corner st. Dcbp in each st across to next corner. Repeat * 2 more times. Join with sl st to top of beg ch-2.
Rnd 11: Sl st to next ch-2 space. Ch 3, dc, ch 2, 2 dc in the same ch-2 space. Dc in each st to next corner. *(2 dc, ch 2, 2 dc) dc in each st across. Repeat * around. Fasten off D.
Single crochet or whip stitch the two panels together.
Bernat Maker Home Dec, 250g / 8.8 oz, 317 yards / 290 m A - Cream - 1 Ball B - Clay - 1 Ball
This pattern looks very effective when changing colour every 2nd row. 1 - 2 is same colour, 3 - 4 is the same colour and ect.
This pattern can bend the mind to get started but once you get to round 4, you will see how it’s working together and that the rest of the rounds are just bigger versions with more spaces to fill between the corners.
Abbreviations
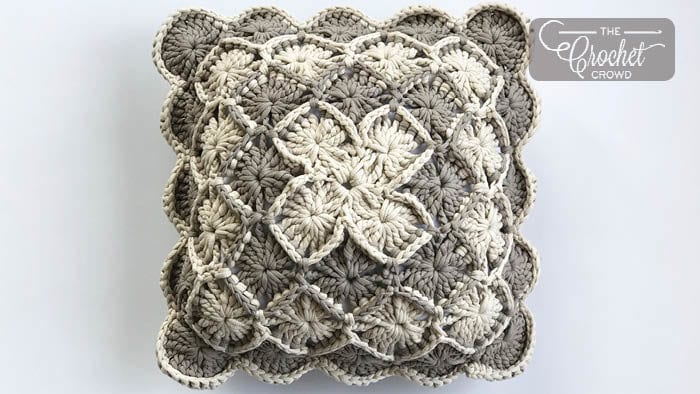
Beg = Begin(ing) Ch = Chain Rep = Repeat RS = Right Side Sc = Single Crochet Sl st = slip stitch St(s) = stitch (stitches 4trtog = 4 Treble Together Tr = Treble 4 trbp = Over next 4 treble stitches. 8 trbp = Over next 8 treble stitches.
Use 5 mm / H/8 Hook
Ch 5, sl st in beg ch to form ring.
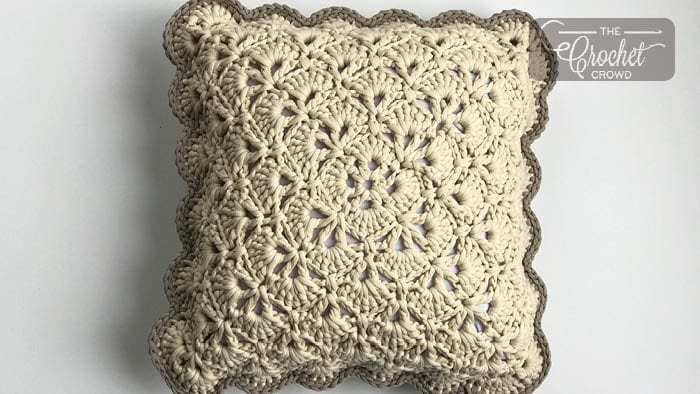
1st rnd: (RS). Ch 1, 1 sc in ring. Ch 3, 4trtog in ring, ch 5. *1 sc in ring. Ch 3, 4 trtog in ring, ch 5. Repeat * 2 more times. Join with sl st to beg sc.
2nd rnd: Ch 1, 1 sc in same st as join. Ch 2, 4 trebles in top of next 4trtog-st. Ch 1. 4 trebles in same 4trtog-st. Ch 1. 4 trebles in same 4trtog-st. Ch 2. *1 sc in next sc st. Ch 2, 4 trebles in top of next 4trtog-st. Ch 1. 4 trebles in same 4trtog-st. Ch 1. 4 trebles in same 4trtog-st. Ch 2. Repeat * 2 more times. Join with sl st to beg sc. Fasten off to change colour.
Rounds 3 - 4 will set up the spacing that will continuously get bigger with each set of 2 rnds for each colour. The spacing between the corners will get bigger with every 2nd round. Corners will always have 4 tr. Ch 1. 4 tr. Ch 1. 4 tr. The first ch-1 of a corner is where you will fasten onto start a new colour for the odd rounds like 3, 5, 7 and etc.
3rd rnd: Fasten onto the 1st ch-1 sp of a corner. *Ch 5. 4trtog over next 4 sts. Ch 5. 1 sc in next ch-1 sp. Ch 5. 8trtog over next 8 trebles. Ch 5. 1 sc in next ch-1 sp. Ch 5. Repeat from * 3 times. Join with a sl st to beg sc.
4th rnd: Ch 1, 1 sc in same join st. (4 tr. Ch 1. 4 tr. Ch 1. 4 tr) in top of next corner 4trtog-st. 1 sc in next sc st. (4 tr. Ch 1. 4 tr) in top of next 8trtog-st. *1 sc in next sc st. (4 tr. Ch 1. 4 tr. Ch 1. 4 tr) in top of next corner 4trtog-st. 1 sc in next sc st. (4 tr. Ch 1. 4 tr) in top of next 8trtog-st. Repeat * 2 more times. Join with sl st to beg sc. Fasten off to start next colour.
There is now space for an additional bavarian circle to go into the next round.
5th rnd: Fasten onto the 1st ch-1 sp of a corner. *Ch 5. 4trtog over next 4 sts. Ch 5. (1 sc in next sc st. Ch 5. 8trtog over next 8 trebles. Ch 5. 1 sc in next sc st.) ( ) twice. Ch 5. Repeat * 3 times. Join with a sl st to beg sc.
6th rnd: Ch 1, 1 sc in same join st. (4 tr. Ch 1. 4 tr. Ch 1. 4 tr) in top of next corner 4trtog-st. 1 sc in next sc st. (4 tr. Ch 1. 4 tr) in top of next 8trtog-st. 1 sc in next sc st. ( ) twice. *(4 tr. Ch 1. 4 tr. Ch 1. 4 tr) in top of next corner 4trtog-st. 1 sc in next sc st. (4 tr. Ch 1. 4 tr) in top of next 8trtog-st. 1 sc in next sc st. ( ) twice. Repeat * 2 more times. Join with sl st to beg sc. Fasten off to start next colour.
Rnds 7 - 8: Repeat rnds 5 - 6. Fasten off.
The pillow has 4 Bavarian Circles around. Essentially 8 rounds. End on the 6th round of instructions. If you are covering a larger pillow or wanting to do an afghan, just continue to do rnds 5 - 6 until desired size is completed.
You will think the pillow face is too big for the pillow but once you apply the final single crochet join, you will see it will shape beautifully.
Make 2 Pillow Faces. Weave in all ends before attaching them together.
Assembly
Have 12” pillow form ready to insert.
Put both motifs together with the wrong side facing each other—matching stitch for stitch, including the ch-1 spaces. Do not attach directly to a corner to hide the attaching better.
Attach to a single crochet between two Bavarian circles.
Insert hook through front motif and pick up the same stitch on the back motif. Sl st to fasten on the yarn. Ch 1, 1 sc in same st. 1 sc in each st and ch-1 sp to close. Follow the motifs around for 3 sides. Insert pillow form and then finish final 4th side. Fasten off and weave in ends.
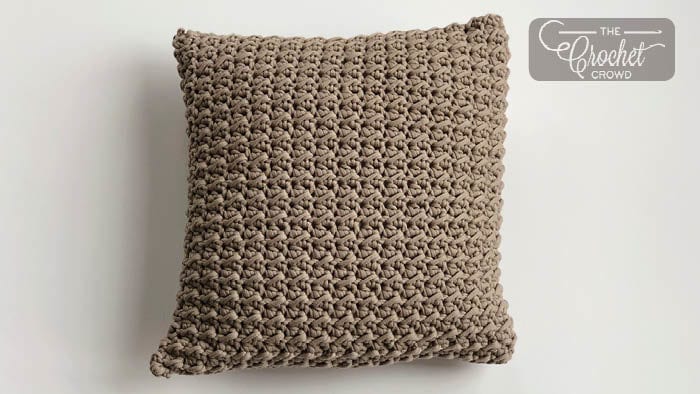
Pillow 5 - Simple Textured Pillow
The crochet idea came from most used stitches for crochet clothing designs.
Bernat Maker Home Dec, 250g / 8.8 oz, 317 yards / 290 m
A - Clay - 1 Ball Hook 6.5 mm / K Hook
Extra Materials
12” Pillow Form
Tapestry Needle
Abbreviations
Beg = Begin(ing) Ch = Chain Hdc = Half Double Crochet Rep = Repeat RS = Right Side Sl st = slip stitch St(s) = stitch (stitches WS = Wrong Side
Note: Pillow is worked in rnds, but work is turned at the end of each rnd to alternate RS and WS rows in order to produce a straight seam.
Ch 72. Join with sl st to first ch to form ring.
1st rnd: (RS). Ch 2 (counts as hdc). Sl st in next ch. *1 hdc in next ch. Sl st in next ch. Rep from * around. Join with sl st to top of ch-2. Turn.
2nd rnd: Ch 2 (counts as hdc). Sl st in next hdc. *1 hdc in next sl st. Sl st in next hdc. Rep from * around. Join with sl st to top of ch-2. Turn.
Rep last rnd until work from beg measures same distance as the width of the pillow” Do not fasten off.
Assemble Pillow
Whip stitch the top of the pillow shut. Fasten in the ends. Slip in the pillow in and whip stitch the bottom of the pillow edges together to seal in the pillow form.
More Pillow Ideas
Sort By
1
2
3
4
5
6
7
Like this:
LikeLoading...
Related
Reader Interactions
Comments
Amysays
Dear Mikey, I just came across this post and your beautiful pillows during a bout of insomnia. I learned how to crochet properly several hers ago by watching your videos. What a source of limitless fun and satisfaction this has been! You are a wonderful teacher and a leader who inspires creativity for both simple joy and greater good. I am grateful for your presence and contributions ??
I feel the same way about crochet where it's non-stop things to learn, improve upon and seeing more can be done with our hands. I'm super glad that you have found we are helpful for your creative journey.

Amy says
Dear Mikey, I just came across this post and your beautiful pillows during a bout of insomnia. I learned how to crochet properly several hers ago by watching your videos. What a source of limitless fun and satisfaction this has been! You are a wonderful teacher and a leader who inspires creativity for both simple joy and greater good. I am grateful for your presence and contributions ??
Mikey says
I feel the same way about crochet where it's non-stop things to learn, improve upon and seeing more can be done with our hands. I'm super glad that you have found we are helpful for your creative journey.
Amber says
No Blue Button
Malathi says
Your work is amazing.inspires me to keep going.thanks