
I Need This Crochet Blanket was designed for me. A pocket for my feet so I can nap without my feet falling out of the bottom of the blanket.
I am sure I am not the only one and with the average size throws being smaller than I am, my height plays a factor in my comfort during a nap. I know, first-world problem.
I wanted something neutral and long-lasting. Caron One Pound blankets I have done in the past are long-lasting and easily washable. Both cats sit with me in the evenings and my colour is selected intentionally to have their hair blend better.
Bottom Pocket Feature
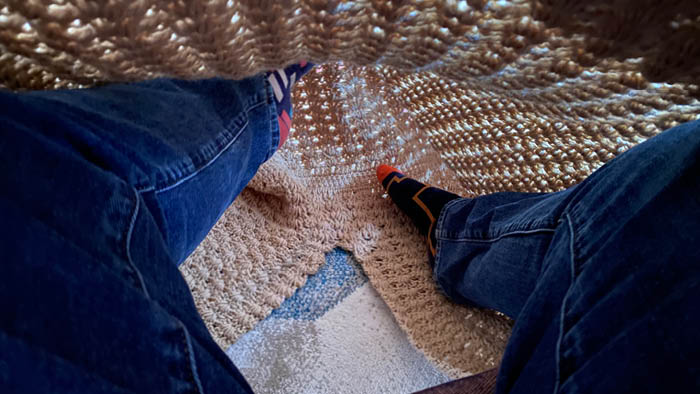
Normally, I would fold over the blanket over my feet to tuck them in. In this case, I don't need to. There is a pocket that's just a few inches and with the natural fold, my legs and feet will stay warm. OMG, what a big baby eh! haha
Pocket Region
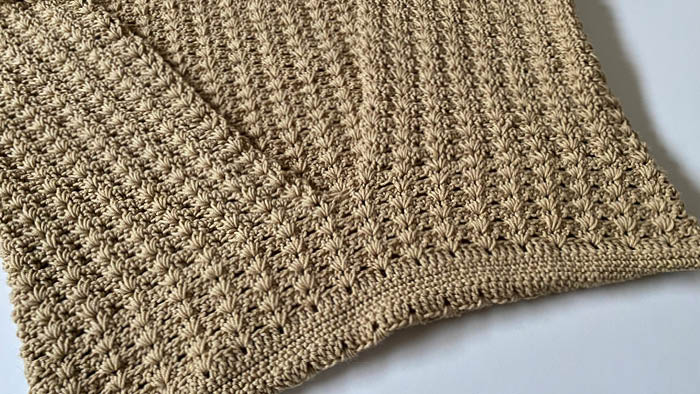
On the underside, you can see the bottom of the blanket is done in rounds for a short time frame. Once I was ready, I then worked the blanket in rows.
Please notice on the diagram and written instructions that I am turning after each round or row. This allows the bottom pocket to blend as you will need to fasten off after the pocket section is made and restart in the middle as I show in the diagram.
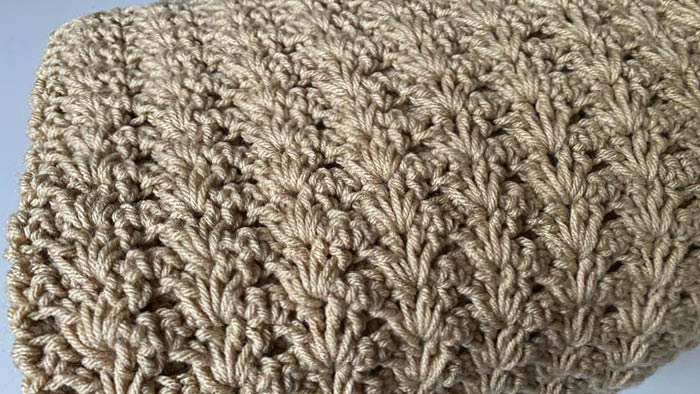
Stitch Concept
I haven't seen this done before but I wondered what would it look like if I crocheted between spaces, 2 rounds or rows below?
It thickens up the project and projects a beautiful texture look that is gender-neutral. Reminds me almost a wicker basket idea. The 4 double crochet covers over the single crochet row inside it. Once you get the pattern established, knowing where to stick the hook will become automatic.
Stitch Multiples & Sizing Changes
Design a blanket where the bottom of the blanket has a pocket to allow your feet to catch inside. When lying with a blanket and you pull up the blanket, the pocket prevents your feet from popping out the bottom of the blanket.
There is plenty of yarn leftover if you want to make this even longer for taller people.
The width of the starting chain is just 2” shorter than the final opening size at the pocket. It is approximately half of the size of the fully open width. If you want to change the size of this blanket and keep it so it is equally balanced with a centre opening spot, the stitch multiple is 8 chs + 1.
You can make kid-size versions with this stitch multiple.
- Ask a child for their preference in foot pocket space and measure it.
- Then chain keeping in multiples of 8 until you get close to the size. Then add 1 extra chain at the end.
- You can begin pattern as written with your new chain.
Yarn and Gauging
Caron® One Pound™ (454g / 16 oz, 742 meters / 812 yards)
- 4 Balls - Lace
If you customize, you will change yarn quantities. If I was to suggest changing colours, I would do it at the double crochet rows.
Sizing
- Use size 5.5 mm, U.S. I/9 crochet hook or size needed to obtain gauge.
- Measurement approx 51” wide x 63” long.
- Gauge 13 sc and 14 rows = 4” [10 cm]
Abbreviations
- Approx = Approximate(ly)
- Beg = Begin(ing)
- Ch = Chain(s)
- Dc = Double Crochet
- Rep = Repeat
- Rem = Remain(ing)
- RS = Right Side
- Sc = Single Crochet
- Sk = Skip
- Sl st = Slip Stitch
- St(s) = Stitch(es)
Instructions
I don’t normally provide my mathematics but I am making an exception so you can change the size of this and know what to look for.
Instructions
See diagrams attached.
Ch 65 (or any multiple of 8 chs and add 1 ch at the end)
1st rnd: RS. 2 sc in 2nd ch from hook. 1 sc in each ch to the 2nd last ch. 3 sc in last ch. I would suggest marking with a stitch marker the middle st of the 3. Continue on the underside of the chain and place 1 sc in each ch until the 2nd last ch. 1 sc in last ch. Join with sl st to beg sc. 66 sc.
To verify the count, the number of stitches in 1st rnd should be divided by 8. There should be 2 stitches left over.
66 stitches / Multiples of 8 = 8.25.
8 x Multiples of 8 = 64
66 stitches - 64 = 2.
This verifies you have multiples of 8 and 2 stitches left over for balance after 1st round is complete. This means the remaining blanket will stay in balance for the rest of the project.
2nd rnd: RS. Ch 3 (counts as dc here and throughout), 3 dc in same beg st. 1 dc in each until the st before the stitch marker. 4 dc in the st with stitch marker. 1 dc in each st to the end of the rnd. Join with sl st to the top of the beg ch 3. TURN. 72 sts.
The stitch counts as the end of 2nd rnd should be able to equally divide by 8 for a whole number. 72 / 8 = 9.
3rd rnd: WS. Ch 1, 1 sc in each st around. Join with sl st to beg sc. TURN. 72 sts.
The fourth round will set us up for the remaining of the afghan for the 4 dc groups to settle into. Keep in mind you that you are playing in between double crochet posts from 2 rnds below.
Special Stitch:
Dc Group St: 4 dc in assigned space between posts 2 rows below. The single crochet row will get buried inside the stitch to create a raised look.
Special Start Up
To start a rnd/row with the dc group st, you first need to reach over to the space between the assigned double crochet and slip stitch through the space and ch 1 to lock it around trapping the sc row above it into position.
4th rnd: RS. Do the special start up in the space after the first 2 dc posts located 2 rnds below. Ch 3, 3 dc in same sp. *Dc group st in next sp after 4th dc 2 rnds below. Rep from * around. Join with sl st to top of beg ch 3. TURN. 34 dc group st around.
5th rnd: WS. Ch 1, 1 sc in each st around. Join with sl st to beg sc. TURN. 72 sts.
You will now be able to clearly see group st done in the 4th rnd from this point. The space in middle between the 2nd and 3rd post.
6th rnd: RS. Do the special start up in the space after the first 2 dc posts located 2 rnds below. Ch 3, 3 dc in same sp. *Dc group st in next sp after 4th dc 2 rnds below. Rep from * around. Join with sl st to top of beg ch 3. TURN. 34 dc group st around.
7th rnd: WS. Ch 1, 1 sc in each st around. Join with sl st to beg sc. TURN. 72 sts.
Rep 6th and 7th rnds - 3 more times. Fasten off and weave in ends.
Pocket is now complete.
Align the Pocket for Middle
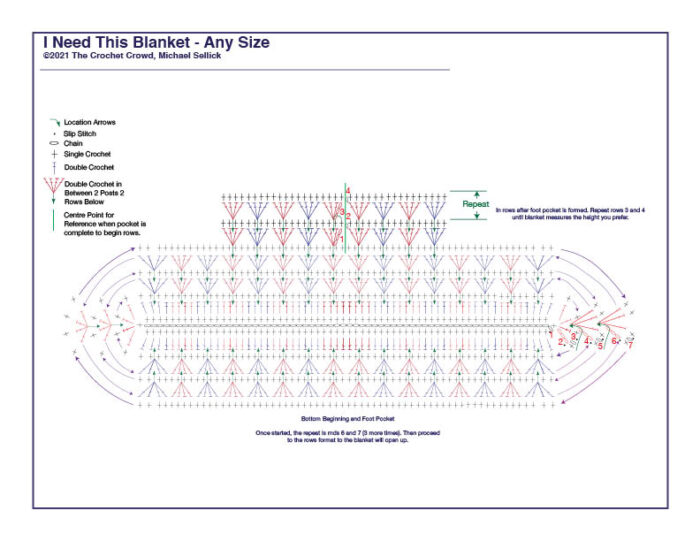
Lay project down find the two dc group sts directly in the middle. Starting on RS. Attach using a special start up in the middle sp of a dc group st.
Green line on diagram shows the middle spot.
1st row: RS. Ch 3, 3 dc in same sp. *Dc group st in next sp after 4th dc 2 rnds below. Rep from * across ending at the middle of the last dc group st from two rnds below. DO NOT JOIN. TURN. 34 dc group st across.
2nd row: WS. Ch 1, 1 sc in each st across. TURN. 72 sts.
3rd row: Do the special start up in the space after the first 2 dc posts located 2 rnds below. Ch 3, 3 dc in same sp. *Dc group st in next sp after 4th dc 2 rnds below. Rep from * across. TURN. 34 dc group st across.
4th row: WS. Ch 1, 1 sc in each st across. TURN. 72 sts.
Repeat 3rd and 4th rows until entire blanket length is approximately 63”. Fasten off.
More Ideas
- Crochet Pocket Idea for Loving Hearts Shawl
- Crochet Textured Pocket Wrap
- 31 Crochet and Knit Crop Tops
- 31 Days of Hats Series - Day 5
Crochet Diagram
You can download or print this crochet diagram if you helps you.

Tutorial
Not filmed at this time.
Karen Faddis says
Please, please please do a tutorial for this blanket!
Mikey says
It's on my list, I don't know when yet.
Sharon says
I'd love a video of this one please.
Stacy H says
I would love to see a video tutorial.